TracCloudWhatsNew
From Redrock Wiki

This page highlights some of the recent changes made to the TracCloud platform, and how you can utilize them on your own instance. A list of past changes and a full changelog can be found in the tabs above.
If you have any questions about these changes, feel free to reach out to us on our helpdesk.
2022-09-21 | View Student Search Availability Count
You can now view how many times a student has searched for an availability without booking an appointment, this appears in the lower-right corner of their profile. This counter updates every 24-hours and resets the moment they book an appointment. You can search for students by this count from the student listing using Students.CustomData/SearchAvailsCounter=

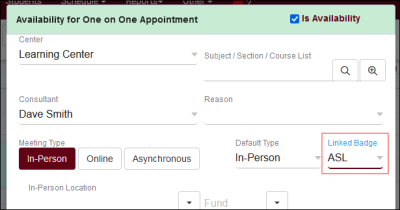
Search Availability badges can be used to add information and indicators to availability slots. Each badge can appear for certain conditions, based on center, availability section/reason, location, skills/accommodations, etc.

Click "New Availability Badge" to begin. This will open a form where you can enter the details for your badge.

Manually Linked
- Rather than the badge automatically appearing based on certain conditions, these badges appear in a menu to be manually selected on the availability itself.

Name
- Name of the Badge. This will not be displayed for students
- Name of the Badge. This will not be displayed for students
Availability Type
- Drop In, 1-on-1, or Group availability
- Drop In, 1-on-1, or Group availability
Consultant
- Assign a specific Staff
- Assign a specific Staff
Reason
- Assign a specific Reason
- Assign a specific Reason
Center
- Assign a specific Center
- Assign a specific Center
Section
- Assign a specific Subject
- Assign a specific Subject
Special Needs
- Select if applicable (more information)
- Select if applicable (more information)
Online
- Availability Type; Online, In Person, or Optional
- Availability Type; Online, In Person, or Optional
Location
- Location of the availability
- Location of the availability
Once you've decided where the badge is needed and have made your selections from the options above, you can now determine which icon, colors, and info work best for the badge created.
Color: Color of Icon
Icon: Choose from the list or use a custom icon
Info Text: Enter text that will display when users hover over the icon
In the example screenshot above, this badge will only appear on availabilities of staff who have been assigned the “ASL” accommodation and are available in the Learning Center. Once saved, your badge will appear in the profile preferences if you need to edit/delete it later.

Any fields left blank will not be considered for where this badge appears, you can be as specific or non-specific as needed. You can also create as many badges as you'd like, more than 1 tag can appear for the same availability. When students search for an availability, the badges will display to the right of the screen as shown below.

2022-09-16 | Log Student Visits from the Group Roster Menu
You can now log students in and out directly from the Group Roster menu on the schedule. All students will default to Not logged in, clicking once changes them to Logged in at [time], and clicking a second time will conclude the visit and set their appointment to attended. These visits will appear as usual on the Log Listing view as well.

No additional configuration is required to enable this feature.
2022-09-14 | 'Custom Past or Next' Time Frame in Reports
A new Time Frame option has been added to reports named 'Custom Past or Next.' Selecting this will give you additional options for your date range, primarily used for auto reports. Past or Next, and the number of days or weeks. This allows you to be more flexible than a blanket "This Week" or "Tomorrow" option if preferred.

TracCloud Reports
This portion of our wiki covers the individual reports available in the system, with descriptions and example screenshots showing what you can expect when you run the report on your own data. The list below on the left contains links to all of our available reports. You can also click the report category in the tabs above to begin.
If you have a question about any of these reports, feel free to reach out to us at helpdesk@go-redrock.com or by submitting a ticket.
Management
• Appointment Slot Utilization Date Comparison
• Appointments/Availabilities by Hour by Day of Week
• Appointments/Visits Utilization
• Consultant Max Hours and Non-Duplicated Appointment Time
• Consultant Non-Duplicated Visit Time
• Logins by Hour by Day of Week
• Optional: In-Person vs Online Appointments
• Outstanding Appointment Requests
• Students Visits Cleanup Data
• Visits by Faculty and Subject
• Visits by Assigned Advisor and Student
Students
• Student Search Availabilities
• Students Visits/Appointments by ??
• Students and Appointment Status Crosstab
• Students by Appointment Status
Q2 Tables
SAGE
• Referrals by Student and Appointments/Visits
SurveyTrac
• Survey Response Rate Comparison
Success Plans
Saving a Report as a Favorite
Find a report that you plan on coming back to? Save it as a favorite for quick access later. From the report results window itself, click the star icon in the top-left corner, choose a name for your favorite, and click save.
- Allow Group Access will make this report visible to other staff members in your Permission Group.


This report can then be found from your dashboard under Reports > Favorites at any time. The button can be used to duplicate the favorite report.


Automating a Favorite Report
After saving your report as a favorite, you can automate it to run on a set schedule and be emailed to you or a group of users.
Start by going to Reports > Favorites > Edit Favorites. This will bring you to the following screen. Click on the Pencil icon of the report you want to automate.

- Deliver to: should be set to Email in this case.
- Email Address(es) is where you'll add your recipients' email addresses. Multiple addresses can be entered, delimited by a semicolon.
- Enable Automation will enable automation and make the following options available.
- Message to include in the report email will add in some custom messaging to your emailed report.
- Automated report frequency. Do you want this report to run daily, weekly, monthly, or once on a specific date?
- Time will determine the time that this report will run on your scheduled frequency.
- Overwrite This Favorite Report will overwrite your existing report settings with your new automation rules.
Click save to apply your changes.

Favorite Reports Management
This utility (found in Other > Other Options > Preferences > Favorite Reports Management) allows you to manage and reassign Favorite reports. This can be used if you want to create a report for someone else or to recover existing favorite reports from inactive (or even deleted) accounts. Within this menu, you'll find the name of the report, the current owner, and a icon to delete the report. The owner drop-down will allow you to change ownership to another staff member. Changes are saved immediately.
Any favorite report belonging to the currently-logged-in sysadmin or an account without a known permission group (i.e., deleted accounts) can be reassigned to any active staff. Favorite reports belonging to staff as well as group favorite reports belonging to deleted staff can only be assigned to those also in the permission group of the original staff account.
In any case, reassigning favorite reports does not bypass report security in TracCloud. For example, it's not possible to give a regular staff account access to payroll reports by reassigning a payroll report to them in this menu. Reassigning ownership of a favorite report also does not change group access. Further modifications to the report must be made by editing the favorite report from the new owner's account.

Search Operators
When using the 'Additional Search' utility in your report settings, you have additional operators available to better narrow down your results. Operators can be combined as needed to perform a more specific search.
- | ('or' operator; search for multiple unique values)

- * (wildcard; anything that starts with/ends with/contains a specified string)

- # ('not' operator; exclude results that match this search)

- && ('and' operator; typically used alongside 'not' to exclude multiple items at once)

- blankornull (this keyword specifically finds records where the chosen field is blank)
2022-09-07 | Custom Student Cancellation Reasons
Students can now be provided a default set of options to choose from when cancelling appointments, in addition to the standard text field.

This new option is found in Other > Other Options > Preferences > System Preferences > Withdraw Codes and Statuses > List of reasons a student can choose from.

Profile Preferences
Prefs
Appointment Display
Both students and consultants will see upcoming appointments on their dashboard, and staff will see them from the schedule view. The formatting of these appointment info boxes can be customized in your profile settings, allowing you to provide the necessary information in a visually appealing format.
Student View
Students will be able to view their upcoming appointments on the right-side of the dashboard. The fields visible and the format they're in is entirely customizable by modifying the Appointment Display preference.

Consultant View
Consultants have a similar view to students, which can be modified independently.

Schedule View
Lastly, the staff schedule view, which allows us to view and manage our consultants’ availabilities and upcoming appointments. The appointment text is also customizable.

Customization
Within the Appointment Display menu, you will see a text box available for Students, Staff, and the Schedule view for Staff. There's also a preview section beneath each text box allowing you to easily see how your changes will display.
These text boxes support HTML and Twig. HTML support is standard, allowing you to easily tag text as <b>bold</b>, <i>italic</i>, or <u>underlined</u>, or add hyperlinks. Twig on the other hand allows you to pull data from TracCloud into the message, as well as include logic that determines whether or not a portion text is included. For information on Twig, please take a look at our dedicated Twig article here.
Other > Other Options > Profiles > [Your Profile] > Prefs > Scheduling > Appointment Display

If you want to reset to the default configuration, simply click on the clipboard icon on the right, which will confirm if you want to erase the existing configuration in favor of the standard one.

Here are a couple examples of how you can configure the schedule and upcoming appointment views. This is more-so to give you an idea of how this feature works rather than a direct suggestion of what to use (although you’re welcome to copy these as-is if you’d like). Hopefully this gives you an idea of how the feature can be used, and how you can configure it on your own system.
Schedule View
Here’s a configuration that provides basic information about the appointment. The student’s name and appointment time in bold lettering, the subject and reason, and the consultant’s name. The if statement checks if the appointment has a Reason, and if it does, include a comma after the subject then print the reason.

<div style="float:left; width: 75%;">
<p style="font-size:9px">
<b>{{Student.Full_Name}}</b> at <b>{{Appointment.StartTime}}</b><br>
{{Course.SubjectCourse}}

{% if Reason.ReasonName != "" %}
, {{Reason.ReasonName}}
{% endif %}

<br>With {{Consultant.FirstLast}}
</p></div>
Student View
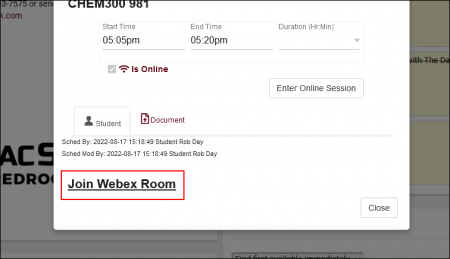
Here’s an example student view configuration. This one reads more like a spoken paragraph, with the important information bolded. Whether the appointment is in-person or online determines the text in the second half.

<div style="float:left; width: 75%;">
{{Appointment.Icon|raw}}
<b>{{Center.Name}}</b><br>
Your appointment with <b>{{Consultant.NameToStudent}}</b> has
been booked for <b> {{Appointment.StartTime}}. </b><br>
{% if Appointment.Online == "Online" %}
This is an online appointment, please select the right arrow icon to join your session.
The icon will only appear within 10 minutes of your appointment start time.
{% else %}
This is an in-person appointment taking place at <b>{{Appointment.Location}}</b>.
If any assistance is required, please reach out to <u>{{Consultant.Email}}</u>.
{% endif %}<br>
{% if Reason.ReasonName != '' %}
Reason: {{Reason.ReasonName}}<br/>
{% endif %}
{% if Course.Subject != '' %}
Subject: {{Course.Subject}}<br/>
{% endif %}<br>
</div>
<div style="line-height: 2;" >
{{Appointment.CancelLink|raw}}<br/>
{{Appointment.ActionLink|raw}}<br/>
{{Appointment.EnterOnlineLink|raw}}<br/>
</div>
<div style="clear: both;"> </div>
Consultant View
This one has a few more moving parts. Near the top, we’re saying “if the appointment has been cancelled, say “CANCELLED:” and strikethrough the rest of the contents.” We also have a series of “if this field isn’t blank, include it in the list” as well as the time saying the word “Today” rather than a standard date and time. A unique option available in the consultant view is the ability to start and stop a visit directly from the dashboard. This can be implemented by including the {{Appointment.LoginStudentToAppt|raw}} Twig tag in your appointment display configuration. It will display as a clickable button to your staff.

<div style="float:left; width: 75%;">
{{Appointment.Icon|raw}}<br>
{% if Appointment.isCancelled == 'true' %}
	CANCELLED: <span class="linethrough" >
{% endif %}<br>
<b>{{Center.Name}}</b>
<span title="{{Student.ID}}">{{Student.FirstLast}}</span> - {{Student.Email}}<br>
{% if Reason.ReasonName != '' %}
	Reason: {{Reason.ReasonName}}<br/>
{% endif %}
{% if Course.Subject != '' %}
	Subject: {{Course.SubjectCourseTitle}}<br/>
{% endif %}
{% if Appointment.Location != '' %}
	Location: {{Appointment.OnlineText}}{{Appointment.Location}}<br/>
{% endif %}<br>
When: <strong>{{Appointment.DisplayDate|raw}}</strong> at
<strong>{{Appointment.DisplayTime|raw}}</strong><br/><br>
{% if Appointment.isCancelled == 'true' %}
	</span>
{% endif %}<br>
</div>
<div style="line-height: 2;" >
	{{Appointment.CancelLink|raw}}<br/>
	{{Appointment.ActionLink| raw}}<br/>
	{{Appointment.EnterOnlineLink|raw}}<br/>
</div>
<div style="clear: both;"> </div>
- Online appointment link text
- Allows you to modify the hyperlink/button visible to students within online appointment records. Default is "The location for this online appointment is here."

See Also
2022-08-09 | Availabilities that aren't booked can now become drop-ins automatically
A new System Preference has been added (Other > Other Options > Preferences > Search Availability Options > Unbooked availabilities become dropins to students on search availability). If this is enabled, any in-person availabilities that remain unbooked by the time your "schedule no sooner than" limit is reached will automatically become drop-ins for students.
As an example, this test system doesn't allow students to book appointments within an hour of the session starting. At more than an hour out, it appears normally.


However, once we pass our 1-hour example threshold, the availability on the staff schedule looks normal, but students will now see this time as an available in-person drop-in session.

