|
|
SAGE
|
| SAGE (Student Alert and Group Events) is an additional module available for the Trac System. SAGE allows your faculty members to submit referrals, progress reports, or evaluations for the students enrolled in their courses. Based on the choices made while creating the referral, an automated email could be sent out to the student's assigned advisor, a professor, or otherwise, that way you and your staff can be as proactive as possible in helping your students.
You can think of SAGE like a three-step process.
- 1. Creation, a referral is submitted, emails are sent out.
- These emails could be sent to advisors, professors, or the student themselves, notifying us of something the student may be struggling with.
- 2. Follow-up, more information is given, new emails are sent out.
- The follow-up email lets relevant users know how this referral is going, what has been done, and what we are doing to help this student.
- 3. Resolution, a final email is sent out to wrap everything up.
- Once the referral has been processed, we can fill out some additional information letting the relevant users know what we did to help this student.
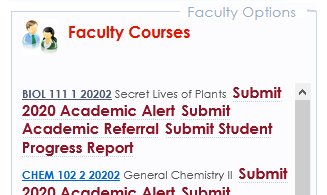
Faculty View / Roster Annotations
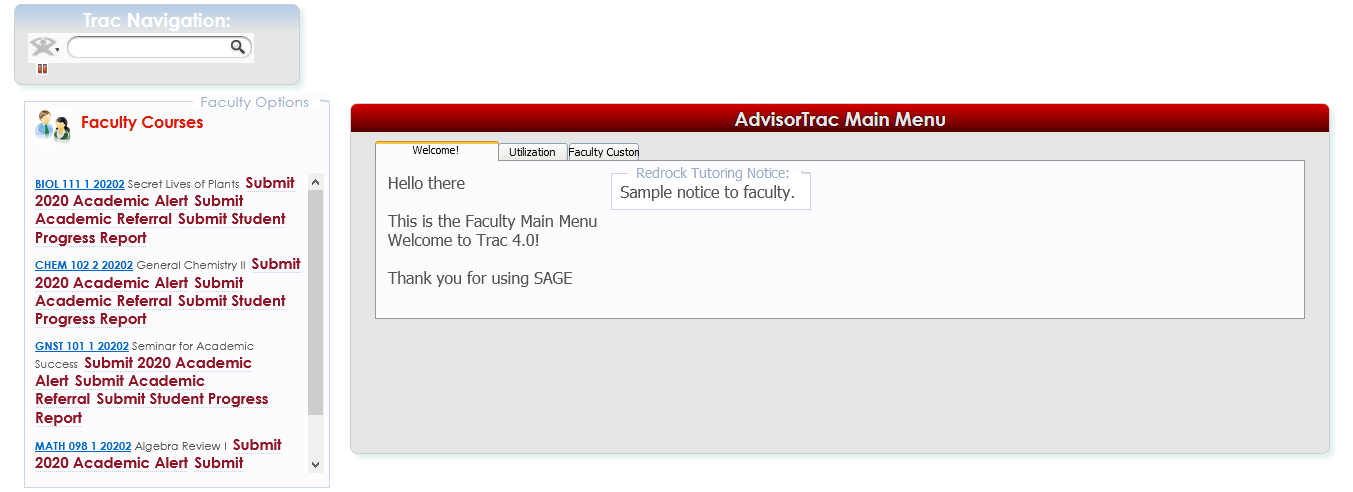
Your faculty members will be the primary users for submitting referrals, and as such, they have a streamlined view of the referral submission process. After logging in, on the left side of their main menu, they'll see their class rosters along with the referrals that have been designated as Roster Annotations (which we'll cover more later). This allows faculty to immediately access important referrals for each of their rosters.
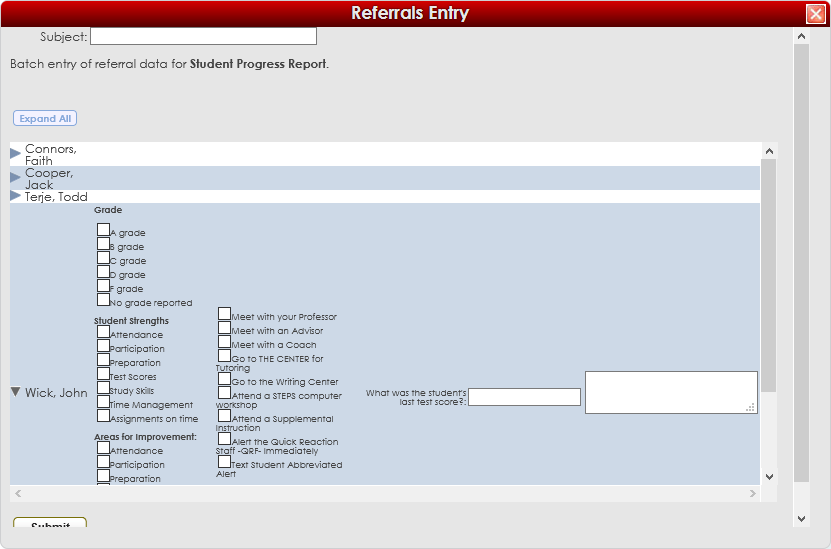
As a faculty member, let's say we wanted to submit a referral for one of our classes. We can simply click on the referral we want to submit for any given roster, and we'll be given access to a mass-referral tool.
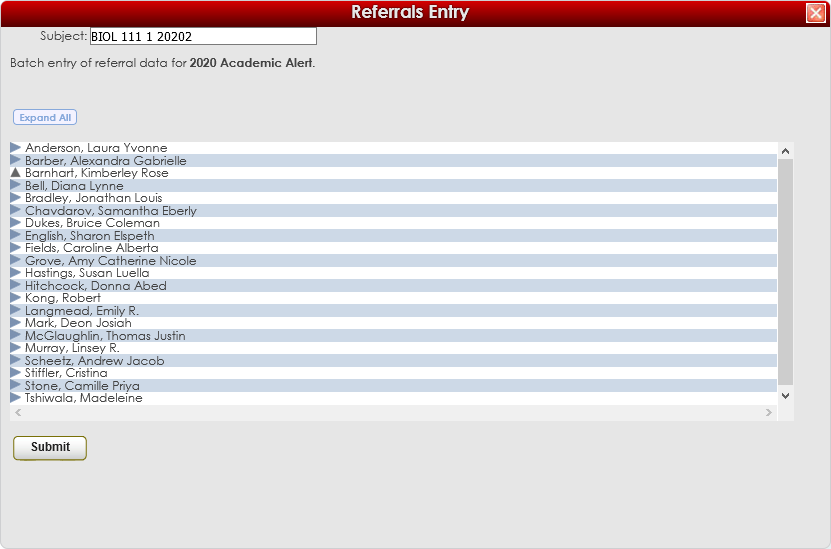
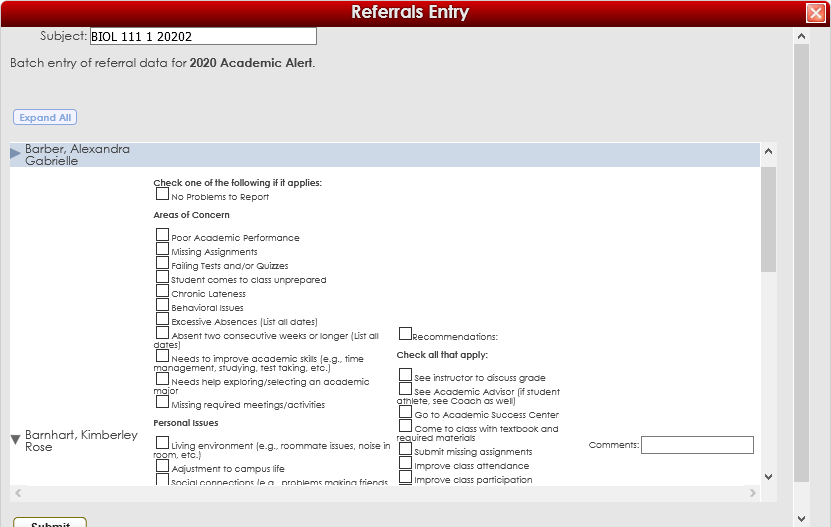
From this menu, we can click on individual students and fill out unique referrals for each without leaving this screen. Once we've filled out referrals for the specific students, we click submit, and we're all set. The referral process has begun for each of these students that we filled out a referral for.
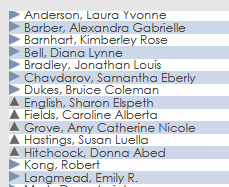
If the referral is configured as a roster annotation for [X] days (we'll cover this later), we can even open this mass-referral tool up later (but within the day limit) and continue where we left off. The up arrows indicate a referral that has already been opened. Clicking it again lets us pick up right where we left off.
Individual Student Referrals
Referrals can also be submitted individually from students' profiles. As non-faculty users don't have access to the class roster view, this will be their primary tool for submitting referrals.
Trac Navigation > Search Glass > Students > [Student] > SAGE tab
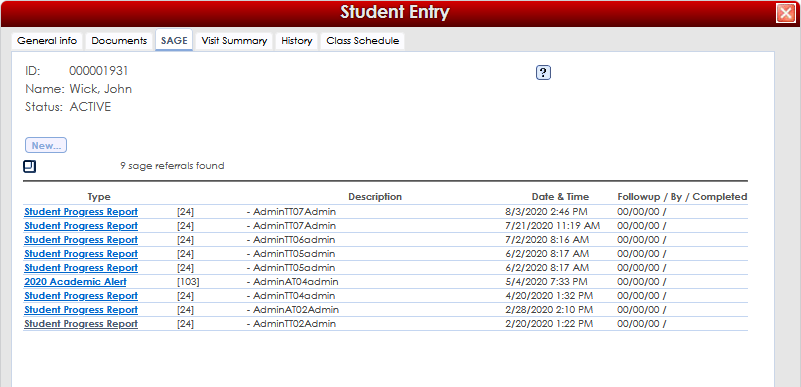
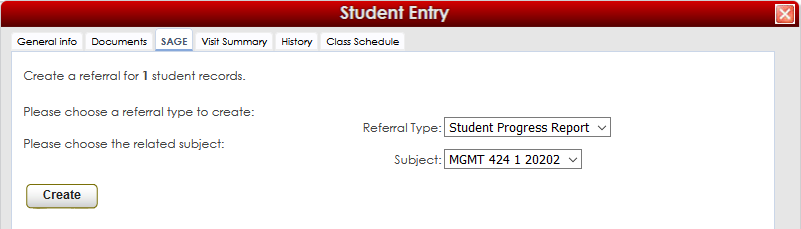
From the SAGE tab within student entry, we can click "New", select our referral and subject of choice, and begin the referral creation process as usual.
Student List Mass Referral Tool
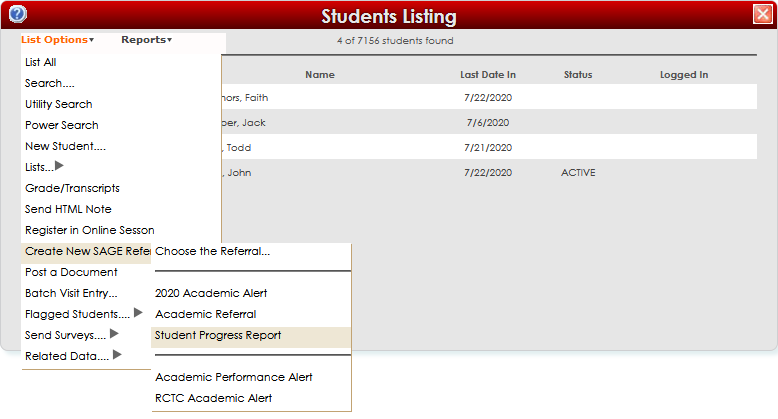
Alternatively, we can also submit referrals from the student listing. This allows us to search for students enrolled in a specific course, pull up a list, or just search for a couple students manually and create referrals in bulk. This screen will operate in the same way as the faculty's roster referral tool.
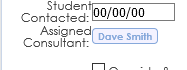
Processed
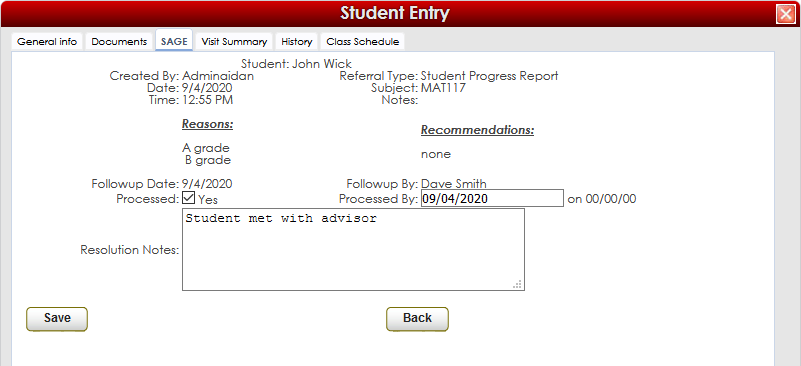
After a referral is marked as processed, we will see the following screen summarizing basic information about this referral, and providing a location to write additional notes about how this situation was resolved. Once saved, the final "Processed" email will be sent out (which we'll learn more about later).
Admin View and SAGE Management
|
From an admin's perspective, we can submit referrals, create new referral types, and run reports on our SAGE data. The bulk of this section will be spent going over SAGE configuration.
Sage Management
The SAGE Management menu is where we go to create new or modify existing referrals, we're given many options to fine-tune exactly how this referral functions and what emails are sent out. When this menu is opened, we can see all of our existing referrals, including the name, reasons, and whether or not it's active. To create a new referral, click on the "New..." button.
Trac Navigation > Trac-Man > SAGE Management
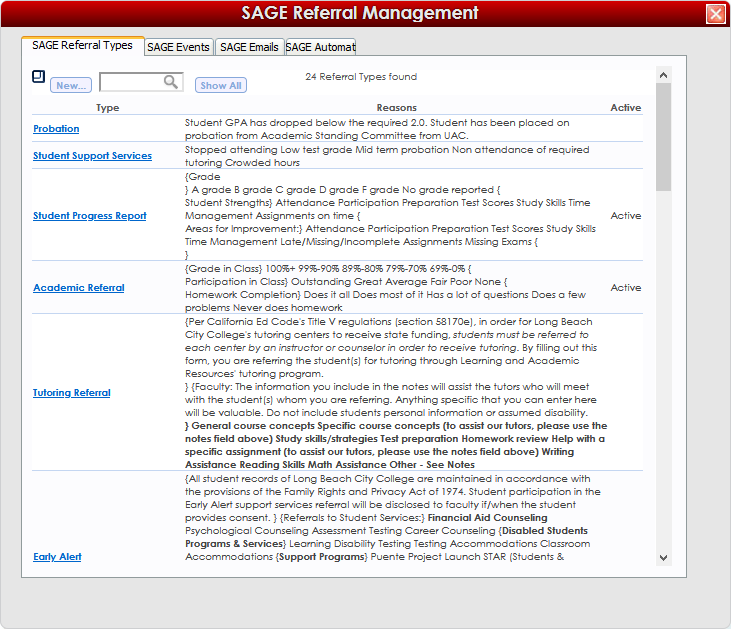
For this example, I'm going to look at an existing referral. To view/edit a referral, simply click the highlighted name from the list.
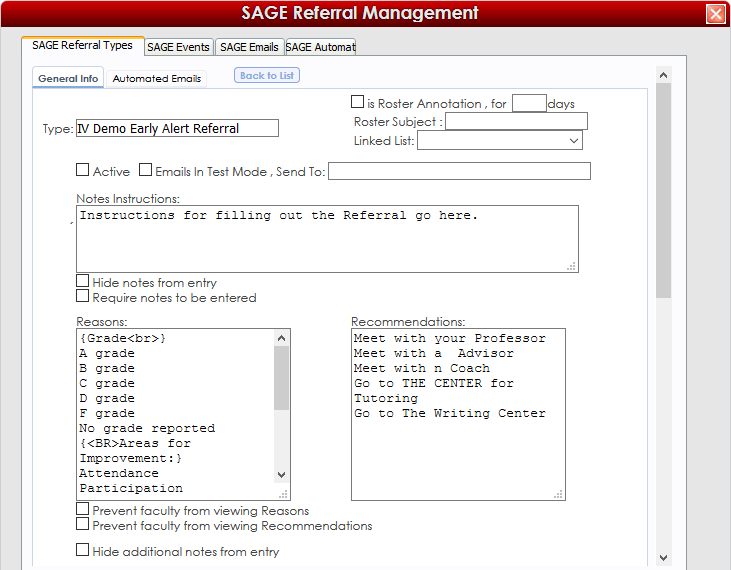 
- If this is checked, the referral will be active and available to submit.
- The Type will be the title/name of your referral, and is how this referral will be referenced by users and within reports.
- is Roster Annotation, for [___] days.
- If this referral is a roster annotation, it will appear as an option on your faculty home screens in their class roster lists. This allows them to easily create referrals for students in their classes.
- The number of days selected here is the time-frame provided to the faculty member where they can edit an existing referral. After this window has passed, the faculty member will create a new referral rather than editing an existing one.
- If you assign the referral to a subject, it will only appear for that subject's roster. If this field is left blank, the referral will be available for all subjects in faculty rosters.
- If this referral is assigned to a student list, faculty and other users will only be able to create this referral for users on that list. See our List Management Wiki for more information.
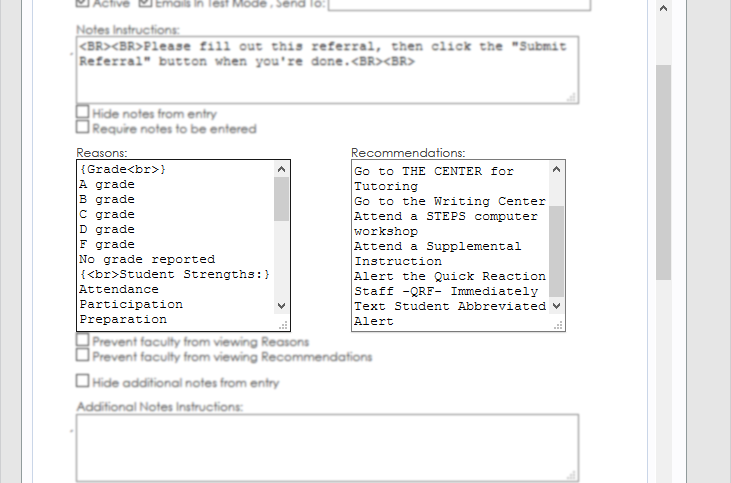
- Emails In Test Mode, Send To: [___]
- When setting up your SAGE referral Type, you may want to test emails that you have created. By checking this option and entering an email address, you can safely test your referral without actually sending emails to the designated recipients. Rather, the email specified in Send To: will receive a copy of all your emails. When you are ready to put your SAGE Referral Type into production, simply uncheck this box to allow SAGE to send to the correct recipients.
- Written instructions that appear above the first notes box. You can also choose to hide this, or make it a required field.

- Hide notes from entry
- Require notes to be entered
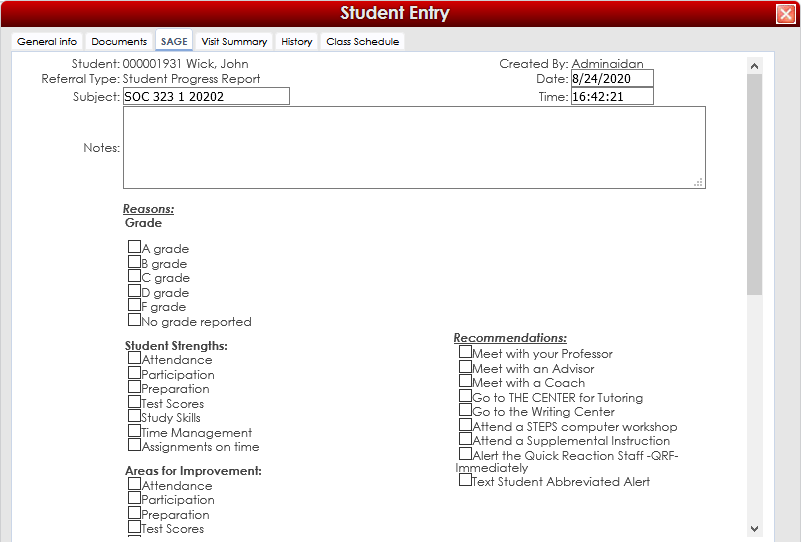
- The notes box, as seen in the screenshot above. This field can be hidden or set to required with these options.
- Prevent faculty from viewing Reasons
- Prevent faculty from viewing Recommendations
- Prevent faculty from viewing processed notes
- Prevent faculty from assigning consultant
- These settings allow you to fine-tune what your faculty are able to view or modify in regards to this referral type.
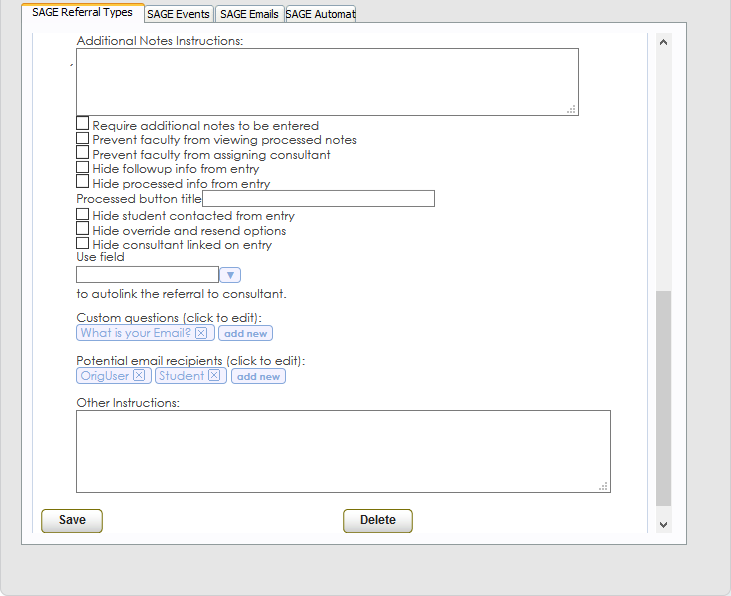
- Additional notes
- Hide additional notes from entry
- Require additional notes to be entered
- This preference adds/hides an additional field for notes after the reasons/recommendations, which can optionally be set to required.
- This button marks the referral as completed. The title of this button can be changed to fit your preferred terminology. "Processed", "Completed", "Finished", etc.
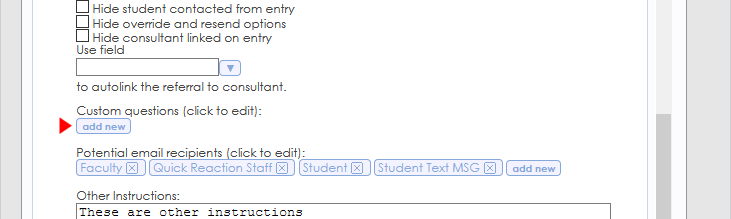
- Hide followup info from entry
- Hide student contacted from entry
- Hide consultant linked on entry
- Hide processed info from entry
- Hide various fields from the referral creation window.
- Hide override and resend options
- The Override & re-send option allows users to re-send the alert emails as if the referral was just submitted, followed-up on, or processed. This setting hides this as an option in the referral creation menu.
- Use field [___] to autolink the referral to consultant
- This setting requires that the consultant's email address be stored in one of the student's custom fields. There's a drop-down menu for this setting that allows you to select which field this data is stored in. If a field is selected, when the referral is submitted, it will automatically link it to the consultant with that email address.
Reasons & Recommendations
Reasons and Recommendations can be one of the most important aspects in creating these referrals, as these options can also dictate which emails get sent out to whom. Typically, these would be configured to allow your faculty to quickly describe where the student is struggling and what they recommend as a solution. However, since these are entirely customizable, you can ask any questions you can think of to help make the referral creation process as straightforward as possible.
Place each reason/recommendation on it's own line in this field. No additional formatting is required, however, these fields do support some HTML tags, so you can customize these further if needed. As a commonly used example, the tag "{<BR>Category}" could be used to separate reason and recommendations into groups to keep everything organized, as seen in the screenshots below. Place the "<BR>" either side of the category name to control if the spacing appears before or after the category name.
Once you've finished testing and actually begin using your referral, your reasons/recommendations can no longer be modified. You can add new ones, but removing, reorganizing, or modifying existing reasons/recommendations will cause SAGE reports to no longer display the correct information, and can even cause email conditions to stop working. If you need to update reasons/recommendations on a referral, we recommend that you create a new referral type and retire the previous one.
Custom Questions
Custom questions allow you to add additional questions to your referrals, these questions can ask whatever you'd like and can be formatted as a write-in box or drop-down menu.
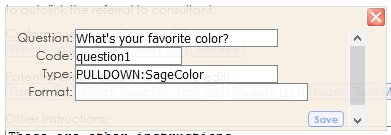
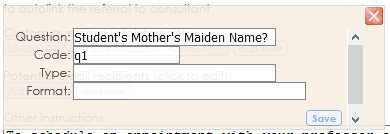
To begin creating the custom question, we simply need to click the "add new" button in our SAGE Management menu. This will open an options box allowing us to customize our question.
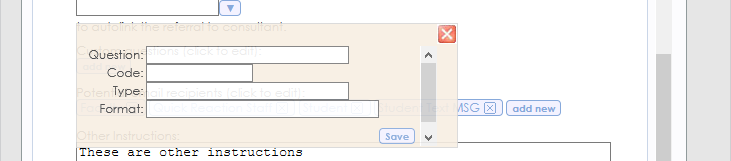
- Type your question in this box
- The Code will serve as an internal tag, so you can reference this question and its answer in SAGE emails or in reports. The Code can be any designation, such as “Question1”, “q1”, "FavoriteColor", etc.
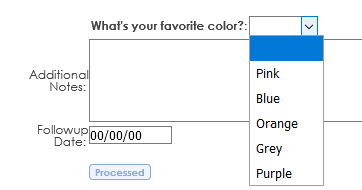
- This field, along with some advanced prefs, can be used to change the question to a drop-down format.
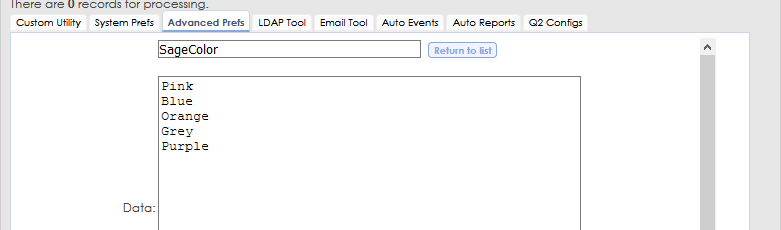
- Advanced Prefs
- We need to create a new advanced pref containing the options for our drop-down menu. As we're creating a new advanced pref, we'll need to give it a name. Any name will work, as long as it's not conflicting with anything else. We recommend starting with the word "SAGE", so it's easier to sort through later. Next, we'll add our available options in the data box, each on its own line.
- Trac Navigation > Trac-Man > Utilities and Prefs > Advanced Prefs > Create New
- SAGE Management
- Within Sage, we need to tell it to use these options. Add the phrase "PULLDOWN:" in the type box, followed by the name of the preference, as seen in the following screenshot.
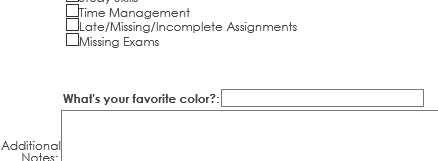
- Once everything is in place, the question will appear in the referral creation screen, just above additional notes.
- Type - Blank
- If this field is left blank, it will simply appear as a write-in box within the referral.
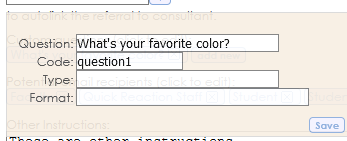 
- This field allows you to change the size of the Custom Question text box using the phrase "size=#", as seen in the screenshots below. If this field is left blank, it will default to 30.
 
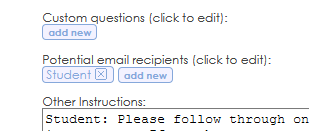
Email Recipients
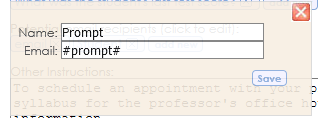
These are the possible recipients of alert emails relating to this referral. For example, if this referral's automated emails can be sent to students, then you will need to add students to the list, as seen in the below screenshot. The name of this field doesn't matter, as long as the correct email tags are used.
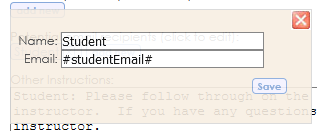 
Email tags will need to be used to add possible recipients, but you can also just type in a normal email address for a specific user. Here's a list of email tags available:
Student:
- #email# or #studentemail# - Student's email address
- #TxtMsgAddress# - Student's text message address (if Text Alerts is enabled)
Faculty:
- #FacEmail# - Faculty's email address, an email will only be sent to the faculty member if they created the referral themselves (unless #prompt# or a specific email address is used).
Advisor/Other
- #Field1# to #Field9# - This will use the email address located in one of the student's custom fields. Typically used for assigned advisors.
Consultant
- #tutoremail# or #advisoremail# - If a consultant is assigned to this referral, either of these tags can be used to send alerts to their email address.
Other:
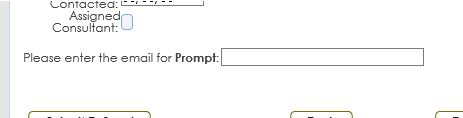
- #prompt# - This will allow users to manually write-in an email address on the referral form itself. This could be used to include the last tutor the student worked with, or another faculty member that otherwise wouldn't be included.
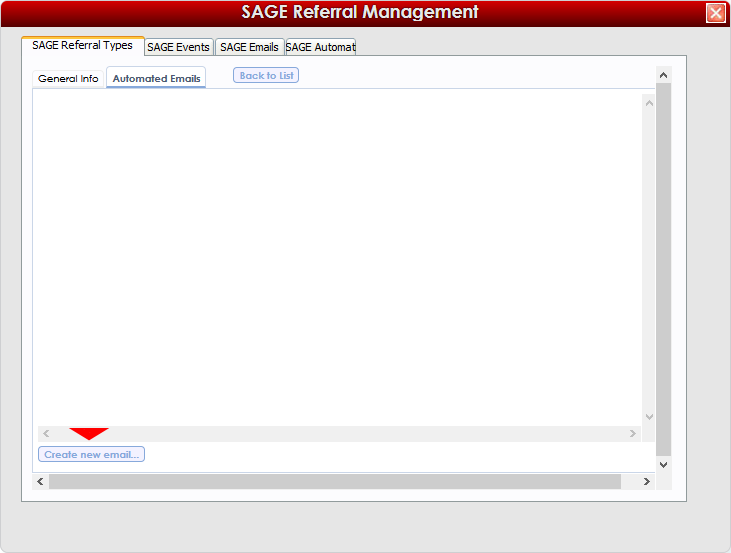
Automated Emails
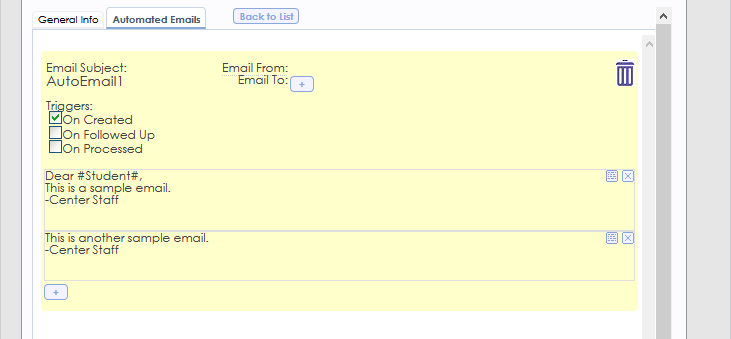
The Automated Emails tab allows you to create custom emails that can be sent to one or more of your Potential Email Recipients upon referral submission. Common examples might be an email that is sent to the student when a referral is created for them. Faculty or other Trac Users might also receive different versions of the same email, or a completely different email if configured that way.
Let's walk through creating a new automated email.
From the "Automated Emails" tab, click on "Create new email...". You may need to scroll down to see it. It will prompt you to choose a name, then once you click "Ok", the email will appear in the Automated Emails list.
 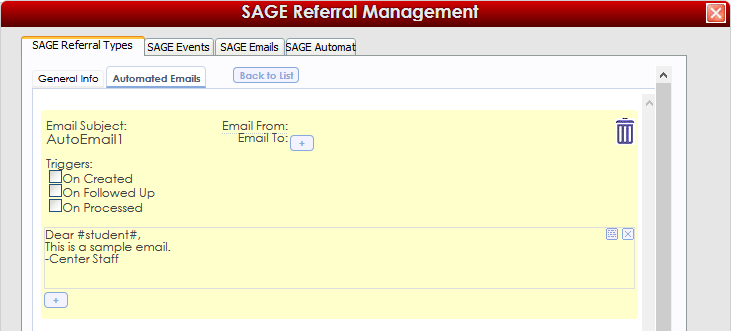
We already have a few options available for this email.
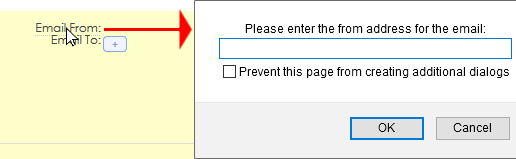
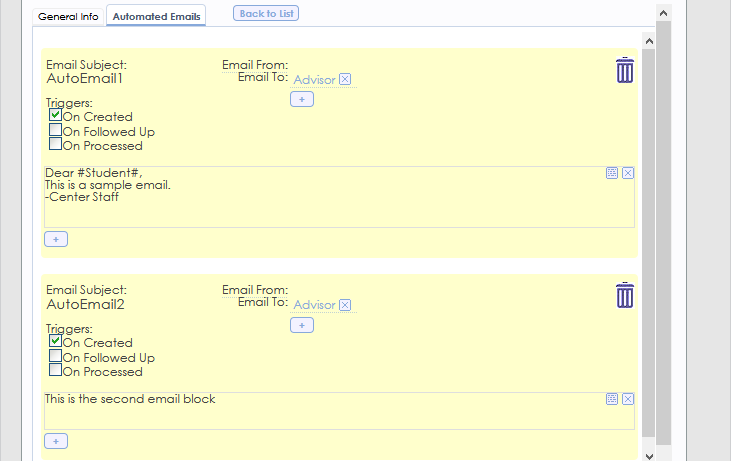
- If this is left blank, SAGE will automatically use the default Trac System email address. However, if your mail server allows you to send mail from alternate addresses, you can specify the email address you want to use by clicking the "Email From:" button and typing in the pop-up prompt.
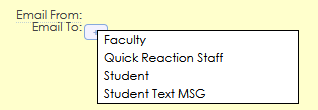
- Who should this email be sent to? The available options here are based on the Potential Email Recipients list that we mentioned earlier. You can also add more than one possible recipient here.
- Decide when this specific email should be sent out. We can send this email out upon creation, on follow-up, or when it's been processed/completed.

- The email contents will contain the actual message that gets sent out to users. As you can see in the following screenshot, we already have a sample email in place. We have a couple icons available as well, the
 icon allows us to begin editing this email block, the icon allows us to begin editing this email block, the  icon will delete the block, and the icon will delete the block, and the  icon lets us add another block. icon lets us add another block.

- To begin editing the email contents, we simply need to click the icon or click anywhere in the email box to enter the text editor. From this menu, we can write out our email contents for this block. An email block is a possible portion of this email that can be sent out if certain conditions are met.
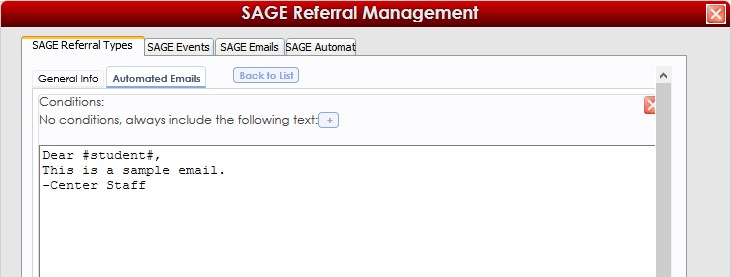
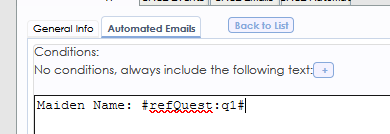
Conditions
Email conditions are one of the most customizable parts of SAGE.
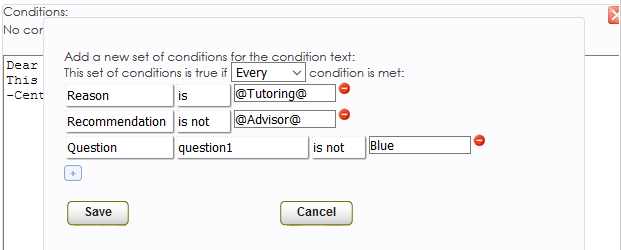
With email conditions, we can control exactly which email blocks are included in the email that gets sent to your recipients, based on choices made during the referral creation process. We have our list of available conditions below, we can have as many conditions as we want. We can also choose whether that email block is included when Every condition is met, or Any One condition is met.
When typing out the name of a Reason or Recommendation, always surround it with the @ symbol. If this isn't used, the condition can sometimes fail to take effect. "@reason@", "@recommendation@", etc, as seen in the screenshot above.
| Reason
|
Is / Is not
|
[Reason Name]
|
| Recommendation
|
Is / Is not
|
[Recommendation Name]
|
| Field
|
[Any student field]
|
Is / Is not
|
[Field Contents]
|
| On list
|
[Any list]
|
is True / is False
|
| Question
|
[Any question]
|
Is / Is not
|
[Answer Name]
|
Adding another email block
By adding another email block, we can setup a new set of email contents with new send conditions. For example, if you're using grade as your reasons, you can have one block send if the grade selected is A/B, and a different block send if the grade is C/D. To add another block, simply click on the , and repeat the above steps to configure it to your needs.
Adding another email
Instead of adding an email block, which will remain under the same umbrella for possible recipients and triggers, you can add a completely new email with it's own settings/blocks. You can add an additional email by clicking on the same "Create new email..." button as before, which will create the new email for you to customize.
From this point, you can go through the same setup process as before for this email instead. Typically, you would have a separate email for the "On Followed Up" trigger, and another for "On Processed". You can have as many emails as needed, and multiple emails can be sent out at once if all criteria is met.
Email Tags
Many of the standard email tags are used in the same way here, but there are a few SAGE-specific tags as well.
Student Fields
| Student Full Name (last, first) |
#student#
|
| Student Full Name (first last) |
#firstlast#
|
| Student First Name |
#first#
|
| Student Last Name |
#last#
|
| Student ID |
#studentID#
|
| Student Formatted ID |
#formattedID#
|
| Student Other ID |
#barcode#
|
| Student Handle |
#Account#
|
| Student Street |
#Address#
|
| Student City |
#City#
|
| Student State |
#State#
|
| Student Zip |
#Zip#
|
| Student Street, City, State, Zip |
#fullAddress#
|
| Student Email |
#studentEmail#
|
| Student Home Phone |
#phone#
|
| Student Work Phone |
#phone2#
|
| Student Text Message Address |
#txtMsgAddress#
|
| Student Gender |
#gender#
|
| Student Birthdate |
#birthdate#
|
| Student Ethnicity |
#ethnicity#
|
| Student Class |
#class#
|
| Student College |
#college#
|
| Student Cohort |
#cohort#
|
| Student Major |
#major#
|
| Student Grad_Und |
#gradund#
|
| Student GPA |
#GPA#
|
| Student Accumulated Hours |
#TotalHours#
|
| Student Graduation Date |
#GradDate#
|
| Student Graduation Degree |
#GradDegree#
|
| Student Condition Code |
#CondCode#
|
| Student Flag Text |
#FlagText#
|
| Student Special Status |
#status#
|
| Student ReferredBy |
#referredby#
|
| Student HS Name |
#HSName#
|
| Student Degree Goal |
#degree#
|
| Student Custom Field1 |
#Field1#
|
| Student Custom Field2 |
#Field2#
|
| Student Custom Field3 |
#Field3#
|
| Student Custom Field4 |
#Field4#
|
| Student Custom Field5 |
#Field5#
|
| Student Custom Field6 |
#Field6#
|
| Student Custom Field7 |
#Field7#
|
| Student Custom Field8 |
#Field8#
|
| Student Custom Field9 |
#Field9#
|
| Student Custom Field10 |
#Field10#
|
Current Date Fields
| Current Date |
#date#
|
| Current Time |
#time#
|
| Current Day of Week |
#apptday#
|
SAGE Specific
| Referral Subject Field |
#refSubject#
|
| Referral Type/Name |
#refType#
|
| Referral Creation Date |
#refDate#
|
| Referral Creation Time |
#refTime#
|
| Referral Notes |
#refNotes#
|
| Referral Additional Notes |
#refAddlInfo#
|
| Followup Date Field |
#refFollowUpDate#
|
| Followup By Date Field |
#refFollowUpBy#
|
| Has this referral been processed/completed? (Yes/No) |
#refProcessed#
|
| When was this referral processed? |
#refProcessedDate#
|
| Who processed this referral? |
#refProcessedBy#
|
| Processed referral notes |
#refProcessedNotes#
|
| Referral Reasons |
#Reasons#
|
| Referral Reasons (Formatting Tags Included) |
#sagereasons:formatted#
|
| Referral Reasons (Formatting Tags Excluded) |
#sagereasons:plain#
|
| Referral Recommendations |
#Recommended#
|
| Referral Recommendations (Formatting Tags Included) |
#sagerecommended:formatted#
|
| Referral Recommendations (Formatting Tags Excluded) |
#sagerecommended:plain#
|
| Custom Question Answer |
#refQuest:[Your Question Code]#
|
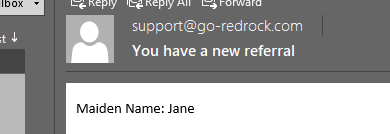
- This is where the custom question codes can come into play, using this tag with the code you assigned to your question allows you to include the answer given during referral creation in the alert email.
- 1. Give your custom question a code
- 2. Add the above tag to your email with the correct code
- 3. The quesiton is answered in the referral
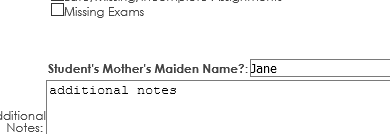
- 4. The answer shows up in referral email
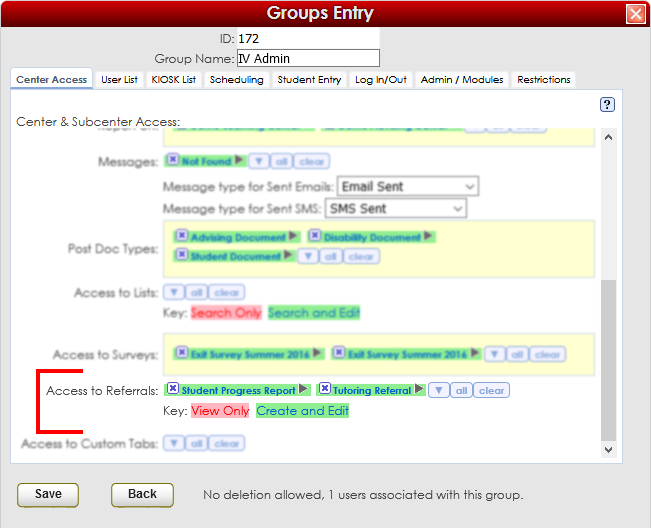
Group Access
If a user needs access to a referral type, you will need to give their permission group access to that specific referral. Once you have the permission group open, scroll down to "Access to Referrals:", add the referral you want them to have access to, and save. This setting is only available to SysAdmins.
Trac Navigation > Search Glass > Center Profiles > [Your Profile] > Group Access > [Permission Group]
On the Admin / Modules tab, we have a few more options available.
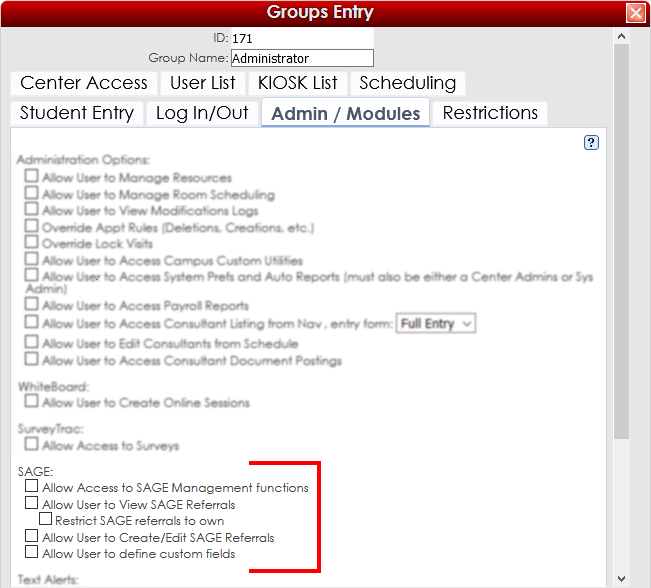
- Allow Access to SAGE Management functions
- If enabled, these users will have access to the SAGE menu (Trac Nav. > Trac-Man > SAGE Management), allowing them to view and edit referral configurations.
- Allow User to View SAGE Referrals
- If enabled, the "SAGE" tab will appear in student profiles and users will be able to view referrals made for students.
- Restrict SAGE referrals to own
- If enabled, users in this group will only be able to view referrals they personally created.
- Allow User to Create/Edit SAGE Referrals
- If enabled, users will be able to create new or edit existing referrals for students.
All of these settings also rely on the Access to Referrals setting above, users will only be able to view/edit/submit referrals found in their group's Center Access tab, including their access to referrals listed in SAGE Management.
Reports
|
| There are three SAGE-specific reports, each providing a different way to look at your SAGE data.
SAGE Referral Snapshot
The legacy Trac 4.0 version of TutorTrac/AdvisorTrac/FitnessTrac is end-of-life. It is no longer receiving new features or security updates. All Trac 4.0 customers are encouraged to migrate to TracCloud. TracCloud has been designed from the ground up for speed, power, and security. Click here to schedule a TracCloud demo or reach out to sales@go-redrock.com for pricing or contract details.
TracCloud
For over two decades, Redrock’s TutorTrac has been a trusted solution used by thousands of centers worldwide. Now, we have completely redesigned TutorTrac using the latest, most sophisticated development tools to bring you TracCloud. Rebuilt from the ground up, TracCloud has been rigorously tested and proven effective in real-world production environments for over four years.
This transformation began with a fresh foundation — a new database (MySQL), a cutting-edge web hosting platform (AWS on Apache), and a robust development environment (PHP). But the improvements don’t stop there. TracCloud features a sleek, modern user interface designed to be exceptionally intuitive and user-friendly, making it easier than ever to navigate and manage your operations. Plus, TracCloud is fully optimized for mobile devices, allowing users to access and utilize its powerful features seamlessly from anywhere. We are now hosted on Amazon Web Services and we are taking advantage of modern cloud security, alert monitoring, and performance monitoring with automatic scalability for on-demand needs.
We are also excited to introduce new modules designed to enhance your campus’s ability to support students effectively. TracInsights for predictive analysis, Wellness Check-ins, and Reflective Prompts empower your campus to stay connected with students across your district. These tools provide instant alerts when students are struggling, allowing you to respond swiftly. Additionally, our TracFlow Automations can initiate timely interventions and connect students with the appropriate services your campus offers, ensuring no student falls through the cracks.
Guided by invaluable customer feedback, we preserved the features that made TutorTrac and AdvisorTrac so popular while embracing an ambitious vision: How can we elevate every great feature from the 4.0 version to be ten times better in the TracCloud version?
We are confident we achieved that vision. TracCloud is now a more powerful, intuitive, and versatile system while remaining affordable for every level of your institution. Whether you are a small writing center using our software for just $2,500 per year, a large multi-center support services department for under $6,000, or an extensive district with multiple campuses utilizing our comprehensive retention bundle (call for pricing), we have the ideal solution to meet your needs.
Most importantly, we are deeply grateful for the ongoing support and loyalty of our customers over the past 25 years. Your feedback and trust have been instrumental in making TracCloud what it is today. As we look to the future, we are excited to continue innovating and finding new ways to make TracCloud even more powerful and effective as a retention tool for your campus.
Training and Assistance for Your Migration
We understand that migrating from your existing, proven solution to a new platform can feel daunting. To make this transition as smooth as possible, we offer personalized one-on-one training sessions and handle the data migration for you. Our team will seamlessly convert your TutorTrac data into the TracCloud format, scheduling both training and migration to ensure minimal downtime and disruption. More importantly, we will perform the training and migration at no additional cost to you.
Unparalleled Tech Support
Redrock has built a strong reputation for responsiveness and availability. Our team remains dedicated to providing the same top-tier, unlimited support that no other company in this industry can match. Our experienced professionals are ready to assist you via support ticket, email, or phone, often responding within hours—if not minutes—of receiving your request. Over the past 25 years, our reputation for stellar support has been well-proven, and we will continue to earn our place as the leader in higher education software through our unwavering commitment to excellence.
Annual Redrock Conference
We will continue to offer in-person training and exclusive previews of the latest features and modules of our software at our annual conference. Customers have consistently reported that this experience provides a valuable opportunity to connect with Redrock team members, network with peers in their industry, share experiences, and gain insights into best practices for using the TracCloud platform effectively at their campuses.
TracCloud: Enhanced Capabilities and Continuous Innovation
TracCloud has been completely rebuilt from the ground up, retaining all existing features while significantly enhancing their performance and usability. Our comprehensive suite of capabilities includes advanced reporting, intuitive scheduling, feedback surveys, online whiteboard meetings, early alert systems, text messaging, study table management, payroll tracking, resource check-in/out, workshop tracking, task management, success plans, terms and conditions waivers, support for unlimited centers, asynchronous appointments, custom fields, custom forms, custom views, work plans, certifications, instructor attendance tracking, testing center group appointments, watch lists, student photos, batch visits, Supplemental Instruction (SI) visit tracking, email templates, and batch emails. All of these powerful features have been further improved and seamlessly integrated with new functionalities, ensuring a more streamlined user experience.
A Modern, Mobile-Friendly Interface
The enhanced TracCloud system offers a responsive, mobile-friendly interface designed for convenience and accessibility. Students can effortlessly schedule appointments by scanning a QR code and tapping a button. Similarly, they can confirm their attendance at a center by scanning a QR code and pressing a single button, providing a smoother, more enjoyable user experience. Every component of TracCloud is now accessible through this sleek, user-friendly interface, enhancing efficiency for both students and administrators.
TracCloud Reporting System is Second to None
Our reporting system capitalizes on the data we receive and generate from the operations that TracCloud manages. Because of the data capture, our reports can comprehensively indicate what resources are needed and how operations can be streamlined to maximize the help that students receive. Reports can be generated automatically by all staff, and data results may be automatically exported on a daily or weekly basis. Reports may be securely emailed on an automated schedule to the people who need the results regularly and timely. Faculty can receive automated reports on student activities, research departments can obtain raw or summarized data indicating important trends, and center administrators can gather feedback on how students are being assisted. All reports utilize the sleek, user-friendly interface that TracCloud is now known for.
Commitment to Continuous Improvement
Since the launch of TracCloud nearly four years ago, we have remained dedicated to enhancing and expanding the platform. This year, we are introducing several new modules that are easy to incorporate into your existing configuration. The Predictive Analytics module helps identify and monitor at-risk students, while the Wellness Check-In module provides valuable insight into students’ emotional well-being. Additionally, our Reflective Prompts feature encourages students to reflect on their educational journey and the steps they are taking to achieve success. All functionalities can be integrated with our TracFlow automation module, enabling timely early alerts and automated student interventions. The newly introduced AI MoodMeter field links allow proactive identification of students who may require additional support. These enhancements are just the beginning, with many more planned for release throughout the year.
TracCloud: An Enterprise Solution that still works for smaller Centers
TracCloud supports single, small centers with limited budgets while providing powerful scalability for large districts with multiple campuses. Our modular approach allows institutions to add features and functionalities as needed, seamlessly integrating them into a cohesive, robust, and user-friendly system. TracCloud continues to provide a comprehensive solution tailored to meet the evolving needs of institutions of all sizes.
A Commitment to a Holistic Approach to Student Well-Being
TutorTrac has historically been a center operations management tool. Our latest improvements with the new TracCloud have focused on the student experience and how centers truly help students succeed. Future modules of TracCloud will strengthen the connection between centers, students, and faculty, while also providing tools for Deans, Provosts, and VPs to oversee the integration of student support services from a high-level perspective. With our extensive experience in center management and student support, TracCloud is uniquely positioned to provide these essential reporting capabilities, thanks to our ability to gather data directly from the source.
Easy to Use - Easy to get Started
The TracCloud version utilizes an intuitive interface so students can quickly begin booking appointments and taking advantage of the power of TracCloud immediately. The Redrock staff will quickly train your system administrators so we can get you up and running within just a couple of weeks for smaller systems and within a month for larger implementations. Our campuses report that the training and implementation process as the smoothest experience in implementing an outside vendors software system. We aim to continue to provide this excellence in service and will continue to go above and beyond in making sure your campus is configured and setup properly and quickly.
Plug and Play with Multiple Different Centers
The TracCloud advantage is its main ability to allow multiple different centers to manage and operate the TracCloud systems in a way that works best for their own needs. The centers can optionally share their information to other centers or can keep their sensitive information private. The ability to add a new center at any time makes TracCloud a great tool that can grow with you as your needs grow. Whether you are a single, small writing center or 50 centers communicating across multiple locations, TracCloud has the same, easy to use interface.
Now, we proudly introduce TracCloud — our latest innovation in student retention and engagement, designed to streamline the management of your learning, writing, advising, or other support centers on your campus.
New, easy to use interface
TracCloud features a modern, easy to use, and mobile-friendly interface, allowing you to easily find and manage your data as you need. Students, staff, and faculty will have a much easier time navigating through the system and accessing the data they need. The new dashboard offers many easy to access widgets to view and manage your data.
New Features
Export almost any report into Excel. Static and dynamic QR codes for touchless-kiosk environments. Unlimited custom data fields in student records, visits, appointments, and more. Customizable views of listing pages. Student timelines. Twig and HTML-supported emails and system messages. Customizable log listing and kiosk views. Center descriptions. New reports. Student success plans as a new module, along with work plans for staff. The full list of changes couldn't fit in this article, and more is being added all the time. Relating to the schedule specifically, you'll find a new appointments listing, availability badges, custom search appointment links and QR codes, unlimited customizable max appointment rules, asynchronous appointment support, and more.
Customizable
With Twig support, you can personalize system messages, upcoming appointment lists, emails, and more based on the users who are viewing/receiving them. From simple changes like greeting the user by name to completely changing an email based on if the related appointment was in-person or online, in a certain center, for a certain reason, even if a certain custom field in the student's profile has a specific value. This extends to the log listing and kiosks as well, where you can add or remove fields, rearrange the data that's displayed, and add custom formatting with HTML and Twig.

Faster
Rewritten from the ground up hosted on AWS, using a MySQL database, TracCloud is faster in every way. This performance increase compared to TutorTrac or what we now call Trac 4.0 can be noticed throughout the entire system, with reports being especially improved. Even the biggest reports in TracCloud load within a few seconds.
Migrate Existing Data
Migrate your existing data from Trac 4.0, allowing you to pick up right where you left off. We'll work with you to plan out your migration, coordinating with your IT, and training your system administrators to get you started in TracCloud.

Although we now bid the old TutorTrac a fond farewell this year, we appreciate how successful it was for so many centers around the world. The new, easy to use interface of TracCloud will make our current TutorTrac users happy to move to this new version. Moreover, our support team will make the transition easy and painless!
Click here to schedule a TracCloud demo!
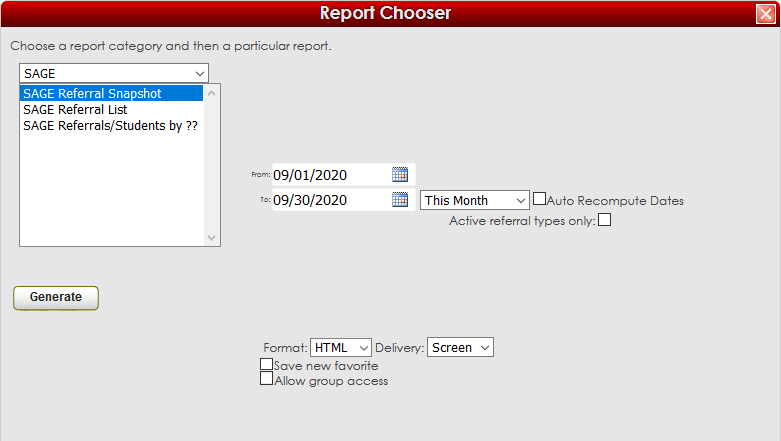
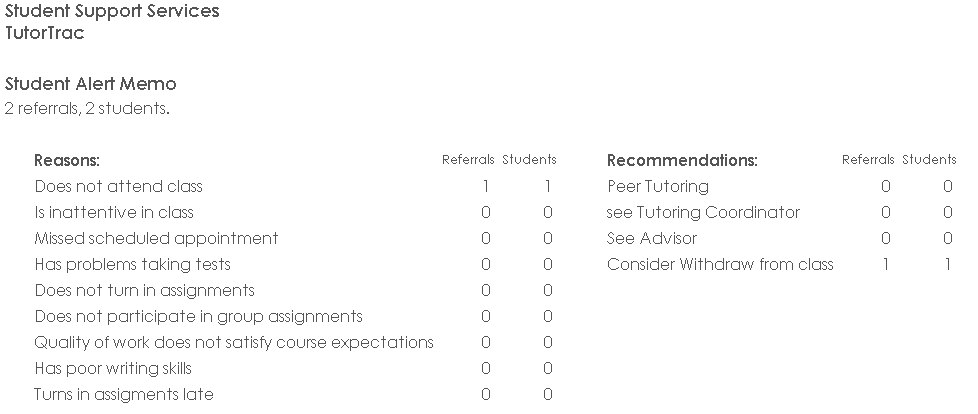
The SAGE Referral Snapshot report provides a quick overview of your reasons and recommendations for each of your referrals, including how many times that reason/recommendation was checked.
Generating the Report
To generate the SAGE Snapshot Report, click on Reports from the Trac System main menu. On the Reports Chooser, select SAGE from the pull down list of available categories. After selecting SAGE, choose SAGE Referral Snapshot. Enter a date range for the time period that you would like to review in the report, then click on the Generate Report button.
SAGE Referral List
The legacy Trac 4.0 version of TutorTrac/AdvisorTrac/FitnessTrac is end-of-life. It is no longer receiving new features or security updates. All Trac 4.0 customers are encouraged to migrate to TracCloud. TracCloud has been designed from the ground up for speed, power, and security. Click here to schedule a TracCloud demo or reach out to sales@go-redrock.com for pricing or contract details.
TracCloud
For over two decades, Redrock’s TutorTrac has been a trusted solution used by thousands of centers worldwide. Now, we have completely redesigned TutorTrac using the latest, most sophisticated development tools to bring you TracCloud. Rebuilt from the ground up, TracCloud has been rigorously tested and proven effective in real-world production environments for over four years.
This transformation began with a fresh foundation — a new database (MySQL), a cutting-edge web hosting platform (AWS on Apache), and a robust development environment (PHP). But the improvements don’t stop there. TracCloud features a sleek, modern user interface designed to be exceptionally intuitive and user-friendly, making it easier than ever to navigate and manage your operations. Plus, TracCloud is fully optimized for mobile devices, allowing users to access and utilize its powerful features seamlessly from anywhere. We are now hosted on Amazon Web Services and we are taking advantage of modern cloud security, alert monitoring, and performance monitoring with automatic scalability for on-demand needs.
We are also excited to introduce new modules designed to enhance your campus’s ability to support students effectively. TracInsights for predictive analysis, Wellness Check-ins, and Reflective Prompts empower your campus to stay connected with students across your district. These tools provide instant alerts when students are struggling, allowing you to respond swiftly. Additionally, our TracFlow Automations can initiate timely interventions and connect students with the appropriate services your campus offers, ensuring no student falls through the cracks.
Guided by invaluable customer feedback, we preserved the features that made TutorTrac and AdvisorTrac so popular while embracing an ambitious vision: How can we elevate every great feature from the 4.0 version to be ten times better in the TracCloud version?
We are confident we achieved that vision. TracCloud is now a more powerful, intuitive, and versatile system while remaining affordable for every level of your institution. Whether you are a small writing center using our software for just $2,500 per year, a large multi-center support services department for under $6,000, or an extensive district with multiple campuses utilizing our comprehensive retention bundle (call for pricing), we have the ideal solution to meet your needs.
Most importantly, we are deeply grateful for the ongoing support and loyalty of our customers over the past 25 years. Your feedback and trust have been instrumental in making TracCloud what it is today. As we look to the future, we are excited to continue innovating and finding new ways to make TracCloud even more powerful and effective as a retention tool for your campus.
Training and Assistance for Your Migration
We understand that migrating from your existing, proven solution to a new platform can feel daunting. To make this transition as smooth as possible, we offer personalized one-on-one training sessions and handle the data migration for you. Our team will seamlessly convert your TutorTrac data into the TracCloud format, scheduling both training and migration to ensure minimal downtime and disruption. More importantly, we will perform the training and migration at no additional cost to you.
Unparalleled Tech Support
Redrock has built a strong reputation for responsiveness and availability. Our team remains dedicated to providing the same top-tier, unlimited support that no other company in this industry can match. Our experienced professionals are ready to assist you via support ticket, email, or phone, often responding within hours—if not minutes—of receiving your request. Over the past 25 years, our reputation for stellar support has been well-proven, and we will continue to earn our place as the leader in higher education software through our unwavering commitment to excellence.
Annual Redrock Conference
We will continue to offer in-person training and exclusive previews of the latest features and modules of our software at our annual conference. Customers have consistently reported that this experience provides a valuable opportunity to connect with Redrock team members, network with peers in their industry, share experiences, and gain insights into best practices for using the TracCloud platform effectively at their campuses.
TracCloud: Enhanced Capabilities and Continuous Innovation
TracCloud has been completely rebuilt from the ground up, retaining all existing features while significantly enhancing their performance and usability. Our comprehensive suite of capabilities includes advanced reporting, intuitive scheduling, feedback surveys, online whiteboard meetings, early alert systems, text messaging, study table management, payroll tracking, resource check-in/out, workshop tracking, task management, success plans, terms and conditions waivers, support for unlimited centers, asynchronous appointments, custom fields, custom forms, custom views, work plans, certifications, instructor attendance tracking, testing center group appointments, watch lists, student photos, batch visits, Supplemental Instruction (SI) visit tracking, email templates, and batch emails. All of these powerful features have been further improved and seamlessly integrated with new functionalities, ensuring a more streamlined user experience.
A Modern, Mobile-Friendly Interface
The enhanced TracCloud system offers a responsive, mobile-friendly interface designed for convenience and accessibility. Students can effortlessly schedule appointments by scanning a QR code and tapping a button. Similarly, they can confirm their attendance at a center by scanning a QR code and pressing a single button, providing a smoother, more enjoyable user experience. Every component of TracCloud is now accessible through this sleek, user-friendly interface, enhancing efficiency for both students and administrators.
TracCloud Reporting System is Second to None
Our reporting system capitalizes on the data we receive and generate from the operations that TracCloud manages. Because of the data capture, our reports can comprehensively indicate what resources are needed and how operations can be streamlined to maximize the help that students receive. Reports can be generated automatically by all staff, and data results may be automatically exported on a daily or weekly basis. Reports may be securely emailed on an automated schedule to the people who need the results regularly and timely. Faculty can receive automated reports on student activities, research departments can obtain raw or summarized data indicating important trends, and center administrators can gather feedback on how students are being assisted. All reports utilize the sleek, user-friendly interface that TracCloud is now known for.
Commitment to Continuous Improvement
Since the launch of TracCloud nearly four years ago, we have remained dedicated to enhancing and expanding the platform. This year, we are introducing several new modules that are easy to incorporate into your existing configuration. The Predictive Analytics module helps identify and monitor at-risk students, while the Wellness Check-In module provides valuable insight into students’ emotional well-being. Additionally, our Reflective Prompts feature encourages students to reflect on their educational journey and the steps they are taking to achieve success. All functionalities can be integrated with our TracFlow automation module, enabling timely early alerts and automated student interventions. The newly introduced AI MoodMeter field links allow proactive identification of students who may require additional support. These enhancements are just the beginning, with many more planned for release throughout the year.
TracCloud: An Enterprise Solution that still works for smaller Centers
TracCloud supports single, small centers with limited budgets while providing powerful scalability for large districts with multiple campuses. Our modular approach allows institutions to add features and functionalities as needed, seamlessly integrating them into a cohesive, robust, and user-friendly system. TracCloud continues to provide a comprehensive solution tailored to meet the evolving needs of institutions of all sizes.
A Commitment to a Holistic Approach to Student Well-Being
TutorTrac has historically been a center operations management tool. Our latest improvements with the new TracCloud have focused on the student experience and how centers truly help students succeed. Future modules of TracCloud will strengthen the connection between centers, students, and faculty, while also providing tools for Deans, Provosts, and VPs to oversee the integration of student support services from a high-level perspective. With our extensive experience in center management and student support, TracCloud is uniquely positioned to provide these essential reporting capabilities, thanks to our ability to gather data directly from the source.
Easy to Use - Easy to get Started
The TracCloud version utilizes an intuitive interface so students can quickly begin booking appointments and taking advantage of the power of TracCloud immediately. The Redrock staff will quickly train your system administrators so we can get you up and running within just a couple of weeks for smaller systems and within a month for larger implementations. Our campuses report that the training and implementation process as the smoothest experience in implementing an outside vendors software system. We aim to continue to provide this excellence in service and will continue to go above and beyond in making sure your campus is configured and setup properly and quickly.
Plug and Play with Multiple Different Centers
The TracCloud advantage is its main ability to allow multiple different centers to manage and operate the TracCloud systems in a way that works best for their own needs. The centers can optionally share their information to other centers or can keep their sensitive information private. The ability to add a new center at any time makes TracCloud a great tool that can grow with you as your needs grow. Whether you are a single, small writing center or 50 centers communicating across multiple locations, TracCloud has the same, easy to use interface.
Now, we proudly introduce TracCloud — our latest innovation in student retention and engagement, designed to streamline the management of your learning, writing, advising, or other support centers on your campus.
New, easy to use interface
TracCloud features a modern, easy to use, and mobile-friendly interface, allowing you to easily find and manage your data as you need. Students, staff, and faculty will have a much easier time navigating through the system and accessing the data they need. The new dashboard offers many easy to access widgets to view and manage your data.
New Features
Export almost any report into Excel. Static and dynamic QR codes for touchless-kiosk environments. Unlimited custom data fields in student records, visits, appointments, and more. Customizable views of listing pages. Student timelines. Twig and HTML-supported emails and system messages. Customizable log listing and kiosk views. Center descriptions. New reports. Student success plans as a new module, along with work plans for staff. The full list of changes couldn't fit in this article, and more is being added all the time. Relating to the schedule specifically, you'll find a new appointments listing, availability badges, custom search appointment links and QR codes, unlimited customizable max appointment rules, asynchronous appointment support, and more.
Customizable
With Twig support, you can personalize system messages, upcoming appointment lists, emails, and more based on the users who are viewing/receiving them. From simple changes like greeting the user by name to completely changing an email based on if the related appointment was in-person or online, in a certain center, for a certain reason, even if a certain custom field in the student's profile has a specific value. This extends to the log listing and kiosks as well, where you can add or remove fields, rearrange the data that's displayed, and add custom formatting with HTML and Twig.
Faster
Rewritten from the ground up hosted on AWS, using a MySQL database, TracCloud is faster in every way. This performance increase compared to TutorTrac or what we now call Trac 4.0 can be noticed throughout the entire system, with reports being especially improved. Even the biggest reports in TracCloud load within a few seconds.
Migrate Existing Data
Migrate your existing data from Trac 4.0, allowing you to pick up right where you left off. We'll work with you to plan out your migration, coordinating with your IT, and training your system administrators to get you started in TracCloud.
Although we now bid the old TutorTrac a fond farewell this year, we appreciate how successful it was for so many centers around the world. The new, easy to use interface of TracCloud will make our current TutorTrac users happy to move to this new version. Moreover, our support team will make the transition easy and painless!
Click here to schedule a TracCloud demo!
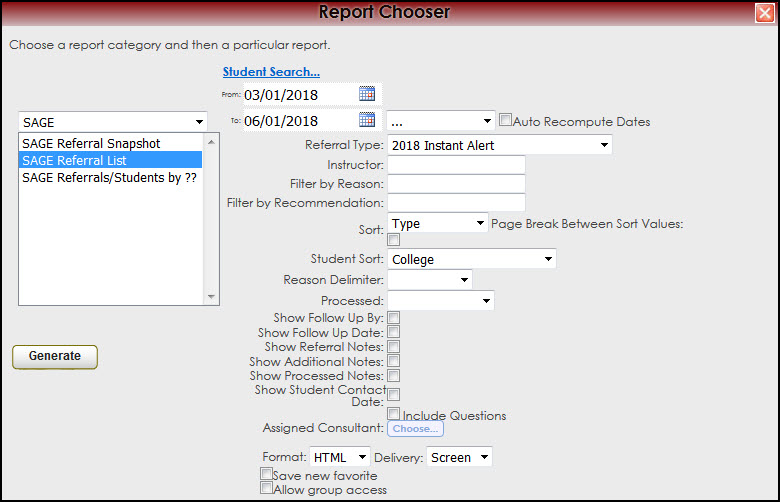
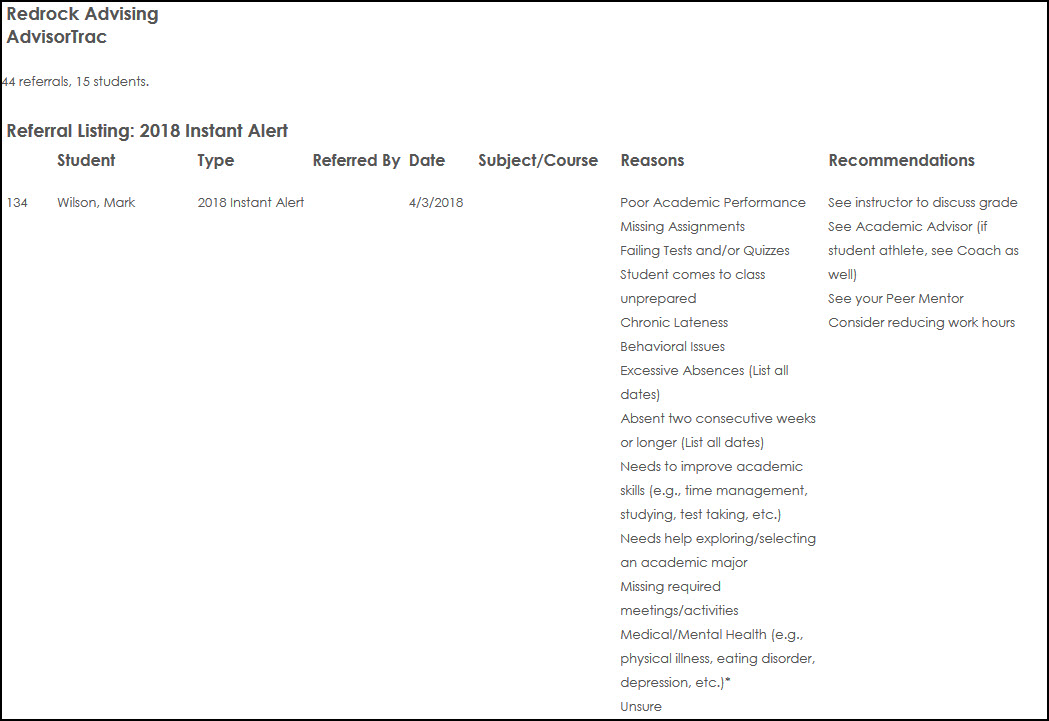
The SAGE Referral List report provides a list of students and their referrals, including the reasons and recommendations selected, and any additional information requested in the Report Chooser window. The results can also be filtered by instructor, reason, recommendation, referral type, and processed status.
Generating the Report
To generate the SAGE Referral List, click on Reports from the Trac System main menu. On the Reports Chooser, select SAGE from the pull down list of available categories. After selecting SAGE, choose SAGE Referral List. Enter a date range for the time period that you would like to review in the report, then click on the Generate Report button.
SAGE Referrals/Students by ??
The legacy Trac 4.0 version of TutorTrac/AdvisorTrac/FitnessTrac is end-of-life. It is no longer receiving new features or security updates. All Trac 4.0 customers are encouraged to migrate to TracCloud. TracCloud has been designed from the ground up for speed, power, and security. Click here to schedule a TracCloud demo or reach out to sales@go-redrock.com for pricing or contract details.
TracCloud
For over two decades, Redrock’s TutorTrac has been a trusted solution used by thousands of centers worldwide. Now, we have completely redesigned TutorTrac using the latest, most sophisticated development tools to bring you TracCloud. Rebuilt from the ground up, TracCloud has been rigorously tested and proven effective in real-world production environments for over four years.
This transformation began with a fresh foundation — a new database (MySQL), a cutting-edge web hosting platform (AWS on Apache), and a robust development environment (PHP). But the improvements don’t stop there. TracCloud features a sleek, modern user interface designed to be exceptionally intuitive and user-friendly, making it easier than ever to navigate and manage your operations. Plus, TracCloud is fully optimized for mobile devices, allowing users to access and utilize its powerful features seamlessly from anywhere. We are now hosted on Amazon Web Services and we are taking advantage of modern cloud security, alert monitoring, and performance monitoring with automatic scalability for on-demand needs.
We are also excited to introduce new modules designed to enhance your campus’s ability to support students effectively. TracInsights for predictive analysis, Wellness Check-ins, and Reflective Prompts empower your campus to stay connected with students across your district. These tools provide instant alerts when students are struggling, allowing you to respond swiftly. Additionally, our TracFlow Automations can initiate timely interventions and connect students with the appropriate services your campus offers, ensuring no student falls through the cracks.
Guided by invaluable customer feedback, we preserved the features that made TutorTrac and AdvisorTrac so popular while embracing an ambitious vision: How can we elevate every great feature from the 4.0 version to be ten times better in the TracCloud version?
We are confident we achieved that vision. TracCloud is now a more powerful, intuitive, and versatile system while remaining affordable for every level of your institution. Whether you are a small writing center using our software for just $2,500 per year, a large multi-center support services department for under $6,000, or an extensive district with multiple campuses utilizing our comprehensive retention bundle (call for pricing), we have the ideal solution to meet your needs.
Most importantly, we are deeply grateful for the ongoing support and loyalty of our customers over the past 25 years. Your feedback and trust have been instrumental in making TracCloud what it is today. As we look to the future, we are excited to continue innovating and finding new ways to make TracCloud even more powerful and effective as a retention tool for your campus.
Training and Assistance for Your Migration
We understand that migrating from your existing, proven solution to a new platform can feel daunting. To make this transition as smooth as possible, we offer personalized one-on-one training sessions and handle the data migration for you. Our team will seamlessly convert your TutorTrac data into the TracCloud format, scheduling both training and migration to ensure minimal downtime and disruption. More importantly, we will perform the training and migration at no additional cost to you.
Unparalleled Tech Support
Redrock has built a strong reputation for responsiveness and availability. Our team remains dedicated to providing the same top-tier, unlimited support that no other company in this industry can match. Our experienced professionals are ready to assist you via support ticket, email, or phone, often responding within hours—if not minutes—of receiving your request. Over the past 25 years, our reputation for stellar support has been well-proven, and we will continue to earn our place as the leader in higher education software through our unwavering commitment to excellence.
Annual Redrock Conference
We will continue to offer in-person training and exclusive previews of the latest features and modules of our software at our annual conference. Customers have consistently reported that this experience provides a valuable opportunity to connect with Redrock team members, network with peers in their industry, share experiences, and gain insights into best practices for using the TracCloud platform effectively at their campuses.
TracCloud: Enhanced Capabilities and Continuous Innovation
TracCloud has been completely rebuilt from the ground up, retaining all existing features while significantly enhancing their performance and usability. Our comprehensive suite of capabilities includes advanced reporting, intuitive scheduling, feedback surveys, online whiteboard meetings, early alert systems, text messaging, study table management, payroll tracking, resource check-in/out, workshop tracking, task management, success plans, terms and conditions waivers, support for unlimited centers, asynchronous appointments, custom fields, custom forms, custom views, work plans, certifications, instructor attendance tracking, testing center group appointments, watch lists, student photos, batch visits, Supplemental Instruction (SI) visit tracking, email templates, and batch emails. All of these powerful features have been further improved and seamlessly integrated with new functionalities, ensuring a more streamlined user experience.
A Modern, Mobile-Friendly Interface
The enhanced TracCloud system offers a responsive, mobile-friendly interface designed for convenience and accessibility. Students can effortlessly schedule appointments by scanning a QR code and tapping a button. Similarly, they can confirm their attendance at a center by scanning a QR code and pressing a single button, providing a smoother, more enjoyable user experience. Every component of TracCloud is now accessible through this sleek, user-friendly interface, enhancing efficiency for both students and administrators.
TracCloud Reporting System is Second to None
Our reporting system capitalizes on the data we receive and generate from the operations that TracCloud manages. Because of the data capture, our reports can comprehensively indicate what resources are needed and how operations can be streamlined to maximize the help that students receive. Reports can be generated automatically by all staff, and data results may be automatically exported on a daily or weekly basis. Reports may be securely emailed on an automated schedule to the people who need the results regularly and timely. Faculty can receive automated reports on student activities, research departments can obtain raw or summarized data indicating important trends, and center administrators can gather feedback on how students are being assisted. All reports utilize the sleek, user-friendly interface that TracCloud is now known for.
Commitment to Continuous Improvement
Since the launch of TracCloud nearly four years ago, we have remained dedicated to enhancing and expanding the platform. This year, we are introducing several new modules that are easy to incorporate into your existing configuration. The Predictive Analytics module helps identify and monitor at-risk students, while the Wellness Check-In module provides valuable insight into students’ emotional well-being. Additionally, our Reflective Prompts feature encourages students to reflect on their educational journey and the steps they are taking to achieve success. All functionalities can be integrated with our TracFlow automation module, enabling timely early alerts and automated student interventions. The newly introduced AI MoodMeter field links allow proactive identification of students who may require additional support. These enhancements are just the beginning, with many more planned for release throughout the year.
TracCloud: An Enterprise Solution that still works for smaller Centers
TracCloud supports single, small centers with limited budgets while providing powerful scalability for large districts with multiple campuses. Our modular approach allows institutions to add features and functionalities as needed, seamlessly integrating them into a cohesive, robust, and user-friendly system. TracCloud continues to provide a comprehensive solution tailored to meet the evolving needs of institutions of all sizes.
A Commitment to a Holistic Approach to Student Well-Being
TutorTrac has historically been a center operations management tool. Our latest improvements with the new TracCloud have focused on the student experience and how centers truly help students succeed. Future modules of TracCloud will strengthen the connection between centers, students, and faculty, while also providing tools for Deans, Provosts, and VPs to oversee the integration of student support services from a high-level perspective. With our extensive experience in center management and student support, TracCloud is uniquely positioned to provide these essential reporting capabilities, thanks to our ability to gather data directly from the source.
Easy to Use - Easy to get Started
The TracCloud version utilizes an intuitive interface so students can quickly begin booking appointments and taking advantage of the power of TracCloud immediately. The Redrock staff will quickly train your system administrators so we can get you up and running within just a couple of weeks for smaller systems and within a month for larger implementations. Our campuses report that the training and implementation process as the smoothest experience in implementing an outside vendors software system. We aim to continue to provide this excellence in service and will continue to go above and beyond in making sure your campus is configured and setup properly and quickly.
Plug and Play with Multiple Different Centers
The TracCloud advantage is its main ability to allow multiple different centers to manage and operate the TracCloud systems in a way that works best for their own needs. The centers can optionally share their information to other centers or can keep their sensitive information private. The ability to add a new center at any time makes TracCloud a great tool that can grow with you as your needs grow. Whether you are a single, small writing center or 50 centers communicating across multiple locations, TracCloud has the same, easy to use interface.
Now, we proudly introduce TracCloud — our latest innovation in student retention and engagement, designed to streamline the management of your learning, writing, advising, or other support centers on your campus.
New, easy to use interface
TracCloud features a modern, easy to use, and mobile-friendly interface, allowing you to easily find and manage your data as you need. Students, staff, and faculty will have a much easier time navigating through the system and accessing the data they need. The new dashboard offers many easy to access widgets to view and manage your data.
New Features
Export almost any report into Excel. Static and dynamic QR codes for touchless-kiosk environments. Unlimited custom data fields in student records, visits, appointments, and more. Customizable views of listing pages. Student timelines. Twig and HTML-supported emails and system messages. Customizable log listing and kiosk views. Center descriptions. New reports. Student success plans as a new module, along with work plans for staff. The full list of changes couldn't fit in this article, and more is being added all the time. Relating to the schedule specifically, you'll find a new appointments listing, availability badges, custom search appointment links and QR codes, unlimited customizable max appointment rules, asynchronous appointment support, and more.
Customizable
With Twig support, you can personalize system messages, upcoming appointment lists, emails, and more based on the users who are viewing/receiving them. From simple changes like greeting the user by name to completely changing an email based on if the related appointment was in-person or online, in a certain center, for a certain reason, even if a certain custom field in the student's profile has a specific value. This extends to the log listing and kiosks as well, where you can add or remove fields, rearrange the data that's displayed, and add custom formatting with HTML and Twig.
Faster
Rewritten from the ground up hosted on AWS, using a MySQL database, TracCloud is faster in every way. This performance increase compared to TutorTrac or what we now call Trac 4.0 can be noticed throughout the entire system, with reports being especially improved. Even the biggest reports in TracCloud load within a few seconds.
Migrate Existing Data
Migrate your existing data from Trac 4.0, allowing you to pick up right where you left off. We'll work with you to plan out your migration, coordinating with your IT, and training your system administrators to get you started in TracCloud.
Although we now bid the old TutorTrac a fond farewell this year, we appreciate how successful it was for so many centers around the world. The new, easy to use interface of TracCloud will make our current TutorTrac users happy to move to this new version. Moreover, our support team will make the transition easy and painless!
Click here to schedule a TracCloud demo!
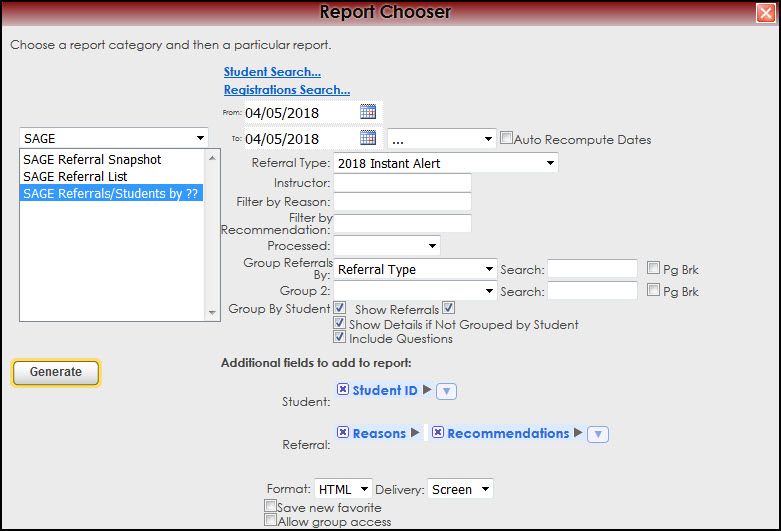
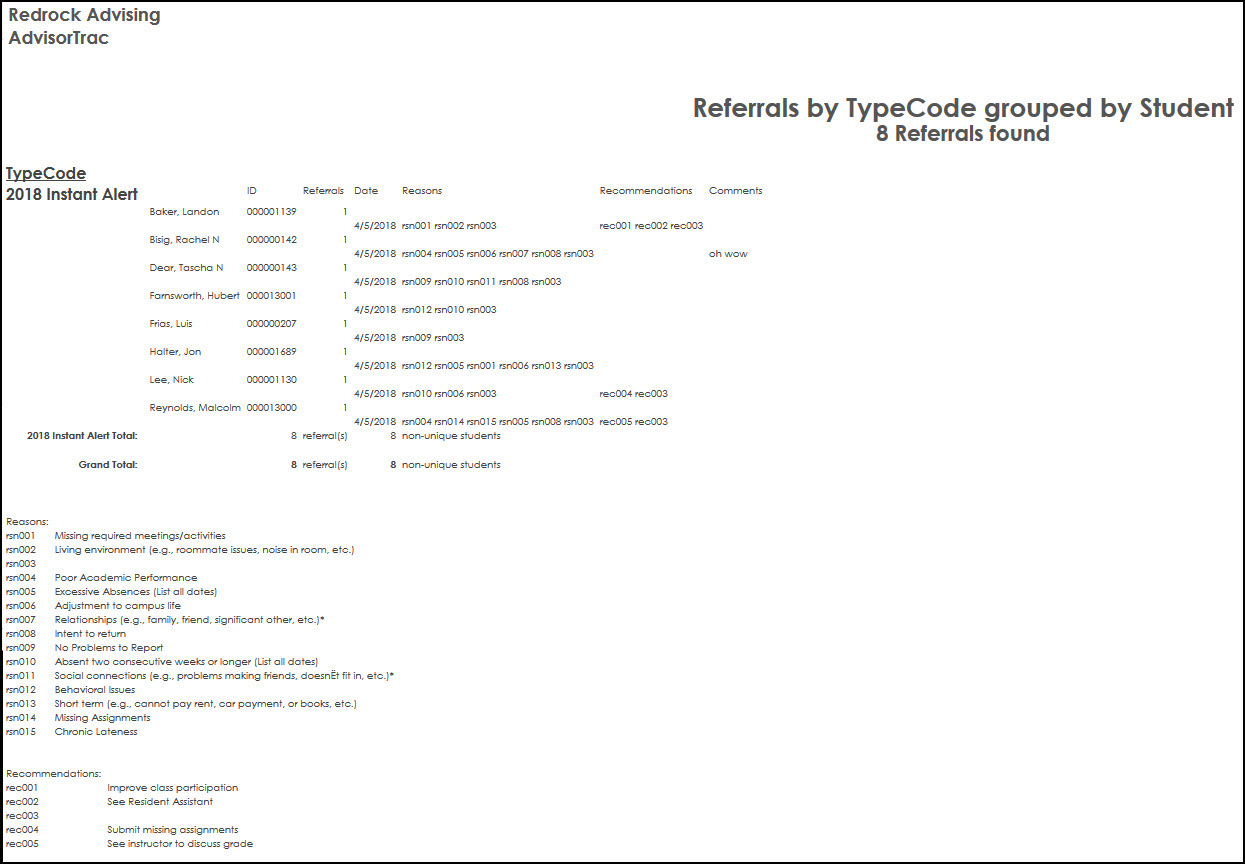
The Referrals/Students by?? report provides the most comprehensive look at your SAGE data of the three available reports. In a format similar to our Visits/Students by ?? report, this report allows you to choose how the data is grouped and what information is included. Additional information such as student fields and various referral fields can be shown in the results as well.
Generating the Report
To generate the Referrals/Students by ?? report, click on Reports from the Trac System main menu. On the Reports Chooser, select SAGE from the pull down list of available categories. After selecting SAGE, choose Referrals/Students by ??. Enter a date range for the time period that you would like to review in the report, then click on the Generate Report button.
|
|


