TracCloud: Workshops
From Redrock Wiki
Additional Features
The Workshops module of TracCloud provides a robust framework for organizing, managing, and tracking workshops held by campuses to enhance student engagement and academic support. Unlike traditional batch visits, workshops allow administrators to separately track student enrollment and attendance, offering valuable insights into participation rates and student involvement. The system supports various functionalities such as enrollment limits, attendance marking, automated visit creation, and credit assignments. Moreover, it allows for efficient communication through automated emails and QR code generation for student self-enrollment.
Tracking student engagement is essential for campuses aiming to improve retention and success rates. The Workshops module helps achieve this by generating detailed reports on attendance trends, enrollment rates, and overall workshop effectiveness. By utilizing TracCloud’s Workshops module, campuses can ensure that students are actively participating in supplemental learning opportunities and can proactively address gaps in student engagement through data-driven decisions.
Workshops can be viewed and managed by going to Other ➜ Workshops.

Access to manage workshops can be provided by going to Other ➜ Other Options ➜ Groups ➜ [The group you want to update] ➜ Admin / Modules ➜ Table Access ➜ Add 'Workshops' ➜ Save.
To create a new workshop from the listing, click the hamburger menu and select New Workshop or click to duplicate an existing workshop.
Fill out the basic details of your workshop such as the date, time, subject, etc.

- Workshop Name
- Choose the name of your workshop, which will appear in the workshops listing and can be referenced with Twig in workshop emails.
- Choose the name of your workshop, which will appear in the workshops listing and can be referenced with Twig in workshop emails.
- Instructor Name
- The instructor of the workshop, which like above can be referenced with Twig in workshop emails.
- The instructor of the workshop, which like above can be referenced with Twig in workshop emails.
- Linked Consultant or Faculty
- Optionally choose an assigned faculty or consultant for this workshop. If a consultant account is selected, they will have a reserve block automatically placed on their schedule to prevent conflicting appointments. Additionally, if your workshop is also configured to create visits when attended, the chosen consultant will be assigned to the resulting visits.
- Optionally choose an assigned faculty or consultant for this workshop. If a consultant account is selected, they will have a reserve block automatically placed on their schedule to prevent conflicting appointments. Additionally, if your workshop is also configured to create visits when attended, the chosen consultant will be assigned to the resulting visits.
- From/To Date/Time of Workshop
- Select the date and time of this workshop. If your workshop is configured to create visits when attended, these times will also be used for the resulting visits.
- Select the date and time of this workshop. If your workshop is configured to create visits when attended, these times will also be used for the resulting visits.
- Workshop Location
- Where the workshop will take place. If your workshop is configured to create visits upon attendance, this will be copied to the visit location field.
- Where the workshop will take place. If your workshop is configured to create visits upon attendance, this will be copied to the visit location field.
- Subject, Course, Section
- Choose the subject, course, and section for this workshop. Similar to batch visits, you can be less specific (just subject, or just subject + course) and TracCloud will attempt to find a matching registration from the student's account. This section will be used in the resulting visit records for attended enrollments if configured in the options tab.
- Choose the subject, course, and section for this workshop. Similar to batch visits, you can be less specific (just subject, or just subject + course) and TracCloud will attempt to find a matching registration from the student's account. This section will be used in the resulting visit records for attended enrollments if configured in the options tab.
- Maximum Enrollment
- Optionally set a limit of how many students can sign up for this workshop.
- Optionally set a limit of how many students can sign up for this workshop.
- Lock Enrollment and Auto-Lock Enrollment on
- Locking the workshop immediately prevents new enrollments from that point onward. You can also automatically lock enrollment at a set time and date.
- Locking the workshop immediately prevents new enrollments from that point onward. You can also automatically lock enrollment at a set time and date.
- Assigned Labels
- Choose the labels for this workshop. More information on this feature can be found further into this article.
- Choose the labels for this workshop. More information on this feature can be found further into this article.
- Workshop Description
- Describe the purpose of this workshop or record additional details as needed. This text is visible to students on the self-enrollment page via the QR code configured in the 'Options' tab. Supports HTML and Twig. For twig tags, you can use any tags from the following tables: Student, Workshop, Consultant (if the workshop is linked to a consultant), and Faculty (if the workshop is linked to a faculty). Additionally, you can use the unique Twig tag {{Status.Code}} in your Twig logic to change the messaging shown depending on the student's ability to enroll. The possible values of this tag are shown below.
Status.Code Description over The workshop is over/expired. locked The workshop is locked. full The workshop is full. notOnList The student isn't on the linked list for this workshop. notRegistered The student doesn't have a registration matching the workshop's selected subject/section. allowed The student is allowed to enroll (the 'Enroll' button will be displayed).
- Notification to Student at Self-Enrollment
- This text is visible to students on the self-enrollment page, on both the enrollment confirmation screen and the no access screen if students aren't allowed to enroll for one of the reasons above. Supports HTML and Twig just like the above preference.
The roster tab is where you can enroll students in the workshop as well as mark enrolled students as attended.

- Filter Student Search for Enrolling Students by a Linked List
- If enabled and a student list is chosen, then only students on that list can be selected from the Enroll Students option.
- If enabled and a student list is chosen, then only students on that list can be selected from the Enroll Students option.
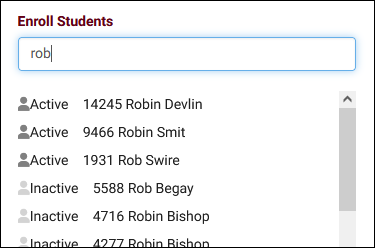
- Enroll Students
- This search box is used to search for and select students to enroll in the workshop. This will display students with an active registration matching the workshop course (unless a non-enrolled course is chosen, in which case it will list all students).

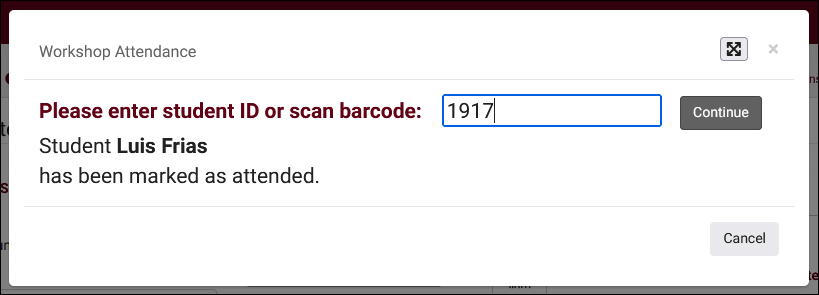
- Scan Students for Attendance ( button)
- The scan student utility will allow a staff member to quickly record student attendance by entering their ID or scanning their barcode. If the student scanned is not yet enrolled in the workshop, the staff member will be prompted to quickly enroll them and mark them as attended at the same time. If the student cannot be enrolled due the workshop being locked or max enrollment being reached, the login will be blocked and the student will be added to the "Failed Enrollment" list. It is possible for staff to override the max enrollment limit and book anyway.

- QR Code for Student Attendance tracking ( button )
- This button will generate a QR code, which students can then scan to record their own attendance.
- This button will generate a QR code, which students can then scan to record their own attendance.
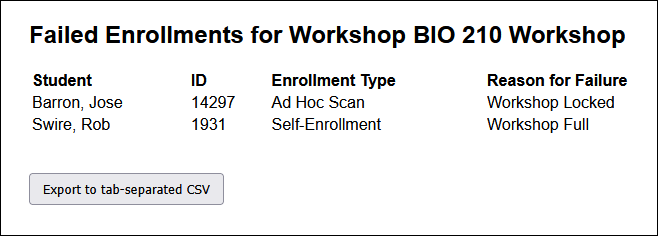
- List Students with Failed Enrollments & Failed Enrollment Details
- These options appear once at least one student has failed to enroll in the workshop. This can occur if your workshop has been locked (manually or automatically) or if your maximum enrollment limit has been reached. Students can be recorded as having failed to enroll either by attempting to enroll with your workshop QR code or by failing to be scanned in using the option above.
- To view a list of students who have failed to enroll for any reason, clicking the List Students with Failed Enrollments will take you to the student listing with those students displayed. Alternatively, to view why each student's enrollment failed, clicking Failed Enrollment Details will show each student and their reason for failure (shown below).

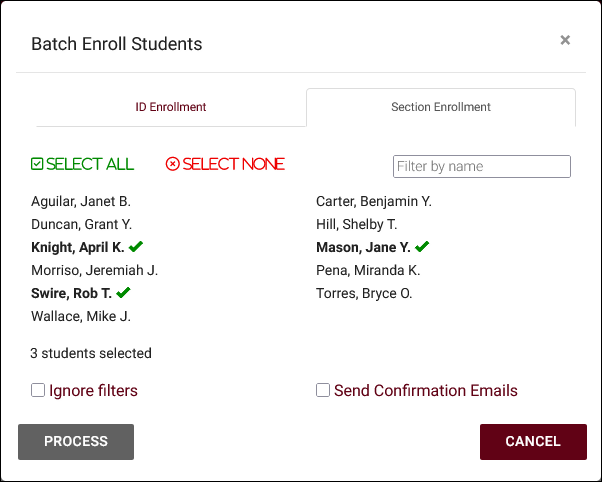
- Batch Enroll Students
- This option can be used to batch enroll multiple students into the workshop at once based on a provided list of IDs, emails, etc or based on student enrollment in the workshop subject/section. Ignore filters can be checked to enroll students even if they aren't enrolled in the workshop subject or on the workshop list. Send Confirmation Emails can be checked to send confirmation emails to each student you're enrolling.


- Mark Non-Attendees as Missed
- Clicking this button will immediately mark all students who didn't attend or cancel as missed, rather than requiring the statuses to be set one at a time.
- Clicking this button will immediately mark all students who didn't attend or cancel as missed, rather than requiring the statuses to be set one at a time.
- Enrolled Student List
- After enrolling students, they will appear in the table on the right side of this menu. Once a student is added to the roster, you can change their enrollment status (attended, missed, canceled) individually as well as batch change enrollment statuses by selecting students with the right checkbox and using the "Mark selected as" utility. Marking students as attended may have other effects, such as creating visits or completing potential assignments, depending on the options chosen in the next workshop tab.
- After enrolling students, they will appear in the table on the right side of this menu. Once a student is added to the roster, you can change their enrollment status (attended, missed, canceled) individually as well as batch change enrollment statuses by selecting students with the right checkbox and using the "Mark selected as" utility. Marking students as attended may have other effects, such as creating visits or completing potential assignments, depending on the options chosen in the next workshop tab.
- Send Email to...
- Send an email to students in the roster. The recipients can be all enrolled students, students by enrollment status, or manually selected students.
- Send an email to students in the roster. The recipients can be all enrolled students, students by enrollment status, or manually selected students.
- Select a survey to send
- Send a survey via SurveyTrac, recipients can be all, attended, missed, attended and missed, or selected students.
The options tab allows you to enable additional actions upon student attendance and to enable emails for this workshop.

- Create A Visit For student When Marked As Attended
- If enabled, the act of marking a workshop enrollment as attended will additionally create a visit record. You must also choose what center and reason the resulting visit should be linked to. Consultant, section, and date/time will be set according to the choices made under the General tab.
- If enabled, the act of marking a workshop enrollment as attended will additionally create a visit record. You must also choose what center and reason the resulting visit should be linked to. Consultant, section, and date/time will be set according to the choices made under the General tab.
- Credit Assignment For Student When Marked As Attended
- If enabled, you will be able to choose the potential assignment to use for this workshop. When a student attends, it will count towards their grade (if grade groups are configured).
- If enabled, you will be able to choose the potential assignment to use for this workshop. When a student attends, it will count towards their grade (if grade groups are configured).
- Send Enrollment Confirmation, Cancellation, Reminder Emails
- Choose which emails should be sent in relation to this workshop record. The emails themselves are configured in your profile preferences, detailed below.
- Choose which emails should be sent in relation to this workshop record. The emails themselves are configured in your profile preferences, detailed below.
- Profile Settings to Use
- While workshop emails are configured at the profile level, workshops are not inherently linked to a profile. In order to send workshop emails, you must select a profile to use the email preferences from. This field is also used to determine how early or late students are allowed to join an online workshop, using the same time restrictions as appointments.
- While workshop emails are configured at the profile level, workshops are not inherently linked to a profile. In order to send workshop emails, you must select a profile to use the email preferences from. This field is also used to determine how early or late students are allowed to join an online workshop, using the same time restrictions as appointments.
- Make This Workshop Online
- If enabled, you will be prompted to provide an online link to a platform such as Zoom, Webex, etc. Students will be able to scan the QR code below or open their workshop enrollment from their dashboard to join, which will automatically mark them as attended.
- If enabled, you will be prompted to provide an online link to a platform such as Zoom, Webex, etc. Students will be able to scan the QR code below or open their workshop enrollment from their dashboard to join, which will automatically mark them as attended.
- Email Actions
- Schedule emails to be sent to enrolled, attended, or missed students on a date and time of your choice. Emails created are stored as email templates in global preferences.
- Schedule emails to be sent to enrolled, attended, or missed students on a date and time of your choice. Emails created are stored as email templates in global preferences.
- Generate QR code for student enrollment
- Generate a QR code that students can scan to enroll themselves or cancel their enrollment in the workshop. Once generated, a few new options will become available to configure.
- Generate a QR code that students can scan to enroll themselves or cancel their enrollment in the workshop. Once generated, a few new options will become available to configure.
- Allow Student to enrollment via dashboard widget
- Allows students to enroll in this workshop from their dashboard. More information on this feature can be found further into this article.
- Allows students to enroll in this workshop from their dashboard. More information on this feature can be found further into this article.
- Allow student to cancel enrollment and Allow cancel up to # hours before workshop
- Choose whether or not students are allowed to cancel their workshop enrollment, and how late if so.
- Choose whether or not students are allowed to cancel their workshop enrollment, and how late if so.
- Require Terms and Conditions for Enrollment
- Require that the student agree to terms/conditions to enroll. Only terms and conditions configured to display on "Workshop Only" will appear in this menu.
Workshop emails are sent when a student is added to a workshop, removed from a workshop (canceled), and as a reminder the night before or morning of the workshop taking place. These emails can be edited in Other ➜ Other Options ➜ Profiles ➜ [Your profile] ➜ Prefs ➜ Emails ➜ Workshops.

- Workshop enrollment confirmation email subject
- This email sends when a student is enrolled in a workshop. Enter the subject line of the email here, supports Twig just like the body below.
- This email sends when a student is enrolled in a workshop. Enter the subject line of the email here, supports Twig just like the body below.
- Workshop confirmation email
- The body of the workshop enrollment confirmation.
- The body of the workshop enrollment confirmation.
- Workshop enrollment confirmation SMS Msg
- A separate message to be sent to the student's phone. Requires TextAlerts module.
- A separate message to be sent to the student's phone. Requires TextAlerts module.
- CC the Profile on workshop enrollment confirmation emails
- This option will send a copy of this email to your Profile email address if available.
- This option will send a copy of this email to your Profile email address if available.
- Workshop enrollment cancellation subject
- This email is sent upon a student's enrollment in a workshop being canceled, supports Twig just like the body below.
- This email is sent upon a student's enrollment in a workshop being canceled, supports Twig just like the body below.
- Workshop cancellation email
- The body of the workshop enrollment cancellation.
- The body of the workshop enrollment cancellation.
- Workshop enrollment cancellation SMS Msg
- A separate message to be sent to the student's phone. Requires TextAlerts module.
- A separate message to be sent to the student's phone. Requires TextAlerts module.
- CC the Profile on workshop enrollment cancellation emails
- This option will send a copy of this email to your Profile email address if available.
- This option will send a copy of this email to your Profile email address if available.
- Send Workshop Reminder emails
- You can optionally send a reminder the day before or the morning of a workshop taking place to the student's email address and/or phone number. A specific time must be chosen for this email to send.
- You can optionally send a reminder the day before or the morning of a workshop taking place to the student's email address and/or phone number. A specific time must be chosen for this email to send.
- Upcoming workshop reminder email subject
- The subject like of the workshop reminder email, supports Twig just like the body below.
- The subject like of the workshop reminder email, supports Twig just like the body below.
- Upcoming workshop reminder email
- The body of the workshop reminder email.
- The body of the workshop reminder email.
- Upcoming workshop reminder SMS Msg
- A separate message to be sent to the student's phone. Requires TextAlerts module.
- A separate message to be sent to the student's phone. Requires TextAlerts module.
- CC the Profile on upcoming workshop reminder emails
- This option will send a copy of this email to your Profile email address if available.
These Twig tags can be used in the emails above to dynamically include details about your workshops. For more information on Twig, including other tags for relating records (Students, Centers, etc), take a look at our full Twig guide here.
| Field | Type | Description | Twig | API |
|---|---|---|---|---|
| Sequence | bigint | Unique identifer for each workshop. | Workshops.Sequence | |
| CenterID | bigint | Which center this workshop is assigned to, relates to Centers.Sequence. | Workshops.CenterID | |
| ReasonID | bigint | Which reason this workshop is assigned to, relates to Reasons.Sequence. | Workshops.ReasonID | |
| Name | varchar(255) | The name of the workshop. | {{Workshop.Name}} | Workshops.Name |
| Instructor | varchar(255) | The instructor of the workshop. | {{Workshop.Instructor}} | Workshops.Instructor |
| RosterSubject | json | Contains the subject, course, and section code of the workshop. | Workshops.RosterSubject | |
| RosterSubject.Subject | varchar(40) | The workshop subject. | {{Workshop.RosterSubject.Subject}} | |
| RosterSubject.Course | varchar(20) | The workshop course. | {{Workshop.RosterSubject.Course}} | |
| RosterSubject.Section | varchar(80) | The workshop section code. | {{Workshop.RosterSubject.Section}} | |
| StudentLinkedListID | bigint | The list of students this workshop is restricted to, relates to Lists.Sequence. | Workshops.StudentLinkedListID | |
| Description | text | The description of the workshop. | {{Workshop.Description}} | Workshops.Description |
| AssignmentID | bigint | Which potential assignment this workshop is assigned to, relates to Assignments.Sequence. | Workshops.AssignmentID | |
| CreatedDT | datetime | The date and time this workshop was created. | {{Workshop.CreatedDT}} | Workshops.CreatedDT |
| DateFrom | datetime | The start date and time of the workshop. | {{Workshop.DateFrom}} | Workshops.DateFrom |
| StartDate | The start date of the workshop. | {{Workshop.StartDate}} | ||
| StartTime | The start time of the workshop. | {{Workshop.StartTime}} | ||
| DateTo | datetime | The end date and time of the workshop. | {{Workshop.DateTo}} | Workshops.DateTo |
| EndDate | The end date of the workshop. | {{Workshop.EndDate}} | Workshops.EndDate | |
| EndTime | The end time of the workshop. | {{Workshop.EndTime}} | Workshops.EndTime | |
| EnrolledDate | The date of student enrollment. | {{WorkshopsRoster.EnrolledDate}} |
An optional feature of workshops is the ability to allow students to search for and enroll themselves in workshops from their dashboard, similar to the the process of booking appointments. In order to search for a workshop, the student would select from a list of "labels" which will determine which workshops are presented to them. You can think of this label & workshop connection as being similar to reasons & availabilities in scheduling.
Workshop labels can be created by going to Other ➜ Other Options ➜ Preferences ➜ Workshop Labels. Each label you create can be given a unique color, with a preview on the right.

To prepare your workshop for dashboard enrollments, there are two requirements. First is that the workshop must be assigned to at least one label. A label can be chosen under the "General" tab, as seen below. Second is that you must check the Allow Student to enrollment via dashboard widget box under the "Options" tab.

After your workshop has been saved, students will be able to search for and enroll themselves in the workshop from their dashboard.

Clicking "Enroll in a Workshop" will open a prompt where the student can choose which labels they want to search by. Selecting at least one label will display the available workshops.

Once the student clicks on the workshop and confirms their enrollment, the workshop widget will display their enrollment like below.

See Also: