TracCloud: Schedule Management
From Redrock Wiki
(Redirected from TracCloud: Schedule Management)
Getting Started / Basics
The TracCloud schedule is where you can create and manage your consultant’s availabilities. The availability blocks created here will appear when staff or students are searching for appointments based on the criteria chosen during the search process. This article will walk you through how to utilize these features, from creating availabilities to booking appointments.
The schedule can be reached by clicking the “Schedule” button at the top of the dashboard. Click the "Expand" options below to view more information on different parts of the schedule management process.
Navigating the staff schedule is a crucial part of managing TracCloud if you host appointment-based sessions. This is where you can create new availabilities/time slots, review past and future appointments, and even book new appointments on behalf of students.

Starting at the top of the schedule view, you'll find options for changing your date range and selected consultant. The date field can be clicked on so that you can select a specific day or week (depending on your current consultant selection), and you can cycle through past/upcoming dates using the arrow buttons. The "Today" button will always take you to the current date.
Following this is the consultant menu. Your consultants will be grouped by the centers they're assigned to (or profiles then centers for systems with 5+ profiles). Selecting an individual consultant will display their schedule for the selected week. You can alternatively select "All of this center" to view all of your consultant schedules for a single day. This option also allows you to hide unavailable consultants with a checkbox along the schedule settings bar. You can also choose your selected center, which applies to both the "all of this center" view as well as individual consultants who work across multiple centers.


Next, you will find your Schedule Display Options. These can be used to change your visible time on the calendar, as well as hide certain record types. Changes made here will only affect your own account, and only in your current browser session. The icon indicates whether or not you have the ability to modify availabilities, and the icon indicates the same for appointments. Consultant accounts can also see a button, which will return them to their personal calendar.

Lastly, the "All of this center" view also has a search field in the top bar, allowing you to filter by consultant names or the location field in consultant records. Preceding your search with "=" will look for an exact match. E.g., "red" will return "red" and "redrock", but "=red" will only return "red." You can also search for multiple values with commas (when not using '='), such as "dave,jane" to return both Dave and Jane's schedules. The latter is commonly used if you need to click-and-drag an appointment between their calendars.
After selecting the consultant you want to create an availability for, click-and-drag to begin creating an availability block in an open space on their schedule. Before you let go of left-click, tapping the 'a' key on your keyboard will cycle through different options. Adhoc appointments (white), reserve blocks (red), and standard availabilities (green). Standard availability is what you'll want to select to create a new time slot on your consultant schedule.

Once you release left-click, you will be brought to the availability entry window where you can configure the time slot.

In the top-right corner of the availability, you can choose the block type. Availability is a regular availability linked to a single center. A Stacked Availability can be linked to multiple centers, essentially allowing you to create multiple overlapping availabilities at the same time. When stacking an availability, you can choose which fields are ignored and not shared between stacked blocks. For example, you can ignore the Meeting Type field so that the Learning Center block can be online and the Writing Center block can be in-person, otherwise non-ignored options will be shared across the entire stack. Reserve Blocks are covered further into this article.
Subject and Reason allow you to restrict what this time slot can be utilized for. If left blank, which is a typical choice, the consultant and center course lists will be used. If you wanted to restrict the availability to a specific subject, you can select it from the search menu, or use a wildcard entry (such as "MATH*" for all sections that start with "MATH) or a course list if your preferences allow it.
The following option, Meeting Type, determines if this is a remote/online availability, in-person, or asynchronous. The latter option will be covered in the next portion of this wiki article. Depending on which option you choose, additional Location fields will be made available. In-person availabilities may be assigned to a specific room or building number, while online sessions will be assigned a specific online invite link. That link can be the consultant's specific invite link from their account, a breakout room, or a new invite can be copy/pasted directly into the "Online URL" field. Students can join these online appointments from their dashboard, as TracCloud will provide a hyperlink to them at the appointment start time.
The Max Students option determines the availability type. 0 would be a drop-in event, 1 is a one-on-one meeting, and 2 or more would be a multi-person group.
The date range and days of the week fields allow you to determine how this availability will repeat going forward. By default, just the one day you created the block on will be active, however, you can push the “To” date farther out and deselect the days of the week that this availability shouldn’t be active for to create a schedule such as "Every Monday, Tuesday, and Friday until May 30th."
Increments and Breaks control how the block is split into different times. If you create a 5-hour block on the schedule, setting the Increments to 60 minutes will split that into 5 1-hour blocks instead. Breaks allow you to schedule breaks for your consultants in-between appointments. For example, you could set Increments to 55 and Breaks to 5 to give your consultants 5-minute breaks in between their 55-minute appointments. The minimum increment length is 10 minutes.
Override Missed Status allows you to choose a different status for students that miss this appointment compared to your profile configuration. Only allow/Block these on the other hand allows you to restrict who is allowed to see this appointment based on student lists. If no lists are chosen in either field, there will be no restriction.
Allow student recurring makes it possible for students to book this recurring availability even if your profile is configured to prevent students from booking recurring appointments.
Overrides will show you gaps in the series. For example, if you have an availability that repeats for some time, but a block in that series is removed (maybe the consultant isn't available that week or their time changes on that one day), that will appear as an override date for the rest of the series. An availability can also be manually overridden if you want to make changes to it independently from the rest of the series by clicking the button as seen in the screenshot below.

Documents can be uploaded to the availability, which will automatically be carried through to booked appointments so that students can access them.
Notes is an internal notes field for staff to share information about this availability with each other. This field is not shown to students, and can be used for any purpose.
Group sessions also offer a couple of unique settings for your availabilities, detailed below.
- Group Slot Restriction
- This determines what subject students can book compared to the first student's selection. Any Subject means that one student could book for MATH100, and another for ACTG100, any subject is allowed (within consultant and center specialties). Same Subject means that one student could book for MATH100 01, and another for MATH100 02, but not for MATH200. Both Same Subject and Instructor and Same Section can be used to be more strict as needed.
- This determines what subject students can book compared to the first student's selection. Any Subject means that one student could book for MATH100, and another for ACTG100, any subject is allowed (within consultant and center specialties). Same Subject means that one student could book for MATH100 01, and another for MATH100 02, but not for MATH200. Both Same Subject and Instructor and Same Section can be used to be more strict as needed.
- First booked appt determines online / in person for that time slot on that day
- This option only appears if the availability offers both in-person and online meeting types. If checked, the first student who books the appointment decides if it will take replace in-person or online. Otherwise, each individual student can independently select online/in-person for a hybrid environment. This option only appears if "Allow group online/in-person per time slot determined by first person that day and time" is enabled in your profile schedule prefs.
- This option only appears if the availability offers both in-person and online meeting types. If checked, the first student who books the appointment decides if it will take replace in-person or online. Otherwise, each individual student can independently select online/in-person for a hybrid environment. This option only appears if "Allow group online/in-person per time slot determined by first person that day and time" is enabled in your profile schedule prefs.
- Group Slot Skill Locks
- If enabled in scheduling prefs, staff will be able to define skills/accommodations in group availabilities that when booked, will lock the availability to the first chosen skill. The typical use case for this is for languages. For example, if you offered the skills "English," "Spanish," "French," and "Extra Time" and the first student books with the "Spanish" skill, you may want to limit all subsequent appointments to Spanish while allowing students to freely choose (or not choose) "Extra Time." To do this, you would simply list out the language skills in the "Group Slot Skill Locks" field in your availability.

- With the above in place, Student A may schedule for Spanish (which locks the group to Spanish since they were first), Student B may schedule for Spanish and Extra Time, but Student C will not see this availability in search results if they search for English.
- With the above in place, Student A may schedule for Spanish (which locks the group to Spanish since they were first), Student B may schedule for Spanish and Extra Time, but Student C will not see this availability in search results if they search for English.
Click “Save” once you’re happy with the availability configuration.
Asynchronous is an additional meeting type available for availabilities. These are created like normal availabilities, but appointments are held asynchronously. A text chat will be provided for a student and consultant to communicate with each other, and documents can be uploaded to the appointment for each user to download and review. This functionality must be enabled in your profile before it can be used, go to Other ➜ Other Options ➜ Profiles ➜ [Your profile] ➜ Prefs ➜ Scheduling ➜ Other Schedule Options ➜ Allow availabilities to be asynchronous.
This meeting type can be selected just like In-Person or Online, and can be combined with those meeting types to give students more choices when booking appointments.

Asynchronous availabilities are shown on the schedule view as a purple box with a icon. Students will see the same color in their availability searches.


After the appointment has been booked, you will notice a couple differences compared to standard appointments. The Status field now only contains "In Progress" and "Concluded" plus a missed and two canceled statuses, as standard synchronous statuses no longer apply. An additional Messages tab has also been added, which will contain all communications between the consultant and the student.

Students and consultants will primarily be communicating and managing the session from the dashboard. This will display all "In Progress" asynchronous sessions that you (a consultant or student) are a part of. Clicking "Show Previous Concluded" will let you review past asynchronous sessions, download documents, or even reopen the session if needed. The "Asynchronous Communications" phrasing in the title of this widget can be overridden in your system preferences.

Clicking on one of these entries will open the appointment record with two tabs available. Appointment Information contains the current status of the appointment, any custom fields, as well as uploaded documents. Messages (pictured below) shows the current discussion between the student and their consultant, along with a log of document uploads/deletions. Either party can conclude or reopen the session at any time with the button in the lower-right corner.

Reserve Blocks can be created over existing availabilities and appointments, to prevent booking and automatically cancel conflicting appointments. This is typically used for holiday breaks, sick days, or to block off specific times of the day when a consultant will not be available.
There are two ways to create a reserve block. You can click-and-drag an availability as usual, then tap the 'a' key to cycle to a reserve block, or create a normal availability then change the block type to "Reserve Block" in the top-right corner.


Once you've started creating your reserve block, you will find a few options that don't exist in normal availabilities which have been detailed below. If only one center is chosen, the block will only apply to availabilities in that one center.

- All Staff this Center is used to create a block for all consultants across your selected center, rather than exclusively for the consultant account that you had originally selected.
- All Staff for All Centers goes beyond what the "this center" option does, placing this block on all consultant schedules across all centers.
- Show on schedule as meeting will change how this block visually displays on the schedule and will be shared to the consultant's calendar via the "Calendar URL" button on the staff dashboard. This does not have an effect on blocking availabilities or cancelling appointments, that functionality will be the same regardless of if this is checked.
- Do NOT Cancel any intersecting appointments will prevent overlapping/conflicting appointments from being automatically canceled when this block is saved, which is otherwise the default behavior of reserve blocks.
- Description can be used to record why this reserve block exits. For example, "Time off for holiday."
- Status will apply to all overlapping appointments. For example, "Canceled - Holiday" to differentiate these cancellations when running reports. If this field is left blank, a generic "Canceled" status will be used instead.
The rest of the reserve block is created like a standard availability, set the time and days that should be blocked, then click "Save" to add it to the schedule.

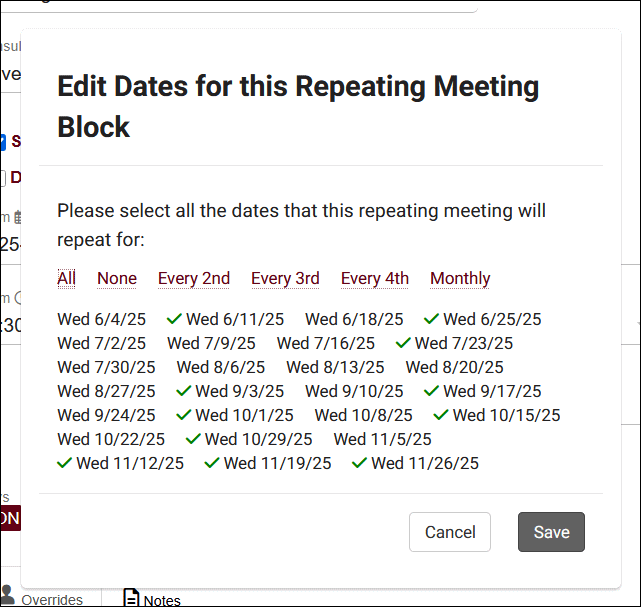
A Recurring reserve block can also be created, allowing you to pick and choose dates to apply the block on. To create reserve blocks with this method, the block must only be on one day and it must be a meeting block. If these conditions are met, you will see the following options.

- Recurring Meeting
- Choose if this block repeats on a daily, weekly, biweekly, or monthly basis.
- Recurs Until
- Choose the end date of the recurring series.
- Edit Dates
- Choose the dates to create reserve blocks on from the recurring schedule. After saving your dates and then saving the reserve block, TracCloud will create distinct reserve blocks on every date you chose on this screen.

Appointments can be booked from the staff schedule directly, or from the dashboard. The former can only be accessed by staff, while the latter can be accessed by both students and staff if their permission group allows it. Regardless of which option is used, emails will be sent out as usual and the records will appear in reports as expected.
Staff Schedule
From the staff schedule, there are 3 ways to book an appointment for a students, depending on what's easiest for that particular session.
Ad-hoc appointments can be created by clicking-and-dragging (as if you're creating an availability), but before you let go of left-click, tap the 'a' key on your keyboard to cycle to the appointment option (white). After you let go, TracCloud will prompt you to choose a student before taking you to the appointment entry screen (detailed further into this article).

Booking availabilities can be accomplished by clicking on the start time of the availability (group or 1-on-1) and searching for a student. After making your selection, you will be brought to the appointment entry screen. You can also click on the icon to set a custom start and end time for your appointment.


Dashboard
Both students and staff have access to the dashboard appointment search widget. The primary difference (aside from the appointment entry page itself) is that staff will need to select a student in the widget, while students do not since they're already logged in on their browser. The exact options available in this widget will be based on your profile preferences and search availability widget settings.


If “Choose a Date & Center” is selected (or was made the default for your system), an additional window will appear after clicking "Search" to choose a center/profile, as well as the specific date of the appointment you want to book. The phrasing of text shown here is based on your search availability widget settings.

After searching, you will be brought to a results screen such as this, allowing you to view the time of the appointment, which center it takes place in, whether it’s a Group, 1 on 1, Drop-In, or Asynchronous time slot, and the consultant. The results will load one day at a time, more results can be loaded by clicking the “Load more for [the following day]” at the bottom of the screen. Clicking on the time slot will open the appointment entry window where you can book that time slot.

Appointment Entry
After clicking on the availability that you want to book, the appointment entry screen where you can fill out custom fields and confirm your appointment will differ depending on if you're logged in as a staff or a student.
The student view is very restricted. The student can only edit fields that your system (or individual availability, depending on the field) allows to be edited. Student custom fields, meeting type, recurring status, and duration.

The staff perspective shows all appointment fields, including status.

Once the appointment is saved, appointment confirmation emails (and SMS texts via TextAlerts) will be sent to both the student and consultant.
Group rosters are exclusive to group availabilities, where multiple appointments need to be viewed or managed at once. This utility offers several unique features compared to the 1-on-1 appointments seen directly on the staff schedule. To open the group roster, you can click on the 0 / 0 icon on the availability block.


- /
- If a group is locked by a staff member, it cannot be found or booked in availability searches. This feature can be used if you want to reserve the remaining slots or to prevent further appointments at this time to provide more attention to a smaller roster. Staff can still book new appointments from the roster view even if it's locked.
- If a group is locked by a staff member, it cannot be found or booked in availability searches. This feature can be used if you want to reserve the remaining slots or to prevent further appointments at this time to provide more attention to a smaller roster. Staff can still book new appointments from the roster view even if it's locked.
- Documents
- If a document is uploaded to the group roster, it will be linked to all appointments at that time. Students will be able to view this document in their appointment record if they have access to the chosen document type.
- If a document is uploaded to the group roster, it will be linked to all appointments at that time. Students will be able to view this document in their appointment record if they have access to the chosen document type.
- Roster List
- In the center of the group roster, you'll see a list of students who have appointments at this time. This includes their name, reason, and subject.
- / / / indicates the status of the appointment, and can be clicked to quickly change the status to a different value.
- Not logged in / Logged in at can be clicked to start or conclude the student's visit, similar to the functionality of the log listing. This feature can be disabled in system preferences (General Appointment Settings) if preferred.
- will open the full appointment record for viewing or editing.
- can be clicked to send a text message to the student if they're opted into SMS alerts. Requires the TextAlerts module.
- / can be clicked to select the appointments. This can be used alongside the "Send Email to" and "Add Notes to" options to only affect the selected records.
- Add to Roster
- Click this button to search for and immediately book an appointment for a student.
- Click this button to search for and immediately book an appointment for a student.
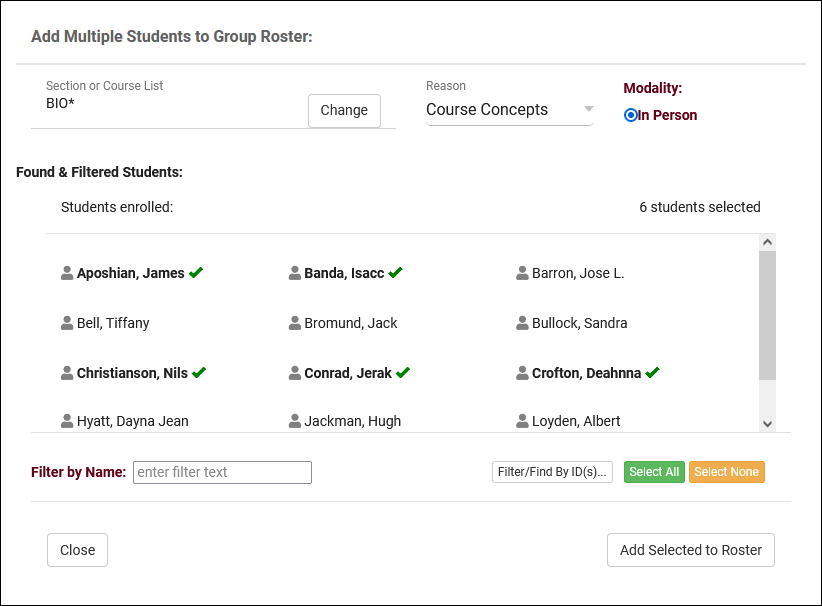
- Add Multiple
- This will open a new window where you can add students as a batch process. Search for and select students based on enrollments, name, or a list of IDs. When searching by enrollments, students will only appear if the consultant is assigned to that course in their course list.

- Mark All as Attended
- This will mark all appointments in the roster that don't already have a status as attended.
- This will mark all appointments in the roster that don't already have a status as attended.
- Send Email to
- Send an email to students in the roster. You can choose to send the email to all students, cancels, misses, attended appointments, or selected appointments.
- Send an email to students in the roster. You can choose to send the email to all students, cancels, misses, attended appointments, or selected appointments.
- Add Notes to
- This option can be used to enter notes in attended visits or appointment custom fields, either based on status or the selected appointments.
- This option can be used to enter notes in attended visits or appointment custom fields, either based on status or the selected appointments.
- Send Notes
- This option may be labelled differently depending on your profile preferences. Click this button to initiate the Send Visits Notes to email for attended appointments.
If an appointments needs to be moved, you can either cancel the appointment and book it at a new time, or you can move the appointment record. There are two ways to accomplish this, both will send a new confirmation email to the student and consultant informing them of this change.
1. Click-and-drag the top-left corner of an appointment to move it to another time slot on the visible schedule. This can be done from an individual staff schedule or from the "all of this center" view. The latter also allows you to move an appointment to another consultant's schedule.

2. The "Move" button within each appointment can be used to initiate an appointment search, just like on the dashboard. Click on the new time slot you want to book and save your changes.


The Availability Listing can be viewed by going to Other ➜ Listings ➜ Availability Blocks. Access to this listing can be provided by adding "Availability Blocks" table access to a permission group under 'Admin / Modules'. This listing contains all availability records that you have permission to view, including the ability to make batch changes or simply search for and few individual records. The icon shows if the availability is a reserve block or not.
Each column of information displayed has a clickable header that will sort the listing accordingly. Clicking once sorts ascending, a second click will sort descending.

Using the Search Bar on this screen, we can easily perform quick searches to find specific availability records. Right clicking in the search bar (shown below) will provide a list of availability fields to search by, click any of these to auto-fill the search bar.

Example Searches:
- Find an availability by a single value, such as the consultant's name.
- Staff.LastFirst="Smith, Dave"
- Staff.LastFirst="Smith, Dave"
- Search multiple fields at once, separate your searches by a space. If a value you're searching for contains a space, make sure to surround the value with quotes like with the consultant's name below.
- Staff.LastFirst="Smith, Dave" AvailBlocks.isOnline=1
- Staff.LastFirst="Smith, Dave" AvailBlocks.isOnline=1
- Date searches such as this are required to be formatted as YYYY-MM-DD.
- #sql:FromDate#=2024-04-16
- #sql:FromDate#=2024-04-16
- You can also search for records where a date is greater than or less than a value like this.
- #sql:FromDate#=<2024-04-16
- #sql:FromDate#=<2024-04-16
- You can also search by a date range with ...
- #sql:FromDate#=2024-04-01...2024-04-30
- #sql:FromDate#=2024-04-01...2024-04-30
- You can search by recurring type like this. Example values would be "Daily", "Optional Daily", "Optional Daily Chosen", "Weekly", etc.
- AvailBlocks.RecurType="Optional Bi-Weekly"
- AvailBlocks.RecurType="Optional Bi-Weekly"
Hamburger Menu
Every listing page in TracCloud features a hamburger menu with utilities to search for or interact with your list of records. Some of these options are specific to to certain listings and record types, others are shared. The following list includes definitions for the hamburger menu options available on this listing and how they can be utilized.

- List All
- This option will show all records on the current listing. Some listings have an additional toggle for only showing active records, such as the student and registration listing, which will override a List All search if checked.
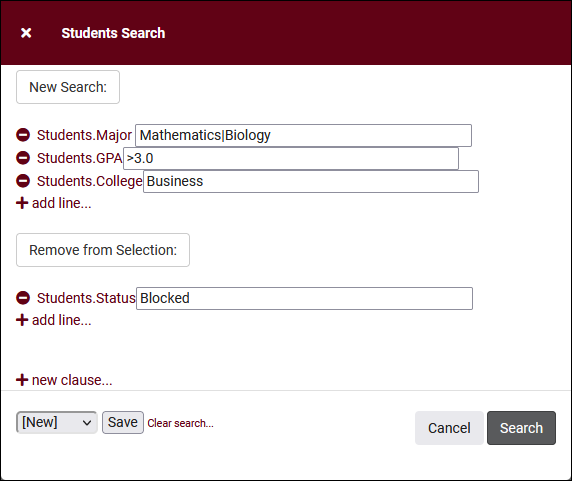
- Power Search
- This option provides a simple but powerful search utility to find the records you need. String together multiple searches, adding or removing results for each. Use Search Symbols to include ranges of data, and Save Searches for later use if needed. The search term 'blankornull' can be used to find all records with a value of nothing ("") or null ().

- Saved Searches
- See Saved Searches for more information.
- Export CSV
- Export current listing contents to a CSV file.
- Show these <records>
- This utility takes your selection of records, finds the related records, and takes you to that listing with the resulting records. For example, on the Registration listing, you can "Show these Students" to display the student records for the registrations that you were viewing.
- Find/Merge Duplicates
- These utilities can be used to cleanup duplicate records in your Trac System. We highly recommend reaching out to Redrock Support directly for assistance in cleaning up this data.
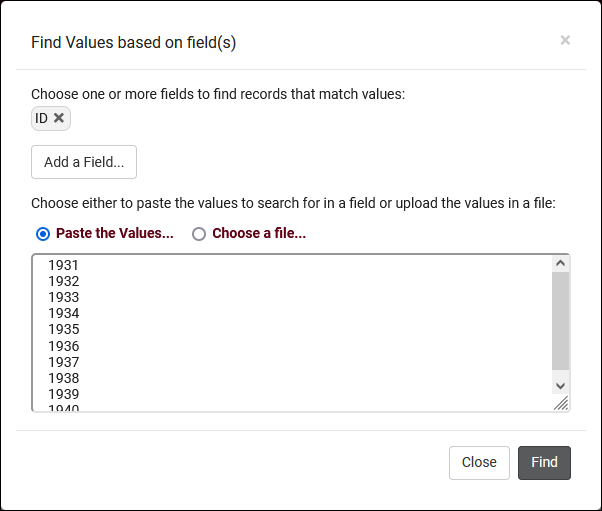
- Find by Values
- This utility can be used to search one field for multiple values. If you have a spreadsheet containing a list of student IDs, this is an easy way to pull up the same list of students in TracCloud by copying the ID column into this search field.

- Change Field Values
- This utility allows you to make modifications in to your records in bulk. Similar to the Merge Duplicates utility, we highly recommend coordinating with Redrock Support directly on this setting.
- Selected...
- The Selection Tool offers several options to filter and manage your records. More information on this feature can be found in its own dedicated article here.
- Allows you to print the contents of the current listing, by extension this also allows you to export the current list as a PDF file.
If you've created a new availability for one of your Consultants and it's not showing up as expected when performing a search for appointment times, there are a few possible causes. This portion of the wiki outlines these possibilities, ordered from most to least likely based on what we at Redrock have experienced working with campuses directly.

1. Center and Consultant Course Lists
The most common cause when an availability isn't appearing in search results is misconfigured Course Lists. Both your Consultant and your Center need to be assigned to the subject you're searching for (unless your Center or Reason is set to ignore Consultant Specialties). Make sure you Process Specialties (Step 2) after applying any changes.
Consultant Course List: Other ➜ Listings ➜ Staff ➜ [Your staff] ➜ Course List of Specialties
Center Course List: Other ➜ Other Options ➜ Profiles ➜ [Your profile] ➜ Centers ➜ Course List for this Center
A complete list of Course Lists can also be found by simply going to: Other ➜ Listings ➜ Course Lists.

2. Process Specialties
This is always recommended after applying changes to Course Lists, but it may also be the case that the specific section you searched for was imported after you created the Course List for your Center/Consultant, and a Course List refresh alone may resolve this issue. We can setup an automated process to Process Specialties daily if this occurs often, reach out to us using the 'Support' tab above for more information.

3. Reason Assignments
Similar to ensuring that your courses are assigned to the correct Consultant and Center, the same applies for Reasons. This step only applies if you're using Reason as a search criteria.
For Consultants, go to Other ➜ Listings ➜ Staff ➜ [Your staff] ➜ Reason Specialties
For Centers, go to Other ➜ Other Options ➜ Profiles ➜ [Your profile] ➜ Centers ➜ [Your center] ➜ Active Reasons

4. Availability Subject/Reason
If your availability is assigned to the wrong subject or reason, this can cause it to be unintentionally filtered out of results. Make sure the value entered here is correct, especially if you're using wildcards. If these are blank (i.e., available for all specialties), you can skip this troubleshooting step.
Schedule ➜ [Consultant] ➜ Availability.

5. Profile Time Restrictions
If your availability is 60 minutes long, but your profile only allows for a maximum of 50-minute appointments, this can unexpectedly filter out availabilities if you haven't updated your profile preferences to match this new limit. The relevant options to check here are Schedule no sooner than and no later than, ensure that you're searching within an allowed range. As well as Minimum and Maximum Appointment Duration, make sure your availability is within the limits defined by your profile.
Other ➜ Other Options ➜ Profiles ➜ [Your profile] ➜ Prefs ➜ Scheduling ➜ Time Restrictions.

More Scheduling Prefs Information
6. Reason/Subject Required for Search
In the event that you aren't searching for both Reason and Subject, and the previous steps haven't resolved your issue, it's worth double-checking to make sure your Profile hasn't been mistakenly set to require a Subject/Reason to show availabilities. Make sure the highlighted settings match the search you're performing on the dashboard.
Other ➜ Other Options ➜ Profiles ➜ [Your profile] ➜ Prefs ➜ Scheduling ➜ Special Fields.

More Scheduling Prefs Information
7. Skills and Accommodations
If your campus utilizes the Skills/Accommodations feature, with 'Excluded when not chosen' enabled, make sure your consultant/availability is assigned to that Skill/Accommodation.
Consultants: Other ➜ Listings ➜ Staff ➜ [Staff account] ➜ Special Needs/Skills/Accommodations
Availabilities: Schedule ➜ [Availability] ➜ Special Needs ➜ Special Needs/Skills/Accommodations

Still having trouble getting the results you expect? Reach out to us using the 'Support' tab at the very top of this page, we'd be happy to help.
Each appointment has a status to show its current state. For example, when a student attends their appointment, it gets marked as "ATTENDED." If they don't attend, it will be marked as missed, etc. Some statuses can be customized in Scheduling preferences, but others are standard in the system. The table below shows what statuses you can expect to see in your data.
| Status | Usage |
|---|---|
| ATTENDED | Used when a student visits for their appointment. This status is automatically applied when the student logs in, joins their online session, or when TracCloud links a visit to their appointment. |
| Blocked | Used when an appointment is created over a reserve block and the status isn't changed by the time the missed appointment process runs. |
| Status for missed | Used when appointments are automatically marked as missed, or when marking an asynchronous appointment as missed. Typically "Missed" or "No Show," but possible to change in scheduling preferences. |
| CANCELED | Used when a reserve block is placed over an appointment, or when canceling appointments from the group roster. |
| "CANCEL - " + Status for missed | Used when a student cancels an appointment late. Can be overridden in Advanced Prefs. |
| AUTO CANCELED - DELETED | Used when a recurring appointment is automatically canceled due to consecutive misses/cancellations. |
| CANCELED - DELETED | Used when a staff member deletes an appointment from the staff schedule, or when a student cancels shortly after booking (if configured in Advanced Prefs). |
| STUDENT CANCELED | Used when a student cancels their own appointment. |
| In Progress | Default status for on-going asynchronous appointments. |
| Concluded | Status for concluded/archived asynchronous appointments. |
See Also
- Emails - Appointment confirmations, reminders, etc.