TracCloud: Scheduling Preferences
From Redrock Wiki
(Redirected from TracCloud: Scheduling Preferences)
Your scheduling preferences allow you to modify appointment booking rules, controlling exactly when a student can book appointments, how many appointments they can book, and much more. These preferences will apply to all centers within the profile. Your schedule preferences can be found in Other ➜ Other Options ➜ Profiles ➜ [Your Profile] ➜ Prefs ➜ Scheduling.

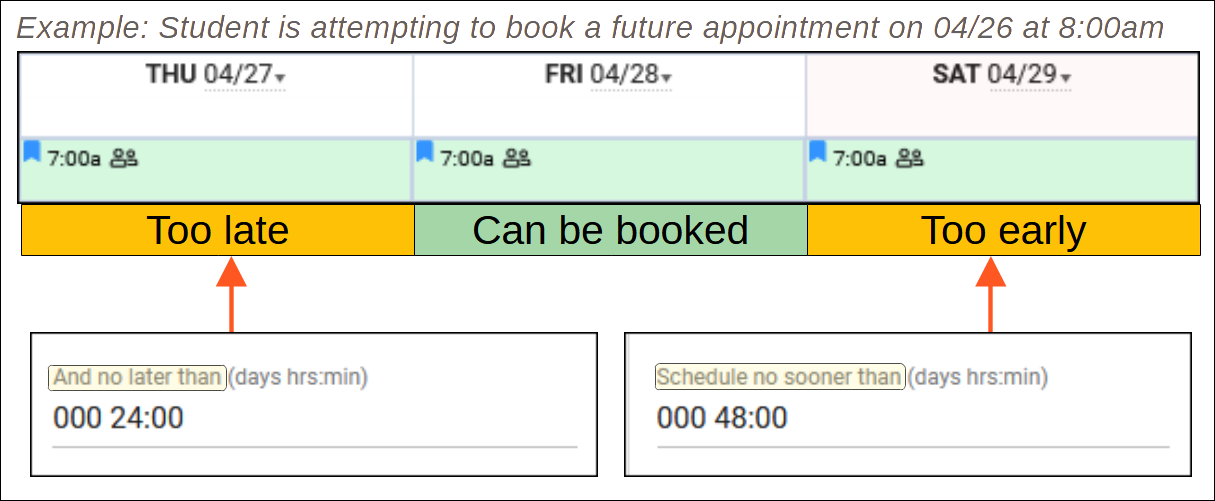
- Schedule no sooner than...And no later than
- This preference controls how early or late a student can book an appointment. The example below visualizes how this preference works, but the time range would typically be larger for a production system (e.g., no later than 12 hours, no sooner than 14 days).

- No Cancellation within
- Determines how late the student can cancel an appointment. If a student attempts to cancel within this time limit, they will be informed that the appointment will be counted as a missed appointment instead. Internally, the status will be recorded as "Cancel - Missed" (by default).
- Determines how late the student can cancel an appointment. If a student attempts to cancel within this time limit, they will be informed that the appointment will be counted as a missed appointment instead. Internally, the status will be recorded as "Cancel - Missed" (by default).
- Minimum and Maximum Appointment Duration
- This preference controls the minimum/maximum possible appointment time. If you exclusively offer 30 or 60 minute availabilities, this should be set to match. If an availability is created with time slots outside of the limit specified here, it will not appear in search results to students.
- This preference controls the minimum/maximum possible appointment time. If you exclusively offer 30 or 60 minute availabilities, this should be set to match. If an availability is created with time slots outside of the limit specified here, it will not appear in search results to students.
- Default appointment duration
- The default duration of an appointment. Typically used in an open-schedule environment, where consultants are available for many hours at a time, this will be the default duration when a student goes to book an appointment.
- The default duration of an appointment. Typically used in an open-schedule environment, where consultants are available for many hours at a time, this will be the default duration when a student goes to book an appointment.
- Appointment start in increments of
- Increments of time that booked appointments can start at. For example, if this preference is set to 15 minutes, appointments could be booked at 9:15, 9:30, 9:45, and so on. This is not commonly used outside of open-schedule environments.
- Increments of time that booked appointments can start at. For example, if this preference is set to 15 minutes, appointments could be booked at 9:15, 9:30, 9:45, and so on. This is not commonly used outside of open-schedule environments.
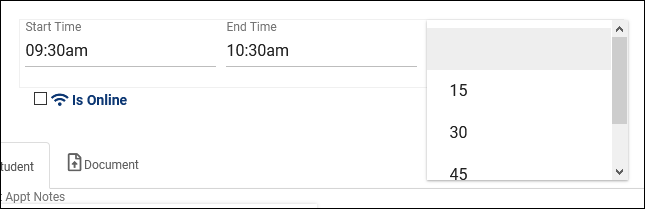
- Appointment duration in increments of
- Increments of time that an appointment can be booked for. For example, if this is set to 10 minutes, appointments can be booked for 20 minutes, 30 minutes, 40, and so on. This is not commonly used outside of open-schedule environments.
- Increments of time that an appointment can be booked for. For example, if this is set to 10 minutes, appointments can be booked for 20 minutes, 30 minutes, 40, and so on. This is not commonly used outside of open-schedule environments.
- Restrict duration to intervals
- The durations specified here will be used by default in your availabilities. Availabilities can be created with custom multi-slot times which can override this preference.


- Prevent students from booking consecutive appointments same student (any consultant)
- This prevents students from booking consecutive appointments in TracCloud. For example, a student could book a 10am to 11am appointment, but couldn't book an 11am to 12pm. An appointment counts as consecutive if the start time is within 61 minutes of the end time of the prior appointment. Consecutive also means with same consultant can be used to block consecutive bookings with the same consultant specifically, which would allow a student to book a 10am to 11am with Dave and an 11am to 12pm with Jane. The default consecutive limit is 2 (no back-to-back appointments), but this can be modified if needed. For example, a limit of "3" would allow a student to book a 1pm to 2pm, and 2pm to 3pm, but not a 3pm to 4pm. Warn staff when they attempt to book consecutive appointments can also be enabled so that staff members are shown a warning when booking consecutive appointments on behalf of students.
- This prevents students from booking consecutive appointments in TracCloud. For example, a student could book a 10am to 11am appointment, but couldn't book an 11am to 12pm. An appointment counts as consecutive if the start time is within 61 minutes of the end time of the prior appointment. Consecutive also means with same consultant can be used to block consecutive bookings with the same consultant specifically, which would allow a student to book a 10am to 11am with Dave and an 11am to 12pm with Jane. The default consecutive limit is 2 (no back-to-back appointments), but this can be modified if needed. For example, a limit of "3" would allow a student to book a 1pm to 2pm, and 2pm to 3pm, but not a 3pm to 4pm. Warn staff when they attempt to book consecutive appointments can also be enabled so that staff members are shown a warning when booking consecutive appointments on behalf of students.
- Allow entry into online appointment session
- These preferences control how soon/late a student can join a remote tutoring session by restricting when the Join button is available. If you’d like the student to be able to join 5 minutes prior to the start time through to the end, you would need to set “No sooner than” to 00:05 and set “No later than” to a value such as “1:00” (assuming you’re holding 1-hour appointments). No later than before end of appt counts back from the end time of the appointment rather than the start, and is an alternate option to No later than after start of appt.
- These preferences control how soon/late a student can join a remote tutoring session by restricting when the Join button is available. If you’d like the student to be able to join 5 minutes prior to the start time through to the end, you would need to set “No sooner than” to 00:05 and set “No later than” to a value such as “1:00” (assuming you’re holding 1-hour appointments). No later than before end of appt counts back from the end time of the appointment rather than the start, and is an alternate option to No later than after start of appt.
- QR Codes expire after
- This applies to Batch Visit QR Codes and Ad-hoc Drop-in QR codes. If this is left blank, these codes can be used up to the end time of the visit. By setting this to a higher value, you can allow students to retroactively create visits for themselves after the visit has already taken place (e.g., in a recording). This preference counts from the start time of the session.
- This applies to Batch Visit QR Codes and Ad-hoc Drop-in QR codes. If this is left blank, these codes can be used up to the end time of the visit. By setting this to a higher value, you can allow students to retroactively create visits for themselves after the visit has already taken place (e.g., in a recording). This preference counts from the start time of the session.
- QR Codes active no sooner than
- Similar to above, but in regards to how early a QR code can be used instead. By default (blank), QR codes can be used once they're created even if that visit would be days in the future.
- Similar to above, but in regards to how early a QR code can be used instead. By default (blank), QR codes can be used once they're created even if that visit would be days in the future.
- Block student from booking appointments between # and #
- This preference allows you to prevent students from booking appointments during a specific time of day. This is more commonly used if Schedule no later than is set to a low value, such as a few hours, allowing students to book close to the start time of the appointment. For example, if you want to prevent a student from booking a morning appointment in the middle of the night so that your tutors have more notice for their upcoming schedule, this is the preference you'll want to change. Default is blank, which does not apply any restrictions based on time of day.

Each group of settings—Reasons, Locations, Sections, Fund—can be precisely adjusted to control where they show up and whether or not they’re required.
Enter in avail determines whether or not the field shows up within the availability entry window.
Enter in appointment determines whether or not the field shows up within the appointment entry window.
Required for Search means that in order for appointments in this profile to appear in search results, this field must not be empty.
Required for Save marks the field as required, so it must be filled out prior to booking the appointment. This applies more-so to Staff, as the above option already requires a student to have this field selected before they have the chance to book.
- Appointment Fund Choices
- Allows you to customize the funds available to choose from on Availability and Appointment entry. More information on funds and payroll tracking in general can be found here.

- Allow students to cancel appointments
- Provides students the option to cancel appointments (as long as they’re outside the time range specified in the first menu.)
- Provides students the option to cancel appointments (as long as they’re outside the time range specified in the first menu.)
- Display consultant alias on availability search
- This will display the consultant’s alias (specified in their staff profile) rather than their full name when students are searching for availabilities. An alias can also be automatically generated based on your System Preferences if preferred (e.g., First Name Last Initial).
- This will display the consultant’s alias (specified in their staff profile) rather than their full name when students are searching for availabilities. An alias can also be automatically generated based on your System Preferences if preferred (e.g., First Name Last Initial).
- Display consultant email/phone on appointment entry
- Displays the specified consultant fields within appointment display, the following twig tags will or won't contain data based on these preferences.
{{Consultant.PhoneToStudent}}
{{Consultant.EmailToStudent}}
- Allow group availability meeting type to be determined by first scheduled appointment
- If this is enabled, the first student booking an optional online/in-person multi-person availability decides if the session will be online or in-person for other students going forward. If this is disabled, each student booking the same time slot can choose online/in-person independently of each other.
- If this is enabled, the first student booking an optional online/in-person multi-person availability decides if the session will be online or in-person for other students going forward. If this is disabled, each student booking the same time slot can choose online/in-person independently of each other.
- Allow group availability to use special skill locking
- If enabled, staff will be able to define skills/accommodations in group availabilities that when booked, will lock the availability to the first chosen skill. The typical use case for this is for languages. For example, if you offered the skills "English," "Spanish," "French," and "Extra Time" and the first student books with the "Spanish" skill, you may want to limit all subsequent appointments to Spanish while allowing students to freely choose (or not choose) "Extra Time." To do this, you would simply list out the language skills in the "Group Slot Skill Locks" field in your availability.

- With the above in place, Student A may schedule for Spanish (which locks the group to Spanish since they were first), Student B may schedule for Spanish and Extra Time, but Student C will not see this availability in search results if they search for English.
- With the above in place, Student A may schedule for Spanish (which locks the group to Spanish since they were first), Student B may schedule for Spanish and Extra Time, but Student C will not see this availability in search results if they search for English.
- Allow student to upload documents to the appointment
- Controls whether or not students can upload documents to the appointment record.
- Controls whether or not students can upload documents to the appointment record.
- Allow staff to upload documents to the appointment
- Controls whether or not staff can upload documents to the appointment record.
- Controls whether or not staff can upload documents to the appointment record.

- Block students from booking recurring appointments
- Prevents students from booking recurring appointments for themselves. Staff can still book recurring availabilities on behalf of students if needed.
- Prevents students from booking recurring appointments for themselves. Staff can still book recurring availabilities on behalf of students if needed.
- Prevent Staff from Overriding and allowing students to book recurring
- Even if the above option is set to 'Yes,' staff can manually allow students to book recurring on a per availability basis. Setting this option to yes will block this as well.
- Even if the above option is set to 'Yes,' staff can manually allow students to book recurring on a per availability basis. Setting this option to yes will block this as well.
- Default value for availability max students
- Determines the default "Max Students" value when creating availabilities. This value can still be overridden when managing your schedule. 0 = drop-in, 1 = one-on-one, 2+ = group.
- Determines the default "Max Students" value when creating availabilities. This value can still be overridden when managing your schedule. 0 = drop-in, 1 = one-on-one, 2+ = group.
- Warning message to display when appointment modality is changed
- When a staff member changes the modality (in-person/online/asynchronous) of an existing appointment, a warning message will appear to confirm that they want to make that change. This text field allows you to add an additional custom message to that warning.
- When a staff member changes the modality (in-person/online/asynchronous) of an existing appointment, a warning message will appear to confirm that they want to make that change. This text field allows you to add an additional custom message to that warning.
- Allow availabilities to be asynchronous
- Enables asynchronous availability/appointment functionality. More information.
- Enables asynchronous availability/appointment functionality. More information.
- Allow message to be composed after conclusion
- This determines whether or not students are allowed to re-open concluded asynchronous appointments to continue sending messages.
- This determines whether or not students are allowed to re-open concluded asynchronous appointments to continue sending messages.
- Asynchronous appointment automatic message
- The text entered here will be automatically sent as a message at the start time of the asynchronous appointment.
- The text entered here will be automatically sent as a message at the start time of the asynchronous appointment.
- Create a visit when an asynchronous appointment is marked as concluded
- If checked, a visit will automatically be created for the student when the asynchronous appointment is marked as 'Concluded.'
- If checked, a visit will automatically be created for the student when the asynchronous appointment is marked as 'Concluded.'
- Also send message to recipient as SMS
- Optionally notify the asynchronous participants of new messages over SMS text. Requires TextAlerts. Enabling this option can result in a significant increase in emails sent from TracCloud, you may need to review your hourly/daily mail server send limit with your IT to ensure this will not be an issue.
- Optionally notify the asynchronous participants of new messages over SMS text. Requires TextAlerts. Enabling this option can result in a significant increase in emails sent from TracCloud, you may need to review your hourly/daily mail server send limit with your IT to ensure this will not be an issue.
- Also send message to recipient as email
- Optionally notify the asynchronous participants of new messages over email. Enabling this option can result in a significant increase in emails sent from TracCloud, you may need to review your hourly/daily mail server send limit with your IT to ensure this will not be an issue.
- If you additionally or alternatively wish to notify the participants of new document uploads, document upload notifications can be managed separately in system preferences.
- If you additionally or alternatively wish to notify the participants of new document uploads, document upload notifications can be managed separately in system preferences.
- When a mentorship communication is sent: Also send message to recipient as SMS/Email
- Functionally similar to the above options, but for peer mentorship communications instead.

- Appointment Status Choices
- These are the statuses that appointments can be set to. Typically, this would be set to something similar to the above example, with an Attended, Missed, and Canceled status, however, you can modify the choices if needed. Statuses containing the phrase “Cancel” will always cancel the appointment, making it available for other users to book (provided they’re still within the “schedule no later than” time limit.)
- These are the statuses that appointments can be set to. Typically, this would be set to something similar to the above example, with an Attended, Missed, and Canceled status, however, you can modify the choices if needed. Statuses containing the phrase “Cancel” will always cancel the appointment, making it available for other users to book (provided they’re still within the “schedule no later than” time limit.)
- Status for missed
- This is the status that TracCloud views as “Missed.” This should typically match the status set in your Missed Appointment Emails "Change missed appointment to Status:" preference.
- This is the status that TracCloud views as “Missed.” This should typically match the status set in your Missed Appointment Emails "Change missed appointment to Status:" preference.
- Calc Missed Appointments Since
- A student’s total number of missed appointments can be utilized in emails via the Twig tag below. This date determines how far back TracCloud searches for missed appointments. If this preference is blank, the global System Preferences date is used instead. Automatically Use Term Start can be used if you'd like to use the start date of your semester instead.
{{CalcMissedAppointments(Student.Sequence, Center.ProfileID)}}
- Additional text message for late cancellation prompt / warning
- This is an optional additional message that displays to students when they are cancelling an appointment outside of your time restriction. This appears in addition to the standard "This will be marked as missed" notice.

These preferences allow you to restrict students from booking excessive appointments, or prevent booking/logins altogether. “Max Appointment Rules” allow you to create restrictions that will dynamically block students from booking appointments if their appointment threshold his met, while “Block Students to this Profile” allows you to block access to logging in for visits or booking appointments based whether or not the student is on a specific list.
Max Appointment Rules

- Allow a maximum of X [hours/appointments] with:
- Choose how many appointments/total hours a student can book within the restrictions assigned below.
- Choose how many appointments/total hours a student can book within the restrictions assigned below.
- ID Number (#1234ABCD)
- Unique identifier for this rule, used for twig logic in failure message.
- Unique identifier for this rule, used for twig logic in failure message.
- Same: [Consultant / Reason / Center / Profile / Subject / Section / Location]
- This allows you to narrow down the restriction to specific fields. Maybe you don’t want a student booking excessively with a specific consultant, or booking too many appointments for a specific reason, this is where you would apply these rules.
- This allows you to narrow down the restriction to specific fields. Maybe you don’t want a student booking excessively with a specific consultant, or booking too many appointments for a specific reason, this is where you would apply these rules.
- add a search clause…
- These clauses allow you to be more specific in where this rule applies. For example, you could add a search clause for Appointment Status and set it to "*Missed*" to apply max appointment rules to missed appointments, where a student wouldn't be able to book additional appointments once the limit is reached. You can also select specific Reasons, Centers, Subjects, or Statuses where the rule should apply, to not affect unrelated appointments. The | symbol can be used for "or" and # can be used for "not" in these search clauses.
- These clauses allow you to be more specific in where this rule applies. For example, you could add a search clause for Appointment Status and set it to "*Missed*" to apply max appointment rules to missed appointments, where a student wouldn't be able to book additional appointments once the limit is reached. You can also select specific Reasons, Centers, Subjects, or Statuses where the rule should apply, to not affect unrelated appointments. The | symbol can be used for "or" and # can be used for "not" in these search clauses.
- in X [Minutes / Hours / Days / Weeks / Months / Terms / Years]
- The time period for this rule. For example, you may want to restrict students from booking more than 3 appointments per week, or 10 appointments per month. This preference is where you’ll make that decision.
- If “X week” is used, you can choose the start day of the week to count from. If “X month” is used, this will be the first to last day of the month. If you would prefer any 7 or 30-day window, you will need to use something like “7 Days” rather than “1 Week”. The maximum value for "Minutes" is 180. If a longer range is desired, hours or days should be used instead.
- This rule is active for appointment dates in the time period
- The date range that this rule is effective for. Maybe your current semester, or a monthly period.
- The date range that this rule is effective for. Maybe your current semester, or a monthly period.
- This rule applies to
- All students individually applies to only the student booking the appointment. John Doe (a student) can’t book more than 3 appointments with the same consultant per week.
- Students as a collective applies to every student. Jane Smith (a tutor) can’t be booked more than 3 appointments per day (by students).
- For student
- Allows you to only apply this rule to a certain |list of students (or students not on a specific list).
- Allows you to only apply this rule to a certain |list of students (or students not on a specific list).
- And also applies to
- Which appointment types should this apply do? E.g., only in-person 1-on-1 appointments. If left blank, this rule is applied to all appointment types.
- Which appointment types should this apply do? E.g., only in-person 1-on-1 appointments. If left blank, this rule is applied to all appointment types.
- Students that fail this rule may be optionally added to a list
- This option requires that Same: and In X time period are both disabled. When the student attempts to book an appointment and is blocked by this rule, they will be added to the student list that you select.
- This option requires that Same: and In X time period are both disabled. When the student attempts to book an appointment and is blocked by this rule, they will be added to the student list that you select.
- Use Seats (all avails for all consultants)
- This option can be used in combination with "Students as a collective" for tracking "seats" rather than "appointments."
- For example, if you created a rule such as "Maximum of 2 appointments in 1 hour for students as a collective," that means in the schedule below, appointments can continue to be booked with Dave Smith or Jane Doe, but an appointment cannot be booked with John Smith. I.e., an appointment is a time with a consultant, regardless of how many students are meeting with that consultant at that time.
- Alternatively, if you created the rule "Maximum of 10 appointments in 1 hour for students as a collective + use seats," then no further appointments can be booked. 10 total seats have been taken, across all of the available slots.
Consultant Time Slots Booked Dave Smith 1:00pm 5/10 Jane Doe 1:00pm 5/10 John Smith 1:00pm 0/10
- Fail Message to Student
- This text field can be used to override the automatically generated description that would otherwise be shown to students. If you want to hide the text of the rule that students are limited by, enter your custom description here.
- This text field can be used to override the automatically generated description that would otherwise be shown to students. If you want to hide the text of the rule that students are limited by, enter your custom description here.
- Rule Failure Message
- This is an optional custom message that can appear to students if they reach the limit of this rule.


- Twig can also be used in this field to display student or consultant information. You can also modify the contents of the message based on which rule was broken. For example:
{% for failRule in failRules %}
{% if failRule.id == "1Y0GYPWS" %}
Sorry, you can only have one upcoming appointment at a time. Please try again later.
{% elseif failRule.id == "HKIEAATS" %}
You can only book 4 appointments per week.
If you think an exception needs to be made, reach out to us at [email protected].
{% endif %}
{% endfor %}
- Twig can also be used in this field to display student or consultant information. You can also modify the contents of the message based on which rule was broken. For example:
In addition to standard maximum appointment rules, you can also utilize these rules to set maximum tutoring/advising hours for your consultants.
In the consultant profile, set 'Max Hours' to your desired limit, e.g., "10".

In your Maximum Appointment Rules, use the phrase "MaxHours" in the "Allow a maximum of [____]" field. When an appointment is booked, TracCloud will check the relevant consultant's maximum hours for use with this rule. If the newly scheduled appointment would be over the maximum number of hours set, it will be blocked.

Block Students to this Profile
- Prevent Scheduling is where you will select a list of students that you want to prevent from booking appointments.
- Message to Display to a Blocked Student is the message displayed when a student on that list tries to book an appointment.

- Prevent Login prevents the student from being logged in on the Log Listing or a Kiosk.
- Message to Display to a Blocked Student is the message displayed when the student tries to login on a Kiosk or a staff member tries to log them in on the Log Listing.

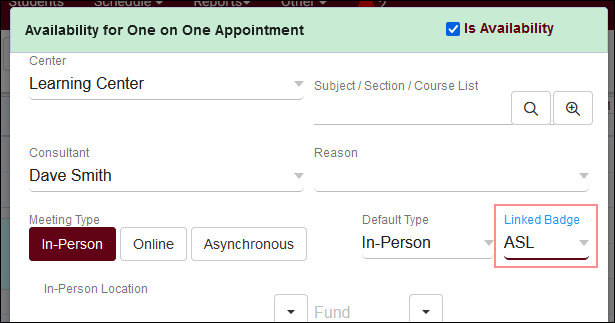
Search Availability badges can be used to add information and indicators to availability slots. Each badge can appear for certain conditions, based on center, availability section/reason, location, skills/accommodations, etc.

Click "New Availability Badge" to begin. This will open a form where you can enter the details for your badge.

Manually Linked
- Rather than the badge automatically appearing based on certain conditions, these badges appear in a menu to be manually selected on the availability itself.

Name
- Name of the Badge. This will not be displayed for students
- Name of the Badge. This will not be displayed for students
Availability Type
- Drop In, 1-on-1, or Group availability
- Drop In, 1-on-1, or Group availability
Consultant
- Assign a specific Staff
- Assign a specific Staff
Reason
- Assign a specific Reason
- Assign a specific Reason
Center
- Assign a specific Center
- Assign a specific Center
Section
- Assign a specific Subject
- Assign a specific Subject
Special Needs
- Select if applicable (more information)
- Select if applicable (more information)
Online
- Availability Type; In Person, Online, Online Optional, or Phone
- Availability Type; In Person, Online, Online Optional, or Phone
Location
- Location of the availability
- Location of the availability
Once you've decided where the badge is needed and have made your selections from the options above, you can now determine which icon, colors, and info work best for the badge created.
Color:
- Choose your preferred color for the badge. Consider contrast when setting this color, availability backgrounds are as follows.
- 1-on-1: #d3f8deGroup: #F5F5B4Drop-in: #d0ffffAsync: #d8c7ff
Icon:
- Choose from the list of available icons or alternatively click the button to use a custom icon from Font Awesome. In that case, you would copy the class values from the icon you want to use.
- Paste them into TracCloud.
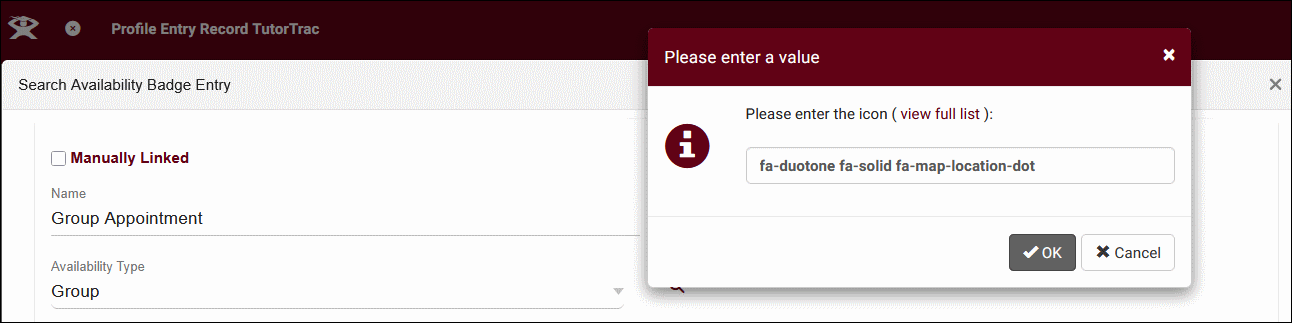
- Then click 'OK.'


Info Text:
- Enter text that will display when students & staff hover over the icon
- Enter text that will display when students & staff hover over the icon
In the example screenshot above, this badge will only appear on availabilities of staff who have been assigned the “ASL” accommodation and are available in the Learning Center. Once saved, your badge will appear in the profile preferences if you need to edit/delete it later.

Any fields left blank will not be considered for where this badge appears, you can be as specific or non-specific as needed. You can also create as many badges as you'd like, more than 1 tag can appear for the same availability. When students search for an availability, the badges will display to the right of the screen as shown below.

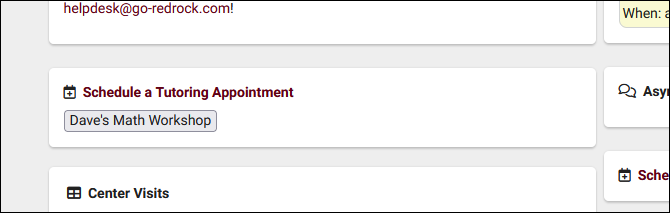
Appointment links allow you to create preset search availability widgets that can be easily shared to students with a QR code or a link from the dashboard. These links are assigned to an existing search availability widget, and you can add additional filters such as what subjects or reasons can be selected, which center or consultant will appear in the results, as well as the meeting modality and type.

Click New Search Appointment Link to begin.

- Inactive
- If checked, this link will not be accessible to those who scan the QR code.
- If checked, this link will not be accessible to those who scan the QR code.
- Show on Student Dashboard
- Enabling this will add a button to the linked search availability widget to access this appointment link. This is only visible to students, the name of the button will be the Link Name unless overridden.

- Show on Student Mentor Widget
- If enabled, a button will be added to the student mentorship widget to open this search appointment link. The search results will only include the mentor that the mentee is assigned to. If multiple search appointment links have this option enabled, only the first will be used.
- If enabled, a button will be added to the student mentorship widget to open this search appointment link. The search results will only include the mentor that the mentee is assigned to. If multiple search appointment links have this option enabled, only the first will be used.
- Allow Dynamic Center/Consultant Codes
- If a specific center and/or consultant are not selected, you will be able to make those fields dynamic. If checked, a new option called "Show Dynamic Codes" will appear. When clicked, you will be able to select a center/consultant and generate a unique QR code link with those records chosen rather than needing to create a completely new appointment link record.
- If a specific center and/or consultant are not selected, you will be able to make those fields dynamic. If checked, a new option called "Show Dynamic Codes" will appear. When clicked, you will be able to select a center/consultant and generate a unique QR code link with those records chosen rather than needing to create a completely new appointment link record.
- QR Code
- This QR code will direct users to this search availability link. Hover your mouse over it to enlarge the code, click on it to visit the appointment link.
- This QR code will direct users to this search availability link. Hover your mouse over it to enlarge the code, click on it to visit the appointment link.
- Link Name
- The name of this link. This will appear to students if Show on Student Dashboard is enabled. HTML is supported if you want to change the color of the button text or add icons. For example,
<i class="fa-solid fa-user-group"></i> <span style="color:green; font-weight:bold">Math Workshop</span>would result inMath Workshop. An icon list can be found at fontawesome.com.
- The name of this link. This will appear to students if Show on Student Dashboard is enabled. HTML is supported if you want to change the color of the button text or add icons. For example,
- Override Name with optional Twig (optional)
- Choose custom text for the search availability link button, including Twig support.
- Choose custom text for the search availability link button, including Twig support.
- Subtitle Additions (optional twig)
- Add a custom description to the search availability link widget to provide additional instructions to students. Twig (center and consultant tags) and HTML are supported.
- Add a custom description to the search availability link widget to provide additional instructions to students. Twig (center and consultant tags) and HTML are supported.
- Created
- Used to keep track of different appointment links. Doesn't affect link functionality.
- Used to keep track of different appointment links. Doesn't affect link functionality.
- Expires
- The expiration date of the link (optional).
- The expiration date of the link (optional).
- Section Link
- Which subject/section must be selected when searching availabilities using this link. "Subject" allows for wildcard entries, such as "MAT*" for all math courses. "Section" can be used to make a specific selection with a search box. "Course List" can be used to include a variety of different sections based on your existing course lists.
- Which subject/section must be selected when searching availabilities using this link. "Subject" allows for wildcard entries, such as "MAT*" for all math courses. "Section" can be used to make a specific selection with a search box. "Course List" can be used to include a variety of different sections based on your existing course lists.
- Reason Link
- Similar to the above option, but for reason choices instead. "Reason Name" allows for wildcard and "or" entries, while "Reason" allows you to select a specific reason with a search box.
- Similar to the above option, but for reason choices instead. "Reason Name" allows for wildcard and "or" entries, while "Reason" allows you to select a specific reason with a search box.
- Specific Center
- Used to filter search results to only a specific center.
- Used to filter search results to only a specific center.
- Specific Consultant
- Used to filter search results to only a specific consultant.
- Used to filter search results to only a specific consultant.
- Modalities to Include
- The modalities and meeting types that can be shown in search results. All are selected by default.
- The modalities and meeting types that can be shown in search results. All are selected by default.
Availability Dynamic QR Codes
Another component of appointment links is the ability to create dynamic links directly from availabilities. These links will be automatically assigned to the center and consultant of the availability they were created from. To give staff the ability to generate these appointment links, go to Other ➜ Other Options ➜ Groups ➜ [The group you want to update] ➜ Scheduling, then check Allow user to generate a dynamic search appointment QR Code based on an existing search appointment link. Additionally, you can check Only allow links for self to prevent consultants in this group from creating availability links for other consultant's schedules.

Once this access is provided, this will appear in a new tab in availabilities named "Dynamic QR Code." Choose the link to utilize for this search, and save or click on the QR code to access the search availability menu. Keep in mind that the consultant's section and reason specialties still apply when using these QR codes, so you'll want to ensure that the link used has those sections/reasons available so that this availability can be found in search results.
