TracCloud: Payroll
From Redrock Wiki
(Redirected from TracCloud: Payroll)
Global Preferences
TracCloud provides the ability to track hours and pay rates of your consultants based on different work types and pay bases. You can then base other system functionality on whether or not a consultant is logged in for work, and report on this payroll data after the fact. Funds can also be used to define pay rates and to group data in reports.
Before implementing payroll and work time tracking in TracCloud, it's important to understand exactly how the different pieces of this system fit together and affect your data. The three most important elements of payroll tracking are Pay Codes, Pay Basis, and Work Types.
Pay Codes
The only purpose of pay codes is to assign pay rates via work types. Each of your consultants can be assigned one pay code, and each pay code can be assigned a different pay rate depending on the work type. The names are arbitrary, we're using "Tier 1," Tier 2," etc in our examples.

Pay Basis
The purpose of pay basis is to determine how TracCloud counts work hours depending on how you pay your staff. If you pay staff based on their availabilities/booked appointments, you would want to use the Schedule pay basis. If it's based on their time spent with students, you can use the Visits pay basis. If consultants are tracking their own hours (i.e., logging in and out for work visits), you would use Consultant Work Time as your pay basis. It all depends on which metric you want to use to calculate work hours.

Work Types
Work types are the most flexible part of payroll tracking in TracCloud. This is how TracCloud will assign a pay rate to your consultant's pay code based on their current visit/availability/appointment criteria. Work types are simply the condition for setting a pay rate, and for that reason you'll want to ensure you don't have any overlapping work types in your system for reporting consistency (i.e., where work time could meet the criteria of more than one work type).

If pay rates are the same regardless of center, reason, fund, etc, you may only need a single work type that applies to everything. The opposite is also true, if a pay rate could change based on many different combinations of center, reason, fund, etc, you can create as many work types as you need. Both of the screenshots below are valid configurations.


The first step towards utilizing TracCloud's payroll features is setting up Pay Codes. Each consultant can be assigned to one pay code, you will then be utilizing these pay code values to determine pay rates in work types.
Other ➜ Other Options ➜ Preferences ➜ Pay Codes.

After your pay codes have been created, they will become available to select in consultant profiles. The is as simple as going to their profile and choosing the correct pay code from the drop-down menu. Save after making changes.
Other ➜ Listings ➜ Staff ➜ [Your consultant] ➜ Pay Code.

The purpose of the Pay Basis option is to choose what data source you're using to calculate consultant hours. A consultant's linked visit time may differ from their total appointment time, etc. This option (found immediately beneath your pay codes in system preferences) determines how we're tracking work hours. Each profile can be set to use a different pay basis.
Schedule will calculate work hours based on the consultant's scheduled availabilities and/or appointments.
Consultant Work Time will calculate work hours based on the actual time the consultant logs in and out for work visits.
Visits will calculate work hours based on the actual time the consultant is meeting with any logged-in student.
Other ➜ Other Options ➜ Preferences ➜ Payroll ➜ Pay Basis for [Profile].

From Definitions:
Next up is Work Types, you can think of these as pay rate conditions. How many you'll need is entirely dependent on how your pay rates change based on center, reason, and fund. You may end up creating only one generic work type, or multiple to cover each possible condition where a unique pay rate needs to be defined.
Other ➜ Listings ➜ Work Types.

To create new Work Type, click the Hamburger icon and select New Work Type. This will bring you to the following screen.

- Active From & Active To
- This work type applies within this date range.
- This work type applies within this date range.
- Pay Basis
- This determines which pay basis this work type applies to. This should always match your profile's pay basis as configured in the previous step.
- This determines which pay basis this work type applies to. This should always match your profile's pay basis as configured in the previous step.
- Disposition
- This allows you to differentiate pay rates based on how many students the consultant is meeting with.
No Students - This work type is used when the consultant is logged in/has available hours but is not currently meeting with a student. If this is the only work type available, the "Consultant Work Time" pay basis will still use this work type regardless of whether or not the consultant was meeting with students.
1-on-1 - This work type applies to consultants who are meeting with a single student.
Group - This applies if the consultant is meeting with 2 or more students at once.
- This allows you to differentiate pay rates based on how many students the consultant is meeting with.
- Fund
- This lets you assign this work type to a particular fund. In order for fund data to appear in payroll reports, a fund must be specified in your work type(s).
- This lets you assign this work type to a particular fund. In order for fund data to appear in payroll reports, a fund must be specified in your work type(s).
- Center
- This lets you assign this work type to a particular center, so that only visits/appointments/availabilities assigned to that center will apply to this work type.
- This lets you assign this work type to a particular center, so that only visits/appointments/availabilities assigned to that center will apply to this work type.
- Work Reason
- This lets you assign this work type to a particular work reason, so that only visits/appointments/availabilities assigned to that reason will apply to this work type.
- This lets you assign this work type to a particular work reason, so that only visits/appointments/availabilities assigned to that reason will apply to this work type.
- Consultant Pay Code Rates
- These are the pay rates for each of your pay codes, used if the conditions of this work type are met.
- These are the pay rates for each of your pay codes, used if the conditions of this work type are met.
To provide a permission group the ability to view/modify work types, it can be added to the relevant group's table access settings.
Other ➜ Other Options ➜ Groups ➜ [The group you want to modify] ➜ Admin / Modules ➜ Table Access.

If consultants are logging in for work hours (kiosk or dashboard), work reasons can be created to better categorize their hours for reports and/or to add more information for work type filtering. Simply create a reason as you normally would (including linking the reasons to your centers), and make sure to check the Work Reason checkbox.
Other ➜ Other Options ➜ Profiles ➜ [Your profile] ➜ Reasons ➜ New Reason.

The next time a consultant logs into a center, they will see the available work reasons to select.

There are three ways a consultant can record work visits in TracCloud, depending on which option best fits your workflow. Consultants must be assigned to a center (via Linked Centers in their profile) in order to start a work visit in that center.
1. From a Kiosk or Log Listing
- Consultants can login for work from a kiosk or on the log listing by clicking the icon, which will prompt them to choose a center and reason for their visit. Clicking the icon again will allow them to conclude their visit. The icon opens a window that displays currently logged in consultants.
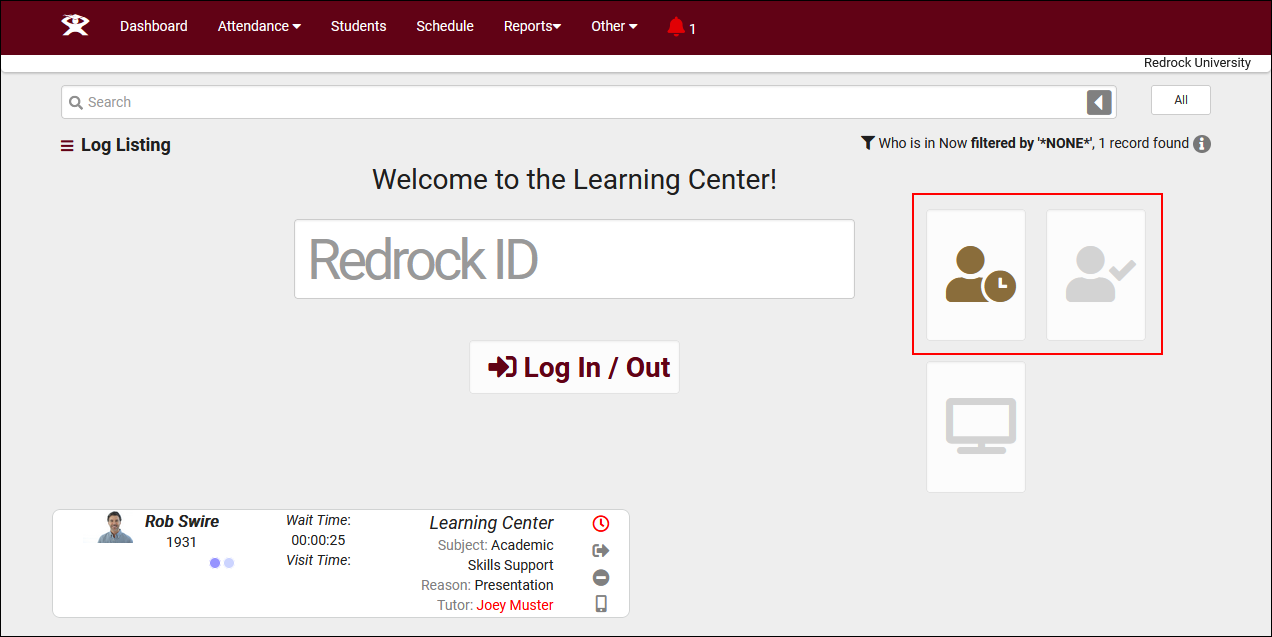

- From the work visit login prompt, the button can be used to fullscreen that work visit prompt. That will leave this prompt open between logins, allowing you to turn any kiosk into a dedicated work visit kiosk. can be used to change it back.

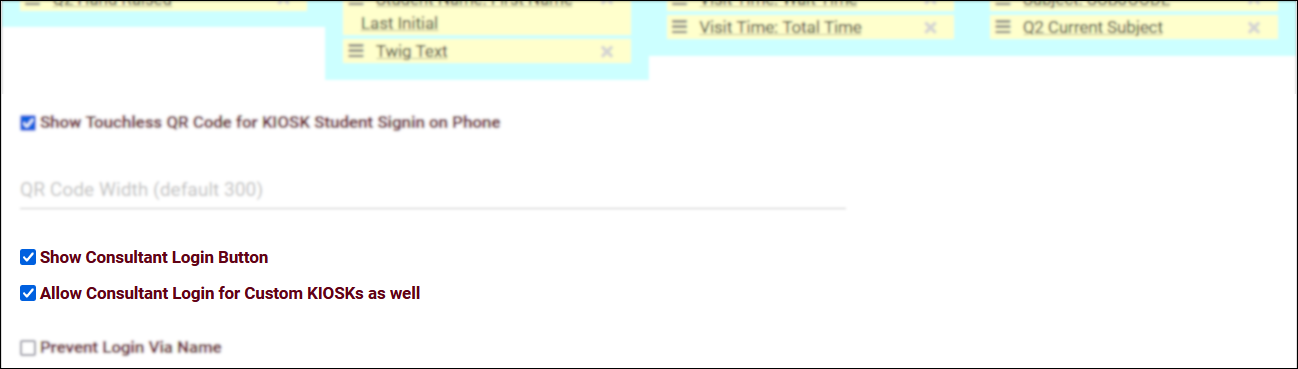
- To enable this functionality, check Show Consultant Login Button (and Allow Consultant Login for Custom KIOSKs as well if needed) in your Log In/Out prefs.
- Other ➜ Other Options ➜ Profiles ➜ [Your profile] ➜ Prefs ➜ Log In/Out.

- To block staff from logging in for work on kiosks/log listings that they opened themselves, go to Other ➜ Other Options ➜ Groups ➜ [Their permission group] ➜ Log In/Out ➜ Uncheck Allow consultant to login for work on KIOSK where the user logged in is themselves ➜ Save.
- In the same preferences menu, and also possibly relevant for those using Consultant Work Time, you have Only show Consultants that are logged in to Work during KIOSK visit login. If enabled, this will filter down the list of available consultants when students are logging in to only those who are logged in for work. Additionally, you can further filter the results to only consultants logged in for work *and* available for a drop-in, and/or only show consultants who are logged in for work in the same center that the student is currently logging into.

2. From the dashboard
- Consultants can be given the ability to log themselves in and out straight from the dashboard if their permission group allows it. This is typically the easiest way to track work time if this kind of permission is appropriate for your staff. To enable this functionality, go to Other ➜ Other Options ➜ Groups ➜ [The group you want to edit] ➜ Log In/Out ➜ Check Allow consultant to login for work at their main menu ➜ Save. Once enabled, a icon will be available in the navigation bar to start and conclude their own work visits.

3. Quick visits
- Just like for student visits, quick visits can be used to immediately create a work visit from scratch. Who has access to this is determined by permission group, go to Other ➜ Other Options ➜ Groups ➜ [The group you want to edit] ➜ Log In/Out ➜ Uncheck Hide 'Is Work' for Quick Visits / Visit Entry ➜ Save. This will appear as another checkbox in the quick visit form. The work time will be given to the consultant who is assigned to the visit, the student field is optional if the work time box is checked.

Funds can be entered in several different records, from the student profile to the center. The order in which these are prioritized is Student > Visit > Appointment > Availability > Consultant > Center, with the center fund only being utilized if the other 5 funds for the work time are blank. In order for a fund to appear in your payroll report, a work type must be assigned to it. E.g., if your student has a fund, but the work type doesn't, the payroll will a blank fund.
As TracCloud checks each record for a fund, it will stop once it finds a record with a value in the fund field. For Example, if the student fund is X and the visit fund is Y, only X can be shown for that work time, even if a work type exists for Y. The visit fund can only be displayed if the student fund is blank, with that pattern repeating through the rest of the possible fund fields. See flowchart below.

Information on enabling each of these fund fields can be found below. The Consultant and Center funds are enabled by default.
Student Fund can be enabled in your System Preferences.
Other ➜ Other Options ➜ Preferences ➜ Student Entry Choices ➜ Display Fund.

Appointment and Availability Fund can be found in your Profile Preferences. The Appointment Preference also applies to Visit Fund.
Other ➜ Other Options ➜ Profiles ➜ Prefs ➜ Scheduling ➜ Special Fields.

There are two payroll reports available to retrieve your consultant's hours and compensation, found in the Navigation Bar, under Reports ➜ Payroll. Access to these reports requires Allow user to access payroll reports to be enabled in the relevant permission group, and will only be accessible to Profile Admins and SysAdmins.
Other ➜ Other Options ➜ Groups ➜ [The group you want to modify] ➜ Center Access.

Once enabled, the reports listed at the bottom of this page will be available.
See Also: