TracCloud: Appointment Display Settings
From Redrock Wiki
(Redirected from TracCloud: Appointment Display Settings)
Both students and consultants will see upcoming appointments on their dashboard, and staff will see them from the schedule view. The formatting of these appointment info boxes can be customized in your profile settings, allowing you to provide the necessary information in a visually appealing format.
Student View
Students will be able to view their upcoming appointments on the right-side of the dashboard. The fields visible and the format they're in is entirely customizable by modifying the Appointment Display preference.

Consultant View
Consultants have a similar view to students, which can be modified independently.

Schedule View
Lastly, the staff schedule view, which allows us to view and manage our consultants’ availabilities and upcoming appointments. The appointment text is also customizable.

Customization
Within the Appointment Display menu, you will see a text box available for Students, Staff, and the Schedule view for Staff. There's also a preview section beneath each text box allowing you to easily see how your changes will display.
These text boxes support HTML and Twig. HTML support is standard, allowing you to easily make text <b>bold</b>, <i>italic</i>, or <u>underlined</u>, or add hyperlinks. Twig on the other hand allows you to pull data from TracCloud into the message, as well as include logic that determines whether or not a portion text is included. For information on Twig, please take a look at our dedicated Twig article here.
The "Appointment Display to Staff on Schedule" field in particular has a unique Twig tag available for use: {{Appointment.SchedVisitStatusIcon|raw}} which will add a button to start and conclude a visit for that appointment directly on the appointment itself.
Other ➜ Other Options ➜ Profiles ➜ [Your profile] ➜ Prefs ➜ Scheduling ➜ Appointment Display.

If you want to reset to the default configuration, simply click on the clipboard icon on the right, which will confirm if you want to erase the existing configuration in favor of the standard one.

Here are a couple examples of how you can configure the schedule and upcoming appointment views. This is more-so to give you an idea of how this feature works rather than a direct suggestion of what to use (although you’re welcome to copy these as-is if you’d like). Hopefully this gives you an idea of how the feature can be used, and how you can configure it on your own system.
Schedule View
Here’s a configuration that provides basic information about the appointment. The student’s name and appointment time in bold lettering, the subject and reason, and the consultant’s name. The if statement checks if the appointment has a Reason, and if it does, include a comma after the subject then print the reason.

<div style="float:left; width: 75%;">
<p style="font-size:9px">
<b>{{Student.Full_Name}}</b> at <b>{{Appointment.StartTime}}</b><br>
{{Course.SubjectCourse}}

{% if Reason.ReasonName != "" %}
, {{Reason.ReasonName}}
{% endif %}

<br>With {{Consultant.FirstLast}}
</p></div>
Student View
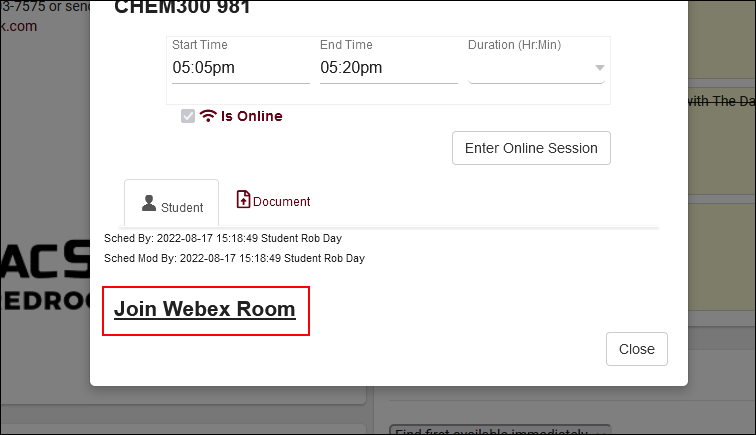
Here’s an example student view configuration. This one reads more like a spoken paragraph, with the important information bolded. Whether the appointment is in-person or online determines the text in the second half.

<div style="float:left; width: 75%;">
{{Appointment.Icon|raw}}
<b>{{Center.Name}}</b><br>
Your appointment with <b>{{Consultant.NameToStudent}}</b> has
been booked for <b> {{Appointment.StartTime}}. </b><br>
{% if Appointment.Online == "1" %}
This is an online appointment, please select the right arrow icon to join your session.
The icon will only appear within 10 minutes of your appointment start time.
{% else %}
This is an in-person appointment taking place at <b>{{Appointment.Location}}</b>.
If any assistance is required, please reach out to <u>{{Consultant.Email}}</u>.
{% endif %}<br>
{% if Reason.ReasonName != '' %}
Reason: {{Reason.ReasonName}}<br/>
{% endif %}
{% if Course.Subject != '' %}
Subject: {{Course.Subject}}<br/>
{% endif %}<br>
</div>
<div style="line-height: 2;">
{{Appointment.CancelLink|raw}}<br/>
{{Appointment.ActionLink|raw}}<br/>
{{Appointment.EnterOnlineLink|raw}}<br/>
</div>
<div style="clear: both;"> </div>
Consultant View
This one has a few more moving parts. Near the top, we’re saying “if the appointment has been cancelled, say “CANCELLED:” and strikethrough the rest of the contents.” We also have a series of “if this field isn’t blank, include it in the list” as well as the time saying the word “Today” rather than a standard date and time.

<div style="float:left; width: 75%;">
{{Appointment.Icon|raw}}<br>
{% if Appointment.isCancelled == 'true' %}
	CANCELLED: <span class="linethrough">
{% endif %}<br>
<b>{{Center.Name}}</b>
<span title="{{Student.ID}}">{{Student.FirstLast}}</span> - {{Student.Email}}<br>
{% if Reason.ReasonName != '' %}
	Reason: {{Reason.ReasonName}}<br/>
{% endif %}
{% if Course.Subject != '' %}
	Subject: {{Course.SubjectCourseTitle}}<br/>
{% endif %}
{% if Appointment.Location != '' %}
	Location: {{Appointment.OnlineText}}{{Appointment.Location}}<br/>
{% endif %}<br>
When: <strong>{{Appointment.DisplayDate|raw}}</strong> at
<strong>{{Appointment.DisplayTime|raw}}</strong><br/><br>
{% if Appointment.isCancelled == 'true' %}
	</span>
{% endif %}<br>
</div>
<div style="line-height: 2;">
	{{Appointment.CancelLink|raw}}<br/>
	{{Appointment.ActionLink| raw}}<br/>
	{{Appointment.EnterOnlineLink|raw}}<br/>
</div>
<div style="clear: both;"> </div>
A unique option available in the consultant view is the ability to start and stop a visit directly from the dashboard. This can be implemented by including the {{Appointment.LoginStudentToAppt|raw}} Twig tag in your appointment display configuration. It will display as a clickable button to your staff.


- Online appointment link text
- Allows you to modify the hyperlink/button visible to students within online appointment records. Default is "The location for this online appointment is here."

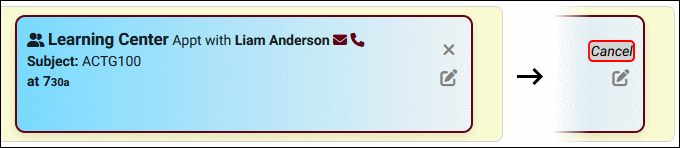
- Cancel/Edit/Enter session button
- Allows you to override the format of these buttons on the appointment display. For example, the following cancel button would have the effect shown in the screenshot below.
- <i style="border: 2px solid red; background-color: lightgrey; color: black; border-radius: 5px; padding: 2%; margin: 1%">Cancel</i>

- Font Awesome icons can also be used, such as <i class="fa-solid fa-trash-xmark"></i>
See Also