TracCloud: Resources
From Redrock Wiki
(Redirected from TracCloud: Resources)
Additional Features
The Resources feature in TracCloud offers a comprehensive system for managing items that can be checked in and out within a campus center. This functionality supports tracking and reporting resource utilization through an intuitive interface. Typical resources include laptops, calculators, and books that can be reserved, checked out, and returned by students or staff. The system allows for custom resource creation, including unique identifiers (barcodes), descriptions, and keywords to enhance searchability. Furthermore, resources can be categorized under Resource Types for improved reporting and restricted access where necessary.
The TracCloud system also supports advanced features such as Collateral Logic, which ensures collateral items are gathered and returned appropriately. Resource availability can be customized, including options for setting due dates, managing renewals, and allowing continuous access for Always Available resources. Additionally, users can define permissions for various user groups to control their ability to log, view, and edit resources, ensuring seamless integration with administrative workflows.
Reporting capabilities in TracCloud allow administrators to generate detailed reports on resource utilization and status, including overdue resources. Students can also be notified via customized emails or SMS messages regarding overdue or successfully returned items. Moreover, TracCloud enables reservation management, where students can reserve resources through their dashboard, adhering to predefined rules and restrictions. The system provides flexible search options, grouping functionalities, and export capabilities to streamline the reporting process, making resource management efficient and adaptable to various campus needs.

To begin creating a resource, go to Other ➜ Resources ➜ Resources ➜ Hamburger menu ➜ New Resource. Custom fields can also be added to this page.

- BarCode is the unique identifier for this item. Can be used to log resources in and out via a barcode scanner or swipe system, in addition to manually entering the value.
- Title is the name of this resource.
- Profile is the linked Profile for this resource. Staff will only be able to checkout a resource if their group has access to the linked profile.
- Checked Out To shows which user currently has this item checked out (if applicable).
- Collateral will store the collateral item collected due to the option below being enabled. This should be left blank when creating a new resource, as it will be automatically filled in when the item is checked out and collateral is collected.
- Collateral Logic enables Collateral functionality if checked. This will ask the staff member logging the resource in/out whether or not collateral has been gathered/returned.
- Reserved For shows who currently has this resource reserved.
- Always Available indicates that this resource doesn't need to be individually checked out or reserved, multiple users can check out the same resource at any time.
- Reserved Date, Last Date Out, and Due Date display the exact times of reservations, checkouts, and when the resource is due to be returned.
- Resource Type allows you to categorize this resource into a type for reporting purposes, or to restrict certain students from accessing this resource.
- Length of Checkout determines how long an item can be checked out for before an overdue notification is sent.
- Arbitrary Due Date allows the staff member checking out the item to choose a due date during checkout.
- Due by end of semester will be based on your current semester end date. If chosen, a new field will appear to add a buffer before the end of the semester (i.e., to require the item be returned X days before semester end.)
- Days / Hours / Mins will automatically set a due date based on the amount of time specified. If chosen, a new field will appear to set the maximum of number of times the checkout can be renewed.
- Not Available to Students / Staff allows you to restrict this resource to one user type or the other. By default (both unchecked), the item is available to either user type.
- Description is an internal description of this particular resource.
- Keywords are the related words for this resource, delimited by commas or semicolons. For example, if you have a Laptop as an available resource, you may want to create keywords like "Computer, PC, Macbook" to make this resource easier to search for.
- Resource Sub-Type can be used to tally available resources of the same type. This tracking must be enabled in the resource type.
- Pickup/Return Instructions can be entered and displayed in resource confirmation/return reminder emails as a twig tag.
Resource Types can be used to group resources together for the purpose of reporting or to block certain students from accessing certain resources. These can be managed by going to Other ➜ Resources ➜ Resource Types ➜ Hamburger menu , then click New Resource Type to begin creating a new type.

After creating a new resource type or clicking on an existing one, you will find the following options.

- Resource Type Name
- The type/category for your resources.
- The type/category for your resources.
- Resource Type Description
- Information about this resource type.
- Information about this resource type.
- Linked to Profile
- Allows you to link this Resource Type for use in a specific profile.
- Allows you to link this Resource Type for use in a specific profile.
- Allowed Student List
- Allows you to only allow students on this list to checkout this resource, blocking everyone else. If left blank, anyone can checkout this resource (assuming they aren't blocked from resource usage entirely).
- Allows you to only allow students on this list to checkout this resource, blocking everyone else. If left blank, anyone can checkout this resource (assuming they aren't blocked from resource usage entirely).
- Activate Option to Rescan Barcode on Checkout from Reservation
- If enabled, when a staff member clicks on a reservation to check a resource out they will be prompted to scan the barcode of any resource instead. This effectively allows them to quickly transfer the reservation to the item actually being checked out. The reason you may want to use this is if you have many of the same item that you track reservations for, but it doesn't matter which item is checked out to the student. For example, a student may reserve calculator #123, but the staff member is holding calculator #456, so they'll check that item out to the student instead.
- If enabled, when a staff member clicks on a reservation to check a resource out they will be prompted to scan the barcode of any resource instead. This effectively allows them to quickly transfer the reservation to the item actually being checked out. The reason you may want to use this is if you have many of the same item that you track reservations for, but it doesn't matter which item is checked out to the student. For example, a student may reserve calculator #123, but the staff member is holding calculator #456, so they'll check that item out to the student instead.
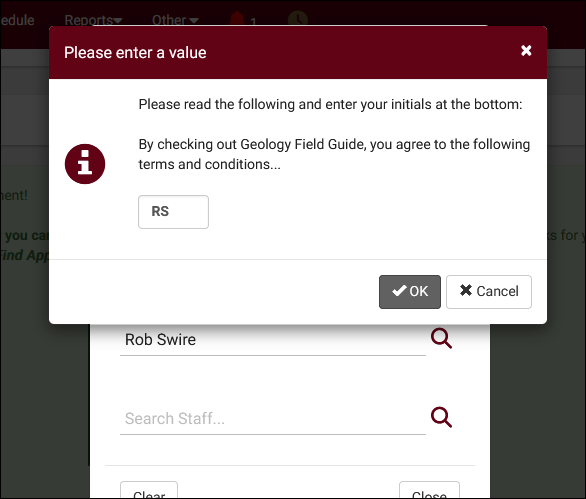
- Display Notice and Require Initials when Checking Out Resources of this Type
- If enabled, a prompt will appear during checkout requiring that the user agree to terms and conditions before continuing. Terms can be entered in the Logout Notice to Student field (HTML & Twig supported), and a copy of the terms can be automatically forwarded to the student by checking Send Terms and Conditions as Email to Recipient. This copy of the terms and conditions can also include a file attachment uploaded via the And also attach file option.

- Track Sub-Types
- This feature allows you to be notified when there are few or many available resources of your sub-types. For example, if you have 20 resources of a sub-type, and 15 of them are checked out, you may want to be aware that there are few of them available. Similarly, you may want to be notified when availability has returned to normal. Those thresholds would be set in the menu below.

- If the resource is linked to a profile, the profile email address will be notified (up to once per day) each time an item is checked out and a threshold is exceeded. If no profile is linked, an email will be sent to the system email address. If that also isn't available, no email will be sent. The warning will also be shown during checkout.


There are a couple settings of note within your permission group(s) relating to Resources.
Other ➜ Other Options ➜ Groups ➜ [Your Group] ➜ Log In/Out

- Allow user to log resources in and out provides users in this group the ability to check resources out to students and staff. Users in this group will only be able to checkout a resource if it is assigned to one of the same profiles as their group, or if the resource is linked to all profiles.
- Allow user to view what resource the student has logged out provides users in this group the ability to view a student's currently logged out item.
Other ➜ Other Options ➜ Groups ➜ [Your Group] ➜ Admin/Modules

- Table Access provides access to the Other ➜ Resources view of resources. You can also assign Resource Types here to allow this group to view and edit these as well.
After creating your resource and updating your groups, you're ready to start checking out resources. This option can be found by going to Other ➜ Log Resource.

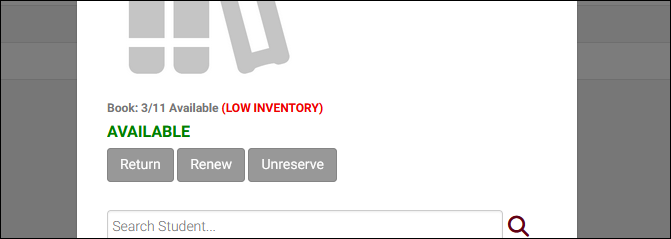
You will then be brought to the following screen with two text entry areas available. The first is where you select a resource (searching by Barcode, Title, or Keywords), the second allows you to select a student or staff member. Once one or both fields are selected, additional options become available to check out, return, or reserve this item. The button can be used to full-screen the resource checkout pop-up, allowing you to leave it open to continuously checkout and return items.

In the event that Collateral Logic is being utilized, more options will be required in regards to collecting/returning the collateral item before and after checkout.

Students can be allowed to reserve resources from their dashboard if configured in global preferences. To enable this functionality, go to Other ➜ Other Options ➜ Preferences ➜ System Preferences ➜ Resource Management.

- Choose to Block Students on List
- Show resources widget on the student dashboard
- Adds a widget to the student dashboard to review currently reserved or checked out resources.
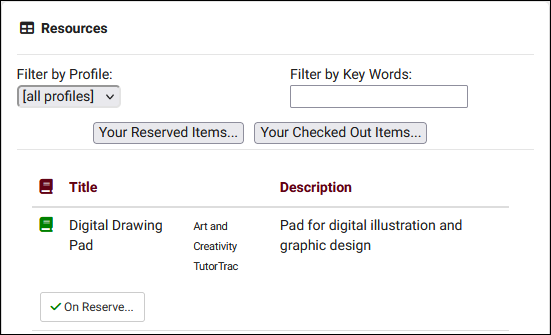

- Allow students to reserve a resource via the dashboard
- Expands the above functionality to allow students to reserve resources for themselves.
- Expands the above functionality to allow students to reserve resources for themselves.
- Maximum # outstanding reservations overall
- How many total outstanding reservations can a student hold for your resources?
- How many total outstanding reservations can a student hold for your resources?
- Maximum # outstanding reservations for one resource
- How many total outstanding reservations can a student hold for a single resource?
- How many total outstanding reservations can a student hold for a single resource?
- Maximum # of days for an individual reservation
- How many days can a student reserve a resource for? For example, allowing the student to reserve the resource from the 11th of the month to the 17th, but no longer, would mean this preference needs to be set to 7.
- How many days can a student reserve a resource for? For example, allowing the student to reserve the resource from the 11th of the month to the 17th, but no longer, would mean this preference needs to be set to 7.
- Minimum time needed (days hrs:min) prior to reservation
- Choose the minimum amount of time in advance needed in order to reserve a resource. This is to prevent students from reserving items in the very near future.
- Choose the minimum amount of time in advance needed in order to reserve a resource. This is to prevent students from reserving items in the very near future.
Resource emails can be customized to inform students of the due date of their checked-out resource, or if the resource is overdue. These options are part of your profile preferences in Other ➜ Other Options ➜ Profiles ➜ [Your profile] ➜ Prefs ➜ Emails ➜ Resource Checkout Emails.
Similar to your other Profile Emails, you can write a subject line and body of your email, an additional SMS text, and choose when this email is sent.

- Send Overdue Emails
- Disable this email, or choose what time it should be sent. This email will send if a student has an overdue checkout.
- Student resource overdue email subject
- The subject line of the email, supports Twig Tags just like the body of the email.
- Resource overdue email
- The body of the email to be sent to Students.
- Resource overdue SMS Msg
- A separate message sent to the Student's phone. Requires TextAlerts Module.
- CC the Profile on Resource overdue emails
- This option will send a copy of this email to your Profile email address if available.
- Send additional overdue emails daily
- Resend the above email on a daily basis until the item is returned.
- Student resource confirmed subject
- This email is sent immediately upon resource checkout. This option affects the subject line of the email, which supports Twig tags just like the body of the email.
- Resource confirm email
- The body of the email to be sent to Students.
- Resource confirm SMS Msg
- A separate message sent to the student's phone. Requires TextAlerts Module.
- CC the Profile on confirmation emails
- This option will send a copy of this email to your Profile email address if available.
- This option will send a copy of this email to your Profile email address if available.

- Send Resource Reminder Emails (Pickup and Return)
- Choose when reservation and overdue reminders are sent. The reservation email will notify the student that an item they reserved is available for pickup based on the first day of their reservation. The return reminder will send prior to the item becoming overdue.
- Student resource pickup/return reminder email subject
- The subject line of the email, supports Twig tags just like the body of the email.
- Resource pickup/return reminder email
- The body of the email to be sent to Students.
- Resource pickup/return reminder SMS Msg
- A separate message sent to the Student's phone. Requires TextAlerts Module.
- A separate message sent to the Student's phone. Requires TextAlerts Module.

- Resource Return Confirmation
- This email allows you to send an email to the user confirming that they have returned the resource.
- Student resource return confirmation email subject
- The subject line of the email, supports Twig tags just like the body of the email.
- Resource return confirmation email
- The body of the email to be sent to the user.
- Resource return confirmation SMS Msg
- A separate message sent to the user's phone. Requires TextAlerts Module.
- CC the Profile on resource return confirmation emails
- This option will send a copy of this email to your Profile email address if available.
- This option will send a copy of this email to your Profile email address if available.
See Also: