TracCloud: Success Plans
From Redrock Wiki
(Redirected from TracCloud: Success Plans)
Additional Features
A Success Plan is a student-facing module with a personalized plan assigned to a student, containing a series of “Steps” or tasks the student must complete. Each step can be a required activity – for example, meeting with an advisor, attending a workshop, completing a survey or reflection, or uploading a document as proof of completing some tasks. TracCloud tracks the student’s progress through these steps and can send reminders for upcoming or overdue tasks. Plans can even be chained, so that when one is finished, a new plan (say, for the next semester) is automatically created. This module is often used for academic success programs or probation interventions where students need to follow a success pathway. Staff can create plan templates (like “Freshman Success Plan” or “Probation Recovery Plan”) and assign them to cohorts of students, then monitor completion rates and outcomes via reports.
This article will go into detail on what options are available for managing your Success Plans, including how to create them, assigning Plans to students, and reporting on that data.
Creating Success Plans
To create your first Success Plan, go to Other ➜ Success Plans, which will take you to the Success Plans listing, then continue to the Hamburger menu ➜ New Success Plan. Give your Success Plan a name and save, then review the following options.


- Plan Name
- This is the name of the Success Plan that you will be assigning to students. This is also visible to students on the dashboard when viewing progress.
- This is the name of the Success Plan that you will be assigning to students. This is also visible to students on the dashboard when viewing progress.
- Duplicate and edit this plan
- This will allow you to create a copy of this plan. For example, if you create new plans on a yearly basis, you can copy last year's plan as a starting point to edit this year.
- This will allow you to create a copy of this plan. For example, if you create new plans on a yearly basis, you can copy last year's plan as a starting point to edit this year.
- Date Mode
- This option determines how the Due in Days field of your steps is calculated. Relative to Plan Start is the most common option, meaning the student would have 3 days to complete the first step in the screenshot above starting when they were first assigned the plan. Relative to Term Start is based on the semester start date instead. If your term started on Jan 1st and the student was assigned the Success Plan on the 2nd, they still need to complete the first Step by Jan 3rd. Fixed allows you to specify a static deadline for each Step.
- This option determines how the Due in Days field of your steps is calculated. Relative to Plan Start is the most common option, meaning the student would have 3 days to complete the first step in the screenshot above starting when they were first assigned the plan. Relative to Term Start is based on the semester start date instead. If your term started on Jan 1st and the student was assigned the Success Plan on the 2nd, they still need to complete the first Step by Jan 3rd. Fixed allows you to specify a static deadline for each Step.
- Inactive
- If this is checked, the Plan will be deactivated and won't be available to select going forward until it is reactivated. No data is deleted by checking this box, so this is preferred instead of deleting the entire Plan.
- If this is checked, the Plan will be deactivated and won't be available to select going forward until it is reactivated. No data is deleted by checking this box, so this is preferred instead of deleting the entire Plan.
- Recompute all related plans' progress
- Clicking this will refresh all plans to ensure they are up-to-date. This is unlikely to be needed outside of specific use-cases, such as importing visits.
Click on the New Step button to create your first step. Based on which Step Type you choose, the rest of the options on this page can differ.

- Days from Plan Start or Date
- This allows you to specify when this step needs to be completed. You will specify the number of days if one of the relative Date Modes is used, or specify a due date date if the fixed Date Mode is chosen.
- This allows you to specify when this step needs to be completed. You will specify the number of days if one of the relative Date Modes is used, or specify a due date date if the fixed Date Mode is chosen.
- Step Type
- This option is where you define what criteria must be met for the Step to be marked as completed. Depending on which option you choose, additional options will be made available to further specify what the student must complete. E.g., if you select Visit as the type, you can set which Center the student needs to visit.
- Visit - Based on the student's visit. You can choose which Center(s), Reason, Consultant, and Section/Course List must be selected for the visit to count towards Plan completion. "Required" and "Count" can be used to mark the step as completed when a student visits a certain number of times or for a total duration. It's also possible to set a minimum duration to count towards step completion. Any fields that are left blank will not be used when determining if a visit counts towards the completion of the step. "Start # Days from Plan Start"/"Start Date" can be used to prevent the student from completing a step too early. "Assigned Consultant for Profile" can be used to require the student meet with their personal assigned advisor/consultant, based on the linking configuration in the chosen profile.
- Survey - This is based on the student responding to a specified survey. Click here for more information on SurveyTrac.
- Document - The student will need to upload a document of the specified type to an appointment for this to be marked as completed. Click here for more information on Documents.
- Task - Based on the student's completion of a task. Click here for more information on Tasks.
- Checkout - Based on student's resource usage. A Step of this type is completed when the student checks out a resource matching the name and category entered here. Click here for more information on Resources.
- Notification - This is based on the student's acknowledgement of a notification. Click here for more information on Notification Types.
- Prompt - This appears as a highlighted question on the student, staff, or faculty dashboard. You can choose the question and the confirm button title, as well as allow the user to enter notes.
- This option is where you define what criteria must be met for the Step to be marked as completed. Depending on which option you choose, additional options will be made available to further specify what the student must complete. E.g., if you select Visit as the type, you can set which Center the student needs to visit.
- Prompt / Confirmation Directed To
- If Step Type Prompt is chosen, this option determines who will see this confirmation. The Student, the Plan/Step Consultant, or the Plan/Step Faculty.
- If Step Type Prompt is chosen, this option determines who will see this confirmation. The Student, the Plan/Step Consultant, or the Plan/Step Faculty.

- Override Step Description
- By default, a description for the step will be generated based on the fields entered on the previous tab. This field can be used to override this description if you want to enter something else.
- By default, a description for the step will be generated based on the fields entered on the previous tab. This field can be used to override this description if you want to enter something else.
- Override Confirmation for this Step
- By default, your steps will follow the Plan's Steps are Confirmed preference. This option allows you to override that for a specific step, requiring or not requiring that a staff member must confirm the completion of this step.
- By default, your steps will follow the Plan's Steps are Confirmed preference. This option allows you to override that for a specific step, requiring or not requiring that a staff member must confirm the completion of this step.
- Is an Optional Step
- If checked, the completion of this Step does not contribute to overall completion of the Plan. These Steps can still be used to initiate emails.
- If checked, the completion of this Step does not contribute to overall completion of the Plan. These Steps can still be used to initiate emails.
- Do not allow auto completion after due date
- By default, steps can still be completed after the due date has passed (both the due date and completion date remain available to view or report on separately). If you want to prevent automatic completion of steps after the due date, this box can be checked.
- By default, steps can still be completed after the due date has passed (both the due date and completion date remain available to view or report on separately). If you want to prevent automatic completion of steps after the due date, this box can be checked.
- Do not send completion/reminder emails
- This option prevents this Step from prompting emails to be sent.
- This option prevents this Step from prompting emails to be sent.
- Show prompt to complete on dashboard
- This will show a reminder to the student in the form of an announcement on the dashboard. The text here can also be customized if you want to provide more specific instructions.
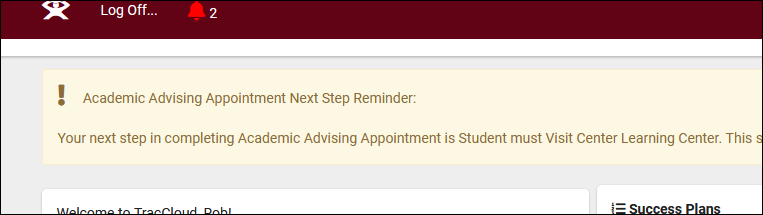

Students can be shown information about their Success Plans on their dashboard. The information and formatting contained here can be customized to more clearly inform students of their Plan and show the current status of each Step. The screenshot below is the student dashboard with the default display configuration.

The default value for this tab can be loaded by clicking the clipboard icon in the top-left corner of this menu. Both Twig and HTML can be used to personalize this. Header displays once at the top of this form, and is expected to contain instructions or details on their Success Plan. Line Display repeats for each Step the student has been assigned, using Twig to determine if the formatting needs to change for each entry. Footer Display is the final block of text in this menu. If these fields are left blank, the Success Plan widget will not be shown on the student dashboard at all.

The default Success Plan template includes some basic options at the top that allow you to customize the display without modifying the HTML/Twig. Some examples are shown below.
{% set showOptionalIndicator = true %}
{% set showDueDates = true %}
{% set showStepNumber = true %}
{% set style = "rows" %}

{% set showOptionalIndicator = false %}
{% set showDueDates = true %}
{% set showStepNumber = false %}
{% set style = "capsules" %}

{% set showOptionalIndicator = false %}
{% set showDueDates = true %}
{% set showStepNumber = true %}
{% set style = "compact" %}

Emails can be sent to users upon assignment and completion of a Plan, and to act as reminders for individual steps if the due date is approaching. These emails can utilize Twig to display additional information and add logic to the contents of the email itself. More information on Twig can be found here.

To create your first email, click the New Email button. This will show you the following menu where you can select your recipients, as well as specify the subject, body, and optional SMS text of this email. Sending SMS texts requires the TextAlerts Module. The Recipients field can use Twig tags such as {{Student.Email}} to automatically use the correct address.

The second tab within each email is Options, this can be used to determine the context that should prompt this email to send.

Manually Initiate Emails can be used to send reminder emails right now, rather than automatically overnight (05:00am).
Here is a list of Success Plan-specific Twig tags from TracCloud Rosetta.
| Field | Type | Description | Twig | API |
|---|---|---|---|---|
| Sequence | bigint | Unique identifer for each success plan. | SuccessPlan.Sequence | |
| Name | varchar(120) | The name of the success plan. | {{SuccessPlan.Name}} | SuccessPlan.Name |
| ProfileID | bigint | Which profile this success plan is assigned to, relates to Profiles.Sequence. | SuccessPlan.ProfileID | |
| Inactive | tinyint | Whether or not this success plan is currently inactive. | SuccessPlan.Inactive |
| Field | Type | Description | Twig | API |
|---|---|---|---|---|
| Sequence | bigint | Unique identifer for each success plan step. | {{SPStep.Sequence}} | SPSteps.Sequence |
| SuccessPlanID | bigint | Which success plan this step is assgined to. | {{SPStep.}} | SPSteps.SuccessPlanID |
| Type | varchar(120) | What type of step this is. Possible values are listed below.
|
{{SPStep.Type}} | SPSteps.Type |
| DateOrOffset | varchar(36) | When this Step needs to be completed (number of days or static date based on Plan type) | {{SPStep.DateOrOffset}} | SPSteps.DateOrOffset |
| isOptional | tinyint | Whether or not the step is optional. | {{SPStep.isOptional}} | SPSteps.isOptional |
| isNoSendEmails | tinyint | Whether or not emails are disabled for this step. | {{SPStep.isNoSendEmails}} | SPSteps.isNoSendEmails |
| isPromptOnDash | tinyint | Whether or not the prompt is set to display on the dashboard. | {{SPStep.isPromptOnDash}} | SPSteps.isPromptOnDash |
| DirectedTo | int | Who the confirmation is directed to. Possible values are listed below.
|
{{SPStep.DirectedTo}} | SPSteps.DirectedTo |
| OverrideRequireConfirmation | int | Whether or not this step has been overridden to allow/disallow confirmation. | {{SPStep.OverrideRequireConfirmation}} | SPSteps.OverrideRequireConfirmation |
| Field | Type | Description | Twig | API |
|---|---|---|---|---|
| Sequence | bigint | Unique identifer for each assigned success plan. | SPAssigned.Sequence | |
| SuccessPlanID | bigint | What type of success plan this is, relates to SuccessPlan.Sequence | SPAssigned.SuccessPlanID | |
| StudentID | bigint | Which student this plan is assigned to, relates to Students.Sequence (not Students.ID). | SPAssigned.StudentID | |
| ConsultantID | bigint | The assigned plan consultant, relates to Staff.Sequence. | SPAssigned.ConsultantID | |
| DateStarted | date | The date the plan began. | {{SPAssigned.DateStarted}} | SPAssigned.DateStarted |
| DateCompleted | date | The date the plan was completed. | {{SPAssigned.DateCompleted}} | SPAssigned.DateCompleted |
| DueDate | date | The date the plan is due for completion. | {{SPAssigned.DueDate}} | SPAssigned.DueDate |
| TermID | bigint | The term this plan is linked to, relates to Terms.Sequence. | SPAssigned.TermID | |
| Inactive | tinyint | Whether or not this plan is inactive. | SPAssigned.Inactive | |
| Status | varchar(120) | The status of the plan. Possible values are listed below.
|
{{SPAssigned.Status}} | SPAssigned.Status |
| Percent | int | The completion percentage of the plan. | {{SPAssigned.Percent}} | SPAssigned.Percent |
| FacultyID | bigint | The faculty assigned to the plan, relates to Faculty.Sequence (not Faculty.UserID). | SPAssigned.FacultyID | |
| DashboardStatus | The HTML text that would appear on the student's main menu showing their progress in the plan. | {{SPAssigned.DashboardStatus|raw}} |
| Field | Type | Description | Twig | API |
|---|---|---|---|---|
| Sequence | bigint | Unique identifer for each assigned success plan step. | SPAssignedSteps.Sequence | |
| SPAssignedID | bigint | Which assigned success plan this is assigned to, relates to SPAssigned.Sequence. | SPAssignedSteps.SPAssignedID | |
| StudentID | bigint | Which student this is assigned to, relates to Students.Sequence (not Students.ID). | SPAssignedSteps.StudentID | |
| SPStepID | bigint | Which success plan step this relates to, relates to SPSteps.Sequence | SPAssignedSteps.SPStepID | |
| CompletedDate | date | The date this step was completed. | {{SPAssignedStep.CompletedDate}} | SPAssignedSteps.CompletedDate |
| DueDate | date | The date this step was due to be completed. | {{SPAssignedStep.DueDate}} | SPAssignedSteps.DueDate |
| CompletionOverride | tinyint | Whether or not the completion override option is enabled for this step. | {{SPAssignedStep.CompletionOverride}} | SPAssignedSteps.CompletionOverride |
| StaffNotes | text | Any notes entered by the staff for this step. | {{SPAssignedStep.StaffNotes}} | SPAssignedSteps.StaffNotes |
| Confirmed | tinyint | Whether or not this step has been confirmed. | {{SPAssignedStep.Confirmed}} | SPAssignedSteps.Confirmed |
| StepFacultyID | bigint | Which faculty this step is assigned to, relates to Faculty.Sequence (not Faculty.UserID). | {{SPAssignedStep.StepFacultyID}} | SPAssignedSteps.StepFacultyID |
| StepConsultantID | bigint | Which staff record this step is assigned to, relates to Staff.Sequence. | {{SPAssignedStep.StepConsultantID}} | SPAssignedSteps.StepConsultantID |
| Index | The number of the step, based on the order they were created in. | {{SPAssignedStep.Index}} | ||
| PartialStepValue | The progress in the step. For example, you may want to show how many visits they've completed out of a step that requires they complete X visits. | {{SPAssignedStep.CustomData|json_decode.PartialStepValue}} |
Here are some additional unique tags and functions available in Success Plan emails.
| {{Trigger}} | The trigger that prompted this email to be sent (trigger_PlanStarted, trigger_PlanReminder1, trigger_PlanComplete, trigger_StepStarted, etc.) |
| {{ setResultActions('FacultyID', '1') }} | If this action is reached (in a Twig statement), the assigned Faculty will be changed to the sequence number specified here |
| {{ setResultActions('ConsultantID', '1') }} | If this action is reached (in a Twig statement), the assigned Consultant will be changed to the sequence number specified here |
| {{ setResultActions('TermID', '1') }} | If this action is reached (in a Twig statement), the assigned Term will be changed to the sequence number specified here |
| {{ setResultActions('NextPlanID', '3') }} | If this action is reached (in a Twig statement), a new Success Plan will be assigned (for use in Chained Sub Plans) |
| {{ createResultAction('createNotification', {'Type' : 1, 'Notes' : 'Sample Notes', 'StudentID': Student.Sequence, 'ForUID' : Student.UUID}) }} | If this action is reached (in a Twig statement), the student will be sent a Notification. Enter the notification sequence where the '1' is in this example. |
| {{ createResultAction('createSurvey', {'SurveyID' : 1, 'StudentID': Student.Sequence, 'linkedUID' : Student.UUID}) }} | If this action is reached (in a Twig statement), the student will be sent a Survey. Enter the Survey sequence where the '1' is in this example. |
| {{ createResultAction('createReferral', {'RefTypeID' : 1, 'StudentID': Student.Sequence, 'FacultyID' : 0, 'SectionID' : 0, 'ConsultantID' : 0, 'CenterID' : 0, 'ReasonsData' : [{"key": "###keyIndex###","reason": "Time management"}]}) }} | If this action is reached (in a Twig statement), a SAGE Referral will be created for the student. Enter the Referral sequence where the "1" is in this example. Additional assignments can also be made. |
| {{ createResultAction('createAssignment', {'PotentialAssignmentID' : 1, 'StudentID': Student.Sequence, 'RegistrationID' : GetStudentRegID(Student.ID,'MAT100 0000 FALL%'), 'GradePoints' : 0, 'Comments' : 'Notes go here'}) }} | If this action is reached (in a Twig statement), an Assignment will be created for the student. Enter the potential assignment sequence where the '1' is, and choose the section. |
| {{ createResultAction('createTask', {'TaskType' : 0, 'ForUID' : Student.UUID, 'StudentID': Student.Sequence, 'TaskName' : 'Test of Task Name', 'DueDate' : '2030-01-01', 'Completed' : 0 }) }} | If this action is reached (in a Twig statement), a Task will be assigned to the Student. Enter the Task sequence where the '0' and choose a due date. |
| {{ createResultAction('updateStudent', {'Major' : 'Business', 'CustomData.cf_99' : 'Text goes here' }) }} | If this action is reached (in a Twig statement), student fields can be updated to the text specified here. Multiple fields can be edited at once (Major and Custom_99 in this example). Field names are case sensitive. |
The second to last tab in your Success Plan Type is Options. This contains various options to fine-tune the functionality of this Success Plan.

- Allow Notes Per Steps
- If checked, staff members will have the ability to enter notes on each Step in student profiles.
- If checked, staff members will have the ability to enter notes on each Step in student profiles.
- Steps are Confirmed
- If checked, a staff member will need to confirm the completion of a Step before it's counted towards Plan completion.
- If checked, a staff member will need to confirm the completion of a Step before it's counted towards Plan completion.
- Completion of Steps may be overridden
- This allows a staff member to specify a completion date for a Step even if the criteria hasn't been met by TracCloud's own process. For example, if a student handed in a physical document rather than uploading it to an appointment, this can be used to mark that Step as completed anyway.
- This allows a staff member to specify a completion date for a Step even if the criteria hasn't been met by TracCloud's own process. For example, if a student handed in a physical document rather than uploading it to an appointment, this can be used to mark that Step as completed anyway.
- Steps may be Completed Out of Order
- If this option is unchecked, Steps must be completed in order to count towards Plan completion. If checked, students can complete Steps in any order.
- If this option is unchecked, Steps must be completed in order to count towards Plan completion. If checked, students can complete Steps in any order.
- Plan / Step Reminder Options
- Multiple reminder emails can be sent as the due date of a Step/Plan approaches. Use these options to determine when those reminders are sent relative to the due date of each Step/Plan. Students will only receive reminders for their current incomplete step. If they do not complete the step, they will not receive reminders for the next step until the previous step is marked as completed. You can also continuously send reminder step reminders using Step Reminder email again num days repeating.
Additional plans can be initiated based on the completion of the current plan. There are two options on this tab, Specific Sub Plan, which allows a simple selection of a follow-up plan to be chosen, and Conditional Sub Plan. The latter provides additional flexibility for determining if a Plan should be assigned, and what plan that should be.

{{ setResultActions('NextPlanID', '#') }} is used to assign a follow-up Success Plan. # should be replaced with the sequence number of the Plan you want to assign. This should be wrapped in Twig logic to determine your criteria for what new Plan should be assigned. More information on how you can utilize Twig can be found here.
Using Success Plans
Assigning plans to students, providing access to your staff, and running reports.
Plans can be assigned to individual students from the Success Plans tab of their profile. Click on Assign Plan to Student and choose the Plan type that you want to use. This page also lists the current and past Plans for this student, including assigned/due date, completion status, term, and more. Clicking the pencil icon on the left provides quick access to that Plan's options.

After creating a new Plan for the student (or opening an existing one), you will find the following options. This includes basic details about the student, their plan details such as due date and progress, the assigned consultant, faculty, and term, and the individual steps.

The options available within each Step can differ based on your Plan options. Override Completion allows you to specify if and when a Step was completed, bypassing TracCloud's automated tracking. Completion Confirmed is used to confirm that this Step has been concluded, allowing it to count towards Plan completion percentage. Notes can be used for any purpose to record additional information regarding each Step.
Clear can be used to unlink the step from a related record, such as a visit. For example, if a visit was accidentally created for the student causing a step to be marked as completed, you would need to delete the visit, clear the sequence number, and change the completed date to blank (mm/dd/yyyy). If the visit is not deleted (or modified in a way that no longer counts towards the step), it will be re-linked to the step upon saving.

Success Plans can also be assigned to multiple students at once from the Student Listing. Go to Students ➜ Search for your selection of students ➜ Hamburger menu ➜ Assign Success Plan.

In order to give staff the ability to manage Success Plans, they must be given access to the Success Plans table. Go to Other ➜ Other Options ➜ Groups ➜ [The group you want to modify] ➜ Admin / Modules ➜ Table Access ➜ Add Success Plans ➜ Save.
If the user in this group is set to user level "Staff," the only access this will provide is to students' assigned success plans.
If the user in this group is set to user level "Profile Admin" or higher, providing table access will also provide access to the Success Plan types found in Other ➜ Success Plans. This would allow these users to view and edit the success plan types that would eventually be assigned to students (if edit access is provided).

If a success plan has been assigned to a Consultant or Faculty (and that user has access to the success plans table as detailed above), a new widget will be visible on the dashboard allowing quick access to student Plans. This can be filtered by Status, Date, and Type. Each entry can be clicked on to view the full success plan entry page for further management.

For information on purchasing the Success Plans Module, reach out to [email protected]
For Success Plans functionality questions, reach out to [email protected]
See Also:
Work Plans - Similar step tracking, but for staff instead.