TracCloud: SAGE
From Redrock Wiki
(Redirected from TracCloud: SAGE)
Additional Features
The SAGE Early Alert module is TracCloud’s early-alert referral system. It allows faculty and support center staff to submit referrals or progress reports for students who may be struggling academically or have other concerns. Through an online form, a professor can flag a student and indicate the issue (e.g., poor attendance, low grades, personal concern) and SAGE will route that information to the appropriate support staff. Based on how the referral is configured, TracCloud can automatically notify relevant parties – for example, send an email to the student’s academic advisor or to a tutoring center coordinator to reach out proactively. SAGE basically creates a case for the student: support staff can record follow-ups, note whether the student was contacted, and close the loop. This helps colleges be proactive in connecting at-risk students with resources. This early-warning systems ensures no student “falls through the cracks” when faculty raise a concern.
You can think of SAGE like a three-step process.
- 1. Creation, a referral is submitted, emails are sent out.
- These emails could be sent to advisors, professors, or the student themselves, notifying us of something the student may be struggling with.
- 2. Follow-up, more information is given, new emails are sent out.
- The follow-up email lets relevant users know how this referral is going, what has been done, and what we are doing to help this student.
- 3. Resolution, a final email is sent out to wrap everything up.
- Once the referral has been processed, we can fill out some additional information letting the relevant users know what we did to help this student.
Creating and Completing Referrals
There are multiple ways to create referrals for students, depending on which method best fits your campus workflow. Referrals can be created by faculty via the class roster, or by advisors or other staff from student profiles.
Faculty Members are typically the primary user-type submitting referrals, and as such, they have a streamlined view of the referral submission process. On the faculty dashboard, you'll find their class rosters along with the referrals that have been designated as Roster Annotations (which will be covered later in this article). This allows faculty to immediately access important referrals for each of their rosters.

As a faculty member, let's say we wanted to submit a referral for one of our classes. We can simply click on the referral we want to submit for any given roster, then we'll be given access to a batch referral tool.

From this menu, we can click on individual students and fill out unique referrals for each without leaving this screen. Once we've filled out referrals for the specific students, we click save and we're all set. The referral process has begun for each of these students that we filled out a referral for and emails will be sent.

If the referral is configured as a roster annotation for [X] days (covered later in this article), we can even open this batch referral tool later (but within the day limit) and continue where we left off by updating existing referrals. The green check-marks indicate a referral that has already been opened. Clicking it again lets us pick up right where we left off.

We also have the ability to apply the same Reason/Recommendation to multiple students at once. Select Affect All Selected and Shown and check the checkboxes for each student we want to assign this reason/recommendation to. Now when we make a recommendation or apply a reason to one student, it will also affect all other checked students. We will see that all other students now have a ... icon, which indicates that a referral is in progress.

As a faculty member, we can also book an appointment for the student from this screen as well (assuming our permission group allows it). This can be accomplished by clicking on the calendar icon on the right-hand side for the relevant student.

Lastly, faculty can submit a "Nothing to Report" referral from this screen. This will immediately create a generic referral for the current date labeled as "[Nothing to Report]."
Referrals can be submitted individually from student profiles as well. As non-faculty staff don't have access to the class roster view, this will be their primary utility for submitting referrals, but faculty can of course use this method too. New referrals can be created through the Actions button, past referrals can be viewed on the student timeline.

After selecting the referral type that we want to submit, we're taken to the full referral submission screen. We'll cover more on configuring this side of SAGE later in this article.

It's also possible to submit referrals from the student listing in bulk. This allows us to search for students enrolled in a specific course, load a list, or just search for a couple students manually and create referrals as a batch. This screen will operate in the same way as the faculty roster referral tool. Students are selected with the checkboxes on the right-side.


After a referral is marked as processed, we will see the following screen summarizing basic information about this referral, and providing a location to write additional notes about how this situation was resolved. Once saved, the final "Processed" email will be sent out, as configured in your Automated Emails. A referral can be re-opened by unchecking the "Processed" box.

If a permission group allows it, it's also possible to utilize the Referrals Listing to quickly access all referrals in your TracCloud instance. This can be accessed by going to Other ➜ Listings ➜ Referrals.

Hamburger Menu
Every listing page in TracCloud features a hamburger menu with utilities to search for or interact with your list of records. Some of these options are specific to to certain listings and record types, others are shared. The following list includes definitions for the hamburger menu options available on this listing and how they can be utilized.

- List All
- This option will show all records on the current listing. Some listings have an additional toggle for only showing active records, such as the student and registration listing, which will override a List All search if checked.
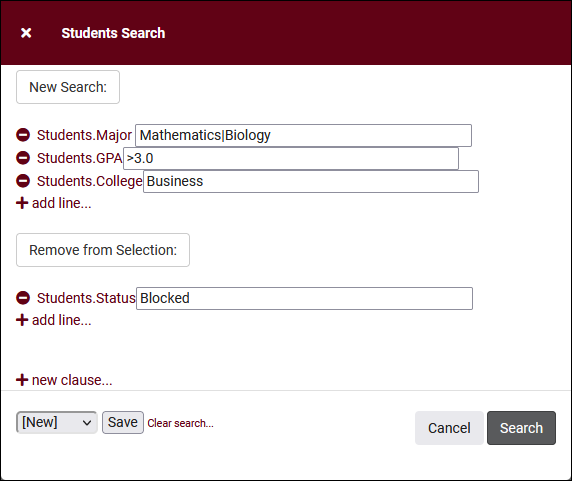
- Power Search
- This option provides a simple but powerful search utility to find the records you need. String together multiple searches, adding or removing results for each. Use Search Symbols to include ranges of data, and Save Searches for later use if needed. The search term 'blankornull' can be used to find all records with a value of nothing ("") or null ().

- Selected...
- The Selection Tool offers several options to filter and manage your records. More information on this feature can be found in its own dedicated article here.
- Change Field Values
- This utility allows you to make modifications in to your records in bulk. Similar to the Merge Duplicates utility, we highly recommend coordinating with Redrock Support directly on this setting.
- Show these <records>
- This utility takes your selection of records, finds the related records, and takes you to that listing with the resulting records. For example, on the Registration listing, you can "Show these Students" to display the student records for the registrations that you were viewing.
- Allows you to print the contents of the current listing, by extension this also allows you to export the current list as a PDF file.
SAGE Configuration
The following chapters of this wiki article will cover how you can create your SAGE referral types, including the reasons, recommendations, emails, custom questions, and more.
To create new SAGE Referral Types, modify existing, or simply review your current configuration, go to Other ➜ Modules ➜ SAGE Referral Types. This will bring you to the Referral Type Listing. To create a new Referral Type, you would click the hamburger icon (), then select New Referral Type.

After opening a referral or creating a new one, you will be able to access the following options.

- Name is the name of this referral type.
- Profiles is the linked profile for this referral type, primarily used to determine linked advisor in reports.
- Active will toggle this referral on or off, allowing you to deactivate it when unneeded, and reactivate it when necessary.
- Test Mode will send all emails to the Test Email Address rather than the actual recipient. This should be enabled when testing emails to prevent your end users from receiving referral notices for test referrals.
- Condense Roster Referral View will display Reasons and Recommendations in a more tightly packed view for faculty. This may be preferred if many referrals are being created at once. Does not affect visible data fields.
- Roster Annotation designates this referral type as a Roster Annotation, meaning it appears as an option for class rosters from the faculty dashboard perspective.
- Days is the time-frame provided to the faculty member where they can edit an existing roster referral. After this window has passed, the faculty member will create a new referral rather than editing an existing one.
- Linked List allows you to assign this referral type to a specific student list. Faculty and other users will only be able to create this referral for students on that list. More information on student lists.
- Referral to Testing Center is a bigger topic, which can be found further into this wiki article.
- Roster Annotation Settings For Faculty Viewing
- Link to Section or Course allows you to link this referral type to a specific subject. The referral will then only appear in contexts of that subject/course/section from the roster referral perspective.
- Roster Instructions allows you to add a custom message to the roster referral menu for faculty and staff.
- Hide: Affect All Selected and Shown will remove the ability to apply referral reasons, recommendations, etc to more than 1 student at a time from the roster referral menu.
- Notes Instructions is a message that appears to the user submitting this referral, providing information above the Notes box.

- Additional Notes Instructions is a message that appears to the user submitting this referral, providing information above the Additional Notes box.
- Processed Button Title determines the name of the "Processed" option, "Complete," "Resolved," etc.
- Submit Referral Button Title determines the name of the "Submit Referral" button, "Save," "Create," etc.
- Hide Options allows you to toggle certain elements/features of your Referral Type off if preferred. Some fields can also be hidden from faculty specifically, while remaining visible to staff.
- Require Notes / Additional Notes will require that whoever is submitting this referral enter notes in one or both of these fields.
- Ask for Special Needs / Accommodations will provide a question in the referral entry form (for both staff and faculty) to fill out special needs, skills, or accommodations for the student. You can configure your search availability widget to automatically select that skill/accommodation when the student next tries to schedule an appointment for the same subject as what the referral was created for. This requires additional configuration in your Search Availability Widget settings to enable.
Reasons and Recommendations can be one of the most important aspects in creating these referrals, as these options can also dictate which emails get sent out to whom. Typically, these would be configured to allow your faculty to quickly describe where the student is struggling and what they recommend as a solution. However, since these are entirely customizable, you can ask any questions you can think of to help make the referral creation process as straightforward as possible.
Click the Add Reasons / Recommendations box to add a new option. Setting a Reason/Recommendation as a "Label" will turn that item into a header for the following list, to help categorize your different options. By entering "(max: #)" with a number in place of #, you can limit how many choices can be made from the options following your header. For example, the label "Attendance (max: 1)" means only one of the following attendance-related reasons can be chosen during referral creation. These options can also be reorganized by dragging the hamburger icon () on the right-side up/down.
The "Reason" and "Recommendation" titles can also be overridden with the corresponding Override fields, if you would prefer to label these options differently.

Custom questions allow you to add additional fields to your referrals. These questions can be formatted as a "Pulldown" menu with preset options, a small "Fill In" text box, or a larger "Essay" text field.
To create your custom question, click Add New Question.

- Question Type determines the question format. Pulldown (text box with preset options), Fill-in (small text field), or Essay (large text field).
- Required makes the question required to be filled out in order to save the referral.
- Code Reference is used to pull this information into your emails or for additional logic around what email content is sent. Typically, something short and unique like "GradeQuestion1."
- Question is the prompt itself, displayed to users when submitting this referral.
- Choices are the available response options, only applicable to Pulldown format questions. Put each choice on its own line.
- Options can be used for style overrides on the field label. If you aren't sure what to enter here, it should be left blank. Here is an example of what the above will look like in practice.

These are the possible recipients of alert emails relating to this referral. For example, if this referral's automated emails can be sent to students, then you will need to add students to the list, as seen in the screenshot below. The name of this field is only used for reference when choosing who will receive alerts when managing your automated emails, using the correct twig tag or entering a valid email is important.

- Student: {{Student.Email}}
- Faculty: {{Faculty.Email}}
- Assigned Advisor/Other {{Student.CustomData.cf_18}}
- Student Custom Fields can also be referred to here to pull email addresses, such as in the case of an Assigned Advisor. More information.
- Linked Consultant: {{Consultant.Email}}
- Specific email addresses can also be entered instead of twig tags.
This allows you to provide faculty the ability to book appointments for students that they're creating referrals for during the roster referral creation process. Typically used for Testing Centers or Lab environments, where faculty would need to book appointments on behalf of students, or assign multiple students to the same Group Availability.

- Referral to Testing Center enables this feature.
- Book in Center determines which center appears when faculty are searching for appointments on behalf of students.
- Search Reason determines which reason is used for the search availability process. Leave blank for all reasons.
- Group Schedule Button Label is the name of the button to search for availabilities.
- Allow Single Appointments provides faculty the ability to book sessions for students one at a time.
- Allow Group Appointments provides faculty the ability to select multiple students, and book a group availability for all at once.
From the faculty perspective, there's a Schedule icon for each student in the roster referral listing, and/or the option to select multiple students and click "Book Testing Center Appointment" to schedule a group appointment for all selected students.

Potential Actions will be available in each submitted referral, with each action being available to add with a date and notes. These actions can be used to piece together a timeline of events relating to each referral and can additionally trigger automated emails.

Here's how this appears during referral creation. Each action can be added or re-added using the "Add New Completed Action" button. The text box can be resized by clicking-and-dragging the bottom-right corner.

The Automated Emails tab allows you to create custom emails that can be sent to one or more of your Potential Email Recipients upon referral submission, follow-up, or completion. Common examples might be an email that is sent to the student when a referral is created for them, with a separate email being sent to an assigned advisor or faculty. The recipients, number of emails, and email contents are up to you.

To create your first Email, click Create New Email, type in your subject line, then click Save. This will add the email to your Automated Emails listing. Click the Pencil Icon for the email you just created, and you should end up at a page like this.

- Email Subject determines the subject line of the email, as you entered previously. This can be changed at any time.
- Email From lets you change which email address this email is sent from. Uses system address if left blank. This field supports Twig, allowing you to set the from email to (for example) {{Consultant.Email}}.
- Add Email Recipient allows you to define which users could possibly receive a copy of this email, based on your Potential Email Recipients.
- Email Sends On Referral Action Based Upon Selected Trigger(s) allows you to decide under what context this email is sent. On initial creation, on follow-up, on completion, and on action completed. The first 3 are detailed further in the next portion of this article, the latter is detailed above.
- Email Body is the actual contents of your email.
- SMS Recipient (Requires TextAlerts)
- If you additionally want to send an SMS message along with this email, choose the recipient and write your message below. The "Consultant" choice will primarily use the consultant linked to the referral. If that field is blank, it will use the student's assigned advisor. If that isn't available, it will send the message to the consultant who created the referral.
Twig
One of the key elements of configuring your SAGE emails is Twig. Twig plays two key roles, providing tags for the information displayed, and adding logic to your email to determine what content is sent. Before reading this section, it's recommended to read the Twig Guide to have a general understanding of how to write your emails with tags and conditions using Twig. A complete list of Twig tags can be found here.
Here's an example email. Note that arrays such as Reasons and Recommendations must be iterated over using the for tag in Twig.
Hello, {{Student.First_Name}}, this {{ReferralType.Name}} was submitted by {{Faculty.FirstName}}.

Here's why this alert was created:<br>
{% for item in Reasons %}
    {{item}} <br>
{% endfor %}<br>

Here's what we recommend:<br>
{% for key,value in Recommendations %}
    {{ value }}<br>
{% endfor %}<br>
If you wanted to conditionally include text based on Reasons or Recommendations, you can do something like this.
{% if "Poor Attendance" in Reasons %}
    Online Tutoring is now available! See example.edu/remote/ for more information.
{% endif %}
Another common case in SAGE emails is wanting to not send the email in certain cases. For this, you can use the special keyword #ACTION:DO NOT SEND#. Here's how that might look in practice. If the first statement is true, the entire email doesn't send.
{% if "No recommendations at this time" in Recommendations %}
    #ACTION:DO NOT SEND#
{% endif %}
Another complicating factor in SAGE emails is custom questions and answers. These can be used emails, but you will need to use the "Code Reference" value that you set earlier. For example, if your Code Reference was "GradeQuestion," the format of this tag would be {{Questions.GradeQuestion}} and {{Answers.GradeQuestion}} for the question and answer respectively.
The answer to {{Questions.GradeQuestion}} was {{Answers.GradeQuestion}}.
If we want to go through all of our answers to all of our questions, this would be an array just like Reasons and Recommendations and is formatted similarly.
{% for key,value in Answers %}
The answer to question {{ attribute(Questions, key) }} is {{ value }}<br>
{% endfor %}
The rest of this section covers unique tags for SAGE. A more complete example of a SAGE email can be found here. You're welcome to take that and modify it for use in your system.
Here is a list of SAGE-specific Twig tags from TracCloud Rosetta.
| Field | Type | Description | Twig | API |
|---|---|---|---|---|
| Sequence | bigint | Unique identifer for each referral type. | ReferralType.Sequence | |
| Name | varchar(255) | The name of the referral type. | {{ReferralType.Name}} | ReferralType.Name |
| RosterSubject | json | This array contains information about what subject(s) this referral type is linked to. | ReferralType.RosterSubject | |
| StudentLinkedListID | bigint | Which student list this referral type is limited to, relates to Lists.Sequence. | ReferralType.StudentLinkedListID | |
| Active | tinyint | Whether or not this referral type is currently active. | ReferralType.Active | |
| NotesInstructions | text | The contents of the notes instructions field. | {{ReferralType.NotesInstructions}} | ReferralType.NotesInstructions |
| Reasons | json | An array of all of this referral type's reasons. | {{ReferralType.Reasons}} | ReferralType.Reasons |
| Recommend | json | An array of all of this referral type's recommendations. | {{ReferralType.Recommend}} | ReferralType.Recommend |
| AdditionalNotesInstr | text | The contents of the additional notes instrucitons field. | {{ReferralType.AdditionalNotesInstr}} | ReferralType.AdditionalNotesInstr |
| OtherInstructions | text | The contents of the other instructions field. | {{ReferralType.OtherInstructions}} | ReferralType.OtherInstructions |
| Field | Type | Description | Twig | API |
|---|---|---|---|---|
| Sequence | bigint | Unique identifer for each referral. | Referrals.Sequence | |
| RefTypeID | bigint | Which referral type this referral is linked to, relates to ReferralType.Sequence | Referrals.RefTypeID | |
| StudentID | bigint | Which student this referral is assigned to, relates to Students.Sequence (not Students.ID). | Referrals.StudentID | |
| FacultyID | bigint | Which faculty this referral is linked to, relates to Faculty.Sequence (not Faculty.UserID). | Referrals.FacultyID | |
| SectionID | bigint | Which section this referral is linked to, relates to Sections.Sequence. | Referrals.SectionID | |
| ConsultantID | bigint | Which consultant this referral is linked to, relates to Staff.Sequence. | Referrals.ConsultantID | |
| CenterID | bigint | Which center this referral is linked to, relates to Centers.Sequence. | Referrals.CenterID | |
| CreatedDT | datetime | The date and time this referral was created. | {{Referrals.CreatedDT}} | Referrals.CreatedDT |
| CreatedBy | varchar(255) | Who created this referral, either a faculty or staff member. | {{Referrals.CreatedBy}} | Referrals.CreatedBy |
| NotesInstrData | text | Notes entered while the referral is being submitted. | {{Referrals.NotesInstrData}} | Referrals.NotesInstrData |
| ReasonsData | json | An array of chosen reasons in this referral. | Reasons* | Referrals.ReasonsData |
| ReasonsAndLabels | Same as above, but this array will also include the reason labels. | ReasonsAndLabels* | ||
| RecommendData | json | An array of chosen recommendations in this referral. | Recommendations* | Referrals.RecommendData |
| RecommendationsAndLabels | Same as above, but this array will also include the recommendation labels. | RecommendationsAndLabels* | ||
| AdditionalNotes | text | Additional notes entered during referral submission. | {{Referrals.AdditionalNotes}} | Referrals.AdditionalNotes |
| FollowUpDate | date | The specified follow-up date from the referral. | {{Referrals.FollowUpDate}} | Referrals.FollowUpDate |
| FollowUpBy | varchar(255) | The name of the user who followed up on this referral. | {{Referrals.FollowUpBy}} | Referrals.FollowUpBy |
| FollowedUp | tinyint | Whether or not this referral has been followed up on. | {{Referrals.FollowedUp}} | Referrals.FollowedUp |
| FollowedUpDT | datetime | The date and time this referral was followed up on. | {{Referrals.FollowedUpDT}} | Referrals.FollowedUpDT |
| Processed | tinyint | Whether or not this referral has been processed (resolved). | {{Referrals.Processed}} | Referrals.Processed |
| ProcessedDT | datetime | The date and time this referral was processed. | {{Referrals.ProcessedDT}} | Referrals.ProcessedDT |
| ProcessedBy | varchar(255) | The user who processed this referral. | {{Referrals.ProcessedBy}} | Referrals.ProcessedBy |
| ProcessedNotes | text | Notes entered while the referral was being processed. | {{Referrals.ProcessedNotes}} | Referrals.ProcessedNotes |
| StudentContacted | date | The date the student was contacted about this referral. | {{Referrals.StudentContacted}} | Referrals.StudentContacted |
| OverrideResend | tinyint | Whether or not the 'Override and resend' feature has been used. | Referrals.OverrideResend | |
| AssignedConsultant | varchar(255) | The name of the consultant or advisor assigned to this referral. | {{Referrals.AssignedConsultant}} | Referrals.AssignedConsultant |
| AssignedConsultantID | varchar(255) | The sequence number of the assigned consultant, relates to Staff.Sequence. | {{Referral.CustomData.AssignedConsultantID}} |
Here are some additional unique tags and functions available in SAGE emails.
| Trigger | The trigger for this email, “Created”, “Followed Up”, or “Processed” |
| Email.Subject | The contents of the email subject line |
| Questions.CODE | Questions.[Your custom question code] |
| Answers.CODE | Answers.[Your custom question code] |
| {{ setResultActions('AssignConsultant', '123') }} | If this line is reached within a SAGE email, the assigned staff member will be changed to the specified sequence. The example below shows how you can use this script to link a student's assigned advisor to the referral. |
| {% set staffSeq = getRecordFieldData('Staff','Email', Student.CustomData.cf_1,'Sequence') %} {{ setResultActions('AssignConsultant', staffSeq) }} | |
| {{ setResultActions('SetProcessed', '1') }} | If this line is reached within an email, the referral will be marked as processed/completed. |
| {{ setResultActions('SetProcessedNotes', 'Example notes') }} | Typically used alongside the tag above. Used to automatically add notes to the processed referral. |
| {{NewCompletedActions[0].id}} | The ID of the most recently completed action. Only for use in emails with the "On Actions Completed" trigger. |
| {{NewCompletedActions[0].name}} | The name of the most recently completed action. Same use restriction as above. |
| {{NewCompletedActions[0].date}} | The date of the most recently completed action. Same use restriction as above. |
| {{NewCompletedActions[0].notes}} | The notes of the most recently completed action. Same use restriction as above. |
| {% for actions in Referral.CustomData.completedActions %} {{actions.name}} {% endfor %} |
Use this to display every completed action of a referral. Replace 'name' with one of the other values above as needed. |
In each automated email, you can determine when the email is sent based on a trigger. Created, Followed up, or Processed. Here's what each of those options mean in practice.
On Created
Emails configured to send "On Created" will send the first time you hit the “Submit Referral” button at the bottom of a student referral or when a faculty member first submits a roster referral. This email type will only send automatically once during initial referral creation and can only be re-sent by using the Override and Resend Referral Email utility and selecting "Saved Referral" as the send option.

On Followed-up
Emails configured to send "On Followed Up" will send the first time data is saved in the "Follow Up Date" field. If this email type needs to be sent again for the same referral, the Override and Resend Referral Email utility must be with the "Followed Up" send option.

On Processed
Emails configured to send "On Processed" will send when the referral is marked as processed/completed/resolved (this phrasing may be configured differently for your system). This button will open a pop-up window to record additional information, the email sends when that pop-up is saved. Like the previous triggers, this email can only be resent by using Override and Resend with the "Processed" option.

In order for staff members to view and/or edit referrals, they must be provided access in their permission group. This also gives you the ability to fine-tune what they can and can't do in relation to these referrals.
Other ➜ Other Options ➜ Groups ➜ [The group you want to modify] ➜ Admin / Modules.

- Allow user to view referrals on Dashboard adds a utility to their dashboard allowing the staff member to quickly review/access relevant referrals.

- User may view which referrals determines if they can view all referrals, or only their own.
- User may DELETE which referrals determines which referrals they're allowed to delete, all, their own, or none.
- Referral Type Access determines which referral types they can view. The icon within each entry can be clicked to cycle between View and Edit or just View. The former allows the user to view and edit referrals of this type, while the latter only allows them to view.
To provide access to the referrals listing, add "Referrals" to table access as well. This is also required to give staff the ability to delete referrals.

For information on purchasing the SAGE Module, reach out to [email protected]
For SAGE functionality questions, reach out to [email protected]
See Also: