TracCloud: Q2 Tables
From Redrock Wiki
(Redirected from TracCloud: Q2 Tables)
Additional Features
Q2 Study Tables offers a unique approach to attendance tracking specifically for study table centers, tracking the total time a student spends in the center in addition to recording the individual table visits where students received help from consultants. Students begin their center visit studying independently, while having the ability to request assistance as needed. Q2 offers the ability for students to virtually raise their hand and specify what they need help with, which consultants will be notified of. Smartphones and tablets drive the queuing system, for both students requesting help and staff viewing which students need assistance while recording table visit time.

At any point during a student's independent study time, they can request help. This is a three-step process.
- 1. The student opens the help request link from their email or scans a nearby QR code, enters their ID number, then specifies what they need help with and which table they're at.
- 2. A consultant sees that the student has requested help for a subject they can assist with. The consultant will go to that table (or send an online invite link for a virtual session) and begin the table visit.
- 3. Once the student has received all the assistance they need, the consultant will conclude the table visit. This process can repeat if the student needs more help later.

Usage
The end-user perspective of Q2. Students requesting and receiving help, with staff managing table visits, recording notes, and more.
A student logs into a Q2 center ("From Center") to record the start of their visit. A staff member can log a student in manually, or the student can log themselves in via a kiosk using a barcode scanner, QR code, or by typing their student ID directly into the search field.
Upon login, students will be asked if they would like to receive an email regarding the Q2 request for help process. This email will contain a Q2 Help Link that students can use to virtually raise their hand, indicating that they need assistance from a consultant. This prompt will contain the student's TracCloud email address by default, but they can be given the ability to enter a preferred email address instead.


If the student chooses not to receive an email containing the Q2 Help Link, they will also have the option to scan a QR code placed by your staff nearby. These QR codes can be table-specific, or you can share a single generic QR code and allow the student to choose their table from a drop-down menu. Both options are generated in your Q2 config.

Once the student scans the QR code or clicks on the emailed Q2 Help Link, they will end up at the window below. Here, the student will be asked to enter their email address or student ID number to request help.

After the student enters their ID or email address and clicks the continue button, they will be prompted to fill in some additional fields to describe what they need assistance with. The option to select a subject and reason can be toggled on or off in your Q2 config settings, depending on whether or not that information is relevant for your Q2 use-case. Once the request for help has been submitted, the student will be moved into a queue only visible from the consultant’s perspective, which will display all students currently requesting help, indicated by a raised-hand icon.

Students can also physically raise their hand or ask someone for help, and a staff member can then virtually raise the student's hand for them by clicking the box to the left of the student's name, as seen in the next portion of this article.
Staff will be able to open the Q2 queue directly from their dashboard to view logged in students and who has their hand raised. The list of options will be based on their permission group.


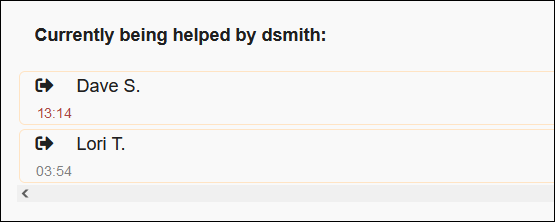
The staff Q2 Dashboard is split into two columns. On the left, students in the center working independently or with other consultants, and whether or not their hand is raised requesting assistance. On the right, students currently being helped by the consultant viewing this page. Each column can be collapsed by clicking on the button, which can be useful on smaller screens.
The icon in the lower-left corner also offers additional options.
- Log Out & Main Menu are self explanatory, allowing the staff member to return to the dashboard or log out of their browser session.
- allows the user to quickly access all of the QR codes relating to this Q2 config.
- Queue Mode hides the "Currently being helped" column, students who don't have their hand raised, and additional details such as student photo. This can be displayed on a screen in the center so that students can see where they are in the queue if several students are requesting help at once.
- Available Configurations allows the user to quickly switch to a different Q2 config, still limited by their permission group.
Staff members can be allowed to manage student's raised hands, and either raise or lower their hand by clicking the space to the left of their name. If your system has any Q2 Raise Hand custom fields, they can be viewed by clicking the icon.

In both cases, an additional pop-up will open to ask for more information and confirm that you want to raise/lower their hand. "Bump to top of list" can be used to artificially add wait time to the hand raise so that they're sorted to the top of the list.

Clicking on the entry will start a table visit with the student. This will lower the student's hand automatically (if it was raised in the first place), and they will now appear in the "Currently being helped" column for the consultant. This will also open a pop-up menu to edit the table visit, allowing the consultant to adjust the reason/subject or enter notes. If this pop-up menu is closed, it can be re-opened by clicking on the table visit entry in the right column at any time. Keep in mind that table visits cannot be managed from more than one device or browser session at a time. The table visit must be started and concluded in the same session.


Once the consultant is ready to conclude the table visit, they can click on the icon to end the visit and move the student back to the left column as they continue to work independently. This will also give the consultant a chance to enter any final notes before concluding the visit. If the visit was started by mistake and the table visit needs to be deleted rather than concluded, the button can be used instead.

Q2 can also be utilized in an Online context. Your availability should look something like this, set to Drop-in, Online, with the Online URL set to Q2Remote. This can also be made a drop-down option by modifying your Default Online Options in Global Preferences.

As a student, I can search for and click on this Drop-in session as usual.

However, clicking 'Enter Online Session' in this case will take me to the following form rather than a meeting room. This allows me (the student) to specify what I need help with and virtually raise my hand, waiting at this form until a link is ready.

As a staff member monitoring this Q2 config, I can see a student has their hand raised for a remote session. Clicking on that entry prompts me to send them a remote meeting link, such as a Zoom or Webex room.


And once again as a student, I see that my meeting link is ready, which I can click to join. After the visit has concluded, the staff member will lower my hand as usual and the student can request help again if needed.

Q2 Configuration
Before you can track table visits, you will need to create your Q2 config and update group permissions to ensure that everything is configured to your needs.
To manage your Q2 configurations, go to Other ➜ Modules ➜ Q2 Tables: Configurations, then click on the config you want to view/edit.

- Q2 Configuration Name
- This is the name of this Q2 Config, which will appear on the dashboard to staff opening the Q2 queue.
- This is the name of this Q2 Config, which will appear on the dashboard to staff opening the Q2 queue.
- Profile
- This determines which profile this Q2 Config will be assigned to.
- This determines which profile this Q2 Config will be assigned to.
- From Center (Queue) & To Center (Center)
- Q2 requires two centers, a From Center (Queue) and a To Center (Center). The From Center/Queue is where TracCloud will record the total time a student spends in the center. The To Center/Center is where TracCloud records each individual contacts a student has with a staff member, also known as table visits.
- The From and To Center can both be created in your profiles (Other ➜ Other Options ➜ [Your profile] ➜ Centers ➜ Create New Center). Your From and To centers will both need to be assigned a course list and reason(s), the same as your other centers.
- Ask for Consultant
- If checked, a consultant selection drop-down will be made available in the raise hand form for staff on the log listing specifically. This does not affect students who are raising their own hand.
- If checked, a consultant selection drop-down will be made available in the raise hand form for staff on the log listing specifically. This does not affect students who are raising their own hand.
- Ask for Reason & Ask for Subject
- If one or both of these options are checked, students (and staff on behalf of students) will be able to select a subject/reason when raising their hand. If checked, additional options will be made available to make each of these fields Required. Otherwise, it will be possible to leave these fields blank when requesting help.
- If one or both of these options are checked, students (and staff on behalf of students) will be able to select a subject/reason when raising their hand. If checked, additional options will be made available to make each of these fields Required. Otherwise, it will be possible to leave these fields blank when requesting help.
- Allow Enter Notes
- If checked, consultants will be able to enter notes during their table/micro visits.
- If checked, consultants will be able to enter notes during their table/micro visits.
- Show Reason/Subject in Queue Mode
- By default, these fields are hidden in the Q2 queue mode. These options allow you to display them.
- By default, these fields are hidden in the Q2 queue mode. These options allow you to display them.
- When Assigning Consultant - Logged in for work only
- If you allow your staff to raise student hands from the Log Listing (more information later in this article), they will have the ability to select a consultant to assign this request to. If this option is checked, only consultants currently logged in for work will be shown.
- If you allow your staff to raise student hands from the Log Listing (more information later in this article), they will have the ability to select a consultant to assign this request to. If this option is checked, only consultants currently logged in for work will be shown.
- Keep Center visit logged in
- This only applies to students logging in for Q2Remote drop-in sessions. If unchecked, a center visit is not recorded for students, only table visits. If checked, the first time the student goes to raise their hand will also log them into your center. That center visit must be concluded by a staff member or terminated automatically, students are not given the ability to manage their own visits.
- This only applies to students logging in for Q2Remote drop-in sessions. If unchecked, a center visit is not recorded for students, only table visits. If checked, the first time the student goes to raise their hand will also log them into your center. That center visit must be concluded by a staff member or terminated automatically, students are not given the ability to manage their own visits.
- Expected Duration
- This is the maximum table visit length before the timer in the Currently Being Helped column turns red indicating that the visit should be concluding soon.

- Confirm Start Help on Initial Click
- If enabled, an additional step is added when beginning a table visit with a student to confirm that the visit should be started. Can be useful if staff are frequently accidentally starting table visits.
- If enabled, an additional step is added when beginning a table visit with a student to confirm that the visit should be started. Can be useful if staff are frequently accidentally starting table visits.
- Confirm Subject / Reason at Start
- If checked, consultants will be able to modify the subject/reason that was initially selected when the student raised their hand. This prompt will appear at the start of the table visit, when the consultant clicks on the students name in the list.
- If checked, consultants will be able to modify the subject/reason that was initially selected when the student raised their hand. This prompt will appear at the start of the table visit, when the consultant clicks on the students name in the list.
- Prevent Consultant from Raising Student's Hand
- Prevents consultants from raising students' hands on behalf of the students.
- Prevents consultants from raising students' hands on behalf of the students.
- Prevent Student from editing the email address for sending table help instructions
- Enforce that the Q2 help instructions prompt use the email address from their student profile, preventing them from using a different address.
- Enforce that the Q2 help instructions prompt use the email address from their student profile, preventing them from using a different address.
- Play sound when hand raised
- This will play a sound whenever a student raises their hand to get the attention of whoever is monitoring the queue.

- Table Listing
- This is where you can define the individual tables that students can request help from. Use Generate Table List QR Codes to display the QR codes for these specific tables. Table Locations can also be defined, which will be recorded for reporting purposes.
- This is where you can define the individual tables that students can request help from. Use Generate Table List QR Codes to display the QR codes for these specific tables. Table Locations can also be defined, which will be recorded for reporting purposes.
- Table Help Procedures
- This message will display when a student scans a QR code with their phone. The text will be visible immediately above the ID field.
- This message will display when a student scans a QR code with their phone. The text will be visible immediately above the ID field.
- KIOSK Login Instructions
- This message appears during the initial center login on a KIOSK or Log Listing. This text appears on the same screen where the student can email themselves the Raise Hand link.
- This message appears during the initial center login on a KIOSK or Log Listing. This text appears on the same screen where the student can email themselves the Raise Hand link.
- Student Instructions Email
- This is where you can customize the contents of the email sent to the student. The URL will always be included below the text you enter here. This field supports twig.
It is also possible to show Q2 information and options on the Log Listing for staff to manage. These options are found in Other ➜ Other Options ➜ Profiles ➜ [Your profile] ➜ Prefs ➜ Log In/Out ➜ Log List Customization. This will only cover the Q2-specific options, for everything else, check out the dedicated Log List Customization article.

- Q2 Hand Raised
- This adds a 'Raise Hand' button to the Log Listing, allowing staff to raise or lower each student's hand. This will also display the table that the student has requested help at.
- This adds a 'Raise Hand' button to the Log Listing, allowing staff to raise or lower each student's hand. This will also display the table that the student has requested help at.
- Q2 Visits List
- This shows the student's currently ongoing table visits, if there are any.
- This shows the student's currently ongoing table visits, if there are any.
- Q2 Visit Flag
- If enabled, a wifi icon will be added to the log listing for students who are logged in for a Q2Remote session.
- If enabled, a wifi icon will be added to the log listing for students who are logged in for a Q2Remote session.
- Q2 Consultant
- Shows the name of the consultant that the student is requesting help with, or the name of the consultant who is currently helping the student.
- Shows the name of the consultant that the student is requesting help with, or the name of the consultant who is currently helping the student.
- Q2 Consultant Alias
- Shows the alias of the consultant that the student is requesting help with, or the alias of the consultant who is currently helping the student.
- Shows the alias of the consultant that the student is requesting help with, or the alias of the consultant who is currently helping the student.
- Q2 Current Reason/Subject
- These display the subject/reason the student is requesting help for.
- These display the subject/reason the student is requesting help for.
- Q2 Reason/Subject
- These display the reason/subject that the student is being helped with or was last helped with.

In order for staff to have access to Q2, their permission group will need to be modified and adjusted to enable that access. The Admin/Modules tab will allow you to add a Q2 Config to each group as needed. This can be found in Other ➜ Other Options ➜ Groups ➜ [The group you want to modify] ➜ Admin / Modules tab.

In the event that you need to create a custom question for students to answer while raising their hand, this can be accomplished with custom fields. To create a Q2 custom field, go to Other ➜ Other Options ➜ Custom Fields. For more information on configuring custom fields in general, take a look at our dedicated custom fields article. In this case, make sure the location of your new custom field is set to "Visit - Q2 Raise Hand."

Once your question has been created, students will be prompted to answer it when they request help through Q2. As a staff member, you can view student answers on the Q2 query screen by clicking on the icon to the right of the student's name.


For information on purchasing the Q2 Module, reach out to [email protected]
For Q2 functionality questions, reach out to [email protected]
See Also: