TracCloudWhatsNew
From Redrock Wiki

This page highlights some of the recent changes made to the TracCloud platform, and how you can utilize them on your own instance. A list of past changes and a full changelog can be found in the tabs above.
If you have any questions about these changes, feel free to reach out to us on our helpdesk.
2023-04-11 | New Look for Availability Online or In-Person Settings
An update will be released soon that simplifies the look of online/in-person options within availabilities. This adjustment doesn't require you to make any changes to your existing availabilities, and will be applied automatically and seamlessly when released. This wiki article is just to make sure everyone is aware that these options will look slightly different in the near future.
The purpose of this new look is to accommodate a future third Meeting Type for Asynchronous availabilities. Keep an eye on our Wiki for more information on that at a later date! If you have any questions about this adjustment, don't hesitate to reach out to us with the contact information at the bottom of this article.

This change also necessitates a slight visual adjustment to the appointment entry screen as well, with each selected modality appearing as a radio choice when booking or modifying these records.

This new look is also intended to be more intuitive to use if you're unfamiliar with TracCloud's schedule. "Optional" and "Optional Chosen" are no longer needed, as you can directly chose the Default Type when applicable. To further clarify, the screenshots below compare the old availability types to their new equivalents.
In-person only

New equivalent. The "Default Type" field cannot be modified.

Online only

New equivalent. The "Default Type" field cannot be modified.

"Optional"

New equivalent.

"Optional Chosen"

New equivalent.

2023-03-14 | Notification Menu Improvements
The Notification menu has received an update to make it easier to search, categorize, and hide notifications. The drop-down option at the top of the menu allows you to select the category of notification that you want to filter by (Task, Appointment Request, etc). Additionally, each notification can now be hidden with the eye icon (or you can hide all shown with the button at the bottom). Hidden notifications can be viewed by clicking on the There are X hidden items text.

Listings
Appointments Listing
An Appointment represents the reservation of a time slot (availability) between a student and a consultant. The student intends to show up at your center at X date & time, for Y subject, Z reason, etc. If the student attends this appointment, a visit record will be created. If they do not attend, no visit will be created, and the status will be recorded as cancelled or missed as needed. Appointments can additionally contain custom fields that both students and staff can fill out, as well as documents that need to be shared between the two parties.

The Appointments Listing can be viewed by going to Other > Listings > Appointments. Access to this listing can be provided by adding "Appointments" table access to a permission group under 'Admin / Modules'. This listing contains all appointment records that you have permission to view, including the ability to make batch changes, create custom views, or simply search for and few individual appointments. The icon shows if the registration that the appointment was booked for is still active.
Each column of information displayed has a clickable header that will sort the listing accordingly. Clicking once sorts ascending, a second click will sort descending.

Using the Search Bar on this screen, we can easily perform quick searches to find specific appointment records. Right clicking in the search bar (shown below) will provide a list of available appointment fields to search, click any of these to auto-fill the search bar.

Example Searches:
- Find an appointment by a single value, such as student ID. Specifying 'Students.ID=' actually isn't required for ID or Name searches, but it works well as an example.
- Students.ID=1931
- Students.ID=1931
- Search multiple fields at once, separate your searches by a space.
- Students.ID=1931 Appointments.Online=1
- Students.ID=1931 Appointments.Online=1
- When performing multiple searches where at least one field contains a space, make sure to surround the contents you're searching for with quotation marks.
- Students.ID=1931 Reasons.Reason="Paper Writing"
- Students.ID=1931 Reasons.Reason="Paper Writing"
- Date searches such as this are required to be formatted as YYYY-MM-DD
- Appointments.StartDT=2023-04-27
- Appointments.StartDT=2023-04-27
- You can also search by a date range with ... (quote protected)
- Appointments.StartDT="2023-04-20...2023-04-30"
- Appointments.StartDT="2023-04-20...2023-04-30"
Hamburger Menu
Every listing page in the Trac System features a hamburger menu with utilities to search for or interact with your list of records. Some of these options are specific to a certain listing/record-type, others are shared. The following list includes definitions for the hamburger menu options available on this listing, and how they can be utilized.

- All Appointments, Today, Recent Appointments, etc
- These options allow you to quickly search for a specific date range for your appointment records. Recent Appointments is the default, showing the past 6 months of data.
- These options allow you to quickly search for a specific date range for your appointment records. Recent Appointments is the default, showing the past 6 months of data.
- Search
- This utility will open a pop-up window unique to each Listing it's present on, allowing you to search your records by a number of different fields.
- This utility will open a pop-up window unique to each Listing it's present on, allowing you to search your records by a number of different fields.
- Power Search
- This option provides a simple but powerful search utility to find the records you need. String together multiple searches, adding or removing results for each. Use Search Symbols to include ranges of data, and Save Searches for later use if needed. The search term 'blankornull' can be used to find all records with a value of nothing ("") or null ().

- Saved Searches
- See Saved Searches for more information.
- See Saved Searches for more information.
- Show these <records>
- This utility takes your selection of records, finds the related records, and takes you to that listing with the resulting records. For example, on the Registration listing, you can "Show these Students" to display the student records for the registrations that you were viewing.
- This utility takes your selection of records, finds the related records, and takes you to that listing with the resulting records. For example, on the Registration listing, you can "Show these Students" to display the student records for the registrations that you were viewing.
- Find/Merge Duplicates
- These utilities can be used to cleanup duplicate records in your Trac System. We highly recommend reaching out to Redrock Support directly for assistance in cleaning up this data.
- These utilities can be used to cleanup duplicate records in your Trac System. We highly recommend reaching out to Redrock Support directly for assistance in cleaning up this data.
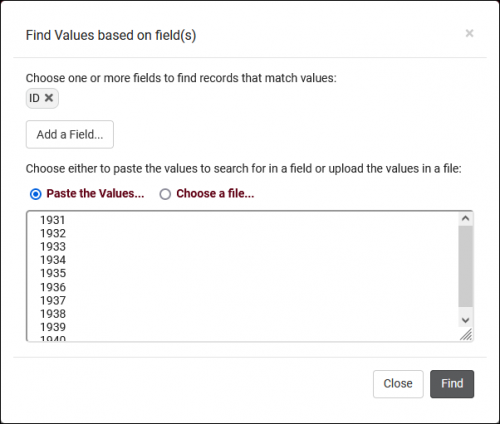
- Find by Values
- This utility can be used to search one field for multiple values. If you have a spreadsheet containing a list of student IDs, this is an easy way to pull up the same list of students in TracCloud by copying the ID column into this search field.

- Change Field Values
- This utility allows you to make modifications in to your records in bulk. Similar to the Merge Duplicates utility, we highly recommend coordinating with Redrock Support directly on this setting.
- This utility allows you to make modifications in to your records in bulk. Similar to the Merge Duplicates utility, we highly recommend coordinating with Redrock Support directly on this setting.
- Selected...
- The Selection Tool offers several options to filter and manage your records. More information on this feature can be found in its own dedicated article here.
- The Selection Tool offers several options to filter and manage your records. More information on this feature can be found in its own dedicated article here.
- Views
- See Views for more information.
- See Views for more information.
- Create Chart
- Based on the data currently being viewed a chart can be generated to visually illustrate the relationships in the data.
- Based on the data currently being viewed a chart can be generated to visually illustrate the relationships in the data.
- Allows you to print the contents of the current listing, by extension this also allows you to export the current list as a PDF file.
- Allows you to print the contents of the current listing, by extension this also allows you to export the current list as a PDF file.
2023-02-09 | Block Students from Booking Appointments Between Two Static Times
It's now possible to prevent students from booking appointments in a specific time range during the day. This applies in addition to the standard "Schedule no later than" rule. The purpose of this is to prevent students from booking very early in morning if your consultants need additional notice in advance.
This option can be found in Other > Other Options > Profiles > [Your Profile] > Prefs > Scheduling > Time Restrictions > Block student from booking appointments between # and #.

2023-02-09 | Search for Students with Birthdays Today
A new special search criteria has been added to TracCloud allowing you to easily find students who's birthday is today. From the student listing, use the phrase "birthdaytoday" to locate these students. See screenshot below.

2023-01-30 | Allow Students Without an Assigned Advisor to Book With Any Staff
A new option has been added to your centers that allows students who's Assigned Advisor field is blank to book with any available Advisor. This option only has an effect if you're already utilizing Student/Consultant link.
This can be found in Other > Other Options > Profiles > [Your Profile] > Centers > [Your Center] > Students with Null or Blank Values in Linking field can book with anyone.

2023-01-19 | Consultant Sort Code for Kiosk Login/Logout
If your Trac System is configured to ask for consultant name during visit login or logout, the list will be sorted alphabetically by last name, then first name. A new option has been added to staff profiles named 'Sort Code' which allows you to override this. Consultants are first sorted by Sort Code, then by Last/First name.
This can be found in Other > Listings > Staff > [Your Staff Account] > Sort Code on KIOSK Login.

In the example below, Dave has a Sort Code of "A" while everyone else is blank (processed as "M"). Similarly, Dave could be given "Z" instead to push them to the bottom of the list. "1", "AAA", "_" are also valid options.

2023-01-07 | Custom Kiosk Course Lists
Course Lists can now be linked to Custom Kiosks to determine what sections students are able to choose on login, which allows more flexibility compared to selecting a single section.
Custom Kiosks can be managed by going to Other > Other Options > Profiles > [Your Profile] > Prefs > Log Listing Message,[...] > Custom Kiosk Options. Within your Custom Kiosk settings, you will see the new Course List field available to utilize. More information on Course Lists can be found here.

Course Lists
Course Lists act as assigned sections or specialties in TracCloud, allowing you to determine which courses each of your consultants can assist with, and which courses are available in each center. Course Lists can additionally be assigned to availabilities as a form of section group, as seen towards the bottom of this article.
To manage your course lists, go to Other > Listings > Course Lists.

This will bring you to the Course Lists listing.

- Process Specialties allows you to re-scan for new courses that fall under the criteria of these lists. For example, if a list was created for Math 100 courses, but only sections 01 and 02 existed when it was created, you would need to re-scan to add the new 03 and 04 sections. This step is part of the TracCloud semester changeover process.
- The Hamburger Icon allows you to show all course lists after a search, print the list, or create a new list. Go ahead and click “New Course List” to begin.
After selecting New Course List, we’re brought to the following page, allowing us to name and customize our new list.

- Name will be what you’ll select when assigning this course list to your centers or consultants.
- Lock to SysAdmin will prevent non-sysadmin accounts from modifying this course list.
- Add New Course Item allows us to add a new subject query. We can be as specific as needed here, specifying up to the Subject, Course Number, Section Number, or Term Number, as well as faculty. For example, this allows us to create a course list of all ACTG250 courses, regardless of section/term, or simply all courses for writing center environments.
- Each course list item also has additional options, detailed below.
- Share will add this item to other selected course lists. More information on this can be found towards the bottom of this article.
- Delete will remove this item from the list.
- Toggle allows us to include/exclude the queried course(s). For example, you could create a course list of all MATH courses, and then create another Course Item for MATH 204 and set the toggle icon to off . This would result in the list containing all MATH courses except for 204.
- Toggle allows us to include/exclude the queried course(s). For example, you could create a course list of all MATH courses, and then create another Course Item for MATH 204 and set the toggle icon to off . This would result in the list containing all MATH courses except for 204.
- Add Other Course List allows us to include/exclude the contents of an entire other course list. Consultant course lists (designated with the sequence number in the name) should not be added to other course lists.
As an example, we’re going to create a course list for one of our consultants. This consultant can assist with all Accounting 100 courses, except for section 386. Here’s how we would write that out.
To start off, we’re including all ACTG 100 courses, ignoring section (wildcard), term, and faculty.

At this point, we can manually add another entry for section 386 and click the toggle icon to exclude the course. Alternatively, we can scroll down to view the sections that will be included in this list, where we can see section 386. We can immediately exclude this course by clicking the remove icon on the right-hand side.

Clicking the icon prompts us to choose how specific we want to be with this exclusion. For our scenario, we would select “Remove ACTG 100 386.”

This will add the new item to the list automatically, excluded by default.

Center course lists are used to filter availability searches and affect what section options are available when creating availabilities and booking appointments from the dashboard, in addition to consultant specialties. In your Center entry window, you will see the highlighted options below.
Other > Other Options > Profiles > [Your Profile] > Centers > [Your Center]

- Ignore consultant specialties for this center
During the kiosk login or appointment booking process, students are asked what subject they need assistance with. When you select a consultant, the list of available subjects/reasons is restricted based on what the consultant is assigned to. By checking this box, these specialties are ignored, and a student can choose any subject/reason/consultant combination, only restricted by what’s assigned to the center itself. Typically used for writing centers.
- Course List for this Center
This option controls the courses assigned to this center. If you have a Math center, you may want to assign a course list containing all MATH courses. A writing center may have all sections assigned, etc.
Managing course lists for consultants is exactly the same as centers, with one exception. Consultants have course lists by default. After you create a new consultant account (Other > Listings > Staff > [Consultant] > Scroll down to "Course List of Specialties"). The consultant's default course list will always be the last option in this drop-down menu, even if you haven't created it manually. After selecting their course list, you can click the Edit button to immediately start modifying it, at which point it's exactly the same as described above.

Another utility available for Course Lists is the ability to share items to other lists, effectively a way to make bulk changes to your specialties by adding or removing sections as needed. For example, if you recently added a non-enrolled course, this allows you to quickly assign it to everyone without editing every list individually.
First, use the selection buttons on the Course Lists listing to choose which Course Lists you want to share an item with.

Second, open a Course List that contains the item you want to share. Click the arrow button on that item, and you will be shown a confirmation window. Clicking "OK" here will immediately add that item to your selected Course Lists.

Another use for Course Lists is as section groups for availabilities. For example, if you have a tutor who is available for MATH, ACTG, and CHEM, but you want to create an availability for MATH and ACTG exclusively, you would need to use a course list. The ability to link course lists to availabilities must be enabled in global preferences first by going to Other > Other Options > Preferences > Search Availability Options > Additional Settings > Allow Course Lists to be assigned to availabilities.
Once enabled, a new search glass icon will be shown in availabilities. You will be able to choose any course list that is assigned to the same profile that the center of the availability is in. Course lists designated as "All Profiles" will not appear in this list.

Profile Preferences
Prefs
Reasons
Reasons/Services allow your staff and students to provide additional information and reasons for booking an appointment. For example, reasons such as “Counseling,” “Study Plan Help,” or “Exam.” This would let the consultants know what the student needs help with, provide preparation details and information as needed, and gives your staff additional information for reports. Reasons can be managed by going to Other > Other Options > Profiles > [Your Profile] > Reasons.

The hamburger icon contains several management options, detailed below.

- Show Activated
- This will display globally activated reasons (left-side checkbox).
- This will display globally activated reasons (left-side checkbox).
- Activate/Deactivate Found Records
- Activate/Deactivate reasons in bulk, based on your last search result.
- Activate/Deactivate reasons in bulk, based on your last search result.
- New Reason
- Create a new reason.
- Create a new reason.
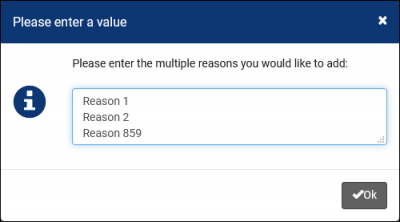
- Add Multiple Reasons
- Create multiple reasons at once, each on its own line.

Creating Reasons
Click on the hamburger button, then select “New Reason” to be brought to the Reason creation menu.

- Profile
- By default, the profile we started creating this reason in will be selected, however, we can change this value or even choose “Available for All Profiles.”
- By default, the profile we started creating this reason in will be selected, however, we can change this value or even choose “Available for All Profiles.”
- Reason
- The name of the reason, this will be what’s selected by students or staff during appointment scheduling and kiosk logins.
- The name of the reason, this will be what’s selected by students or staff during appointment scheduling and kiosk logins.
- Category
- The category this reason is assigned to. More information on this can be found further into this article.
- The category this reason is assigned to. More information on this can be found further into this article.
- Sort Code
- Manually specify how your reasons are sorted during login or appointment search. This can be numeric, or you can simply paste your reason name to sort alphabetically.
- Manually specify how your reasons are sorted during login or appointment search. This can be numeric, or you can simply paste your reason name to sort alphabetically.
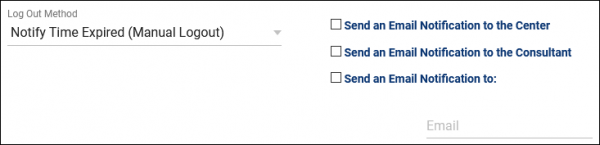
- Log Out Method & Visit Time
- There are three Methods available.
- Auto Logout After Time, which will automatically log the student out of the center when the time specified in Visit Time is reached.
- Auto Logout Immediately will log the student out immediately after they’re logged in and create a visit record of the length specified in Visit Time.
- Notify Time Expired, which will send out an email based on the checkboxes used when the time limit is reached. The contents of this email will be determined by your 'Visit Duration Notification' email in your Profile Prefs.
- There are three Methods available.

- Inactive
- We never recommend deleting records in TracCloud, as this removes them from reports and related records. In the event that you are no longer utilizing a reason, you’ll want to check the Inactive box instead of deleting it to keep the records available and accurate.
- We never recommend deleting records in TracCloud, as this removes them from reports and related records. In the event that you are no longer utilizing a reason, you’ll want to check the Inactive box instead of deleting it to keep the records available and accurate.
- Work Reason
- Work reasons allow consultants to login to TracCloud and track their work hours. This data will then be available to users with appropriate permissions via payroll reports. For more information on payroll tracking in general, click here.
- Work reasons allow consultants to login to TracCloud and track their work hours. This data will then be available to users with appropriate permissions via payroll reports. For more information on payroll tracking in general, click here.
- Ignore Section Specialties when Searching Availabilities with this Reason
- This functions similarly to the 'Ignore Specialties' options in Centers. If a student is searching for availabilities and selects a Reason with this checkbox enabled, they will see all consultants assigned to this Reason regardless of subject chosen. Typically used for Writing or Coaching-related Reasons.
- This functions similarly to the 'Ignore Specialties' options in Centers. If a student is searching for availabilities and selects a Reason with this checkbox enabled, they will see all consultants assigned to this Reason regardless of subject chosen. Typically used for Writing or Coaching-related Reasons.
- Do NOT SHOW for Students (staff only)
- If checked, this Reason will only appear for staff who are booking appointments on behalf of students. Students themselves will not see this Reason.
- If checked, this Reason will only appear for staff who are booking appointments on behalf of students. Students themselves will not see this Reason.
- Do NOT SHOW for Appointments
- Do NOT SHOW for KIOSKS
- Do NOT SHOW for Batch Visits
- Don’t show this reason under these specific circumstances.
- Don’t show this reason under these specific circumstances.
Assigning Reasons to Centers
There are two ways to assign Reasons to your Centers, first is directly from this tab in your Profile. The checkbox button on the right-side allows you to activate/deactivate reasons for the center selected in the top-left corner, or display all activated reasons for the selected center. This can also be used with “All centers” selected, allowing you to quickly add or remove a reason from all of your centers.

Reasons can also be assigned from your Center directly. From your Profile, click on the Centers tab followed by the Center you want to update. The very last option on this page is 'Active Reasons,' allowing you to add or Remove reasons for this specific Center.

Reason Categories
Categories allow you to group different reasons together. If you have several reasons available, it can be beneficial to group them into categories that staff and students can select when booking appointments.
These Categories will appear followed by “…”, which when clicked will prompt you to choose a Reason within the category.


As an example, a “Placement Assessment” category that contains different assessment reasons for each course. A “Note-Taker” category, “Make-Up,” etc. If you have multiple reasons that would be better grouped together, putting them in the same category allows for improved organization and an easier appointment booking process for staff and students.
See Also
- Log In/Out Preferences - To require users select reason during visit login.
- Search Availability Options - To require users select reason during appointment searches.
- Staff & Consultants - Assigning reason specialties to staff.
Custom Lists, Dynamic Lists, & Watch Lists
Lists are used to group an arbitrary selection of students together. These lists can be used for a variety of reasons, from simply viewing a set of students, to sending mass emails, running reports, or even limiting a permission group’s student listing access to only a certain population of students. If you want to make a student stand out on the log listing or student listing, assigning them to a watch list is a great way to accomplish this. There are three types of lists in TracCloud, detailed below.
Static List
- Static lists are managed manually. If an individual student or a set of students need to be added or removed from a list, they will need to be added/removed by a user with the appropriate permissions. Max appointment rules can also be configured to add students to lists automatically, more information on these rules here.
- Static lists are managed manually. If an individual student or a set of students need to be added or removed from a list, they will need to be added/removed by a user with the appropriate permissions. Max appointment rules can also be configured to add students to lists automatically, more information on these rules here.
Dynamic List
- Dynamic lists are updated automatically based on a student search. For example, you can search for all students with a major of X and a class of Y, and a dynamic list created based on that search will keep itself up to date as that search result changes overtime. You can even base a dynamic list on a student search for other custom lists.
- Dynamic lists are updated automatically based on a student search. For example, you can search for all students with a major of X and a class of Y, and a dynamic list created based on that search will keep itself up to date as that search result changes overtime. You can even base a dynamic list on a student search for other custom lists.
Watch Lists
- A watch list can be based on any custom list, static or dynamic, and adds an indicator next to the student's name in a few different locations to make them stand out compared to students not on a watch list. These otherwise share the same functionality as the custom list they're linked to.
- A watch list can be based on any custom list, static or dynamic, and adds an indicator next to the student's name in a few different locations to make them stand out compared to students not on a watch list. These otherwise share the same functionality as the custom list they're linked to.
In order for a user to view or edit a student list, the list must be assigned to their permission group. It's also worth keeping in mind that only SysAdmins are allowed to create lists in the first place.
Creating Static Lists from System Preferences
Within your global preferences, you will find the "Custom Lists" menu. This allows you to view the custom lists that have been created in your Trac System, which can be renamed, deactivated ("!" button), or deleted if needed. Deactivated lists no longer appear on the student list/reports, but can be reactivated later if needed. A new custom list can be created by clicking the + icon, only static lists can be created from this menu. For existing dynamic lists, you can view or edit the query by clicking the button.
Other > Other Options > Preferences > Custom Lists

Creating Static & Dynamic Lists on the Student Listing
Managing lists directly from the student listing is also possible and provides you the ability to create dynamic lists as well, which allow you to have an always-up-to-date list of students for any purpose.
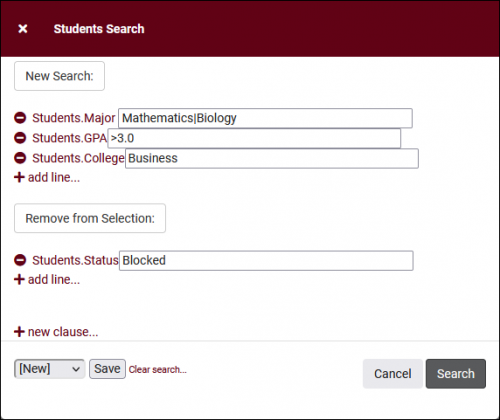
Before creating a list, you will almost always start with a search. This can be any search, from entering a student's name in the search bar, to power searches, and even utilizing the "Show These Students" options using the registrations or visits listing as a source. As an example, the power search in the screenshot below would show all students with a Major of “Mathematics” and a status of “Active."

After you've reached the search results page, click on the hamburger icon > Lists, where you will find the following options.

- Create New Static List
- This will create a new static list and assign all students from your current search to itself. This list will not be updated automatically going forward. You will be prompted to enter a name for the list on selection.
- This will create a new static list and assign all students from your current search to itself. This list will not be updated automatically going forward. You will be prompted to enter a name for the list on selection.
- Create New Dynamic List
- This will create a new dynamic list based on your last search (e.g., Major and Status), and will keep itself up to date going forward based on that search. If a student changes majors, they will be removed, if a new student is imported with this major, they will be added, etc. You will be prompted to enter a name for the list on selection.
- This will create a new dynamic list based on your last search (e.g., Major and Status), and will keep itself up to date going forward based on that search. If a student changes majors, they will be removed, if a new student is imported with this major, they will be added, etc. You will be prompted to enter a name for the list on selection.
- Add these to...
- This allows you to quickly add your current selection of students to an existing static list.
- This allows you to quickly add your current selection of students to an existing static list.
- Remove these from...
- This allows you to quickly remove your current selection of students from an existing static list.
- This allows you to quickly remove your current selection of students from an existing static list.
- Find Not On List...
- This will further filter your selection of students by those who are not on another list (static or dynamic).
- This will further filter your selection of students by those who are not on another list (static or dynamic).
- Delete List...
- This allows you to quickly delete a list from your system.
- This allows you to quickly delete a list from your system.
Beneath these options you will also see all other lists that you have access to. Clicking a list will immediately display those students.
List Categories
Lists can be grouped into categories for further organization. The name of your list should be in the format of Category::List Name. See example below.
System Preferences:

How it appears on the Student Listing:

Creating Watch Lists
To create a new watch list indicator, head over to your global preferences, select "Watch Lists," and click the + icon. This will add a new watch list, clicking on the name lets you rename it, selecting the colored box lets you change the indicator color, and the box next to that determines which custom list this watch list is assigned to. After you’ve given it a name, color, and list, select the right-arrow to control where these indicators appear. Watch list indicator icons refresh daily at 4am, which can be changed here as well if needed.
Other > Other Options > Preferences > Watch Lists

Watch List Indicator Locations
The watch list indicator can be configured to display in various locations throughout the Trac System. Hovering over the indicator also provides the list name.

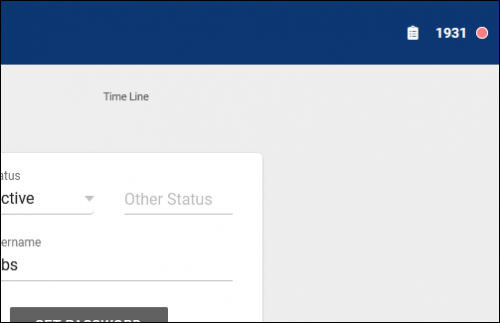
- Display on Log In/Out
- Displays in the upper-right corner of the login/logout process on the log listing.

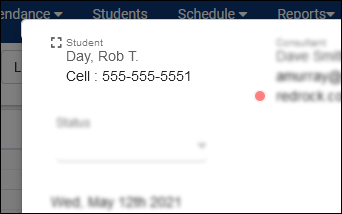
- Display on Entry
- Displays the indicator in the top-right corner of student profiles.

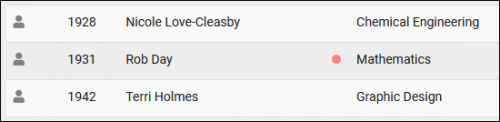
- Display on Listing
- Displays the indicator on the student listing.

- Display on Appointment
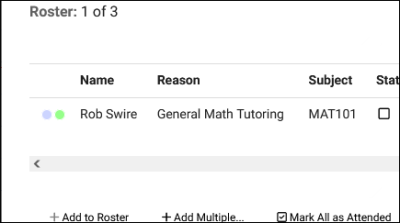
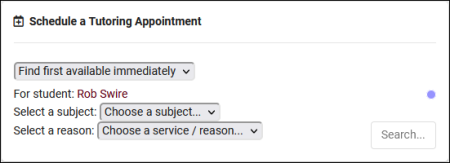
- This makes the indicator visible during availability searches as a staff member, within appointment entry windows, and in group rosters.


- Display on Dashboard
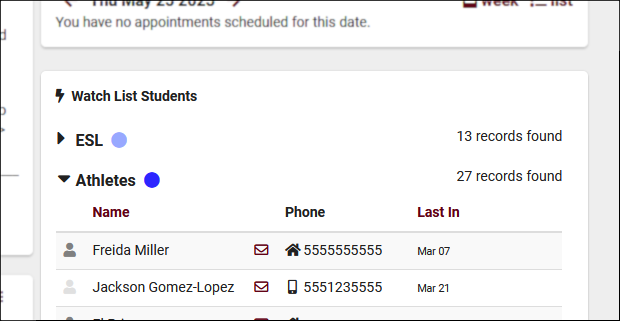
- This will allow the list to be visible from the staff dashboard, within the “Watch List Students” box. Requires "Show the Watch Lists on Main Menu" to be enabled in the staff member's linked permission group.

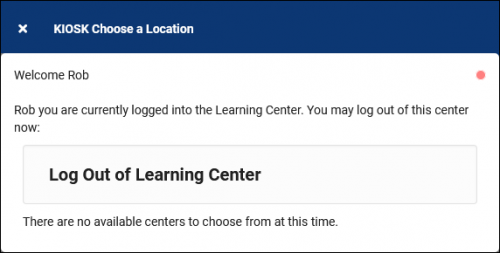
- Display on KIOSK login/out
- Displays in the upper-right corner of the login/logout process on the kiosk.
2022-12-08 | Terms and Conditions Response Listing
You can now view a list of students who have accepted your terms and conditions records, including the date of acceptance, active semester, subject, and initials. This can be viewed from your existing Terms and Conditions records in Other > Listings > Terms and Conditions > [Your Terms] > Responses.
