TracCloudWhatsNew
From Redrock Wiki

This page highlights some of the recent changes made to the TracCloud platform, and how you can utilize them on your own instance. A list of past changes and a full changelog can be found in the tabs above.
If you have any questions about these changes, feel free to reach out to us on our helpdesk.
Profile Preferences
Prefs
Resources
Resources are items that may be checked in and out of your Center(s) and lent to students or staff. The borrowing of resources at your center(s) can be tracked, recorded, and the data collected can be displayed through Reports. Resources can be utilized in many ways, but common examples include Laptops, Calculators, or Books that users can reserve, checkout, and return.

To begin creating a resource, go to Other > Resources > Resources > Hamburger menu > New Resource. Custom fields can also be added to this page.

- BarCode is the unique identifier for this item. Can be used to log resources in and out via a barcode scanner or swipe system, in addition to manually entering the value.
- Title is the name of this resource.
- Profile is the linked Profile for this resource.
- Checked Out To shows which user currently has this item checked out (if applicable).
- Collateral will store the collateral item collected due to the option below being enabled. This should be left blank when creating a new resource, as it will be automatically filled in when the item is checked out and collateral is collected.
- Collateral Logic enables Collateral functionality if checked. This will ask the staff member logging the resource in/out whether or not collateral has been gathered/returned.
- Reserved For shows who currently has this resource reserved.
- Always Available indicates that this resource doesn't need to be individually checked out or reserved, multiple users can check out the same resource at any time.
- Reserved Date, Last Date Out, and Due Date display the exact times of reservations, checkouts, and when the resource is due to be returned.
- Resource Type allows you to categorize this resource into a type for reporting purposes, or to restrict certain students from accessing this resource.
- Length of Checkout determines how long an item can be checked out for before an overdue notification is sent. Enter a number of days from checkout, or choose "Due by end of semester" to base it on your current semester end date. If the latter option is chosen, a new field will appear to add a buffer before the end of the semester (i.e., to require the item be returned X days before semester end.)
- Max Renewals Allowed determines how many times a checkout can be renewed.
- Not Available to Students / Staff allows you to restrict this resource to one user type or the other. By default (both unchecked), the item is available to either user type.
- Description is an internal description of this particular resource.
- Keywords are the related words for this resource, delimited by commas or semicolons. For example, if you have a Laptop as an available resource, you may want to create keywords like "Computer, PC, Macbook" to make this resource easier to search for.
Resource Types can be used to group resources together for the purpose of reporting or to block certain students from accessing certain resources. These can be managed by going to Other > Resources > Resource Types. Click the hamburger menu > New Resource Type to begin creating a new type.

After creating a new resource type or clicking on an existing one, you will find the following options.

- Resource Type Name
- The type/category for your resources.
- The type/category for your resources.
- Resource Type Description
- Information about this resource type.
- Information about this resource type.
- Linked to Profile
- Allows you to link this Resource Type for use in a specific profile.
- Allows you to link this Resource Type for use in a specific profile.
- Allowed Student List
- Allows you to only allow students on this list to checkout this resource, blocking everyone else. If left blank, anyone can checkout this resource (assuming they aren't blocked from resource usage entirely).
- Allows you to only allow students on this list to checkout this resource, blocking everyone else. If left blank, anyone can checkout this resource (assuming they aren't blocked from resource usage entirely).
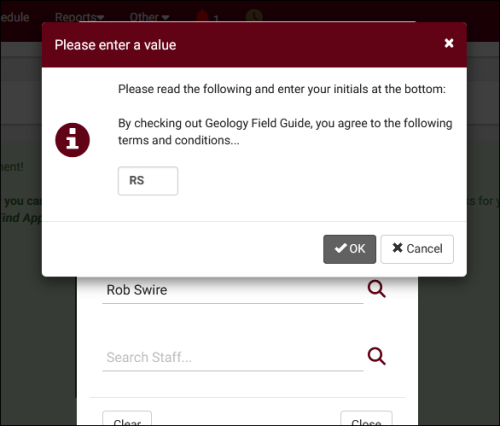
- Display Notice and Require Initials when Checking Out Resources of this Type
- If enabled, a prompt will appear during checkout requiring that the user agree to terms and conditions before continuing. Terms can be entered in the Logout Notice to Student field (Twig supported), and a copy of the terms can be automatically forwarded to the student by checking Send Terms and Conditions as Email to Recipient.

There are a couple settings of note within your permission group(s) relating to Resources.
Other > Other Options > Groups > [Your Group] > Log In/Out

- Allow user to log resources in and out provides users in this group the ability to record resource usage.
- Allow user to view what resource the student has logged out provides users in this group the ability to view a student's currently logged out item.
Other > Other Options > Groups > [Your Group] > Admin/Modules

- Table Access provides access to the Other > Resources view of resources. You can also assign Resource Types here to allow this group to view and edit these as well.
After creating your resource and updating your groups, you're ready to start checking out resources. This option can be found by going to Other > Log Resource.

You will then be brought to the following screen with two text entry areas available. The first is where you select a resource (searching by Barcode, Title, or Keywords), the second allows you to select a student or staff member. Once one or both fields are selected, additional options become available to check out, return, or reserve this item.

In the event that Collateral Logic is being utilized, more options will be available in regards to collecting/returning the collateral item.

Resource emails can be customized to inform students of the due date of their checked-out resource, or if the resource is overdue. These options are part of your profile preferences, in Other > Other Options > Profiles > [Your Profile] > Prefs > Emails > Resource Checkout Emails.
Similar to your other Profile Emails, you can write a subject line and body of your email, an additional SMS text, and choose when this email is sent. Unique to resource emails is Send additional overdue emails daily, which will resend the overdue notice for each day the item is still checked out.

There are two resource reports available in TracCloud. These can be found by going to Reports > Management > Resources. Resources provides information on resource utilization, while Resources Listing provides information on the items themselves.
Resources
This report exports resource usage, showing the students who have checked out a particular resource, the checkout date and time, as well as total hours. This can either be run on overall Utilization, or specifically on Past Due resources.

- Time Frame
- The date range for the data in this report. Beyond entering a date range manually, you can also choose a preset date range (Today, This Month, This Semester, etc) from the dropdown list above.
- Show Inactive Resources
- Include resources in results that have a status of 'Inactive.'
- Show Summary
- Only show data totals, excluding details of individual records.
- For Past Due, Show All Checkouts
- If this is checked, currently checked out resources will be included in report results. Unchecked would exclude these.
- Include Checkout Notes
- Adds the checkout notes field as an additional column in report results.
- Show Totals Bar Chart
- Adds a visual bar chart of totals to your report data.
- Group by
- Group records by the selected field. Some reports allow you to add secondary and tertiary groupings as well.
- Student ID, Resource Type, Resource Title, Barcode, Keywords, Profile
- Search by Student ID, Resource Type, Resource Title, Resource Barcode, Keywords, or the Profile of your resources.
- Output format
- Use HTML to view report data in your browser, or export this report to a CSV file (available for most reports). Some reports offer additional CSV options depending on if you want to include totals and/or data grouping in your export.
- Deliver to
- Display this report immediately in your browser ("Screen"), or send the report to a specified email address ("Email"). Multiple email addresses can be specified, use ; to separate them (example@example.edu;sample@example.edu).
- View Utilization or View Past Due
- Utilization will show all checked out resources and the individual checkouts. Past Due will only display overdue checkouts, items that were not returned soon enough, filtering out checkouts that were returned in time.
HTML

CSV

Resources Listing
The Resources Listing report will show you a list of resource records along with information about the item and how many times it's been checked out. Data can be grouped by Resource Type if set in the Sort by field.

- Sort by
- Choose how the selected data is sorted.
- Show Inactive Resources
- Include resources in results that have a status of 'Inactive.'
- Resource Type, Resource Title, Barcode, Keywords, Profile
- Search by Resource Type, Resource Title, Resource Barcode, Keywords, or the Pofile of your resources.
- Additional Search
- Filter your results by a selected field.
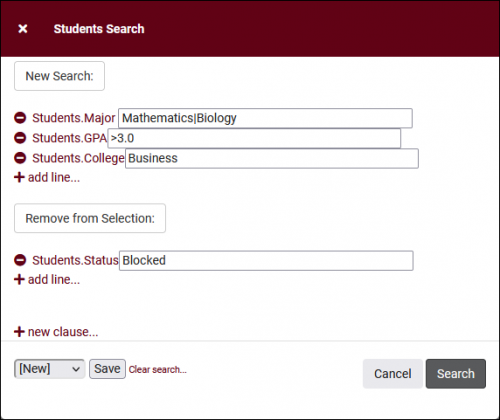
Use * as a wildcard (Subject: MAT*)
| as "or" (Major: Mathematics|Biology)
# as "Not" (Status: #Inactive)
&& as "And" (Major: #Mathematics&&#Biology)
blankornull as a keyword to find records where the field is blank (Reason: blankornull)
Multiple fields can be added to further narrow down your results.
- Filter your results by a selected field.
- Output format
- Use HTML to view report data in your browser, or export this report to a CSV file (available for most reports). Some reports offer additional CSV options depending on if you want to include totals and/or data grouping in your export.
- Deliver to
- Display this report immediately in your browser ("Screen"), or send the report to a specified email address ("Email"). Multiple email addresses can be specified, use ; to separate them (example@example.edu;sample@example.edu).
HTML

CSV

System Preferences
This is the first menu in your "Global Preferences" containing options that affect all profiles. "System Preferences" contains various options like your system theme, withdraw codes, default statuses and schedule views, alias formats, and more. You can find these preferences in Other > Other Options > Preferences > System Preferences


- Center Name
- This is the campus name for your Trac System. Appears in the top-right corner of your dashboard and will be used as the contact name for emails sent from the Trac System.


- Center Email
- Effectively a fallback email address. If an email needs to be sent, but the account/profile doesn’t have an email address configured, this will be used instead.
- Effectively a fallback email address. If an email needs to be sent, but the account/profile doesn’t have an email address configured, this will be used instead.
- Name for your Client
- Determines the phrasing of clients in TracCloud, “Student,” “Tutee,” “Client,” etc.
- Determines the phrasing of clients in TracCloud, “Student,” “Tutee,” “Client,” etc.
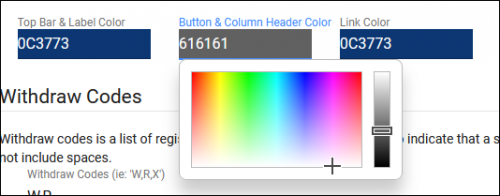
- Colors
- Determines the color of your navigation bar and accent colors, allowing you to match the color-scheme of your campus website. Clicking on these fields also brings up an interactive color picker if you don’t have the hex value available.

- Image
- Upload your campus logo here. This will display faded into the background of TracCloud.
- Upload your campus logo here. This will display faded into the background of TracCloud.
- Main Login Instructions
- This text appears on the local account login screen for your Trac System. This can be ignored if you don't use local accounts.

- Withdraw Codes
- This is where you can specify the withdrawn/dropped statuses for student enrollments. During the import process, if a student’s registration contains one of these codes, the enrollment will be deactivated. Withdraw via Which Field determines where the drop code is stored/imported, grade or registration status.
- This is where you can specify the withdrawn/dropped statuses for student enrollments. During the import process, if a student’s registration contains one of these codes, the enrollment will be deactivated. Withdraw via Which Field determines where the drop code is stored/imported, grade or registration status.
- Keep Enrolled Codes
- This is the opposite of Withdraw Codes. Any values entered here will be set to active during the import process.
- This is the opposite of Withdraw Codes. Any values entered here will be set to active during the import process.
- Deactivate when not imported
- Deactivates registrations in the event that they’re not found in the most recent import file. This overrides "Keep Enrolled Code," a registration with an active code will still be deactivated if it's not being imported.
- Deactivates registrations in the event that they’re not found in the most recent import file. This overrides "Keep Enrolled Code," a registration with an active code will still be deactivated if it's not being imported.
- Deactivate after x Days not Imported
- This is an optional buffer that can be used in combination with Deactivate when not imported. By default, registrations will be deactivated when they were not provided in the current day's files. This preference can be used to add a buffer for when the registration will be set to inactive, e.g., 5 days after it was last imported.
- This is an optional buffer that can be used in combination with Deactivate when not imported. By default, registrations will be deactivated when they were not provided in the current day's files. This preference can be used to add a buffer for when the registration will be set to inactive, e.g., 5 days after it was last imported.
- Appointment Statuses
- These statuses are used when a profile doesn’t already have appointment statuses defined.
- These statuses are used when a profile doesn’t already have appointment statuses defined.
- Cancellation reasons a student can choose from
- This is a preset list of cancellation reasons a student can choose from, in addition to the standard text field offered when a student attempts to cancel their appointment.
- This is a preset list of cancellation reasons a student can choose from, in addition to the standard text field offered when a student attempts to cancel their appointment.
- Student cancellation reason required
- If checked, a student will not be able to cancel without providing a reason (written or from the preset list above).
- If checked, a student will not be able to cancel without providing a reason (written or from the preset list above).
- Calc Missed Appointments Since
- Calculate total missed appointments since this date, used for blocking students from booking appointments if they’ve excessively missed past appointments. This preference is only used if the profile doesn’t already have a Calc Missed Appointments Since value defined. Automatically Use Term Start can be used if you'd like to use the start date of your semester instead.
- Calculate total missed appointments since this date, used for blocking students from booking appointments if they’ve excessively missed past appointments. This preference is only used if the profile doesn’t already have a Calc Missed Appointments Since value defined. Automatically Use Term Start can be used if you'd like to use the start date of your semester instead.

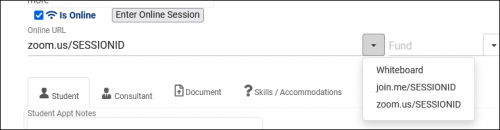
- Default Online Options
- When an appointment/availability is designated as Online, you’re provided the option of choosing a URL for the appointment to take place in. This would typically be the consultant’s assigned static link (found in their profile), but you can also have a few preset options as defined in this field. This could be used for breakout rooms, or placeholder URLs with example session IDs. This is additionally used for the Whiteboard and Q2 modules, if applicable.

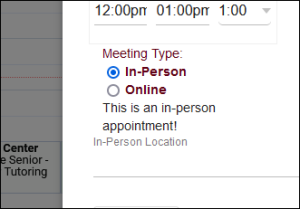
- Text to display when appointment is In Person / Online / Asynchronous
- Text entered here is displayed within appointment records (to both students and staff) if an appointment matches the specified meeting type, allowing for further clarification on the type of appointment being booked.

- Keep physical Location for online visits (not recommended)
- If checked, for online optional availabilities, when a student attends an online session, the in-person location will carry through to the visit record rather than the online location. This option is almost always disabled except for very specific use-cases.
- If checked, for online optional availabilities, when a student attends an online session, the in-person location will carry through to the visit record rather than the online location. This option is almost always disabled except for very specific use-cases.
- Default start time on calendar and number of hours to show on calendar
- This allows you to set default visible calendar hours for new staff accounts. This can be overridden by individual staff accounts setting their own schedule options (shown in screenshot below). For example, to set the default to 7am to 6pm, set Start Hour to 7 and Number of Hours to 11.
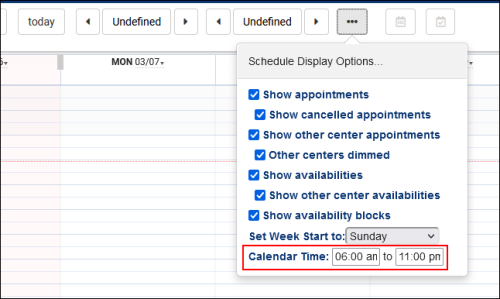

- Default start day to show on calendar
- This determines what day of the week is shown first on the staff schedule view. This can be overridden by individual staff like the above calendar time option.
- This determines what day of the week is shown first on the staff schedule view. This can be overridden by individual staff like the above calendar time option.
- Default sticky drag minutes
- When you click and drag an availability/appointment on the staff schedule, it will snap to 15-minute increments by default. This is so you don't end up with availabilities running from 9:01 to 9:56am, for example. This preference allows you to change those increments. Start time minutes affects your initial click (before you start dragging the time slot), while Duration minutes affects the length of the block that you create. This can always be overridden within the availability options.
- When you click and drag an availability/appointment on the staff schedule, it will snap to 15-minute increments by default. This is so you don't end up with availabilities running from 9:01 to 9:56am, for example. This preference allows you to change those increments. Start time minutes affects your initial click (before you start dragging the time slot), while Duration minutes affects the length of the block that you create. This can always be overridden within the availability options.
- Allow students to see cancelled appointments on dashboard
- Cancelled appointments are not shown to students in their Upcoming Appointments menu by default. Enabling this option changes that, including cancelled appointments in the list. If enabled, you may need to make an adjustment to your Upcoming Appointment Preferences as described, otherwise there will be no visual difference between an upcoming and a cancelled appointment. This is included in the default appointment display out of the box.
- Cancelled appointments are not shown to students in their Upcoming Appointments menu by default. Enabling this option changes that, including cancelled appointments in the list. If enabled, you may need to make an adjustment to your Upcoming Appointment Preferences as described, otherwise there will be no visual difference between an upcoming and a cancelled appointment. This is included in the default appointment display out of the box.
- Default view for students/consultants on dashboard
- Both of these user types can view their upcoming and past appointments on the main menu. This option determines the default setting of this widget, showing the current day's appointments, the week, or list (which allows them to continuously load future appointments). Regardless of which option is chosen, users will still be able to manually choose any of these three options.
- Both of these user types can view their upcoming and past appointments on the main menu. This option determines the default setting of this widget, showing the current day's appointments, the week, or list (which allows them to continuously load future appointments). Regardless of which option is chosen, users will still be able to manually choose any of these three options.
- Allow students to view accepted Terms and Conditions on dashboard
- If checked, students will be able to view any terms and conditions that they've previously accepted.
- If checked, students will be able to view any terms and conditions that they've previously accepted.
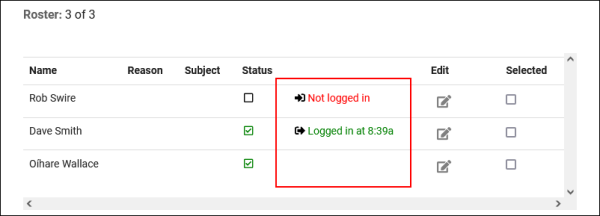
- Hide student login from class roster list
- If checked, the visit start/stop buttons in availability group rosters will be disabled.


- Lock Course Lists to Consultants
- This effectively puts all Course Lists in a "Lock to SysAdmin [or other staff admin]" state, preventing Consultant-type accounts from making further changes.
- This effectively puts all Course Lists in a "Lock to SysAdmin [or other staff admin]" state, preventing Consultant-type accounts from making further changes.
- Allow Consultant Time Check on Dashboard
- Allows staff members to view a Time Check-style menu on their dashboard, showing a quick summary of their recent work visits. If enabled, you can also choose the number of weeks shown in the Time Check window.
- Allows staff members to view a Time Check-style menu on their dashboard, showing a quick summary of their recent work visits. If enabled, you can also choose the number of weeks shown in the Time Check window.
- Activate Consultant Enter Notes on Work Visit Log Out
- If checked, consultants will see a pop-up asking them to enter notes when they log out of their work visits.
- If checked, consultants will see a pop-up asking them to enter notes when they log out of their work visits.
- Prompt for enter work visit notes on conclusion
- If the above option is enabled, this allows you to add custom text above the notes field if additional instructions are needed.
- If the above option is enabled, this allows you to add custom text above the notes field if additional instructions are needed.
- Consultant Alias Format
- If your Profile is set to use Consultant Alias rather than full name, this preference determines the format of that Alias. The default value of 'Use Consultant Alias Field' will use each consultant's personal 'Alias' value, or generic 'Consultant' phrasing if blank. You can also use other automatically generated options, such as First Name Only, First Initial Last Name, etc.
- (First Name Last Initial pictured below)

- Activate Location Filtering
- This will display each consultant's assigned location next to their name in parentheses on the staff schedule.

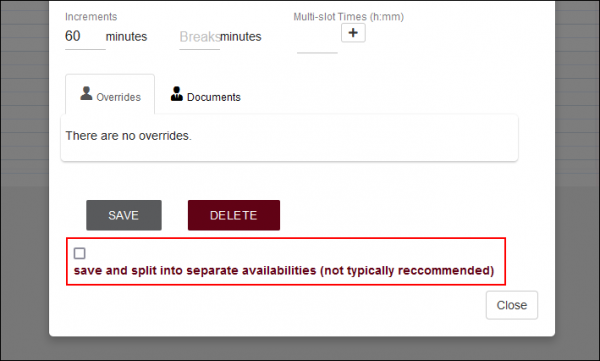
- Activate Save And Split button for Availabilities
- Adds a new option on Availability Entry allowing you to split your single block (e.g., 9 to 12, 60 minute times slots) into multiple blocks (9 to 10, 10 to 11, 11 to 12). This is typically left disabled unless you specifically need to manage individual time slots after creating your schedules. If this option is enabled, Show warning message regarding this feature not recommend will change the phrasing of the option in availability entry to show that it's not typically recommended.

- Ignore Missed Appointments when using the Move Appointment function
- If checked, availabilities with overlapping missed appointments will be shown in search results when a staff member attempts to move an existing appointment. If this behavior is desired, you may also want to modify "Allow move appointment to earlier time" in Search Availability Options > Additional Settings so that the moved appointment can keep the same start time as the availability even if it's over by a few minutes.
- If checked, availabilities with overlapping missed appointments will be shown in search results when a staff member attempts to move an existing appointment. If this behavior is desired, you may also want to modify "Allow move appointment to earlier time" in Search Availability Options > Additional Settings so that the moved appointment can keep the same start time as the availability even if it's over by a few minutes.
- Registration Listing Custom Fields
- If a Custom Field is selected here, it will be displayed as an additional column on the Registrations Listing and Student Registrations pages. This is typically used for custom fields like midterm grade.
- If a Custom Field is selected here, it will be displayed as an additional column on the Registrations Listing and Student Registrations pages. This is typically used for custom fields like midterm grade.
- Certification Listing Custom Fields
- If a Custom Field is selected here, it will be displayed as an additional column on the consultant certifications page. This is typically used for custom fields like certification course.
- If a Custom Field is selected here, it will be displayed as an additional column on the consultant certifications page. This is typically used for custom fields like certification course.
- Show Tip of the Week
- If enabled, SysAdmins will receive occasional newsletters on the dashboard providing information about various TracCloud features.

- Choose to Block Students on List
2022-03-08 | Locking Group Rosters
You can now lock Group Rosters / Availabilities as a Staff member to prevent students from booking further sessions, even if slots are available. For example, if you want to reserve the last time slot for a specific student until they're able to confirm, or if you want to prevent other students from booking this time to provide more attention to a single student.
This option is available within your Group Roster window as a lock icon at the top, click to toggle on or off.

Profile Preferences
Prefs
Staff & Consultants
This tab is where you will find your staff/consultants that have been assigned to this profile. From this view, we can see the staff names, the centers and group they’re assigned to, and what type of staff member they are (consultant or regular staff).
For a complete list of staff, not just staff assigned to this profile, go to Other > Other Options > Listings > Staff.

To create a new staff member, click on the hamburger button, then select “New Staff Member.”


- First Name, Last Name
- The staff member’s name. This will display on the staff schedule and in reports. This can also display to students if alias is not being used instead.
- The staff member’s name. This will display on the staff schedule and in reports. This can also display to students if alias is not being used instead.
- Username
- This is the username that this staff member will use to login (or for SSO authentication). Coordinate with your IT and/or Redrock Software to determine what your username format should be (e.g., ID number, email address, etc).
- This is the username that this staff member will use to login (or for SSO authentication). Coordinate with your IT and/or Redrock Software to determine what your username format should be (e.g., ID number, email address, etc).
- Other ID
- This is the alternate ID of this staff member, can be used for searches or staff work visits.
- This is the alternate ID of this staff member, can be used for searches or staff work visits.
- Hired / Terminated & Reason
- Hired/Termination dates as well as the reason for termination can be recorded for reference if needed. This does not affect Trac System functionality.
- Hired/Termination dates as well as the reason for termination can be recorded for reference if needed. This does not affect Trac System functionality.
- Staff Bio Confirmed & Confirmed Date / Time
- When and if this staff member has completed the confirm bio prompt. More information on Confirm Bio can be found here.
- When and if this staff member has completed the confirm bio prompt. More information on Confirm Bio can be found here.
- Pronouns
- This staff member's preferred pronouns, this information can be shared with students via Twig tags in emails or in Staff Bio on Search Availability.
- This staff member's preferred pronouns, this information can be shared with students via Twig tags in emails or in Staff Bio on Search Availability.
- Staff BIO
- A written bio of this staff account. Can be displayed to students, more information.
- A written bio of this staff account. Can be displayed to students, more information.
- Inactive
- We don’t recommend deleting records in TracCloud, as this will also disconnect them from related records (Visits, Appointments, etc). Instead, we recommend deactivating the account by checking this box. This will hide them from view, but the record and related data remains available if needed, for historical reporting or later reactivation.
- We don’t recommend deleting records in TracCloud, as this will also disconnect them from related records (Visits, Appointments, etc). Instead, we recommend deactivating the account by checking this box. This will hide them from view, but the record and related data remains available if needed, for historical reporting or later reactivation.
- User Level
- The user level determines some baseline rules for what this staff member can and can’t access. More information.
- The user level determines some baseline rules for what this staff member can and can’t access. More information.
- Default Center
- This is the primary center the staff member is assigned to. Also determines which profile's "Staff & Consultants" list they appear in.
- This is the primary center the staff member is assigned to. Also determines which profile's "Staff & Consultants" list they appear in.
- Permission Group
- The permission group that this staff is assigned to. More information.
- The permission group that this staff is assigned to. More information.
- Linked Centers
- This is where you can assign staff members to different centers in TracCloud. A center must be assigned here for a consultant to have availabilities in or be assigned to visits for that center.
- This is where you can assign staff members to different centers in TracCloud. A center must be assigned here for a consultant to have availabilities in or be assigned to visits for that center.
- Notes
- An optional field for any notes that you may want to record relating to this staff member.
- An optional field for any notes that you may want to record relating to this staff member.
- Consultant
- • Alias
- An alternate name that will appear when searching for appointments. Requires the “Display consultant alias on availability search” option to be enabled in your Profile Scheduling Prefs.
- • Online Link
- If remote appointments are held via online conferencing platforms (Zoom, Webex, etc), each of your consultants can have a unique invite link defined in their profile. When a URL is placed here, and their availability is set the online meeting type, the URL entered in this field will appear in the available location choices.
- • Fund
- This is used as the consultant's assigned fund, if applicable. More information on funds and payroll features in general can be found here.
- • Pay Code
- This consultant’s pay code will determine their pay rate when running payroll reports. More information.
- • Max Hours
- Can be used to limit the number of hours this staff member can be booked in a certain range of days, even if they have open availabilities on their calendar. This requires setting up a corresponding max appointment rule, more information here.
- • Location
- The Location option assigned here will display as an option when creating availabilities on this consultant’s schedule.
- • Do not show on schedule
- If checked, this consultant will not show up on the schedule.
- • Course List of Specialties
- The course list selected here determines which subjects this consultant can assist with. More information on creating and managing course lists can be found here.
- • Accommodations
- These are the skills/accommodations that this consultant can assist with. For example, if accommodations are used to specify a preferred language, you could select the languages this consultant can assist with here. More information on configuring these accommodations can be found here.
- KIOSK
- If the “KIOSK” checkbox is selected, the account is heavily restricted and many fields are removed. Kiosk accounts can login and select a Kiosk to open, and nothing else. Normal staff members can open kiosks as well, but this can be useful if you need to create a generic account to share with other people to open kiosks in your center.

Most of the options here are self-explanatory, just basic contact information about this staff member, such as their email address, phone number, address, etc. The icon indicates whether or not they're opted into text alerts. Custom fields can also be created on this page as well.

This menu allows you to view and manage this consultant’s certifications (e.g., CLRA). New certifications can be created by selecting the hamburger icon > New Certification, which will take you to an empty form to fill out. More information on Work Plans can be found in its own article by clicking here.


This tab allows you to specify which reasons this consultant is assigned to. If a user searches for availabilities with a reason that the consultant isn't assigned to, they won't appear in the search results, similar to section specialties.

The staff timeline operates similarly to the student timeline, showing a history of their related records. Visits, appointments, tasks, document uploads, etc.
To view a list of all staff accounts in TracCloud across multiple profiles, go to Other > Listings Staff. This will display all active staff by default, but any search will override that.

Staff records can be duplicated by clicking the button. This will copy group, user level, default center, linked centers, consultant status, course list, reason specialties, and accommodations to a new staff record and prompt you to replace unique information such as name, address, etc.

Hamburger Menu
Every listing page in the Trac System features a hamburger menu with utilities to search for or interact with your list of records. Some of these options are specific to a certain listing/record-type, others are shared. The following list includes definitions for the hamburger menu options available on this listing, and how they can be utilized.

- List All
- This option will show all records on the current listing. Some listings have an additional toggle for only showing "Active" records, such as Students and Registrations, which will still override a "List All" search if checked.
- This option will show all records on the current listing. Some listings have an additional toggle for only showing "Active" records, such as Students and Registrations, which will still override a "List All" search if checked.
- Power Search
- This option provides a simple but powerful search utility to find the records you need. String together multiple searches, adding or removing results for each. Use Search Symbols to include ranges of data, and Save Searches for later use if needed. The search term 'blankornull' can be used to find all records with a value of nothing ("") or null ().

- Saved Searches
- See Saved Searches for more information.
- See Saved Searches for more information.
- Selected...
- The Selection Tool offers several options to filter and manage your records. More information on this feature can be found in its own dedicated article here.
- The Selection Tool offers several options to filter and manage your records. More information on this feature can be found in its own dedicated article here.
- Change Field Values
- This utility allows you to make modifications in to your records in bulk. Similar to the Merge Duplicates utility, we highly recommend coordinating with Redrock Support directly on this setting.
- This utility allows you to make modifications in to your records in bulk. Similar to the Merge Duplicates utility, we highly recommend coordinating with Redrock Support directly on this setting.
- Views
- See Views for more information.
- See Views for more information.
- Batch Create Certifications/Work Visits & Batch Activate/Deactivate
- Allows you to create these Staff-specific records in bulk, or change the activation status of many staff members at once.
- Allows you to create these Staff-specific records in bulk, or change the activation status of many staff members at once.
- Export CSV
- Export current listing contents to a CSV file.
- Export current listing contents to a CSV file.
- Send Email
- Allows you to send an email directly to a list of users.
- Allows you to send an email directly to a list of users.
- Allows you to print the contents of the current listing, by extension this also allows you to export the current list as a PDF file.
- Allows you to print the contents of the current listing, by extension this also allows you to export the current list as a PDF file.
- Create Task
- Allows you to send a task to the current student list. More information.
- Allows you to send a task to the current student list. More information.
- New <Record>
- Allows you to create a new record based on your selected listing.
- Allows you to create a new record based on your selected listing.