This page highlights some of the recent changes made to the TracCloud platform, and how you can utilize them on your own instance. A list of past changes and a full changelog can be found in the tabs above.
If you have any questions about these changes, feel free to reach out to us on our helpdesk.
Many text fields throughout TracCloud support Twig and HTML, giving you greater control in determining what data is displayed to your users based on the context of appointments, visits, and more, as well as formatting that data to be as clear as possible.
Twig will be the primary focus of this article. Twig is a template engine that serves two primary purposes in TracCloud:
1. Print variables in text
Personalize your emails and messages. Greet the student by name, let them know what subject they selected in their appointment, what time their appointment takes place, the location, and more. These same variables are also used for purpose #2.
2. Add logic to your text
Modify the email or message based on why it was sent. Add an extra paragraph if X center was selected, send a follow-up email after a visit if the student chose Y, prevent an email from being sent on a SAGE referral if Z recommendation was checked, and much more. Rather than creating a generic email for any context, create an email that formats itself to match the current context.
Twig (and HTML) are supported in profile emails, welcome messages, email templates, appointment display, and more. Most of the examples listed in this article are for appointment emails or SAGE referrals, but the same concepts apply in all other supported fields. It's also worth keeping in mind that Twig exists outside of TracCloud, and there are many resources online for how you can utilize it that will also work here. This guide likely covers everything you will need, but it doesn't cover everything Twig is capable of.
HTML will also be used throughout this article, but without much explanation as it's more ubiquitous than Twig. There are many excellent resources online explaining how to use this markup language, such as W3Schools. HTML is used to adjust font sizes and colors, embed images and videos, and more.
What are Twig tags?
Twig tags can be used to pull data from various TracCloud fields to be included in emails and upcoming appointments. Many of the Twig examples in this chapter will be using these tags, whether they’re used as part of a Twig command or just offhandedly included in an unrelated part of the email. A list of tags can be found at the bottom of this chapter (and within the TracCloud menu), but for a basic primer on how these tags can be used in isolation, here’s an example of a confirmation email.
Hello, {{Student.First_Name}}<br/><br/>Your {{Appointment.OnlineText}} appointment with {{Consultant.FirstLast}} at {{Appointment.StartTime}} for {{Course.SubjectCourse}} has been scheduled. If you have any questions prior to your appointment, feel free to reach out to {{Consultant.Email}}<br/><br/> Your appointment can be joined here: {{Appointment.OnlineLink}}<br/><b/r>Regards, {{Center.Name}}
When this email is sent, all the tags we included are replaced with the relevant information for this appointment.
if / if X then do Y
if statements will likely be the most commonly used Twig command for most use-cases. This allows you to write out statements such as “if the student selected reason “Exam Help,” then include this piece of text.” Or in the example below, if the appointment is online, include text to specify this.
In the statement, we’re using the same tags that are used for emails, but without the curly brackets.
Hello {{Student.First_Name}},<br/><br/>{%ifAppointment.Online=="1"%}This is an online appointment.{%endif%}<br/><br/>Please be ready for the appointment at the time you selected.
If the if statement is true, all text up to the endif line will be printed in the email. Since the appointment this student booked is online, the “This is an online appointment” text was included. Otherwise, it would jump straight to “Please be ready for the appointment…”
We aren’t limited to just “equals” either. Similar examples with different logic can be found below.
{%ifCourse.Subjectstarts with"Chem"%}this text is only included if our subject starts with “Chem”. This is case-sensitive. {%endif%}{%ifCourse.SubjectCourseends with"101"%}This text is only included if our subject ends with “101”{%endif%}{%ifAppointment.Online!="1"%}This text is only included if the appointment is not online{%endif%}{%ifCourse.Subject=="Math"orCourse.Subject=="Chem"%}This text is only included if the subject is Math or Chem{%endif%}{%ifCourse.Subject=="Math"andCenter.Name=="Math Center"%}This text is only included if the subject is Math and the center is Math Center{%endif%}{%ifCourse.Subject=="Math"and(Center.Name=="SI"orCenter.Name=="Workshop")%}This text is only included if the subject is Math and the center is SI or Workshop{%endif%}{%if(CalcMissedAppointments(Student.Sequence,Center.ProfileID)>0)%}You have {{CalcMissedAppointments(Student.Sequence,Center.ProfileID)}} missed appointments since {{CalcMissedDate(Center.ProfileID)}}.{%endif%}
Other Examples
"If student is on a Watch List." Watch List sequence can be retrieved by hovering your mouse over the Watch List name in your System Preferences.
{%ifStudent.WatchLists.wl_14=="true"%}This student is on the Athletes list!{%endif%}
Modify who receives an email based on a custom field, specific to Send Visit Notes to Coach, Advisor or Student.
To Address of Recipient of the Notes (Coach, Advisor, Student) - Only include emails selected from a multi-checkbox custom field, only include semi-colon if needed.
{%setvar2=0%}{%if"Student"inVisit.CustomData.cf_104%}{%ifvar2>=1%};{%endif%}{{Student.Email}}{%setvar2=1%}{%endif%}{%if"Faculty"inVisit.CustomData.cf_104%}{%ifvar2>=1%};{%endif%}{{Faculty.Email}}{%setvar2=1%}{%endif%}{%if"Consultant"inVisit.CustomData.cf_104%}{%ifvar2>=1%};{%endif%}{{Staff.Email}}{%setvar2=1%}{%endif%}{%if"SysAdmin Dave Smith"inVisit.CustomData.cf_104%}{%ifvar2>=1%};{%endif%} example@school.edu{%setvar2=1%}{%endif%}
`Who` Label of the Button for Sending the Notes - Modify the phrasing of this button based on the options selected.
'if' statement based on availability type - One-on-one, group, etc.
{%ifAppointment.AvailRecID!="0"%}{%ifAvailBlock.MaxStudents>"1"%}This is a multi-person appointment with {{AvailBlock.MaxStudents}} slots, make sure you do X{%else%}This is a one-on-one appointment, make sure you do Y{%endif%}{%else%}This is an ad-hoc appointment, make sure you do Z{%endif%}
else / if X then do Y, otherwise do Z
An else statement allows us to include a block of text or an additional instruction if an if statement ends up not being true. For example, if our appointment above turns out to be an in-person appointment, maybe we want to include a different string of text.
Hello {{Student.First_Name}},<br/><br/>{%ifAppointment.Online=="1"%}This is an online appointment.{%else%}This is an in-person appointment.{%endif%}<br/><br/>Please be ready for the appointment at the time you selected.
Since the appointment wasn’t online, we get the “This is an in-person…” text in our confirmation email instead.
elseif / if W then do X, otherwise if Y then do Z
An elseif statement allows us to ask additional if questions, assuming the answer to the prior question was No.
Hello {{Student.First_Name}},<br/><br/>{%ifCourse.Subject=="Math"%}This appointment is for Math{%elseifCourse.Subject=="Chem"%}This appointment is for Chem{%endif%}<br/><br/>Please be ready for the appointment at the time you selected.
Since our appointment was for Chemistry, we receive the following email. If the appointment was for neither Chemistry nor Math, we wouldn’t see a middle block of text at all.
if (arrays) / if X in Y
When you want to use an if statement for arrays, such as the Reasons and Recommendations for SAGE referrals, the formatting is a little bit different. In this context, you would want to know if the Reasons array contains the reason you’re looking for. This would be formatted as such:
Hello {{Student.First_Name}},<br/>{%if"Poor Grades"inReasons%}This referral is being submitted due to the reason “Poor Grades”{%endif%}
Since “Poor Grades” was the reason our faculty member selected when submitting this referral, we receive the following email.
We can also search for the opposite, specifying “not in” instead:
{%if"Poor Grades"notinReasons%}This referral was *not* created with the reason “Poor Grades”{%endif%}
for (arrays) / for each X in Y, do Z
The for command allows us to list out the contents from a specific sequence. This would frequently be used for listing out Reasons or Recommendations in SAGE referral emails.
This referral is being submitted because of these reasons:<br/>{%forkey,valueinReasons%}{{value}} <br/>{%endfor%}<br/><br/>And these recommendations:<br/>{%forkey,valueinRecommendations%}{{value}} <br/>{%endfor%}
Alternatively, Array tags such as ReferralType.Reasons will need to be formatted as such:
Custom questions within SAGE have one more moving part to take into consideration. When creating a custom question, there’s a field named “Code Reference.” This is the code used when referring to this question in emails and reports.
These questions/answers are part of an array, utilized just like the Reasons and Recommendations above.
Hi, this referral has been submitted:<br/><br/>{%ifAnswers.VisitQuestion!=''%}You answered {{Answers.VisitQuestion}} to the question {{Questions.VisitQuestion}}{%endif%}<br/><br/>{%forkey,valueinAnswers%}The answer to question {{attribute(Questions,key)}} is {{value}}<br/>{%endfor%}
First, we’re looking for a specific question and answer. To pull this information, we’re using the tags “Answers.[Code Reference]” and “Questions.[Code Reference]”, with the code reference portion being replaced with whatever we entered in the SAGE custom question. If this question was answered, we’re going to include our answer and the question itself in the email.
Secondly, we want to go through all of our answers to all of our questions. This would be an array just like Reasons and Recommendations, and is formatted similarly. Once we receive this email, we will see the answers selected by our faculty member.
Actions
Actions can be used as commands in addition to Twig. At this time, the only Action that has been implemented is #ACTION:DO NOT SEND#, which prevents the email from being sent. This is primary used in SAGE emails, but can also be used in profile emails if needed. For example, this could be useful in situations where not all of your SAGE referrals need to result in an email being sent. You could have a dedicated recommendation for “No recommendations at this time”, and we could use that to determine whether or not an email gets sent.
{%if"No recommendations at this time"notinRecommendations%}This referral is being submitted because of these reasons:<br/>{%forkey,valueinReasons%}{{value}} <br/>{%endfor%}<br/><br/>And these recommendations:<br/>{%forkey,valueinRecommendations%}{{value}} <br/>{%endfor%}{%else%}#ACTION:DO NOT SEND#{%endif%}
With this email configuration in place, if our faculty member submits a referral with the recommendation “No recommendations at this time,” no email would be sent. An email will only be sent if that recommendation wasn’t selected, which would then follow the rest of the example above, listing out reasons and recommendations.
The student’s total number of missed appointments since the date specified in your profile Scheduling Prefs. Uses System Pref date if Profile date is blank.
{{CalcMissedDate(Center.ProfileID)}}
Your profile “Calc Missed Appointments Since” date. If this field is blank, this will use your global Calc Missed date instead.
If this action is reached (in a Twig statement), the student will be sent a Notification. Enter the notification sequence where the '1' is in this example.
If this action is reached (in a Twig statement), a SAGE Referral will be created for the student. Enter the Referral sequence where the "1" is in this example. Additional assignments can also be made.
If this action is reached (in a Twig statement), an Assignment will be created for the student. Enter the potential assignment sequence where the '1' is, and choose the section.
If this action is reached (in a Twig statement), student fields can be updated to the text specified here. Multiple fields can be edited at once (Major and Custom_99 in this example). Field names are case sensitive.
Special Twig Functions/Tags (Work Plans)
Work Plans
{{Trigger}}
The trigger that prompted this email to be sent (trigger_PlanStarted, trigger_PlanReminder1, trigger_PlanComplete, trigger_StepStarted, etc.)
{{ setResultActions('ConsultantID', '1') }}
If this action is reached (in a Twig statement), the assigned Consultant will be changed to the sequence number specified here
{{ setResultActions('TermID', '1') }}
If this action is reached (in a Twig statement), the assigned Term will be changed to the sequence number specified here
{{ setResultActions('NextPlanID', '3') }}
If this action is reached (in a Twig statement), a new Work Plan will be assigned (for use in Chained Sub Plans)
Special Twig Functions/Tags (SAGE)
Trigger
The trigger for this email, “Created”, “Followed Up”, or “Processed”
Email.Subject
The contents of the email subject line
Questions.CODE
Questions.[Your custom question code], as covered above
Answers.CODE
Answers.[Your custom question code], as covered above
{{ setResultActions('AssignConsultant', '123') }}
If this line is reached within a SAGE email, the assigned staff member will be changed to the specified sequence. The example below shows how you can use this script to link a student's assigned advisor to the referral.
Appointment Display
Both students and consultants will see upcoming appointments on their dashboard, and staff will see them from the schedule view. The formatting of these appointment info boxes can be customized in your profile settings, allowing you to provide the necessary information in a visually appealing format.
Student View
Students will be able to view their upcoming appointments on the right-side of the dashboard. The fields visible and the format they're in is entirely customizable by modifying the Appointment Display preference.
Consultant View
Consultants have a similar view to students, which can be modified independently.
Schedule View
Lastly, the staff schedule view, which allows us to view and manage our consultants’ availabilities and upcoming appointments. The appointment text is also customizable.
Customization
Within the Appointment Display menu, you will see a text box available for Students, Staff, and the Schedule view for Staff. There's also a preview section beneath each text box allowing you to easily see how your changes will display.
These text boxes support HTML and Twig. HTML support is standard, allowing you to easily make text <b>bold</b>, <i>italic</i>, or <u>underlined</u>, or add hyperlinks. Twig on the other hand allows you to pull data from TracCloud into the message, as well as include logic that determines whether or not a portion text is included. For information on Twig, please take a look at our dedicated Twig article here.
The "Appointment Display to Staff on Schedule" field in particular has a unique Twig tag available for use: {{Appointment.SchedVisitStatusIcon|raw}} which will add a button to start and conclude a visit for that appointment directly on the appointment itself.
Other > Other Options > Profiles > [Your Profile] > Prefs > Scheduling > Appointment Display
If you want to reset to the default configuration, simply click on the clipboard icon on the right, which will confirm if you want to erase the existing configuration in favor of the standard one.
Here are a couple examples of how you can configure the schedule and upcoming appointment views. This is more-so to give you an idea of how this feature works rather than a direct suggestion of what to use (although you’re welcome to copy these as-is if you’d like). Hopefully this gives you an idea of how the feature can be used, and how you can configure it on your own system.
Schedule View
Here’s a configuration that provides basic information about the appointment. The student’s name and appointment time in bold lettering, the subject and reason, and the consultant’s name. The if statement checks if the appointment has a Reason, and if it does, include a comma after the subject then print the reason.
<div style="float:left; width: 75%;"><p style="font-size:9px"><b>{{Student.Full_Name}}</b> at <b>{{Appointment.StartTime}}</b><br>{{Course.SubjectCourse}}{%ifReason.ReasonName!=""%}, {{Reason.ReasonName}}{%endif%}<br>With {{Consultant.FirstLast}}</p></div>
Student View
Here’s an example student view configuration. This one reads more like a spoken paragraph, with the important information bolded. Whether the appointment is in-person or online determines the text in the second half.
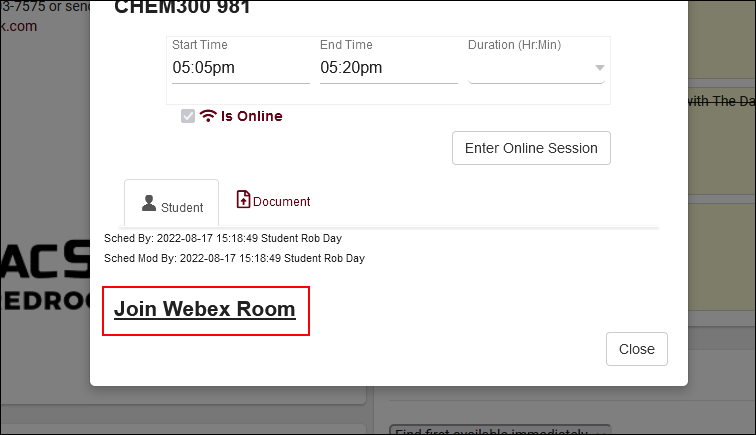
<div style="float:left; width: 75%;">{{Appointment.Icon|raw}}<b>{{Center.Name}}</b><br>Your appointment with <b>{{Consultant.NameToStudent}}</b> has been booked for <b> {{Appointment.StartTime}}. </b><br>{%ifAppointment.Online=="1"%}This is an online appointment, please select the right arrow icon to join your session.The icon will only appear within 10 minutes of your appointment start time.{%else%}This is an in-person appointment taking place at <b>{{Appointment.Location}}</b>. If any assistance is required, please reach out to <u>{{Consultant.Email}}</u>.{%endif%}<br>{%ifReason.ReasonName!=''%}Reason: {{Reason.ReasonName}}<br/>{%endif%}{%ifCourse.Subject!=''%}Subject: {{Course.Subject}}<br/>{%endif%}<br></div><div style="line-height: 2;" >{{Appointment.CancelLink|raw}}<br/>{{Appointment.ActionLink|raw}}<br/>{{Appointment.EnterOnlineLink|raw}}<br/></div><div style="clear: both;"> </div>
Consultant View
This one has a few more moving parts. Near the top, we’re saying “if the appointment has been cancelled, say “CANCELLED:” and strikethrough the rest of the contents.” We also have a series of “if this field isn’t blank, include it in the list” as well as the time saying the word “Today” rather than a standard date and time.
A unique option available in the consultant view is the ability to start and stop a visit directly from the dashboard. This can be implemented by including the {{Appointment.LoginStudentToAppt|raw}} Twig tag in your appointment display configuration. It will display as a clickable button to your staff.
Online appointment link text
Allows you to modify the hyperlink/button visible to students within online appointment records. Default is "The location for this online appointment is here."
Groups
Permission groups determine what kind of access your staff have to various elements of TracCloud. Each group represents a set of permissions. Do you want this group to access the schedule? Which centers? Can they create students? Can they manage resources? These options and many more are available to modify in your permission groups.
From a profile perspective, this tab displays the groups assigned to the profile, allowing you to manage your staff permissions to ensure they only have the information they need, and nothing more. Groups can also be managed from their own dedicated list by going to Other > Other Options > Groups.
We can create a new, or add an existing permission group to the profile by clicking the hamburger icon. New group will prompt us to choose a name and which profile it’s assigned to. After saving, you will be brought to the settings menu where we can configure the permissions of this group.
Within each permission group, you will find multiple tabs to categorize different types of preferences. Details on each of these tabs and the preferences within can be found below.
Center Access
Color/Icon Code
Some of these options have multiple permissions based on the icon selected for each field. Click on the icon to cycle through the available options. The key for what each icon represents is within the preference name. For example, “Scheduling: View Sched and Edit All or View Sched…” in the screenshot below.
Scheduling
These are the center schedules that staff assigned to this group can view/manage.
Schedule Access Options
View Staff Schedule
Edit Appts on Staff Schedule
Edit Avails on Staff Schedule
Book Avail on Dashboard
View Sched and Edit All
Yes
Yes
Yes
Yes
View Sched - Edit Avail
Yes
No
Yes
No
Search Availability Only
No
No
No
Yes
View Sched - No Edits
Yes
No
No
No
View Sched - Edit Appt
Yes
Yes
No
Yes
Only access own schedule
Restrict consultants in this group to only being able to access their personal calendar (for the centers they’re assigned to). This also applies to which appointments they can view on the Appointments Listing, if that access is provided via table access.
Prevent create new appointments
Prevents users in this group from creating new appointments, independent of the center view/edit choice.
Viewing, Logging, Reporting Visits
This determines which centers the staff in this group can view or record visits in. The View Visit - Hide Notes access option can be used to restrict this group from viewing or editing the notes field in visit records.
Show the Center Status Tab on Main Menu
The Center Status tab appears on the staff main menu and provides a brief summary of visit/appointment totals as well as how many students are waiting in each of your centers. This checkbox enables or disables this feature for staff in this group.
Lists
You can choose which student lists this user group can view/edit. Just as with the center options, we can change the color of the squares to determine their level of access to each list (only search or search and edit).
Which document types can this staff member view/edit? Editing permissions are required in order to upload documents.
Allow dashboard document upload
If enabled, staff in this group can upload documents to their account via a widget on the dashboard.
User List
The User List contains all staff accounts that have been assigned to this profile. At a glance, we can see their name, email, and phone, but we can also click the entry to start editing their staff profile. We’ll go into more detail on this process in another article.
Move Selected Users to...
Allows you to easily select and move staff members to another permission group.
Delete Selected User(s)
Allows you to quickly select and delete staff members.
Scheduling
Show Consultant Location on Day Schedule
Displays the consultant’s location beneath their name on the day schedule view.
Show which student contact field on Schedule
Displays the student’s email or phone number in the top-left corner of appointments.
Allow user to override any scheduling rules
If this is checked, staff in this group will be able to bypass scheduling restrictions to book appointments for students regardless of the scheduling rules in place. A warning will still display notifying the user that they are booking beyond what a max appointment rule allows.
Allow user to pick repeating schedule dates
If checked, users in this group can modify the included dates when booking a recurring appointment for a student.
If this is a consultant, do not cause one on one availabilities to be converted to drop in on search results
If the related global preference to convert unbooked 1-on-1s to drop-ins is enabled, this checkbox makes the consultants in this group an exception. These consultants will no longer have their availabilities converted to drop-ins, their availabilities will simply disappear from the available time slots when the schedule no later than threshold is reached.
Allow user to generate a dynamic search appointment QR Code based on an existing search appointment link
If enabled, users in this group will be allowed to create dynamic QR codes for custom appointment links. More information on this feature can be found in the scheduling prefs article.
Only allow links for self
Continuing from the option above, this option prevents consultants in this group from creating availability links for other consultant's schedules.
Only allow saving changes to own availabilities
If checked, even if consultants in this group have edit access for an entire center, they will only be able to save changes to their own availabilities.
Only allow saving changes to own appointments
Same as above, but in relation to appointment records instead.
Student / Visit
Student Access Preferences
View/Edit Student using form [Standard/Brief]
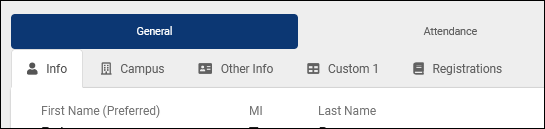
This option affects what fields are visible in the General > Info tab of student profiles. "Standard" allows these staff members view student profiles as usual, with access to every field (based on global preferences and the options below). While “Brief” limits access to only a handful of fields, as seen in the comparison below. The "Brief" view inherently prevents saving student records even if table editing access is granted. If you need to provide permission to save student records while only showing "Brief" fields, use the "Brief with Save" form instead.
Allow user (non admins) to create student records
By default, only staff assigned to the Profile Admin user level or higher are allowed to manually create student accounts. This option can be enabled to grant that permission to regular staff.
Allow user to delete student records [Standard Only]
This determines if staff members in this group can delete student profiles. It is recommended to leave this unchecked for non-administrative groups.
Allow user to create prospective student requests
Allows users in this group to create prospective student records from the students listing. Requires additional configuration in global settings, click here to learn more.
Prevent mass emailing from Student Listing
This prevents these users from sending batch emails to multiple students at once.
Prevent Action Send Email to Single Student
This prevents users from sending emails to individual students.
Hide [field] of student
These options allow you to toggle certain fields on or off depending on what these users should have access to, such as IDs and phone numbers. Some of these are only available if the “View/Edit Student using form” option is set to “Brief.”
Show Student Flag Information (Flag Text)
This enables a "Flag Information" text field in the "Other Info" tab of student profiles. If data is entered in that field, a grey flag icon will appear next to the student's name on the students listing.
Hide [tab] of student
These options allow you to disable the additional tabs in student profiles. The "Campus" tab contains some preset fields that have been enabled in Student Entry Choices under Global Preferences, and the custom tabs can be renamed in that same menu. Other Info and all custom tabs exclusively contain custom fields.
Limit Student listings to the chosen list
This allows you to restrict the students viewable by staff in this group to only students on a specific student list.
Visit Access Preferences
Allow user to view student visit satisfaction & Allow user to view consultant visit satisfaction
If visit satisfaction questions are enabled in your profile's log in/out preferences, these options allow you to control which groups can access the responses that were recorded. View and Edit allows this group to change the satisfaction rating for visits, while View only allows them to access what was previously saved. No Access hides these fields entirely in visit records. The visit satisfaction question will still appear during logout if View/No Access is selected, these options only affect concluded visit records.
Allow user to send notes to coach/advisor
Provides these staff members the ability to initiate the Visit Notes email from visit records, and enables automatic sending of the Visit Notes email if it's configured to do so in your Profile Prefs.
Prevent log in/out from KIOSK and Log Listing
If checked, these staff members will not be able to log students in/out on the Kiosk or Log Listing pages.
Allow user to save changes to visit records (and which visits)
This controls whether or not these staff members can save changes to visit records. If enabled, you can specify if they can save changes to their own visits or all visits.
Allow user to delete visit records (and which visits)
This determines if staff members in this group can delete visit records. If enabled, you can specify if they can delete their own visits or all visits.
Prevent user from accessing Batch Visits
If checked, users in this group will be unable to record visits with the Batch Visits utility.
User may view which visits
This determines if these staff members can view all visits, only their own, or none.
User may view which work visits
Similar to student version of this option, but for work visits instead.
Show the Utilization Tab on Main Menu
Enables the Utilization widget, allowing quick access to recent visits from the dashboard. Consultant accounts will also have the ability to quickly filter to only their own visits. All visit access permissions are still used, this does not provide additional privileges, only faster access to these records.
Allow user to create student when not found in Log in Lookup
If a student record isn’t found based on the ID entered on the Log Listing, staff members can be given the ability to immediately create a new account for the student they’re logging in. This is generally not recommended as it can lead to duplicate students being created if someone was entering the wrong identifier in the first place.
Show KIOSK for Generic All Profiles option
This adds an additional Kiosk option for these users that allows students to login to any Profile's center from the same Kiosk.
Lock all KIOSKs and Log Listings to IP Zone for this Group
This option allows you to restrict kiosk/log listing access based on IP address. You can define IP address zones or simply an "On Campus" IP address in system preferences. The default value of blank will not restrict access based on IP.
Allow user to log resources in and out
This allows these staff members to log resources in/out via a “Log Resource” button within the “Other” tab in the navigation bar.
Allow user to view what resource the student has logged out
This allows staff members in this profile view resources that students have logged out.
Allow consultant to login for work at their main menu
Provides consultant accounts the ability to login for work visits from the dashboard. This will appear as a clock icon in the navigation bar where they can initiate or conclude their work visit without going through the log listing or a kiosk.
Hide 'Is Work' for Quick Visits / Visit Entry
If enabled, these users will not be allowed to create quick work visits. Work visits must be recorded by logging in and logging out.
Allow consultant to login for work on KIOSK where the user logged in is themself
By default, staff members are not allowed to login for work visits on kiosks that they initiate. If this option is enabled, that restriction is lifted, allowing them to login for work on their own kiosks/log listings.
Allow staff to view work visits on schedule
If enabled, users in this group can view work time on the staff schedule, visualized as a red line overlaying the schedule. This can be restricted to only their own work visits, or all.
Log In to Work: On/Off Campus Restriction
Both of these options allow you to restrict whether or not this user can start a work visit from their dashboard depending on their IP address. After you designate an on campus IP address in your system preferences, you can set these preferences to one of 4 values:
No Restriction - No additional restrictions regardless of IP.
Only with Appointments - Can only login for work during an appointment or drop-in availability time, with the allowed login window being determined by No sooner than x minutes before appointment starts and No later than x minutes after appointment starts.
Only with Appointments same modality ('Off Campus' only) - Same as above, but only if the appointment or drop-in availability is online.
Appointments/Availability same Modality ('Off Campus' only) - Same to above, additionally including any availabilities even if unbooked.
Not Allowed - Block work visit login entirely for that IP zone.
Admin / Modules
Table Access
This primarily determines which Listings these staff members can access. For example, you could entirely prevent a group from accessing the student listing, course listing, etc. Each table can be set to a different access level:
View Listing and Edit provides full access to this listing, along with editing permissions.
View Listing (No Edit) means that these staff can view the Listing page and the records within it, but can't save any changes.
Edit (No Listing) allows staff to edit records, but not browse the Listing page. A common example here would be Course Lists, where Consultants may be able to edit their own Course List, but you don't want them browsing to or editing others.
View Entry (No Listing) will prevent users from accessing the Listing or applying changes to individual records, but they are allowed to view individual records if provided a link.
Custom Views
Custom listing views can be shared to groups, allowing staff in this group to select these alternate views when needed.
Normal View will be available to switch to from that listing, but will not be the default.
Default View - will be the default when these staff members open the listing, but they can still switch to other views (or standard).
Only this View will be the only view this group can see for the related listing, they will not be allowed to switch to other views.
Custom Searches
Custom Saved Searches can be saved and shared to groups.
Allow user to access reports
This enables or disables access to reports. Some reports are restricted to certain User Levels independent of group, click here for more information. Choose the specific reports that users in this group can generate using the menu below.
Allow user to access payroll reports
This enables or disables access to payroll reports specifically. The above option also needs to be enabled for a staff member to view these reports. These reports are also only available to users designated as "Profile Admin" or higher.
Controls which surveys these accounts have access to.
[ SAGE ] Allow user to view referrals on Dashboard
Adds a Referrals tab on the Dashboard providing quick access to referrals assigned to themselves, including information such as the Type, Date created, Date Followed-up, and Date Processed.
This determines which Q2 Configs these staff members can access.
[ Text Alerts ] Allow user to view and edit the student field ‘Receive Text Alerts’
This option gives staff in this group the ability to enable or disable text alerts for students from the student’s profile.
[ Text Alerts ] Allow user to send SMS messages to students
This option provides staff the ability to send students messages directly, either from the Log Listing or the Student’s Profile under the “Actions” tab.
[ Text Alerts ] Allow user to send SMS messages to staff
Just like students, staff can also be sent SMS messages from their profile via the “Actions” tab. This option determines whether or not this option is available for staff in this group.
If checked, these users will not be able to access the "Attendance" menu in the navigation bar, including utilities such as kiosks, log listings, batch visits, etc.
Prevent User from Creating Staff Records
If checked, these staff members will not be able to create additional staff accounts.
Prevent User from Editing Staff/Student Passwords
If checked, these users will not be allowed to set new passwords for students/staff.
Prevent User Viewing Grades
If checked, these users will be unable to view the grade field in registration records.
Disable Notifications
By default, staff will receive notifications about visits, appointments, tasks, outstanding appointment requests, and more in a bell icon in their navigation bar. This box can be checked to disable this feature for staff in this group.
If this group has access to student records, the student timeline can display email history, extra details (canceled/missed appointments, exact login/out times), and appointment searches. These options can be checked to block access to those details.
Override Required Field Validation (SysAdmin only)
If checked, SysAdmins will be allowed to save records without filling out required fields (standard or custom fields). This option can only be enabled in the SysAdmin group.
Add existing group
If you already have a group assigned to another profile (or no profile at all) that you want to provide profile access to, you can use the "Add existing group" utility. This allows us to provide staff members assigned to that group the ability to schedule and manage visits in centers outside of their own profile.
To accomplish this, click the hamburger icon again, and choose “Add Existing Group.” Next, select the group you want to add, which adds it to the list of groups. When clicking on this group (that still primarily exists in another profile), we’re given a restricted set of options, as it’s only displaying options relevant to this secondary profile.
Group Name
Changing the name here will also change its name in the primary profile.
Profile
This shows the primary profile this group is assigned.
Scheduling and Visits access
This is exactly the same as assigning center permissions in standard groups. This controls which centers staff members can view/edit visits and schedules in.
Student data is one of the most important parts of your Trac System, on top of being the record that all their visits, appointments, documents, and more are assigned to, you also have the student's information directly. You can run reports on visits grouped by student majors, or send emails to students of a certain class, cohort, or any other field you have available. This article goes over some of the ways you can search for these records.
The Students Listing itself (found by clicking 'Students' in the Navigation Bar) contains all student records uploaded to your Trac System. From this page, we're able to manage student data in bulk, creating lists, sending emails, or submitting SAGE referrals, or we can open a specific student record and manage just one student profile at a time.
Each column of information displayed has a clickable header that will sort the listing accordingly. Clicking once sorts ascending, a second click will sort descending.
Using the Search Bar on this screen, we can easily perform quick searches to find specific students. Right clicking in the search bar (shown below) will provide a list of available student fields to search, click any of these to auto-fill the search bar.
Example Searches:
Find a student by a single value, such as ID. Specifying 'Students.ID=' actually isn't required for ID or Name searches, but it works well as an example.
Students.ID=1931
...or name. Names should be formatted as 'Last, First' or 'First M Last'. 'First Last' will also work if middle names are not being imported.
Day, Rob
Search multiple fields at once, separate your searches by a space.
When performing multiple searches where at least one field contains a space, make sure to surround the contents you're searching for with quotation marks.
Search in Custom Fields. It's recommended to use the right-click menu to select these, as it will always auto-fill the correct field name.
#sql:InState#=Yes
Date searches such as this are required to be formatted as YYYY-MM-DD
Students.BirthDate=1993-07-16
We also offer a special search to find students where today is their birthday.
birthdaytoday
Additionally, it's even possible to search for students who received a batch email from TracCloud. The search below would return all students who received a batch email from TracCloud on 2024-10-23 where the subject contained the phrase "Upcoming Event".
The Student Listing also has a unique Search utility found in the hamburger menu . This utility has the ability to search related tables to find relevant students. This includes the ability to run searches such as "students who have had appointments in the last 7 days" or "students who have ongoing referrals."
Search Type
This can be set to New Search, Search Selection, Remove found from Selection, or Add found to Selection, depending on the desired effect of this search.
General Info tab
This tab is where you can search for basic information about the student. ID, Status, Name, etc.
Appointments
This tab allows you to search for students by appointment information. For example, "students who had an appointment from 02/10 to 02/20 with a status of Missed." Any fields that support wildcards additionally support the | character for "or."
Visits
This tab allows you to search for students by visit info. For example, "students who visited more than 2 times from 02/10 to 02/20 where the subject was MAT100." Any fields that support wildcards additionally support the | character for "or."
Registration
This tab allows you to search for students by registration info. For example, "students who are actively enrolled in more than one math course." Any fields that support wildcards additionally support the | character for "or."
Documents
This allows you to search for students by documents. "Students who have a document of a certain filename uploaded in the last month."
Surveys
Students who have received or responded to a survey in a certain time period. Requires SurveyTrac.
SAGE Referrals
Students who have ongoing or completed referrals of a specific type in a specified date range. Requires SAGE. Any fields that support wildcards additionally support the | character for "or."
Assignments
This tab allows you to search by potential assignments. Any fields that support wildcards additionally support the | character for "or."
Resources
This tab allows you to search for students by their resource usage, whether they have certain items checked out or overdue. Any fields that support wildcards additionally support the | character for "or."
Terms & Conditions
Search by accepted terms and conditions. Any fields that support wildcards additionally support the | character for "or."
Every listing page in the Trac System features a hamburger menu with utilities to search for or interact with your list of records. Some of these options are specific to a certain listing/record-type, others are shared. The following list includes definitions for the hamburger menu options available on this listing, and how they can be utilized.
List All
This option will show all records on the current listing. Some listings have an additional toggle for only showing "Active" records, such as Students and Registrations, which will still override a "List All" search if checked.
Search
This utility will open a pop-up window unique to each Listing it's present on, allowing you to search your records by a number of different fields. In the case of the Student Listing, you could use this to search related records, such as 'Students who have at least 2 Visits in the Learning Center' or 'Students with a recent Document upload in their timeline.'
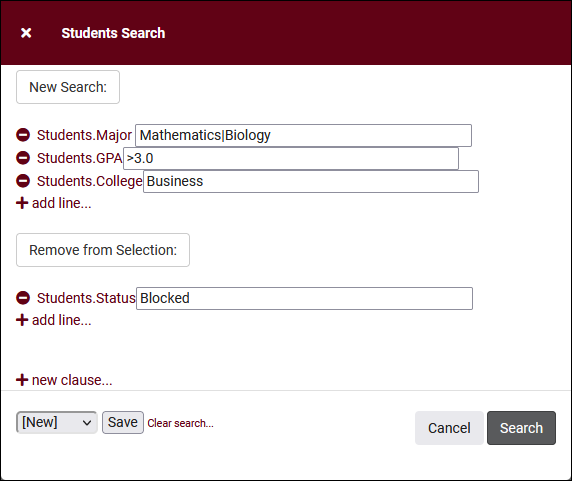
Power Search
This option provides a simple but powerful search utility to find the records you need. String together multiple searches, adding or removing results for each. Use Search Symbols to include ranges of data, and Save Searches for later use if needed. The search term 'blankornull' can be used to find all records with a value of nothing ("") or null ().
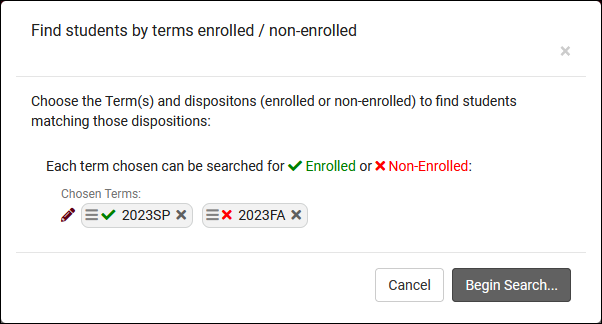
Search by Term Enrollment
Allows you to search based on the students' enrollment in a specific term or multiple terms. The example search below would show students who are enrolled in a 2023SP registration AND are not enrolled in a 2023FA registration.
These utilities can be used to cleanup duplicate records in your Trac System. We highly recommend reaching out to Redrock Support directly for assistance in cleaning up this data.
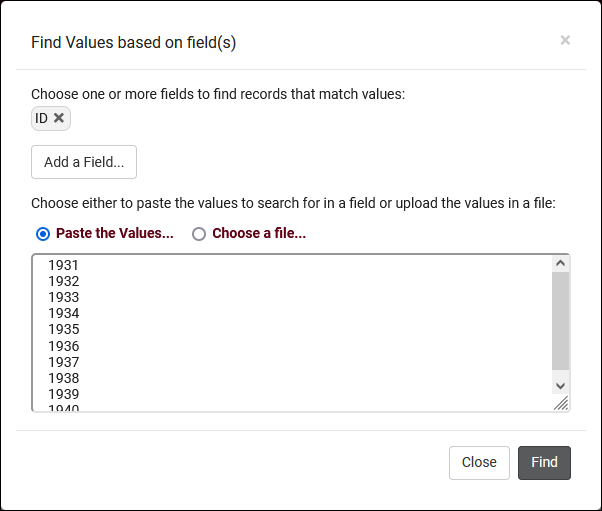
Find by Values
This utility can be used to search one field for multiple values. If you have a spreadsheet containing a list of student IDs, this is an easy way to pull up the same list of students in TracCloud by copying the ID column into this search field.
Change Field Values
This utility allows you to make modifications in to your records in bulk. Similar to the Merge Duplicates utility, we highly recommend coordinating with Redrock Support directly on this setting.
Allows you to send a survey to the current user list. More information.
Register In
Allows you to quickly enroll a student in a new registration. Depending on your import configuration, manually recreated registrations may be deactivated during your auto-import.
Assign Success Plan
Allows you to assign a new Success Plan to the current student list. More information.
Create Referral
Allows you to create a batch referral through SAGE. More information.
Create Task
Allows you to send a task to the current student list. More information.
Toggle Photos
Enable or disable student photos on the Student Listing.
Create Chart
Based on the data currently being viewed a chart can be generated to visually illustrate the relationships in the data.
Export CSV
Export current listing contents to a CSV file.
Send Email
Allows you to send an email directly to a list of users.
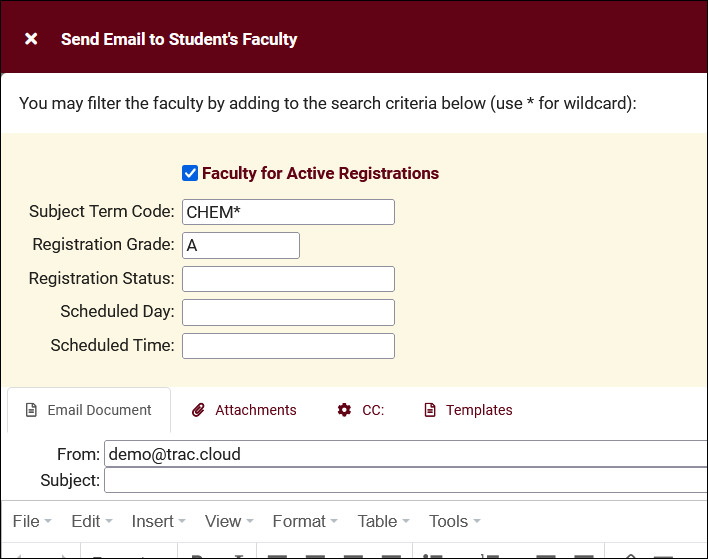
Send Email to Faculty
This email utility allows you to email faculty linked to student registrations. The faculty recipients can be determined by subject, status, and grade. One email will be sent per linked registration, so if there are 3 students listed enrolled in MAT100 with Dave Smith, Dave Smith will receive 3 emails. Faculty recipients can also be filtered by scheduled day/time if section schedule is being imported.
Show these <records>
This utility takes your selection of records, finds the related records, and takes you to that listing with the resulting records. For example, on the Registration listing, you can "Show these Students" to display the student records for the registrations that you were viewing.
Print
Allows you to print the contents of the current listing, by extension this also allows you to export the current list as a PDF file.
New <Record>
Allows you to create a new record based on your selected listing.
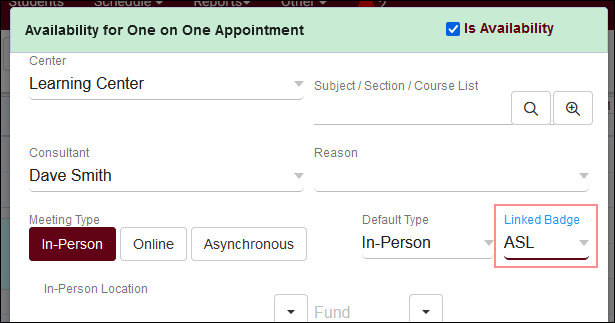
Search Availability badges can be used to add information and indicators to availability slots. Each badge can appear for certain conditions, based on center, availability section/reason, location, skills/accommodations, etc.
Click "New Availability Badge" to begin. This will open a form where you can enter the details for your badge.
Manually Linked
Rather than the badge automatically appearing based on certain conditions, these badges appear in a menu to be manually selected on the availability itself.
Name
Name of the Badge. This will not be displayed for students
Availability Type; In Person, Online, Online Optional, or Phone
Location
Location of the availability
Once you've decided where the badge is needed and have made your selections from the options above, you can now determine which icon, colors, and info work best for the badge created. Color: Color of Icon Icon: Choose from the list or use a custom icon Info Text: Enter text that will display when users hover over the icon
In the example screenshot above, this badge will only appear on availabilities of staff who have been assigned the “ASL” accommodation and are available in the Learning Center. Once saved, your badge will appear in the profile preferences if you need to edit/delete it later.
Any fields left blank will not be considered for where this badge appears, you can be as specific or non-specific as needed. You can also create as many badges as you'd like, more than 1 tag can appear for the same availability. When students search for an availability, the badges will display to the right of the screen as shown below.
The TracCloud schedule is where you can create and manage your consultant’s availabilities. The availability blocks created here will appear when staff or students are searching for appointments based on the criteria chosen during the search process. This article will walk you through how to utilize these features, from creating availabilities to booking appointments.
The schedule can be reached by clicking the “Schedule” button at the top of the dashboard. Click the "Expand" options below to view more information on different parts of the schedule management process.
Navigating the Staff Schedule
Navigating the staff schedule is a crucial part of managing your Trac System if you host appointment-based sessions. This is where you can create new availabilities/time slots, review past and future appointments, and even book new appointments on behalf of students.
Starting at the top of the schedule view, you'll find options for changing your date range and selected consultant. The date field can be clicked on so that you can select a specific day or week (depending on your current consultant selection), and you can cycle through past/upcoming dates using the arrow buttons. The "Today" button will always take you to the current date.
Following this is the consultant menu. Your consultants will be grouped by the centers they're assigned to (or profiles then centers for systems with 5+ profiles). Selecting an individual consultant will display their schedule for the selected week. You can alternatively select "All of this center" to view all of your consultant schedules for a single day. This option also allows you to hide unavailable consultants with a checkbox along the schedule settings bar. You can also choose your selected center, which applies to both the "all of this center" view as well as individual consultants who work across multiple centers.
Lastly, you will find your Schedule Display Options. These can be used to change your visible time on the calendar, as well as hide certain record types. Changes made here will only affect your own account, and only in your current browser session. The icon indicates whether or not you have the ability to modify availabilities, and the icon indicates the same for appointments. Consultant accounts can also see a button, which will return them to their personal calendar.
Creating Availabilities / 1-on-1, group, and drop-in
After selecting the consultant you want to create an availability for, click-and-drag to begin creating an availability block in an open space on their schedule. Before you let go of left-click, tapping the 'a' key on your keyboard will cycle through different options. Adhoc appointments (white), reserve blocks (red), and standard availabilities (green). Standard availability is what you'll want to select to create a new time slot on your consultant schedule.
Once you release left-click, you will be brought to the availability entry window where you can configure the time slot.
In the top-right corner of the availability, you can choose the block type. Availability is a regular availability linked to a single center. A Stacked Availability can be linked to multiple centers, essentially allowing you to create multiple overlapping availabilities at the same time. When stacking an availability, you can choose which fields are ignored and not shared between stacked blocks. For example, you can ignore the Meeting Type field so that the Learning Center block can be online and the Writing Center block can be in-person, otherwise non-ignored options will be shared across the entire stack. Reserve Blocks are covered further into this article.
Subject and Reason allow you to restrict what this time slot can be utilized for. If left blank, which is a typical choice, the consultant and center course lists will be used. If you wanted to restrict the availability to a specific subject, you can select it from the search menu, or use a wildcard entry (such as "MATH*" for all sections that start with "MATH) or a course list if your preferences allow it.
The following option, Meeting Type, determines if this is a remote/online availability, in-person, or asynchronous. The latter option will be covered in the next portion of this wiki article. Depending on which option you choose, additional Location fields will be made available. In-person availabilities may be assigned to a specific room or building number, while online sessions will be assigned a specific online invite link. That link can be the consultant's specific invite link from their account, a breakout room, or a new invite can be copy/pasted directly into the "Online URL" field. Students can join these online appointments from their dashboard, as TracCloud will provide a hyperlink to them at the appointment start time.
The Max Students option determines the availability type. 0 would be a drop-in event, 1 is a one-on-one meeting, and 2 or more would be a multi-person group.
The date range and days of the week fields allow you to determine how this availability will repeat going forward. By default, just the one day you created the block on will be active, however, you can push the “To” date farther out and deselect the days of the week that this availability shouldn’t be active for to create a schedule such as “Every Monday, Tuesday, and Friday until May 30th.”
Increments and Breaks control how the block is split into different times. If you create a 5-hour block on the schedule, setting the Increments to 60 minutes will split that into 5 1-hour blocks instead. Breaks allow you to schedule breaks for your consultants in-between appointments. For example, you could set Increments to 55 and Breaks to 5 to give your consultants 5-minute breaks in between their 55-minute appointments.
Override Missed Status allows you to choose a different status for students that miss this appointment compared to your profile configuration. Only allow/Block these on the other hand allows you to restrict who is allowed to see this appointment based on student lists. If no lists are chosen in either field, there will be no restriction.
Overrides will show you gaps in the series. For example, if you have an availability that repeats for some time, but a block in that series is removed (maybe the consultant isn't available that week or their time changes on that one day), that will appear as an override date for the rest of the series. An availability can also be manually overridden if you want to make changes to it independently from the rest of the series by clicking the button as seen in the screenshot below.
Documents can be uploaded to the availability, which will automatically be carried through to booked appointments so that students can access them.
Notes is an internal notes field for staff to share information about this availability with each other. This field is not shown to students, and can be used for any purpose.
Group sessions also offer a couple of unique settings for your availabilities, detailed below.
Group Slot Restriction
This determines what subject students can book compared to the first student's selection. Any Subject means that one student could book for MATH100, and another for ACTG100, any subject is allowed (within consultant and center specialties). Same Subject means that one student could book for MATH100 01, and another for MATH100 02, but not for MATH200. Both Same Subject and Instructor and Same Section can be used to be more strict as needed.
First booked appt determines online / in person for that time slot on that day
Asynchronous is an additional meeting type available for availabilities. These are created like normal availabilities, but appointments are held asynchronously. A text chat will be provided for a student and consultant to communicate with each other, and documents can be uploaded to the appointment for each user to download and review. This functionality must be enabled in your profile before it can be used, go to Other > Other Options > Profiles > [Your Profile] > Prefs > Scheduling > Other Schedule Options > Allow availabilities to be asynchronous
This meeting type can be selected just like In-Person or Online, and can be combined with those meeting types to give students more choices when booking appointments.
Asynchronous availabilities are shown on the schedule view as a purple box with a icon. Students will see the same color in their availability searches.
After the appointment has been booked, you will notice a couple differences compared to standard appointments. The Status field now only contains "In Progress" and "Concluded" plus a missed and canceled status, as standard synchronous statuses no longer apply. An additional Messages tab has also been added, which will contain all communications between the consultant and the student.
Students and consultants will primarily be communicating and managing the session from the dashboard. This will display all "In Progress" asynchronous sessions that you (a consultant or student) are a part of. Clicking "Show Previous Concluded" will let you review past asynchronous sessions, download documents, or even reopen the session if needed. The "Asynchronous Communications" phrasing in the title of this widget can be overridden in your system preferences.
Clicking on one of these entries will open the appointment record with two tabs available. Appointment Information contains the current status of the appointment, any custom fields, as well as uploaded documents. Messages (pictured below) shows the current discussion between the student and their consultant, along with a log of document uploads/deletions. Either party can conclude or reopen the session at any time with the button in the lower-right corner.
Reserve Blocks / Prevent booking and cancel appointments
Reserve Blocks can be created over existing availabilities and appointments, to prevent booking and automatically cancel conflicting appointments. This is typically used for holiday breaks, sick days, or to block off specific times of the day when a consultant will not be available.
There are two ways to create a reserve block. You can click-and-drag an availability as usual, then tap the 'a' key to cycle to a reserve block, or create a normal availability then change the block type to "Reserve Block" in the top-right corner.
Once you've started creating your reserve block, you will find a few options that don't exist in normal availabilities which have been detailed below.
All Staff this Center is used to create a block for all consultants across your selected center, rather than exclusively for the consultant account that you had originally selected.
All Staff for All Centers goes beyond what the "this center" option does, placing this block on all consultant schedules across all centers.
Show on schedule as meeting will change how this block visually displays on the schedule and will be shared to the consultant's calendar via the "Calendar URL" button on the staff dashboard. This does not have an effect on blocking availabilities or cancelling appointments, that functionality will be the same regardless of if this is checked.
Do NOT Cancel any intersecting appointments will prevent overlapping/conflicting appointments from being automatically canceled when this block is saved, which is otherwise the default behavior of reserve blocks.
Description can be used to record why this reserve block exits. For example, "Time off for holiday."
Status will apply to all overlapping appointments. For example, "Canceled - Holiday" to differentiate these cancellations when running reports. If this field is left blank, a generic "Canceled" status will be used instead.
The rest of the reserve block is created like a standard availability, set the time and days that should be blocked, then click "Save" to add it to the schedule.
Booking Appointments
Appointments can be booked from the staff schedule directly, or from the dashboard. The former can only be accessed by staff, while the latter can be accessed by both students and staff if their permission group allows it. Regardless of which option is used, emails will be sent out as usual and the records will appear in reports as expected.
Staff Schedule
From the staff schedule, there are 3 ways to book an appointment for a students, depending on what's easiest for that particular session.
Ad-hoc appointments can be created by clicking-and-dragging (as if you're creating an availability), but before you let go of left-click, tap the 'a' key on your keyboard to cycle to the appointment option (white). After you let go, TracCloud will prompt you to choose a student before taking you to the appointment entry screen (detailed further into this article).
Booking availabilities can be accomplished by clicking on the start time of the availability (group or 1-on-1) and searching for a student. After making your selection, you will be brought to the appointment entry screen. You can also click on the icon to set a custom start and end time for your appointment.
Dashboard
Both students and staff have access to the dashboard appointment search widget. The primary difference (aside from the appointment entry page itself) is that staff will need to select a student in the widget, while students do not since they're already logged in on their browser. The exact options available in this widget will be based on your profile preferences and search availability widget settings.
If “Choose a Date & Center” is selected (or was made the default for your system), an additional window will appear after clicking "Search" to choose a center/profile, as well as the specific date of the appointment you want to book. The phrasing of text shown here is based on your search availability widget settings.
After searching, you will be brought to a results screen such as this, allowing you to view the time of the appointment, which center it takes place in, whether it’s a Group, 1 on 1, Drop-In, or Asynchronous time slot, and the consultant. The results will load one day at a time, more results can be loaded by clicking the “Load more for [the following day]” at the bottom of the screen. Clicking on the time slot will open the appointment entry window where you can book that time slot.
Appointment Entry
After clicking on the availability that you want to book, the appointment entry screen where you can fill out custom fields and confirm your appointment will differ depending on if you're logged in as a staff or a student.
The student view is very restricted. The student can only edit fields that your system (or individual availability, depending on the field) allows to be edited. Student custom fields, meeting type, recurring status, and duration.
The staff perspective shows all appointment fields, including status.
Group rosters are exclusive to group availabilities, where multiple appointments need to be viewed or managed at once. This utility offers several unique features compared to the 1-on-1 appointments seen directly on the staff schedule. To open the group roster, you can click on the 0 / 0 icon on the availability block.
/
If a group is locked by a staff member, it cannot be found or booked in availability searches. This feature can be used if you want to reserve the remaining slots or to prevent further appointments at this time to provide more attention to a smaller roster. Staff can still book new appointments from the roster view even if it's locked.
Documents
If a document is uploaded to the group roster, it will be linked to all appointments at that time. Students will be able to view this document in their appointment record if they have access to the chosen document type.
Roster List
In the center of the group roster, you'll see a list of students who have appointments at this time. This includes their name, reason, and subject.
/ / / indicates the status of the appointment, and can be clicked to quickly change the status to a different value.
Not logged in / Logged in at can be clicked to start or conclude the student's visit, similar to the functionality of the log listing. This feature can be disabled in system preferences (General Appointment Settings) if preferred.
will open the full appointment record for viewing or editing.
can be clicked to send a text message to the student if they're opted into SMS alerts. Requires the TextAlerts module.
/ can be clicked to select the appointments. This can be used alongside the "Send Email to" and "Add Notes to" options to only affect the selected records.
Add to Roster
Click this button to search for and immediately book an appointment for a student.
Add Multiple
This will open a new window where you can add students as a batch process. Search for and select students based on enrollments, name, or a list of IDs. When searching by enrollments, students will only appear if the consultant is assigned to that course in their course list.
Mark All as Attended
This will mark all appointments in the roster that don't already have a status as attended.
Send Email to
Send an email to students in the roster. You can choose to send the email to all students, cancels, misses, attended appointments, or selected appointments.
Add Notes to
This option can be used to enter notes in attended visits or appointment custom fields, either based on status or the selected appointments.
Send Notes
This option may be labelled differently depending on your profile preferences. Click this button to initiate the Send Visits Notes to email for attended appointments.
Moving Appointments
If an appointments needs to be moved, you can either cancel the appointment and book it at a new time, or you can move the appointment record. There are two ways to accomplish this, both will send a new confirmation email to the student and consultant informing them of this change.
1. Click-and-drag the top-left corner of an appointment to move it to another time slot on the visible schedule. This can be done from an individual staff schedule or from the "all of this center" view. The latter also allows you to move an appointment to another consultant's schedule.
2. The "Move" button within each appointment can be used to initiate an appointment search, just like on the dashboard. Click on the new time slot you want to book and save your changes.
Availability Blocks Listing
The Availability Listing can be viewed by going to Other > Listings > Availability Blocks. Access to this listing can be provided by adding "Availability Blocks" table access to a permission group under 'Admin / Modules'. This listing contains all availability records that you have permission to view, including the ability to make batch changes or simply search for and few individual records. The icon shows if the availability is a reserve block or not.
Each column of information displayed has a clickable header that will sort the listing accordingly. Clicking once sorts ascending, a second click will sort descending.
Using the Search Bar on this screen, we can easily perform quick searches to find specific availability records. Right clicking in the search bar (shown below) will provide a list of availability fields to search by, click any of these to auto-fill the search bar.
Example Searches:
Find an availability by a single value, such as the consultant's name.
Staff.LastFirst="Smith, Dave"
Search multiple fields at once, separate your searches by a space. If a value you're searching for contains a space, make sure to surround the value with quotes like with the consultant's name below.
Date searches such as this are required to be formatted as YYYY-MM-DD.
#sql:FromDate#=2024-04-16
You can also search for records where a date is greater than or less than a value like this.
#sql:FromDate#=<2024-04-16
You can also search by a date range with ...
#sql:FromDate#=2024-04-01...2024-04-30
You can search by recurring type like this. Example values would be "Daily", "Optional Daily", "Optional Daily Chosen", "Weekly", etc.
AvailBlocks.RecurType="Optional Bi-Weekly"
Hamburger Menu
Every listing page in the Trac System features a hamburger menu with utilities to search for or interact with your list of records. Some of these options are specific to a certain listing/record-type, others are shared. The following list includes definitions for the hamburger menu options available on this listing, and how they can be utilized.
List All
This option will show all records on the current listing. Some listings have an additional toggle for only showing "Active" records, such as Students and Registrations, which will still override a "List All" search if checked.
Power Search
This option provides a simple but powerful search utility to find the records you need. String together multiple searches, adding or removing results for each. Use Search Symbols to include ranges of data, and Save Searches for later use if needed. The search term 'blankornull' can be used to find all records with a value of nothing ("") or null ().
This utility takes your selection of records, finds the related records, and takes you to that listing with the resulting records. For example, on the Registration listing, you can "Show these Students" to display the student records for the registrations that you were viewing.
Find/Merge Duplicates
These utilities can be used to cleanup duplicate records in your Trac System. We highly recommend reaching out to Redrock Support directly for assistance in cleaning up this data.
Find by Values
This utility can be used to search one field for multiple values. If you have a spreadsheet containing a list of student IDs, this is an easy way to pull up the same list of students in TracCloud by copying the ID column into this search field.
Change Field Values
This utility allows you to make modifications in to your records in bulk. Similar to the Merge Duplicates utility, we highly recommend coordinating with Redrock Support directly on this setting.
Allows you to print the contents of the current listing, by extension this also allows you to export the current list as a PDF file.
Troubleshooting Availability Searches
If you've created a new availability for one of your Consultants and it's not showing up as expected when performing a search for appointment times, there are a few possible causes. This portion of the wiki outlines these possibilities, ordered from most to least likely based on what we at Redrock have experienced working with campuses directly.
1. Center and Consultant Course Lists
The most common cause when an availability isn't appearing in search results is misconfigured Course Lists. Both your Consultant and your Center need to be assigned to the subject you're searching for (unless your Center or Reason is set to ignore Consultant Specialties). Make sure you Process Specialties (Step 2) after applying any changes.
Consultant Course List: Other > Listings > Staff > [Your Staff] > Course List of Specialties Center Course List:Other > Other Options > Profiles > [Your Profile] > Centers > Course List for this Center
A complete list of Course Lists can also be found by simply going to: Other > Listings > Course Lists
This is always recommended after applying changes to Course Lists, but it may also be the case that the specific section you searched for was imported after you created the Course List for your Center/Consultant, and a Course List refresh alone may resolve this issue. We can setup an automated process to Process Specialties daily if this occurs often, reach out to us using the 'Support' tab above for more information.
3. Reason Assignments
Similar to ensuring that your courses are assigned to the correct Consultant and Center, the same applies for Reasons. This step only applies if you're using Reason as a search criteria.
For Consultants, go to Other > Listings > Staff > [Your Staff] > Reason Specialties For Centers, go to Other > Other Options > Profiles > [Your Profile] > Centers > [Your Center] > Active Reasons
If your availability is assigned to the wrong subject or reason, this can cause it to be unintentionally filtered out of results. Make sure the value entered here is correct, especially if you're using wildcards. If these are blank (i.e., available for all specialties), you can skip this troubleshooting step.
Schedule > [Consultant] > Availability
5. Profile Time Restrictions
If your availability is 60 minutes long, but your profile only allows for a maximum of 50-minute appointments, this can unexpectedly filter out availabilities if you haven't updated your profile preferences to match this new limit. The relevant options to check here are Schedule no sooner than and no later than, ensure that you're searching within an allowed range. As well as Minimum and Maximum Appointment Duration, make sure your availability is within the limits defined by your profile.
Other > Other Options > Profiles > [Your Profile] > Prefs > Scheduling > Time Restrictions
In the event that you aren't searching for both Reason and Subject, and the previous steps haven't resolved your issue, it's worth double-checking to make sure your Profile hasn't been mistakenly set to require a Subject/Reason to show availabilities. Make sure the highlighted settings match the search you're performing on the dashboard.
Other > Other Options > Profiles > [Your Profile] > Prefs > Scheduling > Special Fields
If your campus utilizes the Skills/Accommodations feature, with 'Excluded when not chosen' enabled, make sure your consultant/availability is assigned to that Skill/Accommodation.
Consultants: Other > Listings > Staff > [Staff Account] > Special Needs/Skills/Accommodations
Availabilities: Schedule > [Availability] > Special Needs > Special Needs/Skills/Accommodations
Still having trouble getting the results you expect? Reach out to us using the 'Support' tab at the very top of this page, we'd be happy to help.
This portion of our wiki covers the individual reports available in the system, with descriptions and example screenshots showing what you can expect when you run the report on your own data. The list below on the left contains links to all of our available reports. You can also click the report category in the tabs above to begin.
Find a report that you plan on coming back to? Save it as a favorite for quick access later. From the report results window itself, click the star icon in the top-left corner, choose a name for your favorite, and click save.
Allow Group Access will make this report visible to other staff members in your Permission Group.
This report can then be found from your dashboard under Reports > Favorites at any time. The button can be used to duplicate the favorite report.
Automating a Favorite Report
After saving your report as a favorite, you can automate it to run on a set schedule and be emailed to you or a group of users.
Start by going to Reports > Favorites > Edit Favorites. This will bring you to the following screen. Click on the Pencil icon of the report you want to automate.
Deliver to: should be set to Email in this case.
Email Address(es) is where you'll add your recipients' email addresses. Multiple addresses can be entered, delimited by a semicolon.
Enable Automation will enable automation and make the following options available.
Message to include in the report email will add in some custom messaging to your emailed report.
Automated report frequency. Do you want this report to run daily, weekly, monthly, or once on a specific date?
Time will determine the time that this report will run on your scheduled frequency.
Overwrite This Favorite Report will overwrite your existing report settings with your new automation rules.
Click save to apply your changes.
Reports Management
This utility (found in Other > Other Options > Preferences > Reports Management) allows you to manage and reassign Favorite reports. This can be used if you want to create a report for someone else or to recover existing favorite reports from inactive (or even deleted) accounts. Within this menu, you'll find the name of the report, the current owner, and a icon to delete the report. The owner drop-down will allow you to change ownership to another staff member. Changes are saved immediately.
Any favorite report belonging to the currently-logged-in sysadmin or an account without a known permission group (i.e., deleted accounts) can be reassigned to any active staff. Favorite reports belonging to staff as well as group favorite reports belonging to deleted staff can only be assigned to those also in the permission group of the original staff account.
In any case, reassigning favorite reports does not bypass report security in TracCloud. For example, it's not possible to give a regular staff account access to payroll reports by reassigning a payroll report to them in this menu. Reassigning ownership of a favorite report also does not change group access. Further modifications to the report must be made by editing the favorite report from the new owner's account.
Email reports with the report file attached in a single email
Rather than sending emailed reports as a link and a passcode in two separate emails, enabling this will instead send emailed reports as an attachment. This setting will be ignored if a generated report is greater than 10MB.
Search Operators
When using the 'Additional Search' utility in your report settings, you have additional operators available to better narrow down your results. Operators can be combined as needed to perform a more specific search.
| ('or' operator; search for multiple unique values)
* (wildcard; anything that starts with/ends with/contains a specified string)
# ('not' operator; exclude results that match this search)
&& ('and' operator; typically used alongside 'not' to exclude multiple items at once)
blankornull (this keyword specifically finds records where the chosen field is blank)
Custom fields can be configured throughout TracCloud to store additional data that your campus may require. These custom fields can be displayed in student profiles, appointments, visits, faculty, registrations, and more.
These fields can be viewed just like other standard fields, and can even be used in reports. This data can also be imported from your Student Information System just like the rest of the standard fields, more information on that can be found in our import article.
Custom Fields can be managed in Other > Other Options > Custom Fields.
Creating a new Custom Field
To begin creating your new custom field, go to Other > Other Options > Custom Fields and select the Add new field button. This will open the custom field entry screen where you can begin to customize your new field.
Profile
Determines which profile this custom field is active for, including “All Profiles” if preferred.
Location
This determines where the field displays. There are several locations available:
Student – Campus / Other Info / Custom1-5 displays within one of these tabs on student profiles. The name of the “Custom” tabs can be changed in your Student Entry Choices preferences.
Visit – Student / Consultant displays in the visit record. Typically used with “Asked on log in/out” enabled, that way the student or staff member can input this information from the Log Listing/Kiosk view.
Visit - Q2 Raise Hand displays on the Raise Hand prompt for Q2, applying to Q2Remote and when raising a hand from the Log Listing.
Appointment – Student / Consultant will appear during the appointment booking process, with separate tabs containing different questions for students or consultants. This location is also unique in that it's the only custom field location that can be center-specific. After selecting this location and a specific profile, additional options will become available to only show this field for a certain center or exclude it from a certain center.
Registration appears within registration records. Frequently used for additional enrollment data or midterm grades.
Reason appears within each of your Reasons. Possibly a description of the purpose of the reason, or any additional information that staff may need to reference when making changes later.
Resource appears in each of your Resources. Typically used for resource location.
Marks the field as inactive. This is recommended if you aren’t planning on utilizing a field anymore, but don’t want to remove the data associated with it. This way the data is still available if you want to re-enable it again in the future, but it won’t be visible throughout general TracCloud use.
Field Name
This is the internal name of this field, shown in the custom fields menu and in report field lists. This needs to be a shorter, unique name without spaces, something like “Student_Notes” instead of “Do you have any notes on your visit today?”.
Prompt Text
This is the text that’s shown to your users when viewed. Continuing from the example above, this one should be “Do you have any notes on your visit today?”. This is visible in the record itself.
Field Entry Type
The type of field. Text boxes, multiple choice questions, etc. A list of options with example screenshots can be found further into this article.
Show on KIOSK Login/Logout
These determine if the field is displayed during the login/logout process on the log listing/kiosk. This even applies to non-visit fields. The student could be asked a question relating to one of their student or registration fields, for example.
Required
Sets the field to required, so an answer must be provided before continuing/saving.
Show on Timeline
Displays this field on the student timeline alongside Visit Notes.
Hide from Consultants
Hides this Custom Field from consultant view (e.g., for Student Visit Remarks).
Depending on which Field Entry Type is used, this option will change. “Field, Menu, or Radio Choices” allows you to list out your various options for multiple-choice questions. “# Lines” determines the size of text boxes for essay fields.
Relative Width
This determines the size of the field. 100% will span the entire Info box, while 8% will only have enough space for a single letter to be visible. The example screenshot below displays our custom field at 100%, 33%, and 17%.
Start on a New Line
Custom Fields are formatted automatically. For example, if you have a 50% width field followed by another 50% width field, they will appear on the same line at the same height in the page. If this box is checked, it forces this custom field to start on a new line regardless of the width of the previous field.
Maximum # of choices allowed ("Multiple Checkboxes" fields only)
This field allows you to set the maximum number of selections a user can make from the set of choices. If left blank, the user can check up to every box.
Longer prompt (Optional) ("Image Pop Field" fields only)
Any text entered in this field will display between the prompt text and the answer field.
Menu Width ("Image Pop Field" fields only)
The horizontal size of the icon menu. If left blank, the default is 210.
Item Width ("Image Pop Field" fields only)
The distance between icons. Setting this below 35 is not recommended. If left blank, the default is 50.
Delete
Deletes the custom field. We would recommend deactivating the field instead, but if there’s no data tied to it yet or the data needs to be deleted, then this option is available.
Field Entry Type Examples
Single line entry field allows us to either type in a custom response or select an option from the drop-down menu.
Text Entry Area provides a text box that we can write anything we’d like in. If this option is selected, we can specify how many lines tall this box is by default.
Checkbox simply provides a checkbox next to your field name.
Multiple Checkboxes provides multiple choices, allowing more than one to be selected at once.
Radio Option provides multiple choices, but only allows a single option to be selected.
Push Button Radio functions similarly to "Radio Option," but provides the choices as buttons rather than checkboxes.
Multi Push Button Radio functions similarly to "Multiple Checkboxes," but provides the choices as buttons rather than checkboxes.
Radio Icon Options provides icons that can be selected instead of a checkbox. This requires a specific format in your custom field choices. Sub Delimiter Char should almost always be set to "|" (pipe/vertical bar). The choices must be formatted as:
<choice value, typically counting up from 1>|<the Font Awesome icon you want to use>|<title/name of choice>.
Toggle Option displays as a toggleable choice. By default, Yes/No will be used, but custom options can also be specified in the “Field, Menu or Radio Choices” box.
Menu Field provides a drop-down list of options when selected.
Image Menu Field provides a vertically formatted drop-down list of icons rather than text options. This requires a specific format in your custom field choices. Sub Delimiter Char should almost always be set to "|" (pipe/vertical bar). The choices must be formatted as:
<choice value, typically counting up from 1>|<the unicode value of the Font Awesome icon you want to use>|<title/name of choice>.
Image Pop Field provides a horizontally formatted list of icons rather than text options. If many options are available, icons will wrap to the next line. This requires a specific format in your custom field choices. Sub Delimiter Char should almost always be set to "|" (pipe/vertical bar). The choices must be formatted as:
<choice value, typically counting up from 1>|<the text value of the field>|<the Font Awesome icon you want to use>|<title/name of choice, which appears on hover>.
Signature provides a box that users can scrawl their signature in.
Document allows users to upload a document to the field. If this entry type is chosen, you can optionally list allowed file types in the Field, Menu or Radio Choices box (e.g., ".txt,.docx"). This custom field type is not compatible with the Appointment, Document, or Visit - Q2 Raise Hand locations.
Label (non-entry) allows you to add text without being tied to an entry field.
Info (non-entry) is a non-entry field like label, but text is in a slightly larger font and text wrapping is supported.
Header (non-entry) is similar to Info, but displays in a larger underlined font.
Custom Field Groups
A custom field "Group" allows you to group other custom fields together in a colored box in any of the normal custom field locations. Creating a custom field group starts like any other custom field in TracCloud (detailed above), except the "Field Entry Type" is set to "Field Group."
Group Color
Choose the background color for the fields placed into this group.
Repeating group values
Enabling this option will allow for multiple values to be recorded for each field in the group, with the entire group having pages to create, delete, or review. When reporting on fields in this group, the most recent value will be shown. Fields in a group with this option enabled cannot be imported and must be filled out manually.
Group Border
Adds an outline to the group box.
After creating the group, return to the custom field listing and select the location containing your group and the other custom fields (Student - Custom1 in the screenshot below).
There are two ways to add custom fields to a group. First is by simply clicking and dragging the custom field into the group. Drag the icon of the custom field over the group in the list.
Alternatively, you can change the location of the custom field to the group, as the group becomes a location in the drop-down menu.
After moving the custom fields into the group, you can click the button of the group to view them. Additionally, you can drag custom fields to the to move them back out of the group (or change the location field within the field settings).
Here is what the example above looks like in a student account.
Custom Field Listing Options
The custom fields listing also offers a few utilities for managing your fields. You can search for specific fields, filter the list by assigned profile or location, or even change custom field options directly from the list with the icons shown. When a specific location is chosen, you will also be able to click and drag custom fields using the icon to reorder them in the list. This reorders them in the location they appear in.
Inactive
Show on KIOSK Login
Show on KIOSK Logout
Required
Show on Timeline
Hide from Consultants
Hide on SI Batch Visit Entry
The listing hamburger menu also has a couple options relevant to custom fields.
List All
This option will show all records on the current listing. Some listings have an additional toggle for only showing "Active" records, such as Students and Registrations, which will still override a "List All" search if checked.
Power Search
This option provides a simple but powerful search utility to find the records you need. String together multiple searches, adding or removing results for each. Use Search Symbols to include ranges of data, and Save Searches for later use if needed. The search term 'blankornull' can be used to find all records with a value of nothing ("") or null ().
This can be utilized to block resource access to certain students based on lists. When a staff member tries to log a resource out to a student on this list, a message will appear informing them that this student has been blocked from checking out resources.
Show resources widget on the student dashboard
Adds a widget to the student dashboard to review currently reserved or checked out resources.
Allow students to reserve a resource via the dashboard
Expands the above functionality to allow students to reserve resources for themselves.
Maximum # outstanding reservations overall
How many total outstanding reservations can a student hold for your resources?
Maximum # outstanding reservations for one resource
How many total outstanding reservations can a student hold for a single resource?
Maximum # of days for an individual reservation
How many days can a student reserve a resource for? For example, allowing the student to reserve the resource from the 11th of the month to the 17th, but no longer, would mean this preference needs to be set to 7.
Minimum time needed (days hrs:min) prior to reservation
Choose the minimum amount of time in advance needed in order to reserve a resource. This is to prevent students from reserving items in the very near future.
Appointment Display
Both students and consultants will see upcoming appointments on their dashboard, and staff will see them from the schedule view. The formatting of these appointment info boxes can be customized in your profile settings, allowing you to provide the necessary information in a visually appealing format.
Student View
Students will be able to view their upcoming appointments on the right-side of the dashboard. The fields visible and the format they're in is entirely customizable by modifying the Appointment Display preference.
Consultant View
Consultants have a similar view to students, which can be modified independently.
Schedule View
Lastly, the staff schedule view, which allows us to view and manage our consultants’ availabilities and upcoming appointments. The appointment text is also customizable.
Customization
Within the Appointment Display menu, you will see a text box available for Students, Staff, and the Schedule view for Staff. There's also a preview section beneath each text box allowing you to easily see how your changes will display.
These text boxes support HTML and Twig. HTML support is standard, allowing you to easily make text <b>bold</b>, <i>italic</i>, or <u>underlined</u>, or add hyperlinks. Twig on the other hand allows you to pull data from TracCloud into the message, as well as include logic that determines whether or not a portion text is included. For information on Twig, please take a look at our dedicated Twig article here.
The "Appointment Display to Staff on Schedule" field in particular has a unique Twig tag available for use: {{Appointment.SchedVisitStatusIcon|raw}} which will add a button to start and conclude a visit for that appointment directly on the appointment itself.
Other > Other Options > Profiles > [Your Profile] > Prefs > Scheduling > Appointment Display
If you want to reset to the default configuration, simply click on the clipboard icon on the right, which will confirm if you want to erase the existing configuration in favor of the standard one.
Here are a couple examples of how you can configure the schedule and upcoming appointment views. This is more-so to give you an idea of how this feature works rather than a direct suggestion of what to use (although you’re welcome to copy these as-is if you’d like). Hopefully this gives you an idea of how the feature can be used, and how you can configure it on your own system.
Schedule View
Here’s a configuration that provides basic information about the appointment. The student’s name and appointment time in bold lettering, the subject and reason, and the consultant’s name. The if statement checks if the appointment has a Reason, and if it does, include a comma after the subject then print the reason.
<div style="float:left; width: 75%;"><p style="font-size:9px"><b>{{Student.Full_Name}}</b> at <b>{{Appointment.StartTime}}</b><br>{{Course.SubjectCourse}}{%ifReason.ReasonName!=""%}, {{Reason.ReasonName}}{%endif%}<br>With {{Consultant.FirstLast}}</p></div>
Student View
Here’s an example student view configuration. This one reads more like a spoken paragraph, with the important information bolded. Whether the appointment is in-person or online determines the text in the second half.
<div style="float:left; width: 75%;">{{Appointment.Icon|raw}}<b>{{Center.Name}}</b><br>Your appointment with <b>{{Consultant.NameToStudent}}</b> has been booked for <b> {{Appointment.StartTime}}. </b><br>{%ifAppointment.Online=="1"%}This is an online appointment, please select the right arrow icon to join your session.The icon will only appear within 10 minutes of your appointment start time.{%else%}This is an in-person appointment taking place at <b>{{Appointment.Location}}</b>. If any assistance is required, please reach out to <u>{{Consultant.Email}}</u>.{%endif%}<br>{%ifReason.ReasonName!=''%}Reason: {{Reason.ReasonName}}<br/>{%endif%}{%ifCourse.Subject!=''%}Subject: {{Course.Subject}}<br/>{%endif%}<br></div><div style="line-height: 2;" >{{Appointment.CancelLink|raw}}<br/>{{Appointment.ActionLink|raw}}<br/>{{Appointment.EnterOnlineLink|raw}}<br/></div><div style="clear: both;"> </div>
Consultant View
This one has a few more moving parts. Near the top, we’re saying “if the appointment has been cancelled, say “CANCELLED:” and strikethrough the rest of the contents.” We also have a series of “if this field isn’t blank, include it in the list” as well as the time saying the word “Today” rather than a standard date and time.
A unique option available in the consultant view is the ability to start and stop a visit directly from the dashboard. This can be implemented by including the {{Appointment.LoginStudentToAppt|raw}} Twig tag in your appointment display configuration. It will display as a clickable button to your staff.
Online appointment link text
Allows you to modify the hyperlink/button visible to students within online appointment records. Default is "The location for this online appointment is here."