TracCloudWhatsNew: Difference between revisions
From Redrock Wiki
No edit summary |
No edit summary |
||
| Line 9: | Line 9: | ||
<hr style="height:1px;border:none;color:#333;background-color:#333;" /> | <hr style="height:1px;border:none;color:#333;background-color:#333;" /> | ||
{{:TracCloudWhatsNew2023-02-09_2}} | |||
<hr style="height:1px;border:none;color:#333;background-color:#333;" /> | |||
{{:TracCloudWhatsNew2023-02-09_1}} | |||
<hr style="height:1px;border:none;color:#333;background-color:#333;" /> | |||
{{:TracCloudWhatsNew2023-01-30_1}} | |||
<hr style="height:1px;border:none;color:#333;background-color:#333;" /> | |||
{{:TracCloudWhatsNew2023-01-19_1}} | {{:TracCloudWhatsNew2023-01-19_1}} | ||
<hr style="height:1px;border:none;color:#333;background-color:#333;" /> | <hr style="height:1px;border:none;color:#333;background-color:#333;" /> | ||
| Line 31: | Line 37: | ||
{{:TracCloudWhatsNew2022-11-04_2}} | {{:TracCloudWhatsNew2022-11-04_2}} | ||
<hr style="height:1px;border:none;color:#333;background-color:#333;" /> | <hr style="height:1px;border:none;color:#333;background-color:#333;" /> | ||
[[TracCloudWhatsOld|View more...]] | [[TracCloudWhatsOld|View more...]] | ||
Revision as of 17:01, 1 March 2023
This page highlights some of the recent changes made to the TracCloud platform, and how you can utilize them on your own instance. A list of past changes and a full changelog can be found in the tabs above.
If you have any questions about these changes, feel free to reach out to us on our helpdesk.
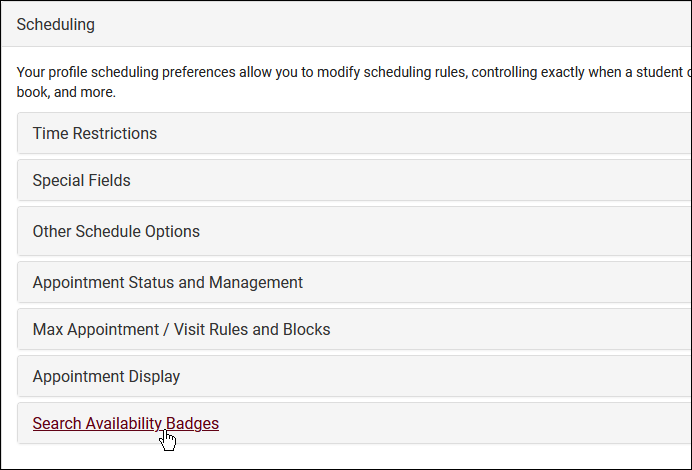
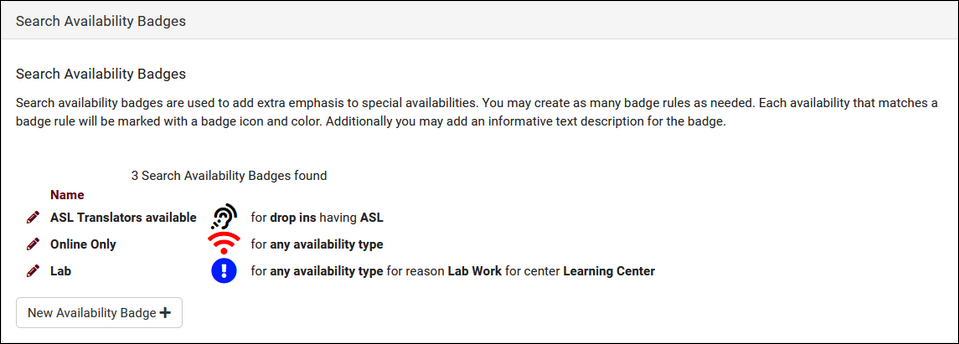
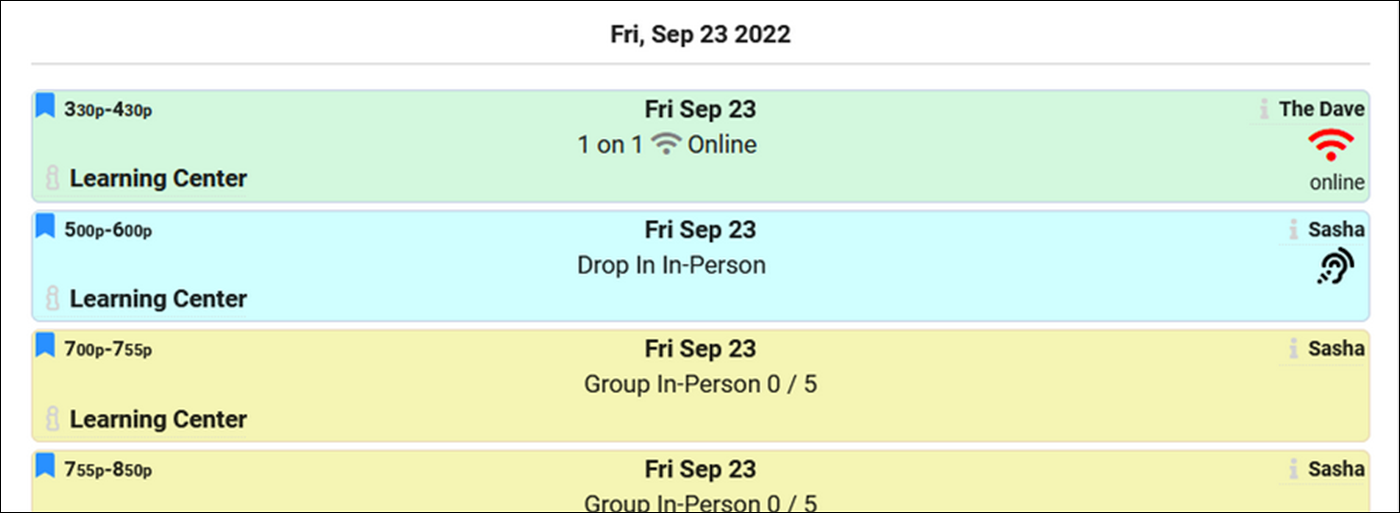
Search Availability badges can be used to add information and indicators to availability slots. Each badge can appear for certain conditions, based on center, availability section/reason, location, skills/accommodations, etc.
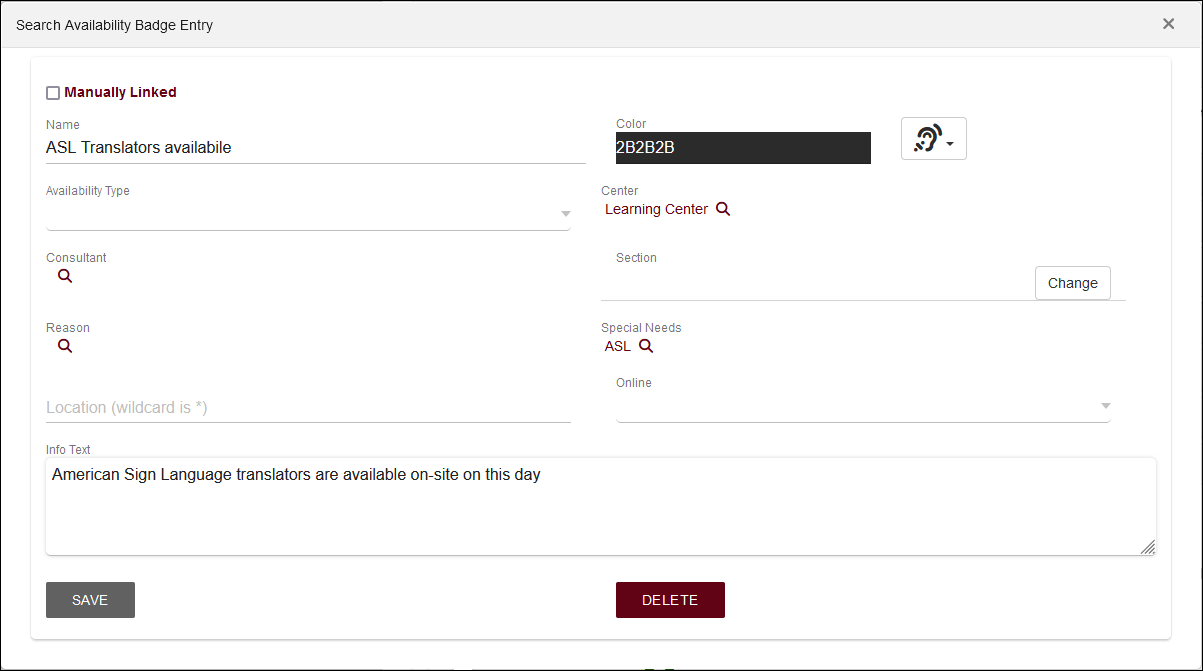
Click "New Availability Badge" to begin. This will open a form where you can enter the details for your badge.
Manually Linked
Name
- Name of the Badge. This will not be displayed for students
- Name of the Badge. This will not be displayed for students
Availability Type
- Drop In, 1-on-1, or Group availability
- Drop In, 1-on-1, or Group availability
Consultant
- Assign a specific Staff
- Assign a specific Staff
Reason
- Assign a specific Reason
- Assign a specific Reason
Center
- Assign a specific Center
- Assign a specific Center
Section
- Assign a specific Subject
- Assign a specific Subject
Special Needs
- Select if applicable (more information)
- Select if applicable (more information)
Online
- Availability Type; Online, In Person, or Optional
- Availability Type; Online, In Person, or Optional
Location
- Location of the availability
- Location of the availability
Once you've decided where the badge is needed and have made your selections from the options above, you can now determine which icon, colors, and info work best for the badge created.
Color: Color of Icon
Icon: Choose from the list or use a custom icon
Info Text: Enter text that will display when users hover over the icon
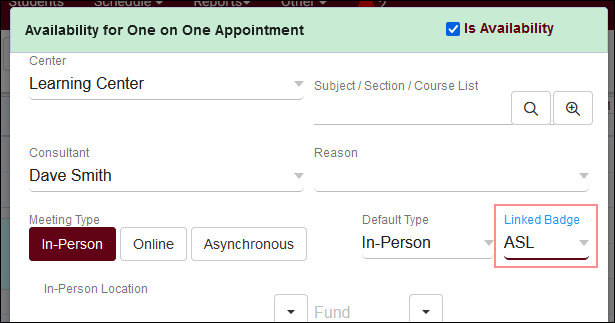
In the example screenshot above, this badge will only appear on availabilities of staff who have been assigned the “ASL” accommodation and are available in the Learning Center. Once saved, your badge will appear in the profile preferences if you need to edit/delete it later.
Any fields left blank will not be considered for where this badge appears, you can be as specific or non-specific as needed. You can also create as many badges as you'd like, more than 1 tag can appear for the same availability. When students search for an availability, the badges will display to the right of the screen as shown below.
Students Listing
Student data is one of the most important parts of your Trac System, on top of being the record that all their visits, appointments, documents, and more are assigned to, you also have the student's information directly. You can run reports on visits grouped by student majors, or send emails to students of a certain class, cohort, or any other field you have available. This article goes over some of the ways you can search for these records.
The Students Listing itself (found by clicking 'Students' in the Navigation Bar) contains all student records uploaded to your Trac System. From this page, we're able to manage student data in bulk, creating lists, sending emails, or submitting SAGE referrals, or we can open a specific student record and manage just one student profile at a time.
Each column of information displayed has a clickable header that will sort the listing accordingly. Clicking once sorts ascending, a second click will sort descending.
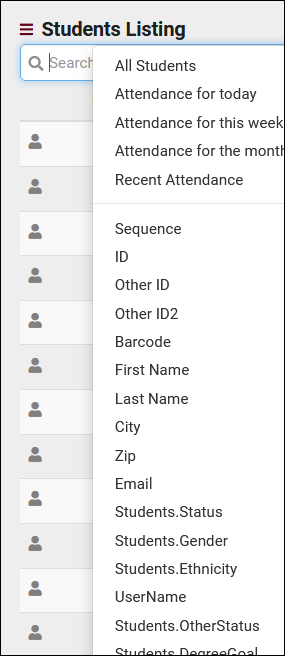
Using the Search Bar on this screen, we can easily perform quick searches to find specific students. Right clicking in the search bar (shown below) will provide a list of available student fields to search, click any of these to auto-fill the search bar.
Example Searches:
- Find a student by a single value, such as ID. Specifying 'Students.ID=' actually isn't required for ID or Name searches, but it works well as an example.
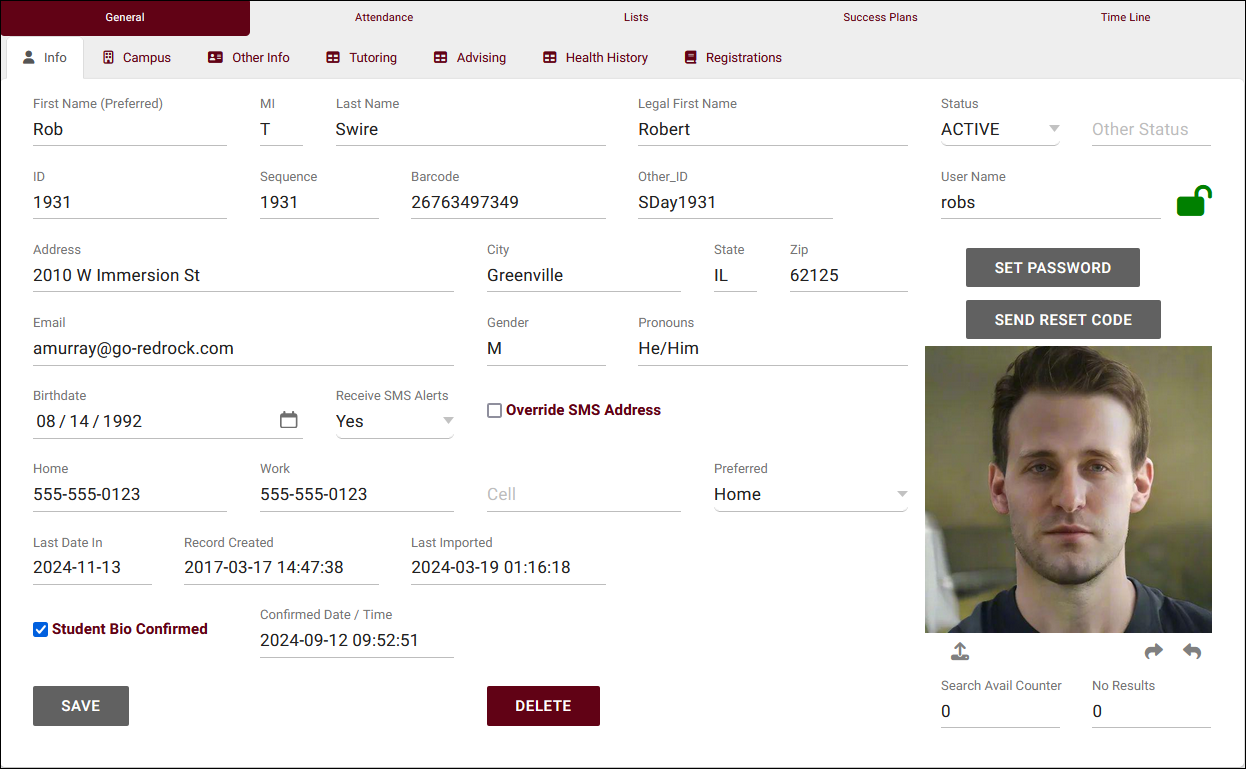
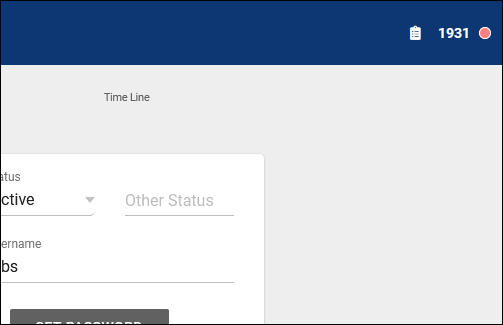
- Students.ID=1931
- Students.ID=1931
- ...or name. Names should be formatted as 'Last, First' or 'First M Last'. 'First Last' will also work if middle names are not being imported.
- Day, Rob
- Day, Rob
- Search multiple fields at once, separate your searches by a space.
- Students.Major=Mathematics Students.Class=Sophomore
- Students.Major=Mathematics Students.Class=Sophomore
- When performing multiple searches where at least one field contains a space, make sure to surround the contents you're searching for with quotation marks.
- Students.Major="Chemical Engineering" Students.Status=Active
- Students.Major="Chemical Engineering" Students.Status=Active
- Search in Custom Fields. It's recommended to use the right-click menu to select these, as it will always auto-fill the correct field name.
- #sql:InState#=Yes
- #sql:InState#=Yes
- Date searches such as this are required to be formatted as YYYY-MM-DD
- Students.BirthDate=1993-07-16
- Students.BirthDate=1993-07-16
- We also offer a special search to find students where today is their birthday.
- birthdaytoday
- birthdaytoday
Students Search
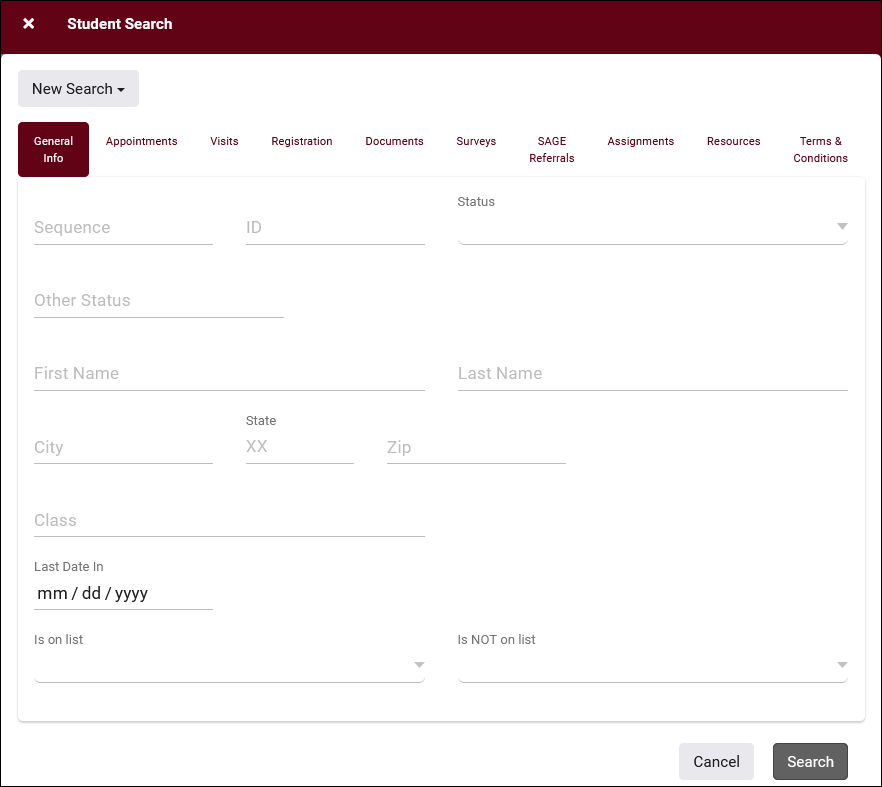
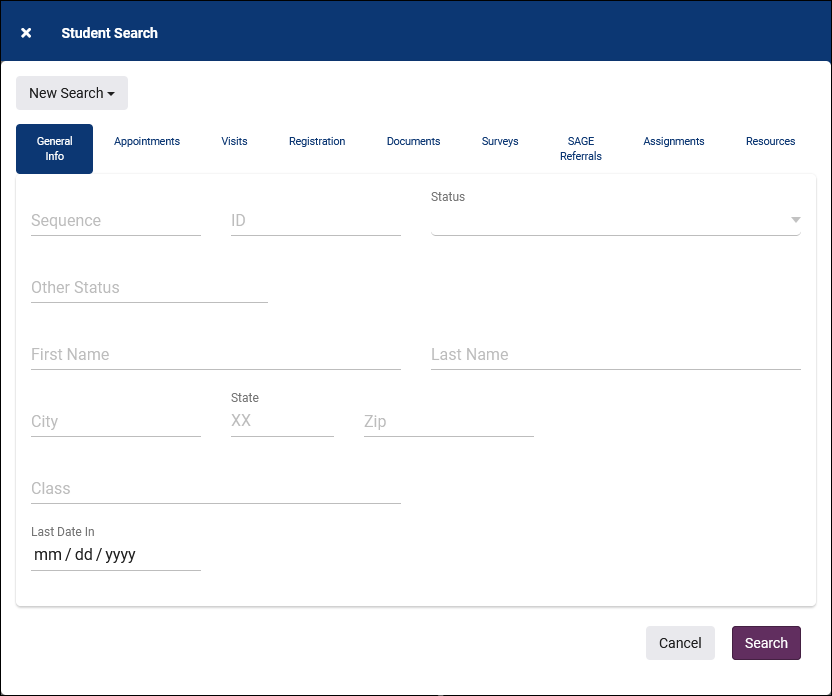
The Student Listing also has a unique Search utility found in the hamburger menu . This utility has the ability to search related tables to find relevant students. This includes the ability to run searches such as "students who have had appointments in the last 7 days" or "students who have ongoing referrals."
- Search Type
- This can be set to New Search, Search Selection, Remove found from Selection, or Add found to Selection, depending on the desired effect of this search.
- General Info tab
- This tab is where you can search for basic information about the student. ID, Status, Name, etc.
- Appointments
- This tab allows you to search for students by appointment information. For example, "students who had an appointment from 02/10 to 02/20 with a status of Missed." Any fields that support wildcards additionally support the | character for "or."
- Visits
- This tab allows you to search for students by visit info. For example, "students who visited more than 2 times from 02/10 to 02/20 where the subject was MAT100." Any fields that support wildcards additionally support the | character for "or."
- Registration
- This tab allows you to search for students by registration info. For example, "students who are actively enrolled in more than one math course." Any fields that support wildcards additionally support the | character for "or."
- Documents
- This allows you to search for students by documents. "Students who have a document of a certain filename uploaded in the last month."
- Surveys
- Students who have received or responded to a survey in a certain time period. Requires SurveyTrac.
- SAGE Referrals
- Students who have ongoing or completed referrals of a specific type in a specified date range. Requires SAGE. Any fields that support wildcards additionally support the | character for "or."
- Assignments
- This tab allows you to search by potential assignments. Any fields that support wildcards additionally support the | character for "or."
- Resources
- This tab allows you to search for students by their resource usage, whether they have certain items checked out or overdue. Any fields that support wildcards additionally support the | character for "or."
- Terms & Conditions
- Search by accepted terms and conditions. Any fields that support wildcards additionally support the | character for "or."
- Success Plans
- Search by assigned Success Plans.
Hamburger Menu
Every listing page in the Trac System features a hamburger menu with utilities to search for or interact with your list of records. Some of these options are specific to a certain listing/record-type, others are shared. The following list includes definitions for the hamburger menu options available on this listing, and how they can be utilized.
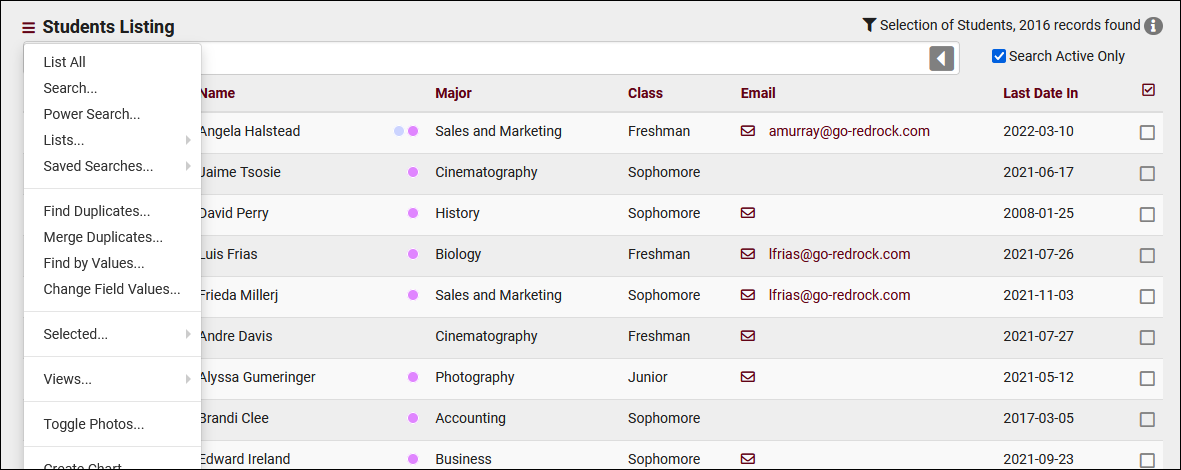
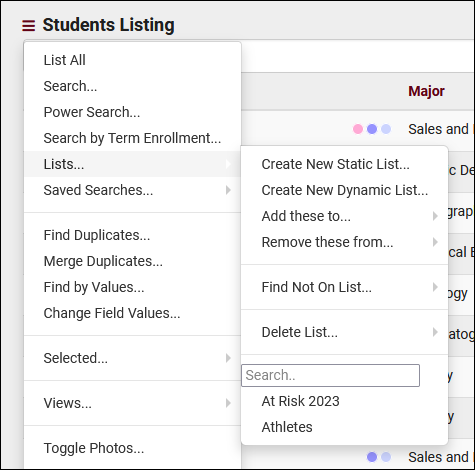
- List All
- This option will show all records on the current listing. Some listings have an additional toggle for only showing "Active" records, such as Students and Registrations, which will still override a "List All" search if checked.
- This option will show all records on the current listing. Some listings have an additional toggle for only showing "Active" records, such as Students and Registrations, which will still override a "List All" search if checked.
- Search
- This utility will open a pop-up window unique to each Listing it's present on, allowing you to search your records by a number of different fields. In the case of the Student Listing, you could use this to search related records, such as 'Students who have at least 2 Visits in the Learning Center' or 'Students with a recent Document upload in their timeline.'
- Power Search
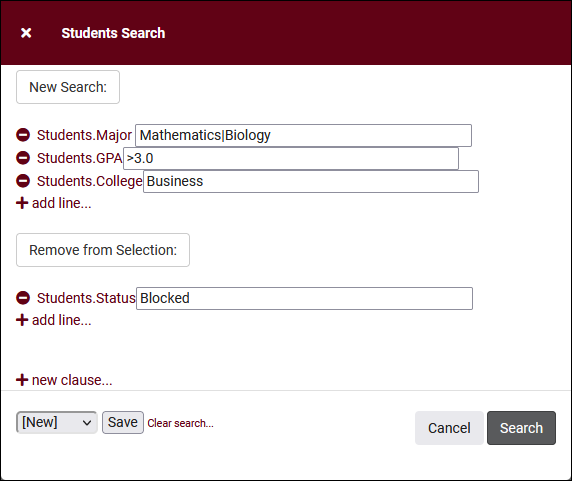
- This option provides a simple but powerful search utility to find the records you need. String together multiple searches, adding or removing results for each. Use Search Symbols to include ranges of data, and Save Searches for later use if needed. The search term 'blankornull' can be used to find all records with a value of nothing ("") or null ().
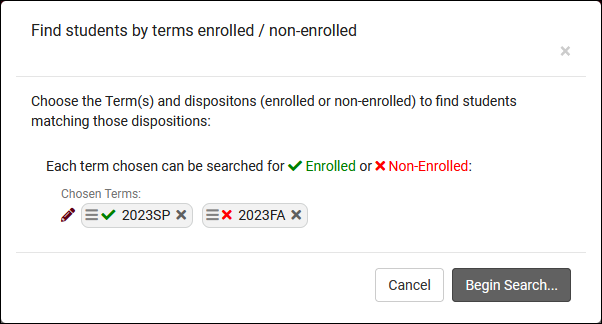
- Search by Term Enrollment
- Lists
- See Student Lists and Watch Lists for more information.
- See Student Lists and Watch Lists for more information.
- Saved Searches
- See Saved Searches for more information.
- See Saved Searches for more information.
- Find/Merge Duplicates
- These utilities can be used to cleanup duplicate records in your Trac System. We highly recommend reaching out to Redrock Support directly for assistance in cleaning up this data.
- These utilities can be used to cleanup duplicate records in your Trac System. We highly recommend reaching out to Redrock Support directly for assistance in cleaning up this data.
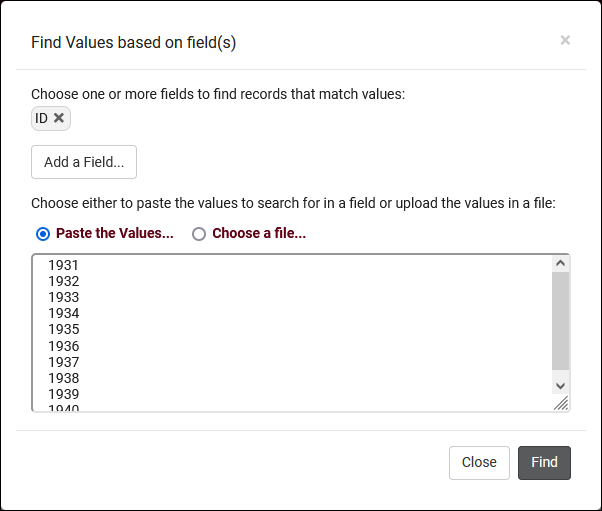
- Find by Values
- Change Field Values
- This utility allows you to make modifications in to your records in bulk. Similar to the Merge Duplicates utility, we highly recommend coordinating with Redrock Support directly on this setting.
- This utility allows you to make modifications in to your records in bulk. Similar to the Merge Duplicates utility, we highly recommend coordinating with Redrock Support directly on this setting.
- Selected...
- The Selection Tool offers several options to filter and manage your records. More information on this feature can be found in its own dedicated article here.
- The Selection Tool offers several options to filter and manage your records. More information on this feature can be found in its own dedicated article here.
- Views
- See Views for more information.
- See Views for more information.
- Send Survey
- Allows you to send a survey to the current user list. More information.
- Allows you to send a survey to the current user list. More information.
- Register In
- Allows you to quickly enroll a student in a new registration. Depending on your import configuration, manually recreated registrations may be deactivated during your auto-import.
- Allows you to quickly enroll a student in a new registration. Depending on your import configuration, manually recreated registrations may be deactivated during your auto-import.
- Assign Success Plan
- Allows you to assign a new Success Plan to the current student list. More information.
- Allows you to assign a new Success Plan to the current student list. More information.
- Create Referral
- Allows you to create a batch referral through SAGE. More information.
- Allows you to create a batch referral through SAGE. More information.
- Create Task
- Allows you to send a task to the current student list. More information.
- Allows you to send a task to the current student list. More information.
- Toggle Photos
- Enable or disable student photos on the Student Listing.
- Enable or disable student photos on the Student Listing.
- Create Chart
- Based on the data currently being viewed a chart can be generated to visually illustrate the relationships in the data.
- Based on the data currently being viewed a chart can be generated to visually illustrate the relationships in the data.
- Export CSV
- Export current listing contents to a CSV file.
- Export current listing contents to a CSV file.
- Send Email
- Allows you to send an email directly to a list of users.
- Allows you to send an email directly to a list of users.
- Send Email to Faculty
- This email utility allows you to email faculty linked to student registrations. The faculty recipients can be determined by subject, status, and grade. One email will be sent per linked registration, so if there are 3 students listed enrolled in MAT100 with Dave Smith, Dave Smith will receive 3 emails. Faculty recipients can also be filtered by scheduled day/time if section schedule is being imported.
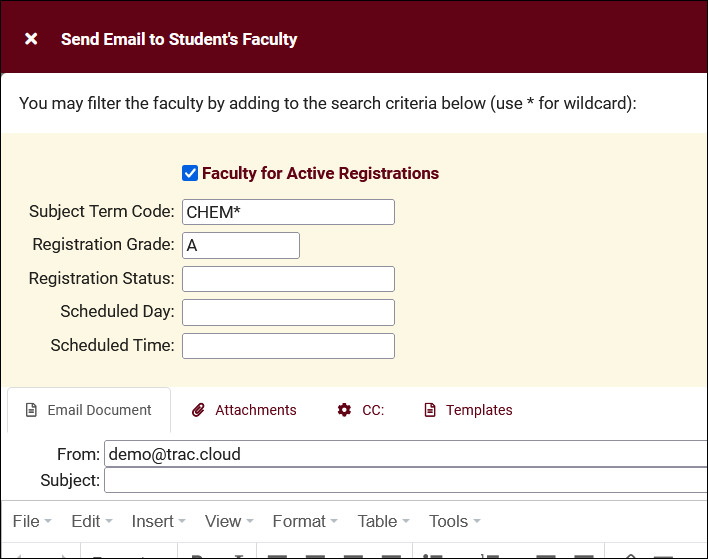
- Show these <records>
- This utility takes your selection of records, finds the related records, and takes you to that listing with the resulting records. For example, on the Registration listing, you can "Show these Students" to display the student records for the registrations that you were viewing.
- This utility takes your selection of records, finds the related records, and takes you to that listing with the resulting records. For example, on the Registration listing, you can "Show these Students" to display the student records for the registrations that you were viewing.
- Allows you to print the contents of the current listing, by extension this also allows you to export the current list as a PDF file.
- Allows you to print the contents of the current listing, by extension this also allows you to export the current list as a PDF file.
- New <Record>
- Allows you to create a new record based on your selected listing.
- Allows you to create a new record based on your selected listing.
See Also
Profile Preferences
Prefs
Centers
The Centers tab contains all of the Centers created in this profile. A center can represent a physical center, department, or any other division that you may want to designate. From this menu, we can also see the linked course list and the color designation.
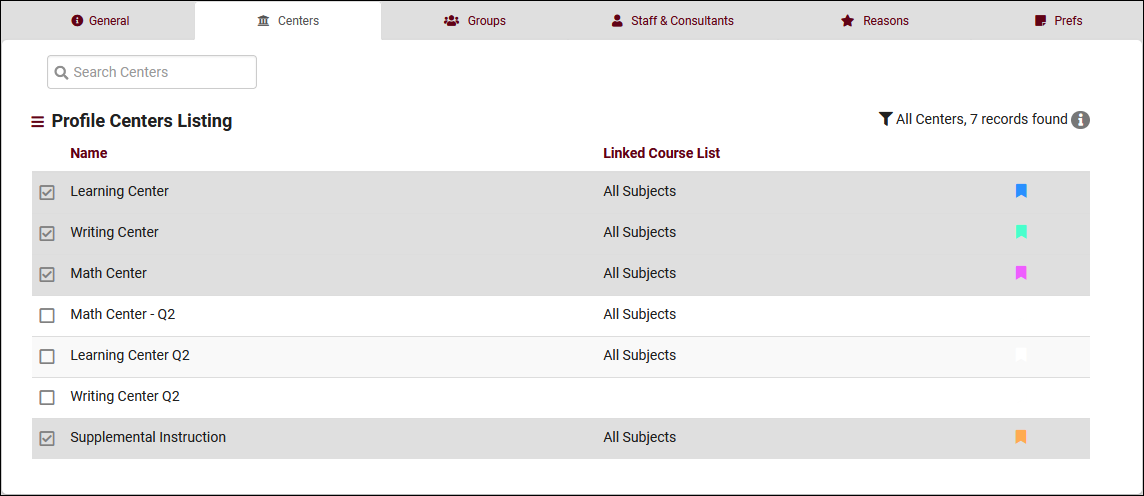
Creating a Center
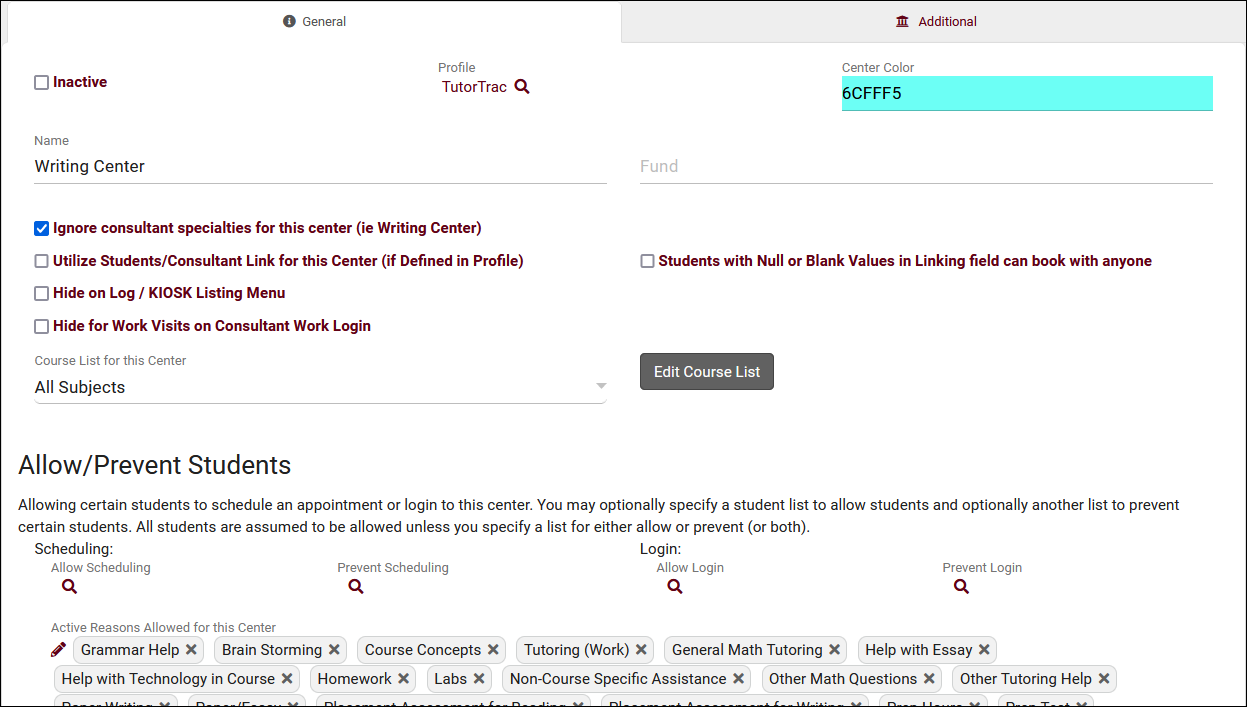
The hamburger icon button contains the option to create a new center. Once selected, you will be taken to a General tab where you can start configuring your center.
- Inactive
- We never recommend deleting centers in TracCloud, as this will remove the related records (Visits/Appointments/etc) from reports and student/staff histories. Instead, we recommend setting these records to Inactive, which will hide it from view, but keeps the records available for reports or reactivation.
- We never recommend deleting centers in TracCloud, as this will remove the related records (Visits/Appointments/etc) from reports and student/staff histories. Instead, we recommend setting these records to Inactive, which will hide it from view, but keeps the records available for reports or reactivation.
- Profile
- All of your centers are assigned to profiles; this field displays which profile this particular center has been assigned to. This will default to whichever profile you started creating the center from.
- All of your centers are assigned to profiles; this field displays which profile this particular center has been assigned to. This will default to whichever profile you started creating the center from.
- Center Color
- Name
- The name of the center, which is typically displayed to all user types in regards to visit tracking and scheduling.
- The name of the center, which is typically displayed to all user types in regards to visit tracking and scheduling.
- Fund
- The optional fund or payment source for this center. Click here for more information on funds and payroll tracking.
- The optional fund or payment source for this center. Click here for more information on funds and payroll tracking.
- Ignore consultant specialties for this center (ie Writing Center)
- When searching for availabilities, only consultants who are assigned to the selected subject will appear. For example, when a staff member or student selects “MATH101”, only consultants who can assist with MATH101 will be displayed. This checkbox disables that, allowing consultants in this center to assist with any course, regardless of their assigned course list. This is typically used for writing centers, and only applies when searching for availabilities from the dashboard, and does not have an effect when booking appointments from the staff schedule. The center course list still applies as usual.
- When searching for availabilities, only consultants who are assigned to the selected subject will appear. For example, when a staff member or student selects “MATH101”, only consultants who can assist with MATH101 will be displayed. This checkbox disables that, allowing consultants in this center to assist with any course, regardless of their assigned course list. This is typically used for writing centers, and only applies when searching for availabilities from the dashboard, and does not have an effect when booking appointments from the staff schedule. The center course list still applies as usual.
- Utilize Students/Consultant Link for this Center (if Defined in Profile)
- If configured in your profile options, students can be linked with advisors/consultants based on a field in their profile. When that student logs in, they will only see advisors that match their linked field. Checking this box enables this feature in this center. For example, students would only see advisors assigned to their major, etc.
- If configured in your profile options, students can be linked with advisors/consultants based on a field in their profile. When that student logs in, they will only see advisors that match their linked field. Checking this box enables this feature in this center. For example, students would only see advisors assigned to their major, etc.
- Students with Null or Blank Values in Linking field can book with anyone
- This option expands on the above, so that if a student does not have any data in their assigned advisor/major/etc field, they are allowed to see all consultants in search results. Otherwise, no results will be returned from this center.
- This option expands on the above, so that if a student does not have any data in their assigned advisor/major/etc field, they are allowed to see all consultants in search results. Otherwise, no results will be returned from this center.
- Hide on Log / KIOSK Listing Menu
- Enabling this option will remove this Center as a choice in the KIOSK and Log Listing menu, as well as from the available Center choices when logging into a Profile-wide Kiosk.
- Enabling this option will remove this Center as a choice in the KIOSK and Log Listing menu, as well as from the available Center choices when logging into a Profile-wide Kiosk.
- Hide for Work Visits on Consultant Work Login
- Enabling this option will remove this Center as a choice when staff members are logging in for work visits.
- Enabling this option will remove this Center as a choice when staff members are logging in for work visits.
- Course List for this Center
- This setting determines which courses are assigned and available in this center. Click here For more information on Course Lists in general.
- This setting determines which courses are assigned and available in this center. Click here For more information on Course Lists in general.
- Allow/Prevent Students
- Allow or block students on a specific list from logging into or booking appointments in this center. If a list is selected in an "allow" field, all other students would be automatically prevented from scheduling/logging in.
- Allow or block students on a specific list from logging into or booking appointments in this center. If a list is selected in an "allow" field, all other students would be automatically prevented from scheduling/logging in.
- Active Reasons Allowed for This Center
- The reasons assigned to this center. This controls which reasons are displayed when searching for and booking appointments, as well as the options available during kiosk logins.
Additional tab
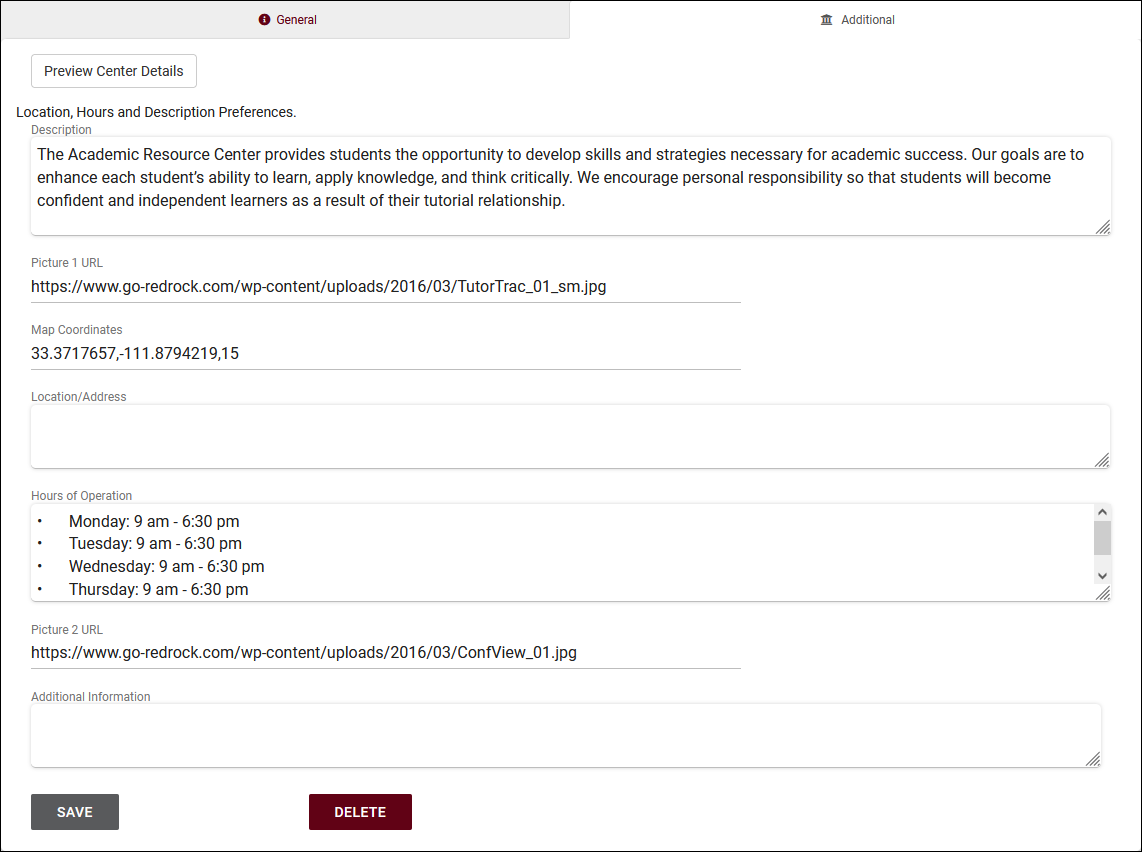
The Additional tab contains information about the center that can be accessed from the Searching for Appointments screen. If preferred, a profile-wide default can be set rather than entering a unique description for every center. The center description takes priority if both are used.
When searching for an appointment, you can click the info icon/center name, and the additional information will be displayed.
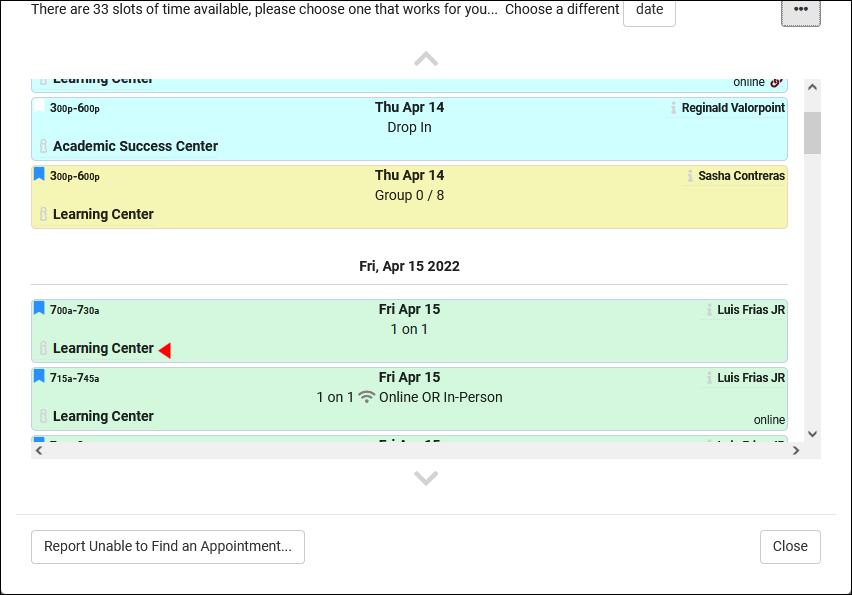
This information can contain a center description, map location, written location, additional info, hours of operation, and even photos. More information on configuring this screen can be found in our dedicated Locations, Hours, and Descriptions article.
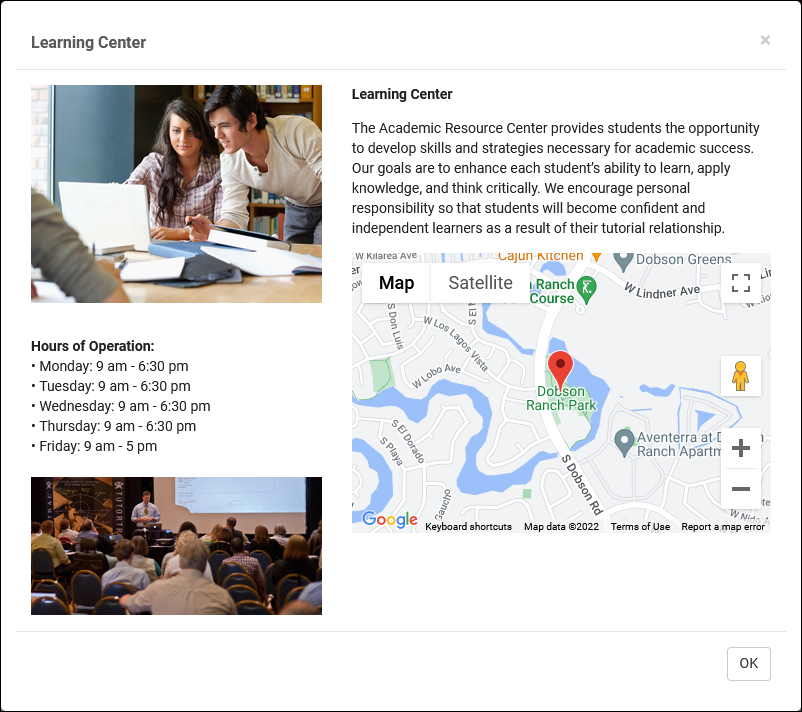
- Description
- This text field appears in the top-right corner of the Center Info window.
- This text field appears in the top-right corner of the Center Info window.
- Picture 1 URL
- A direct link to an image of your choice, this will appear in the top-left corner of Center Info.
- A direct link to an image of your choice, this will appear in the top-left corner of Center Info.
- Map Coordinates
- This will be the location displayed in the Google Maps box, and how far zoomed in/out the default view is. Formatted as Latitude, Longitude, default zoom level.
- For the default zoom, 12 would be fairly zoomed out, giving people a highway/main road reference, 15 would be a typical street-level view, and 18 would be a zoomed in campus-level view.
- Location/Address
- This will appear above the Google Maps box, providing the written address.
- This will appear above the Google Maps box, providing the written address.
- Hours of Operation
- Your center hours, displayed on the left-side of the Center Info box.
- Your center hours, displayed on the left-side of the Center Info box.
- Picture 2 URL
- A direct link to an image that will appear in the lower-left corner of the Center Info box.
- A direct link to an image that will appear in the lower-left corner of the Center Info box.
- Additional Information
- An additional text field that displays at the very bottom of the Center Info box.
- An additional text field that displays at the very bottom of the Center Info box.
Any field left blank will simply not appear in Center Info at all.
Profile Preferences
Prefs
Staff & Consultants
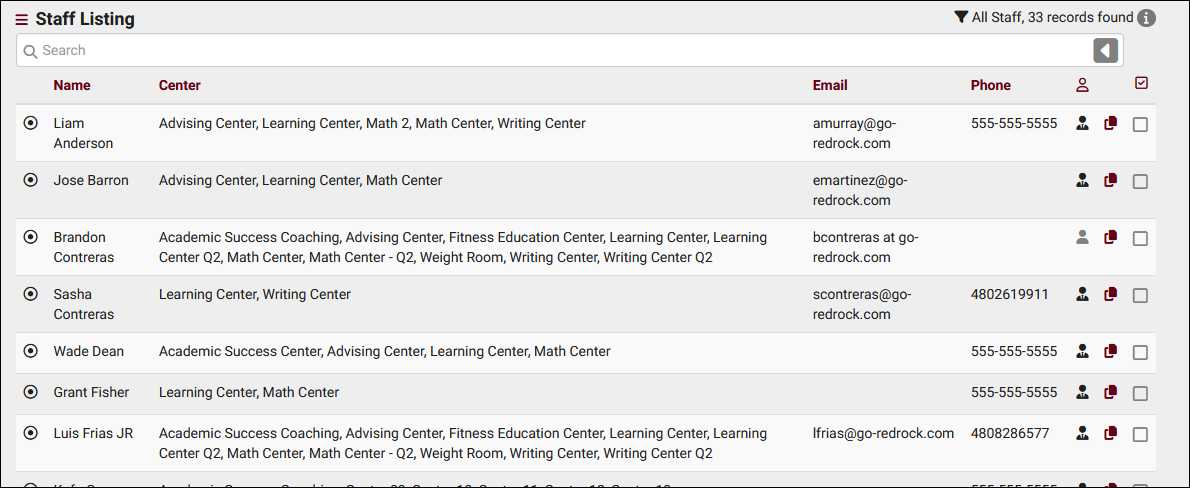
This tab is where you will find your staff/consultants that have been assigned to this profile. From this view, we can see the staff names, the centers and group they’re assigned to, and what type of staff member they are (consultant or regular staff).
For a complete list of staff, not just staff assigned to this profile, go to Other > Other Options > Listings > Staff.
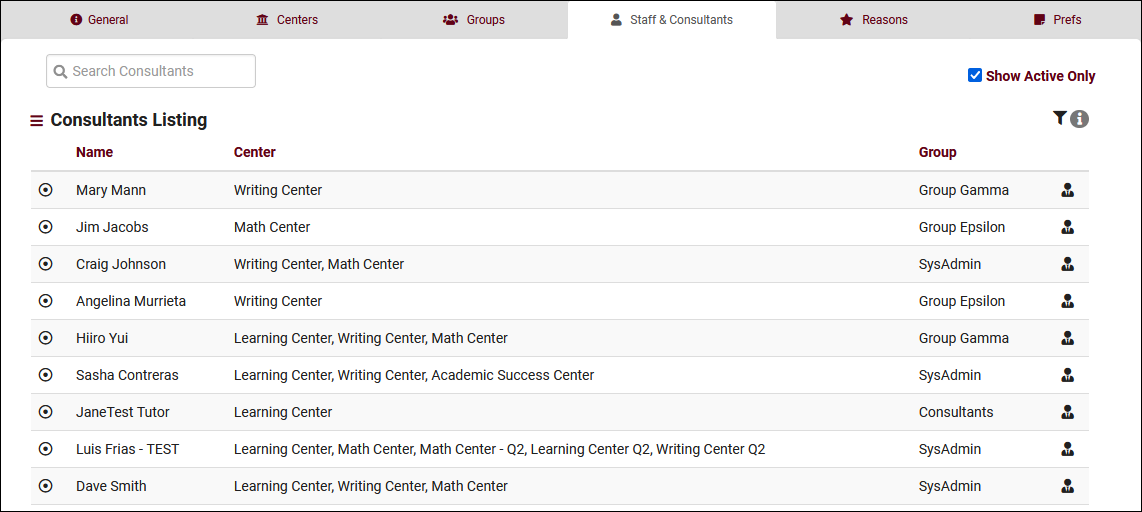
To create a new staff member, click on the hamburger button, then select “New Staff Member.”

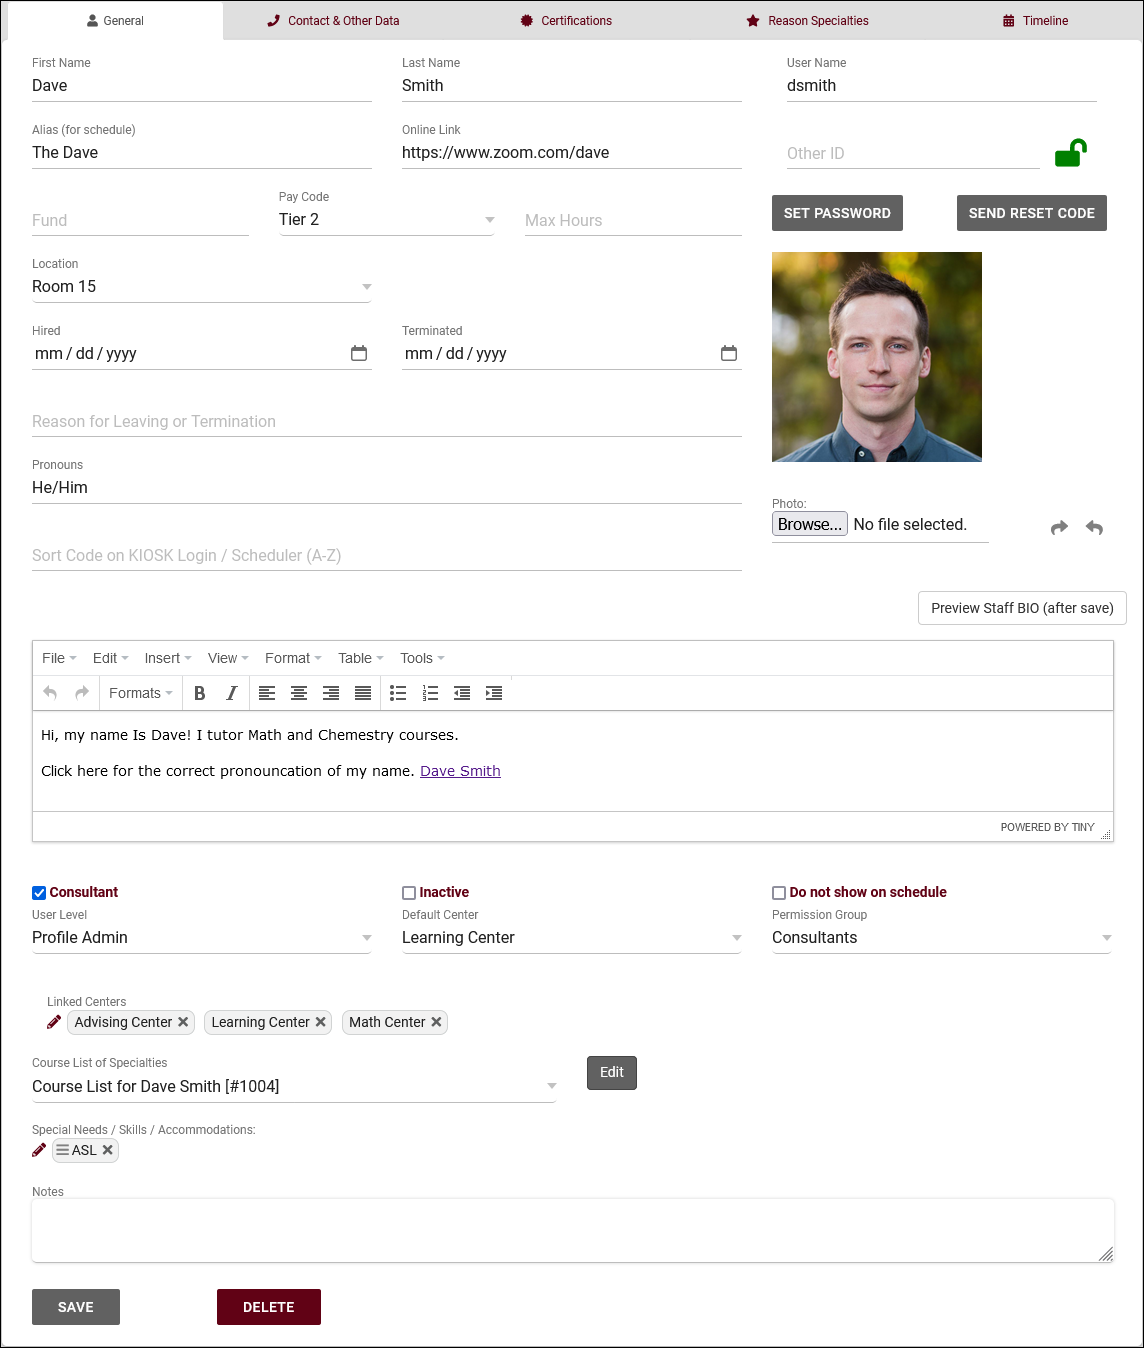
- First Name, Last Name
- The staff member’s name. This will display on the staff schedule and in reports. This can also display to students if alias is not being used instead.
- The staff member’s name. This will display on the staff schedule and in reports. This can also display to students if alias is not being used instead.
- Username
- This is the username that this staff member will use to login (or for SSO authentication). Coordinate with your IT and/or Redrock Software to determine what your username format should be (e.g., ID number, email address, etc).
- This is the username that this staff member will use to login (or for SSO authentication). Coordinate with your IT and/or Redrock Software to determine what your username format should be (e.g., ID number, email address, etc).
- Other ID
- This is the alternate ID of this staff member, can be used for searches or staff work visits.
- This is the alternate ID of this staff member, can be used for searches or staff work visits.
- Hired / Terminated & Reason
- Hired/Termination dates as well as the reason for termination can be recorded for reference if needed. This does not affect Trac System functionality.
- Hired/Termination dates as well as the reason for termination can be recorded for reference if needed. This does not affect Trac System functionality.
- Staff Bio Confirmed & Confirmed Date / Time
- When and if this staff member has completed the confirm bio prompt. More information on Confirm Bio can be found here.
- When and if this staff member has completed the confirm bio prompt. More information on Confirm Bio can be found here.
- Pronouns
- This staff member's preferred pronouns, this information can be shared with students via Twig tags in emails or in Staff Bio on Search Availability.
- This staff member's preferred pronouns, this information can be shared with students via Twig tags in emails or in Staff Bio on Search Availability.
- Sort Code on KIOSK Login / Scheduler (A-Z)
- During visit login/logout or on the staff schedule, where a list of consultants are shown, the results will be sorted alphabetically by last name. You can enter text in this field to override this. For example, Hans Zimmer would typically be at the very end of the list, but if you enter "AAA" in this field, they would be displayed towards the very top instead. The opposite is also true, you can enter "ZZZ" for Dave Anderson to push him towards the bottom of the list.
- During visit login/logout or on the staff schedule, where a list of consultants are shown, the results will be sorted alphabetically by last name. You can enter text in this field to override this. For example, Hans Zimmer would typically be at the very end of the list, but if you enter "AAA" in this field, they would be displayed towards the very top instead. The opposite is also true, you can enter "ZZZ" for Dave Anderson to push him towards the bottom of the list.
- Staff BIO
- A written bio of this staff account. Can be displayed to students, more information.
- A written bio of this staff account. Can be displayed to students, more information.
- Inactive
- We don’t recommend deleting records in TracCloud, as this will also disconnect them from related records (Visits, Appointments, etc). Instead, we recommend deactivating the account by checking this box. This will hide them from view and prevent them from logging into TracCloud, but the record and related data remains available if needed, for historical reporting or later reactivation.
- We don’t recommend deleting records in TracCloud, as this will also disconnect them from related records (Visits, Appointments, etc). Instead, we recommend deactivating the account by checking this box. This will hide them from view and prevent them from logging into TracCloud, but the record and related data remains available if needed, for historical reporting or later reactivation.
- Title or Position & Supervisor
- This staff member's position title and supervisor for reference if needed. This does not affect Trac System functionality.
- This staff member's position title and supervisor for reference if needed. This does not affect Trac System functionality.
- User Level
- The user level determines some baseline rules for what this staff member can and can’t access. More information.
- The user level determines some baseline rules for what this staff member can and can’t access. More information.
- Default Center
- This is the primary center the staff member is assigned to. Also determines which profile's "Staff & Consultants" list they appear in.
- This is the primary center the staff member is assigned to. Also determines which profile's "Staff & Consultants" list they appear in.
- Permission Group
- The permission group that this staff is assigned to. More information.
- The permission group that this staff is assigned to. More information.
- Linked Centers
- This is where you can assign staff members to different centers in TracCloud. A center must be assigned here for a consultant to have availabilities in or be assigned to visits for that center.
- This is where you can assign staff members to different centers in TracCloud. A center must be assigned here for a consultant to have availabilities in or be assigned to visits for that center.
- Notes
- An optional field for any notes that you may want to record relating to this staff member.
- An optional field for any notes that you may want to record relating to this staff member.
- Consultant
- • Alias
- An alternate name that will appear when searching for appointments. Requires the “Display consultant alias on availability search” option to be enabled in your Profile Scheduling Prefs.
- • Online Link
- If remote appointments are held via online conferencing platforms (Zoom, Webex, etc), each of your consultants can have a unique invite link defined in their profile. When a URL is placed here, and their availability is set the online meeting type, the URL entered in this field will appear in the available location choices.
- • Fund
- This is used as the consultant's assigned fund, if applicable. More information on funds and payroll features in general can be found here.
- • Pay Code
- This consultant’s pay code will determine their pay rate when running payroll reports. More information.
- • Max Hours
- Can be used to limit the number of hours this staff member can be booked in a certain range of days, even if they have open availabilities on their calendar. This requires setting up a corresponding max appointment rule, more information here.
- • Location
- The Location option assigned here will display as an option when creating availabilities on this consultant’s schedule.
- • Do not show on schedule
- If checked, this consultant will not show up on the schedule.
- • Course List of Specialties
- The course list selected here determines which subjects this consultant can assist with. More information on creating and managing course lists can be found here.
- • Accommodations
- These are the skills/accommodations that this consultant can assist with. For example, if accommodations are used to specify a preferred language, you could select the languages this consultant can assist with here. More information on configuring these accommodations can be found here.
- KIOSK
- If the “KIOSK” checkbox is selected, the account is heavily restricted and many fields are removed. Kiosk accounts can login and select a Kiosk to open, and nothing else. Normal staff members can open kiosks as well, but this can be useful if you need to create a generic account to share with other people to open kiosks in your center.
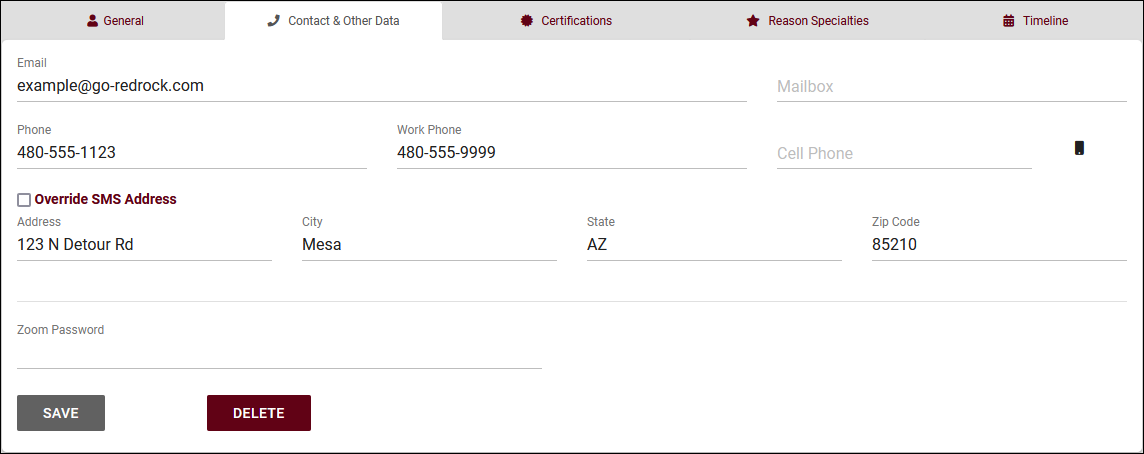
Most of the options here are self-explanatory, just basic contact information about this staff member, such as their email address, phone number, address, etc. The icon indicates whether or not they're opted into text alerts. Custom fields can also be created on this page as well.

This menu allows you to view and manage this consultant’s certifications (e.g., CLRA). New certifications can be created by selecting the hamburger icon > New Certification, which will take you to an empty form to fill out. More information on Work Plans can be found in its own article by clicking here.

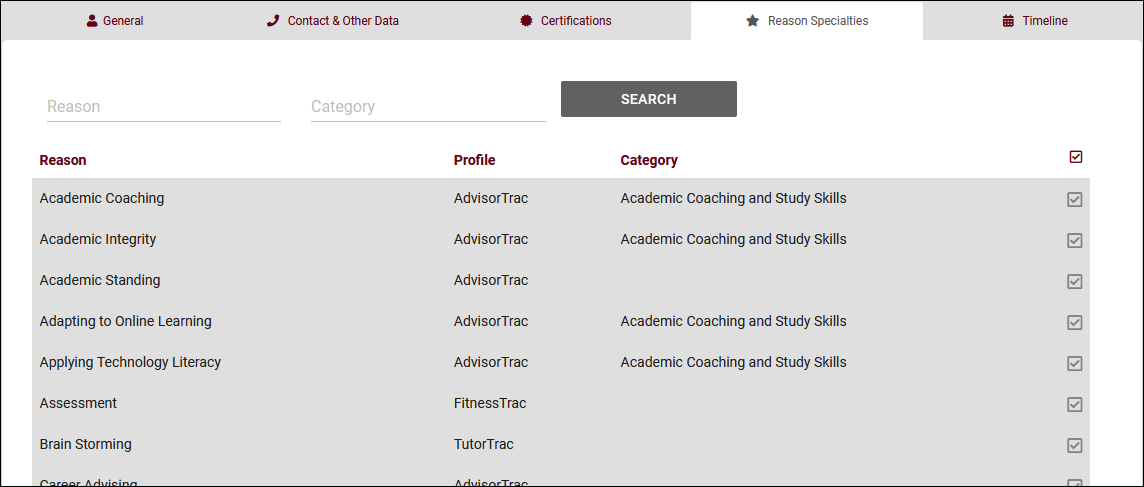
This tab allows you to specify which reasons this consultant is assigned to. If a user searches for availabilities with a reason that the consultant isn't assigned to, they won't appear in the search results, similar to section specialties.
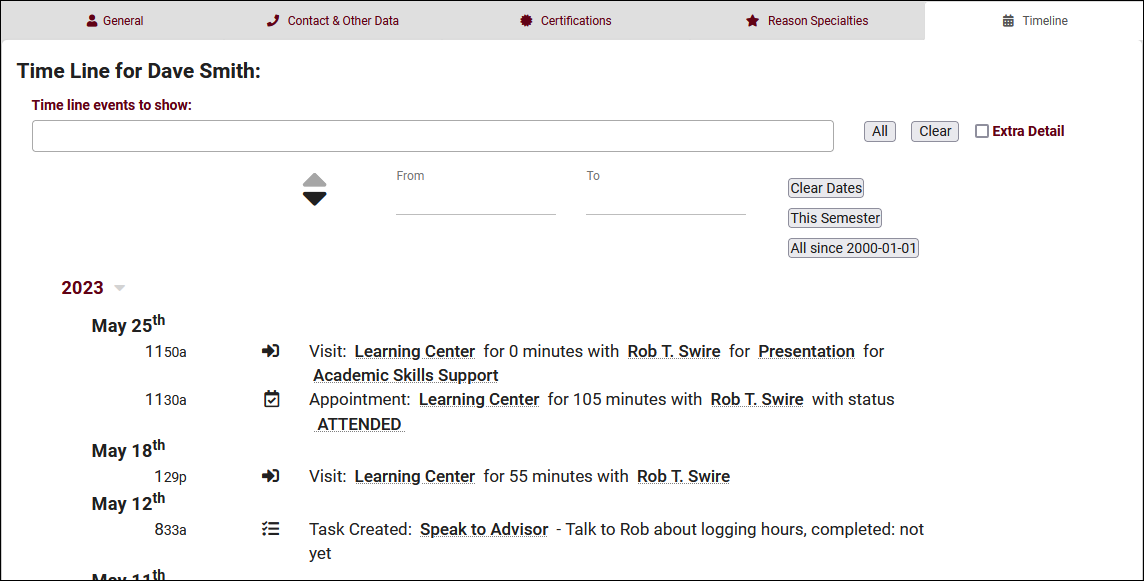
The staff timeline operates similarly to the student timeline, showing a history of their related records. Visits, appointments, tasks, document uploads, etc.
To view a list of all staff accounts in TracCloud across multiple profiles, go to Other > Listings Staff.
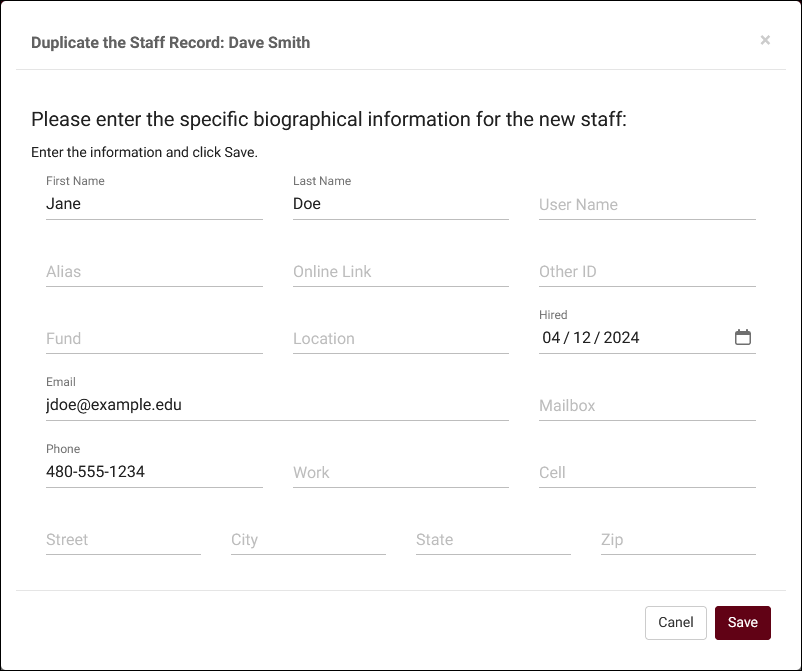
Staff records can be duplicated by clicking the button. This will copy group, user level, default center, linked centers, consultant status, course list (generic course lists only, per-consultant course lists will not be copied), reason specialties, and accommodations to a new staff record and prompt you to replace unique information such as name, address, etc.
Hamburger Menu
Every listing page in the Trac System features a hamburger menu with utilities to search for or interact with your list of records. Some of these options are specific to a certain listing/record-type, others are shared. The following list includes definitions for the hamburger menu options available on this listing, and how they can be utilized.
- List All
- This option will show all records on the current listing. Some listings have an additional toggle for only showing "Active" records, such as Students and Registrations, which will still override a "List All" search if checked.
- This option will show all records on the current listing. Some listings have an additional toggle for only showing "Active" records, such as Students and Registrations, which will still override a "List All" search if checked.
- Power Search
- This option provides a simple but powerful search utility to find the records you need. String together multiple searches, adding or removing results for each. Use Search Symbols to include ranges of data, and Save Searches for later use if needed. The search term 'blankornull' can be used to find all records with a value of nothing ("") or null ().

- Saved Searches
- See Saved Searches for more information.
- See Saved Searches for more information.
- Selected...
- The Selection Tool offers several options to filter and manage your records. More information on this feature can be found in its own dedicated article here.
- The Selection Tool offers several options to filter and manage your records. More information on this feature can be found in its own dedicated article here.
- Change Field Values
- This utility allows you to make modifications in to your records in bulk. Similar to the Merge Duplicates utility, we highly recommend coordinating with Redrock Support directly on this setting.
- This utility allows you to make modifications in to your records in bulk. Similar to the Merge Duplicates utility, we highly recommend coordinating with Redrock Support directly on this setting.
- Views
- See Views for more information.
- See Views for more information.
- Batch Create Certifications/Work Visits & Batch Activate/Deactivate
- Allows you to create these Staff-specific records in bulk, or change the activation status of many staff members at once.
- Allows you to create these Staff-specific records in bulk, or change the activation status of many staff members at once.
- Export CSV
- Export current listing contents to a CSV file.
- Export current listing contents to a CSV file.
- Send Email
- Allows you to send an email directly to a list of users.
- Allows you to send an email directly to a list of users.
- Allows you to print the contents of the current listing, by extension this also allows you to export the current list as a PDF file.
- Allows you to print the contents of the current listing, by extension this also allows you to export the current list as a PDF file.
- Create Task
- Allows you to send a task to the current student list. More information.
- Allows you to send a task to the current student list. More information.
- New <Record>
- Allows you to create a new record based on your selected listing.
- Allows you to create a new record based on your selected listing.
Profile Preferences
Prefs
Log Listing Message, KIOSK Notices, and Custom KIOSKs
This section of your profile preferences contains additional options relating to the Log Listing, KIOSKs, and more.
Other > Other Options > Profiles > [Your Profile] > Prefs > Log Listing Message, KIOSKS Notices, and Custom KIOSKs
A notice can be configured to display on KIOSKs and the Log Listing page. This message can display information that may be useful to staff and students who are trying to login. This message also supports HTML, so you can use bold or italics tags to adjust the visibility of your message.
Here’s an example of a message we can include.

Which displays as:

Kiosk Login Welcome / Goodbye Messages
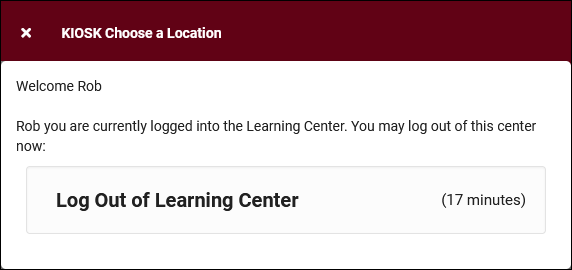
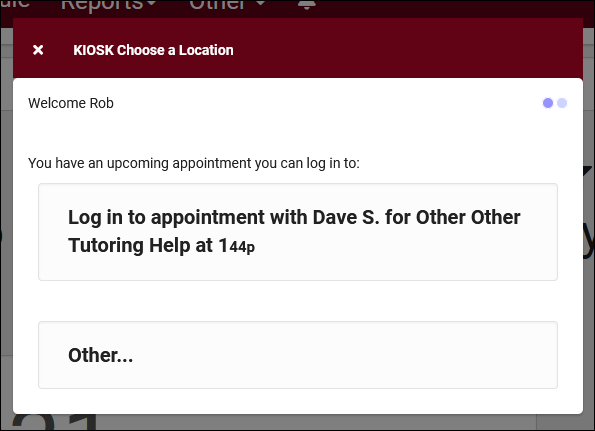
These are custom, Twig & HTML-supported messages that can be displayed during the login/logout process on the KIOSK or Log Listing. This allows you to display information to the student while they’re logging in, maybe their upcoming appointment information or contact info for the consultant, this is up to you. For more information on Twig, take a look at our dedicated Twig article.
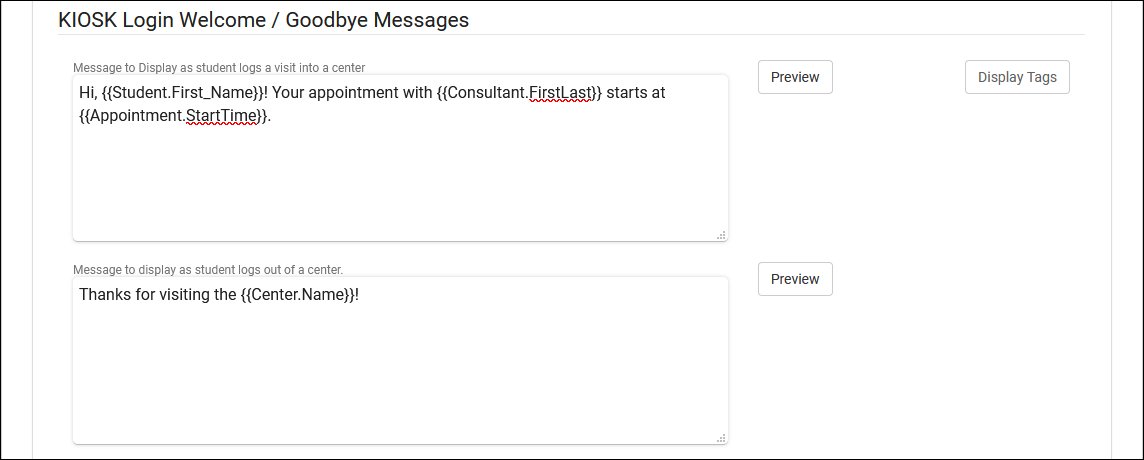
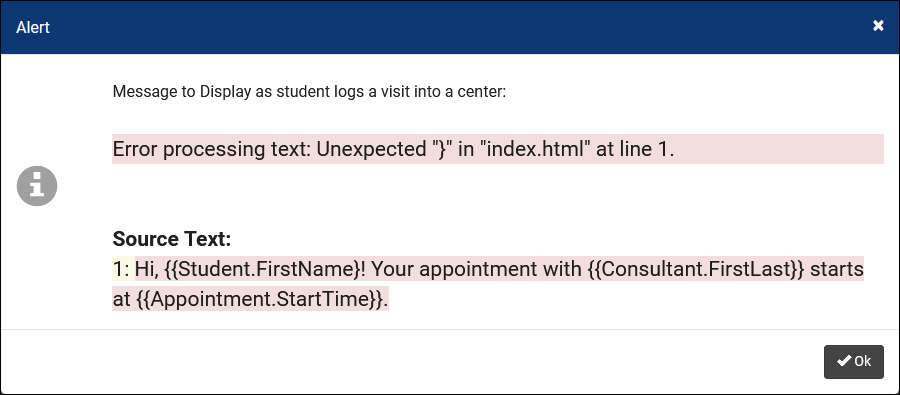
Before these messages can be saved, you will need to select the “Preview” button. This will show you how your message will be displayed using a recent appointment/visit as an example. If there are any errors, you will be notified so you can correct them before saving.
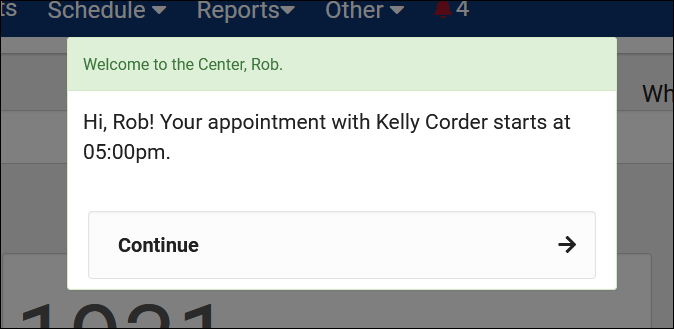
Here’s an example of how the Welcome/Goodbye messages can display:

The Auto Termination process can automatically conclude ongoing visits at the end of the night and/or correct visits that have a longer-than-intended duration. There are two parts of this process. The first, Terminate all still logged in, will only conclude visits that are still in-progress by your Time for Nightly Termination. The second, Auto terminate visits longer than, also applies to on-going visits that meet this criteria, however, this additionally applies to concluded visits that same day. For example, if a user created a 10-hour visit for one of your students, this process will change it back to your defined time.
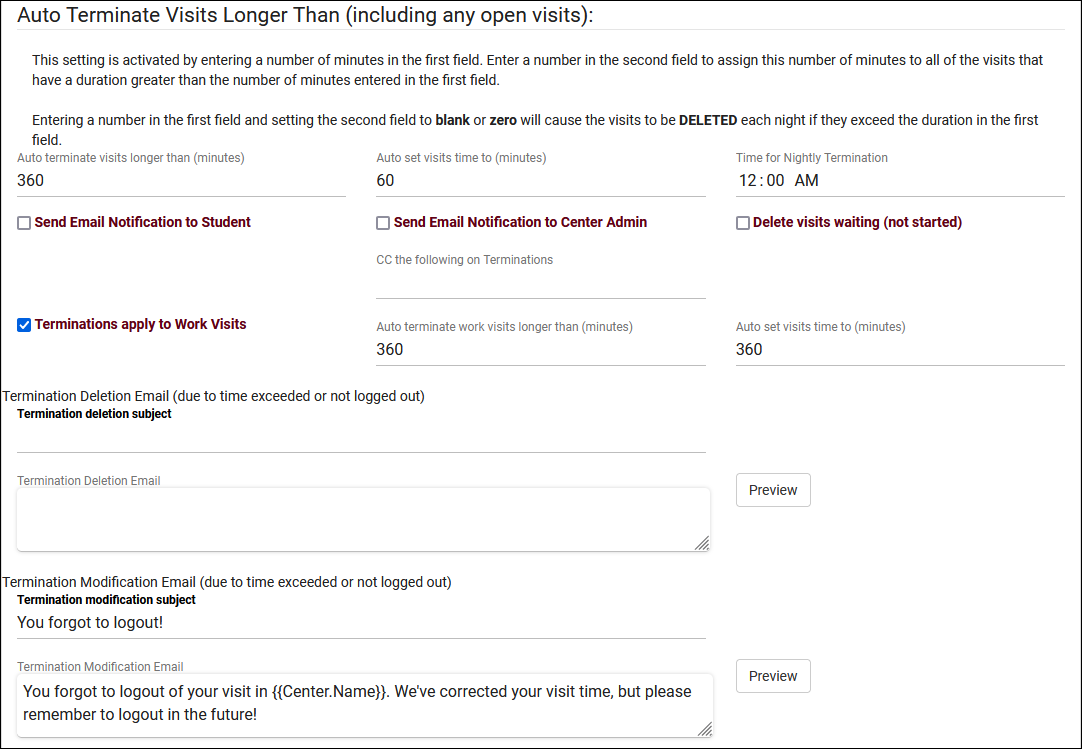
- Terminate all still logged in
- If enabled, any on-going visits by Time for Nightly Termination will be concluded and set to your defined duration.
- If enabled, any on-going visits by Time for Nightly Termination will be concluded and set to your defined duration.
- Auto set these visits time to (minutes)
- If an on-going visit is terminated, this is the duration it will be set to in minutes. If this is set to 0 minutes, a terminated visit will be deleted instead.
- If an on-going visit is terminated, this is the duration it will be set to in minutes. If this is set to 0 minutes, a terminated visit will be deleted instead.
- Open visit terminations applies to Work Visits
- Also apply the above logic to consultant Work Visits as well.
- Also apply the above logic to consultant Work Visits as well.
- Auto terminate visits longer than (minutes)
- This part of the process will also affect concluded visits as described earlier. This should be set to your maximum possible visit duration to prevent accurate visits from being adjusted. Leave this and Auto set visits time to blank to disable this part of Auto Termination.
- This part of the process will also affect concluded visits as described earlier. This should be set to your maximum possible visit duration to prevent accurate visits from being adjusted. Leave this and Auto set visits time to blank to disable this part of Auto Termination.
- Auto set visits time to (minutes)
- This is the duration visits will be changed to in the above scenario. Leave this and Auto terminate visits longer than blank to disable this part of Auto Termination. If this is set to 0 minutes, a terminated visit will be deleted instead.
- This is the duration visits will be changed to in the above scenario. Leave this and Auto terminate visits longer than blank to disable this part of Auto Termination. If this is set to 0 minutes, a terminated visit will be deleted instead.
- Time for Nightly Termination
- This is the specific time the Auto Termination process runs each day. This should be set to a later time in the day (e.g., 11:30pm) to prevent actual in-progress visits from being affected.
- This is the specific time the Auto Termination process runs each day. This should be set to a later time in the day (e.g., 11:30pm) to prevent actual in-progress visits from being affected.
- Send Email Notification to Student / Center Admin
- Toggling these options will send an email to the student and/or center admin letting them know that the student wasn’t logged out. If Center Admin is chosen, additional email addresses can be CC'd in the box below. "Center Admin" refers to the email address entered in [Your Profile] > Prefs > Emails > Profile Email Address.
- Toggling these options will send an email to the student and/or center admin letting them know that the student wasn’t logged out. If Center Admin is chosen, additional email addresses can be CC'd in the box below. "Center Admin" refers to the email address entered in [Your Profile] > Prefs > Emails > Profile Email Address.
- Delete visits waiting (not started)
- If a 'Waiting' status visit reaches the auto-termination window, you can choose if it's terminated normally (unchecked) or deleted (checked).
- If a 'Waiting' status visit reaches the auto-termination window, you can choose if it's terminated normally (unchecked) or deleted (checked).
- Terminations apply to Work Visits
- If you would like to also terminate work visits, you can check this box and define a different threshold and adjusted time.
- If you would like to also terminate work visits, you can check this box and define a different threshold and adjusted time.
- Termination deletion email & Termination modification email
- These allow you to override the default email that sends to students when their visit is automatically terminated. You can modify the deletion and the modification email independently of each other, leaving these blank is also safe as the system will use a default template in that case.
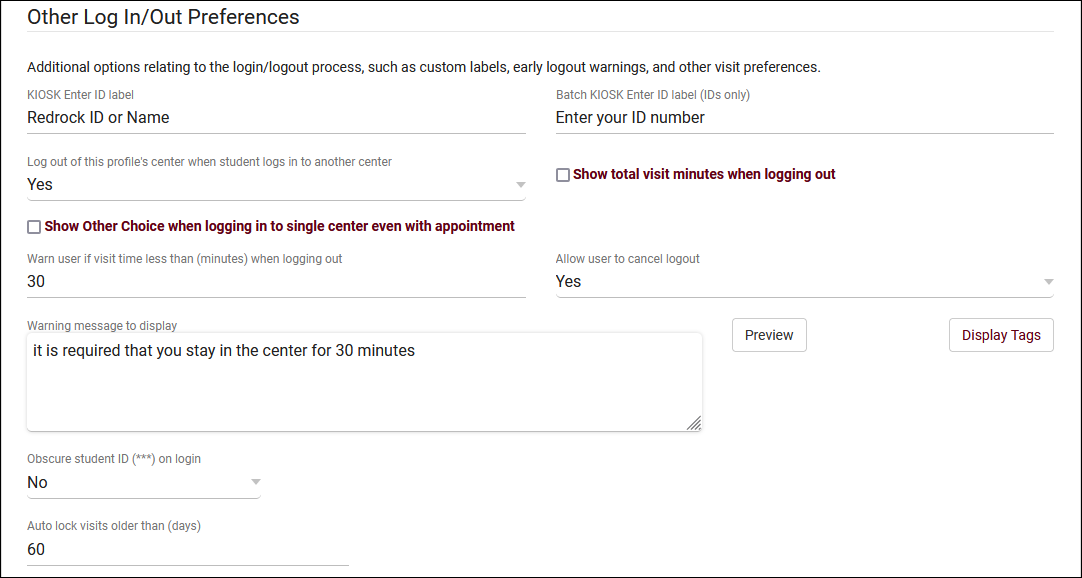
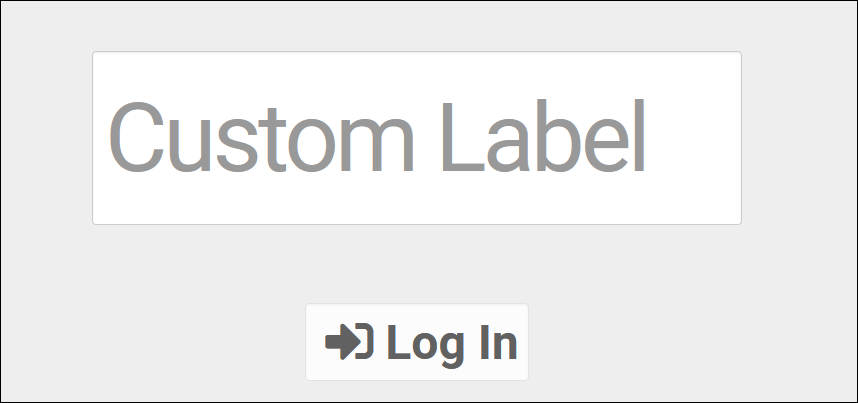
- KIOSK Enter ID label
- Changes the text shown in the Log Listing/Kiosk “Enter ID” box.
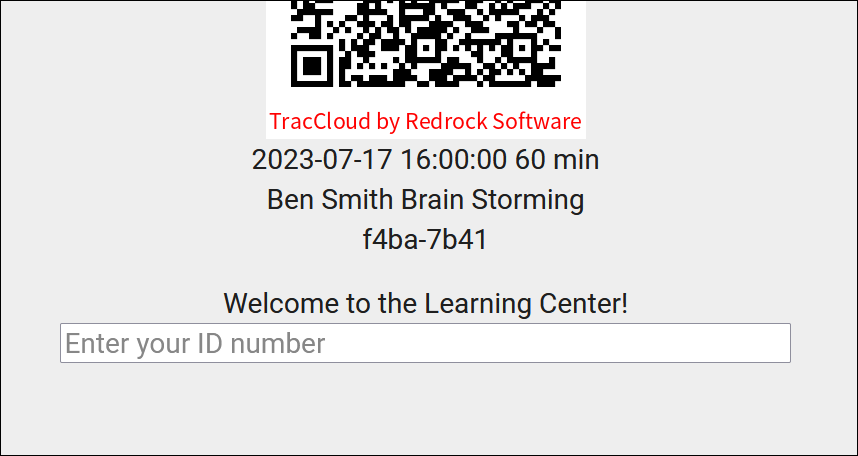
- Batch KIOSK Enter ID label (IDs only)
- Changes the text shown in the Batch Visit QR Code "Enter ID" box.
- Log out of this profile when student logs in to another profile
- If enabled, when a student logs into Center 1, then logs into Center 2, their visit in Center 1 will be automatically concluded.
- If enabled, when a student logs into Center 1, then logs into Center 2, their visit in Center 1 will be automatically concluded.
- Show total visit minutes when logging out
- Show Other Choice when logging in to single center even with appointment
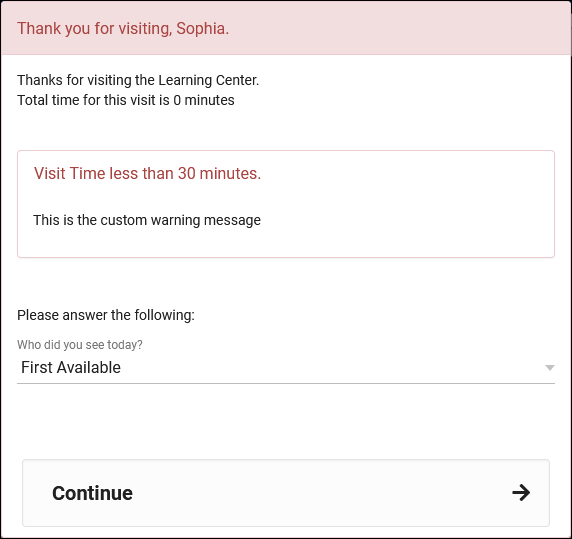
- Warn user if visit time is less than (minutes) & Warning message to display
- If enabled, the staff member logging a student out of a visit that hasn’t lasted the specified amount of time will receive a notice as seen in the screenshot below. This message also supports Twig tags for displaying student data (see our dedicated Twig article), and can be previewed with the “Preview” button so you know what your changes will look like.
- Allow user to cancel logout
- Provides the ability to cancel during the student logout process, to keep the student logged in. This only applies when trying to logout within the time limit set for Warn user if visit timeless than (minutes) when logging out.
- Provides the ability to cancel during the student logout process, to keep the student logged in. This only applies when trying to logout within the time limit set for Warn user if visit timeless than (minutes) when logging out.
- Obscure student ID (***) on login
- Auto lock visits older than (days)
- This preference allows you to prevent visit records from being modified after a specified period of time. This applies to all user groups modifying visits in this profile, with the exception of SysAdmin users.
Custom kiosks can be configured for specific visit scenarios. For example, if one of your kiosks is only going to be used for a specific Center/Reason combination, you can use a Custom Kiosks to make sure students are logging in with those fields predetermined. You can also select a Location, Consultant, Section, Meeting Type (Online/In-Person), and even IP address zone.
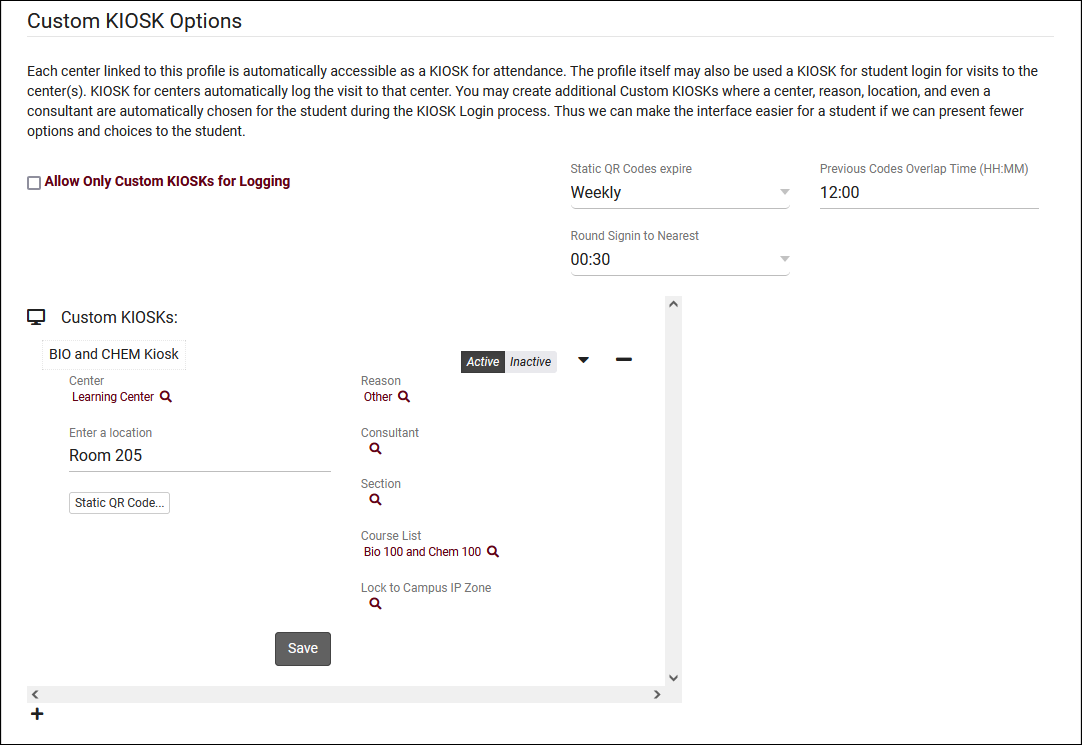
These custom kiosks can be accessed from the same menu as your standard center kiosks. They will appear in the bottom half of the list, with a preceding icon. The only visual difference within the kiosk is that any fields preselected in the custom kiosk menu won’t show up during student logins, as the visits will already be assigned to that Center/Reason/Consultant/Location.
Allow Only Custom KIOSKs for Logging disables the preset center kiosk options that you would see by default, only allowing you to open custom kiosks.
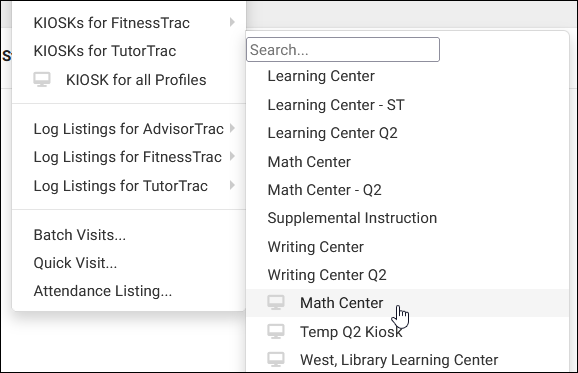
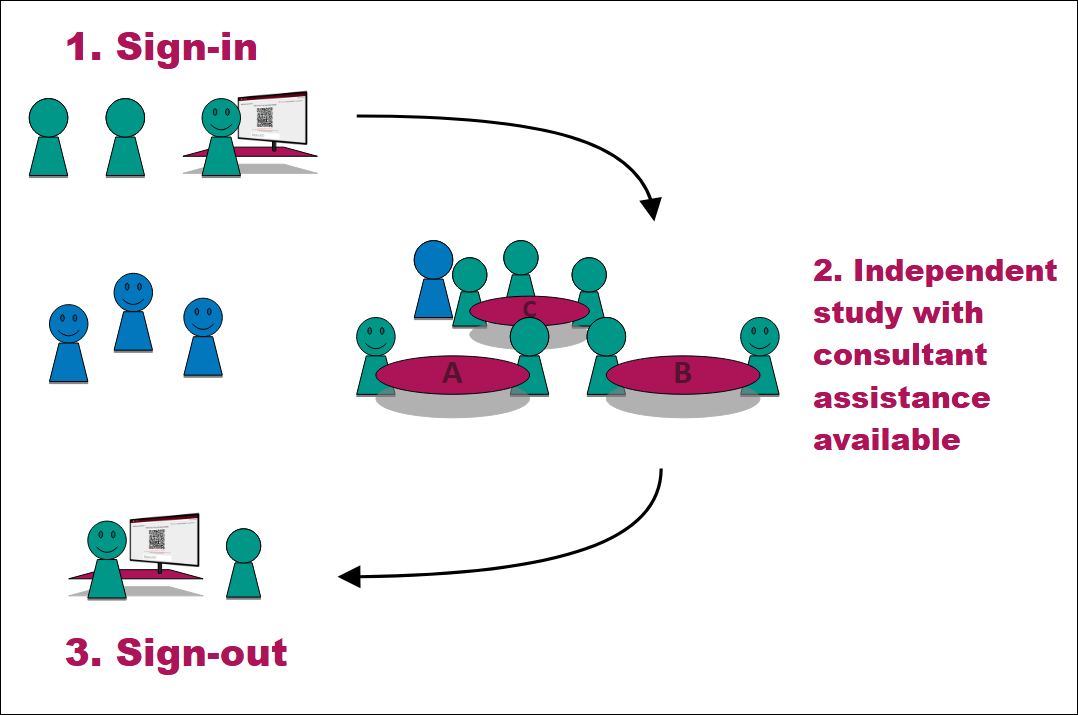
In addition to standard kiosk functionality, custom kiosks also allow you to create static QR codes that your staff can reuse with a rotating confirmation code.
- Static QR Codes expire
- Choose how frequently the QR code expires, daily or weekly.
- Choose how frequently the QR code expires, daily or weekly.
- Previous Codes Overlap Time
- Add a buffer allowing "expired" QR codes to be used after a new code is generated.
- Add a buffer allowing "expired" QR codes to be used after a new code is generated.
- Round Signin to Nearest
- Allows TracCloud to automatically round logins to the nearest 15, 30, or 60 minutes. The purpose of this is to emulate batch visits, where the time would be static.
- Allows TracCloud to automatically round logins to the nearest 15, 30, or 60 minutes. The purpose of this is to emulate batch visits, where the time would be static.
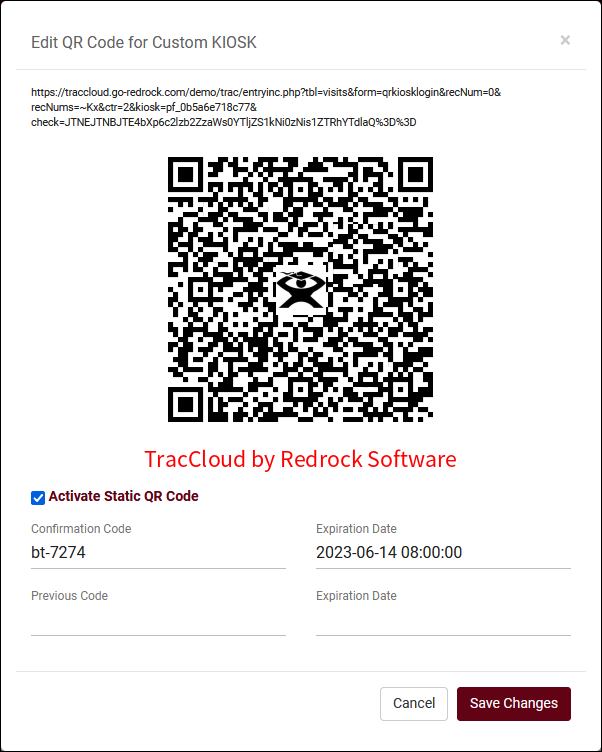
Within each custom kiosk, you will then find a Static QR Code button. Clicking this opens the following form.
- Activate Static QR Code
- Enable or disable this QR code.
- Enable or disable this QR code.
- Confirmation Code
- This is the current confirmation code for this QR code. Students will need to enter this value after scanning, and this value will expire based on your preference in Static QR Codes expire. If you're creating a QR code for the first time, this code (and expiration date) will need to be set manually. Going forward, it will be updated daily/weekly automatically. If a consultant is linked to the custom kiosk, they will automatically receive new confirmation codes in an email.
- This is the current confirmation code for this QR code. Students will need to enter this value after scanning, and this value will expire based on your preference in Static QR Codes expire. If you're creating a QR code for the first time, this code (and expiration date) will need to be set manually. Going forward, it will be updated daily/weekly automatically. If a consultant is linked to the custom kiosk, they will automatically receive new confirmation codes in an email.
- Expiration Date
- The expiration date of the related code. This code will not be automatically updated until this date is reached (or if the code will expire within the next date period), a manual expiration date can be set further into the future than 1 day/week.
- The expiration date of the related code. This code will not be automatically updated until this date is reached (or if the code will expire within the next date period), a manual expiration date can be set further into the future than 1 day/week.
After a student scans the QR code, they will be prompted to enter the confirmation code followed by their ID. The login process is the same as a normal kiosk from this point onward.
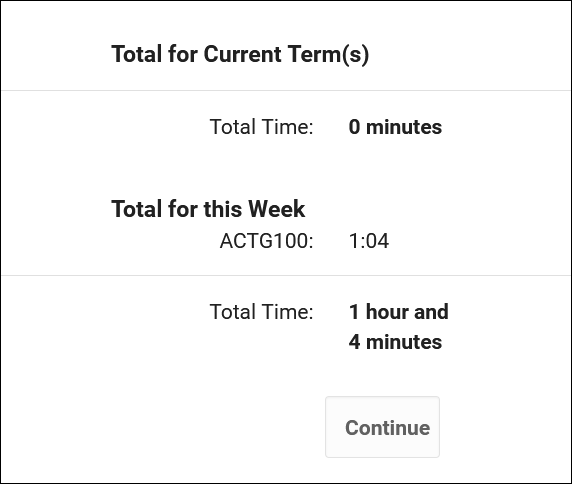
When students log in or out of a center, Time Check will allow them to view how many visit hours they have accumulated within a given time frame. This feature is typically utilized in athletic centers, where students may have a required hours per week or semester. Within these settings, you will be able to manage and adjust the date range of the required hours as well as what totals are displayed to the student, and even a custom message.
- Time check Available
- Show Semester totals
- Will display the students total time based on the current terms active date range.
- Will display the students total time based on the current terms active date range.
- Show Week Totals
- Will display the students total time based on a week date range. If checked, an additional drop down will appear to the right titled Week Starts On. This option will allow you to adjust the day of week that the Time Check utility will calculate the hours for. As an example, selecting Tuesday from the drop down will calculate hours from Tuesday to Monday.
- Will display the students total time based on a week date range. If checked, an additional drop down will appear to the right titled Week Starts On. This option will allow you to adjust the day of week that the Time Check utility will calculate the hours for. As an example, selecting Tuesday from the drop down will calculate hours from Tuesday to Monday.
- Show Required Time Per
- There are three options available:
None – Will not display Required Hours or difference
Weekly – Will show Required Hours and difference based on a one-week time frame.
Semester - Will show Required Hours and difference based on the active semesters term date range.
- There are three options available:
- Required Time Field
- The Required Hours utility will point to a custom field in the student’s profile. In order to use Required Hours, you will need to point to the custom field designated on the student's profile where their required hours are stored. Required hours can be added to a list of students, or manually added to each individual student’s account. If needed, required time can also be included in your data import.
- The Required Hours utility will point to a custom field in the student’s profile. In order to use Required Hours, you will need to point to the custom field designated on the student's profile where their required hours are stored. Required hours can be added to a list of students, or manually added to each individual student’s account. If needed, required time can also be included in your data import.
- Required Time in
- Select the format of the Required Hours field selected, hours or minutes.
- Select the format of the Required Hours field selected, hours or minutes.
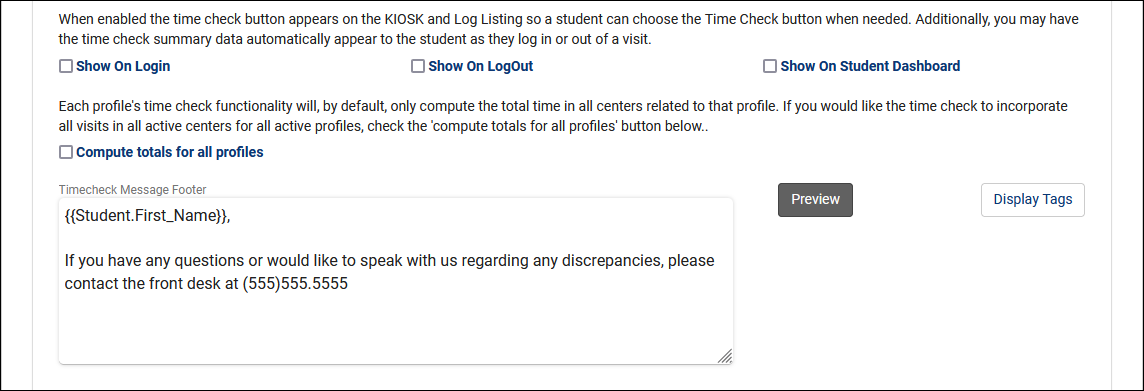
- Show On Login, Show On LogOut, Show On Student Dashboard
- Determines where the Time Check utility will appear for students.
- Compute totals for all profiles
- By default, Time Check will only compute the total time in centers related to the linked profile. If this option is checked, that search will be expanded to all profiles.
- Timecheck Message Footer
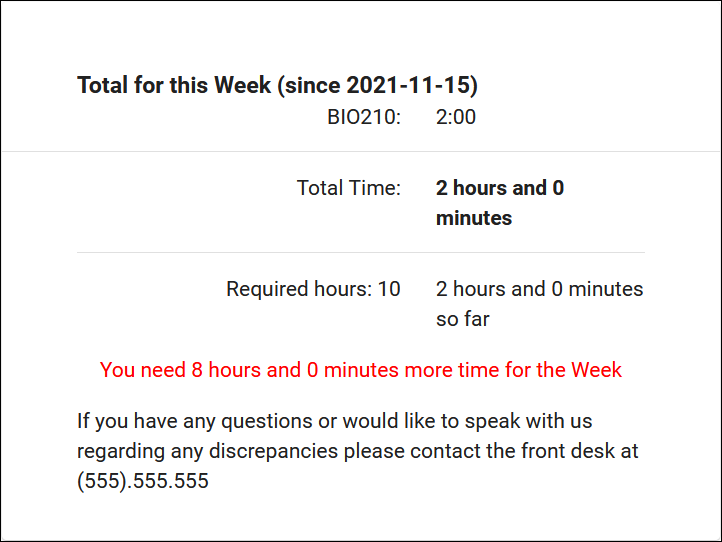
- This will allow the profile to customize the message that displays across the bottom of the Time Check screen. This footer can utilize Twig to personalize the message and add in important information as seen below.
Getting Started / Basics
Course Lists
Course Lists act as assigned sections or specialties in TracCloud, allowing you to determine which courses each of your consultants can assist with, and which courses are available in each center. Course Lists can additionally be assigned to availabilities as a form of section group, as seen towards the bottom of this article.
To manage your course lists, go to Other > Listings > Course Lists.
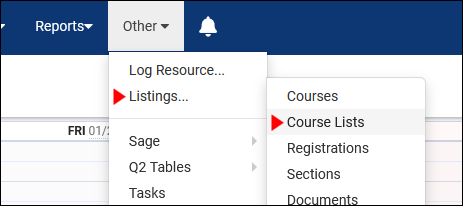
This will bring you to the Course Lists listing.
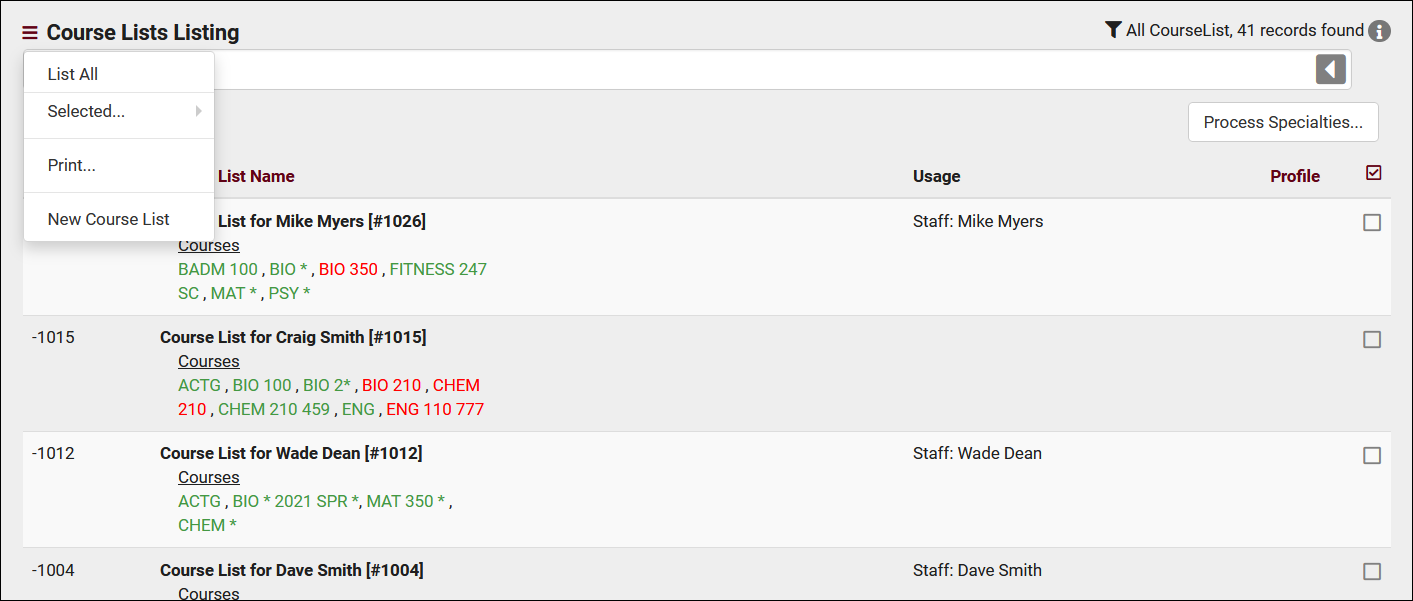
- Process Specialties allows you to re-scan for new courses that fall under the criteria of these lists. For example, if a list was created for Math 100 courses, but only sections 01 and 02 existed when it was created, you would need to re-scan to add the new 03 and 04 sections. This step is part of the TracCloud semester changeover process.
- The Hamburger Icon allows you to show all course lists after a search, print the list, or create a new list. Go ahead and click “New Course List” to begin.
After selecting New Course List, we’re brought to the following page, allowing us to name and customize our new list.
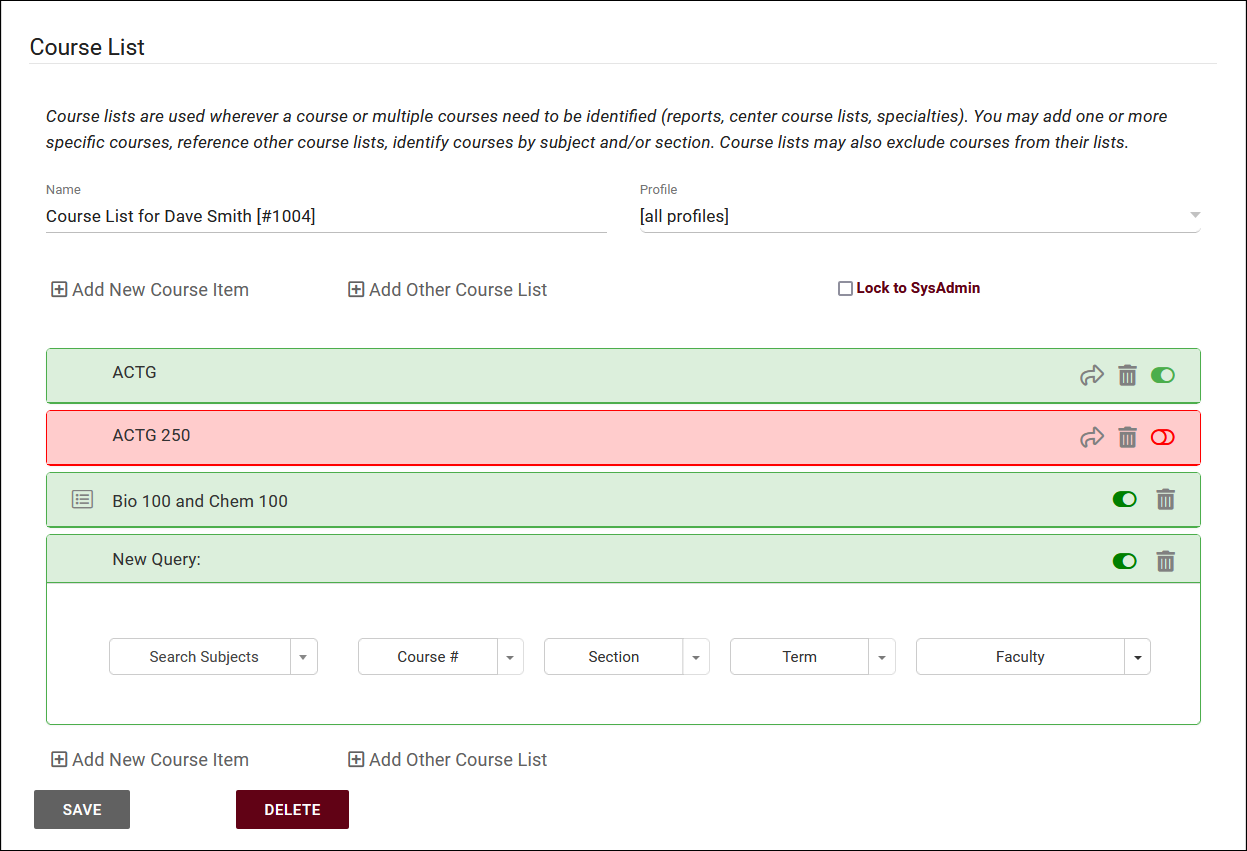
- Name will be what you’ll select when assigning this course list to your centers or consultants.
- Lock to SysAdmin will prevent non-sysadmin accounts from modifying this course list.
- Add New Course Item allows us to add a new subject query. We can be as specific as needed here, specifying up to the Subject, Course Number, Section Number, or Term Number, as well as faculty. For example, this allows us to create a course list of all ACTG250 courses, regardless of section/term, or simply all courses for writing center environments.
- Each course list item also has additional options, detailed below.
- Share will add this item to other selected course lists. More information on this can be found towards the bottom of this article.
- Delete will remove this item from the list.
- Toggle allows us to include/exclude the queried course(s). For example, you could create a course list of all MATH courses, and then create another Course Item for MATH 204 and set the toggle icon to off . This would result in the list containing all MATH courses except for 204.
- Toggle allows us to include/exclude the queried course(s). For example, you could create a course list of all MATH courses, and then create another Course Item for MATH 204 and set the toggle icon to off . This would result in the list containing all MATH courses except for 204.
- Add Other Course List allows us to include/exclude the contents of an entire other course list. Consultant course lists (designated with the sequence number in the name) should not be added to other course lists. Keep in mind that this only relates to the sections that the other course list contains, not the filter items from the copied course list. For example, if Course List A contains +BIOL* and Course List B contains +CHEM*,-BIOL*, and you assign B to A, then A would have all BIOL and CHEM sections despite B excluding them. This is because we are only adding the sections that B contains.
As an example, we’re going to create a course list for one of our consultants. This consultant can assist with all Accounting 100 courses, except for section 386. Here’s how we would write that out.
To start off, we’re including all ACTG 100 courses, ignoring section (wildcard), term, and faculty.

At this point, we can manually add another entry for section 386 and click the toggle icon to exclude the course. Alternatively, we can scroll down to view the sections that will be included in this list, where we can see section 386. We can immediately exclude this course by clicking the remove icon on the right-hand side.
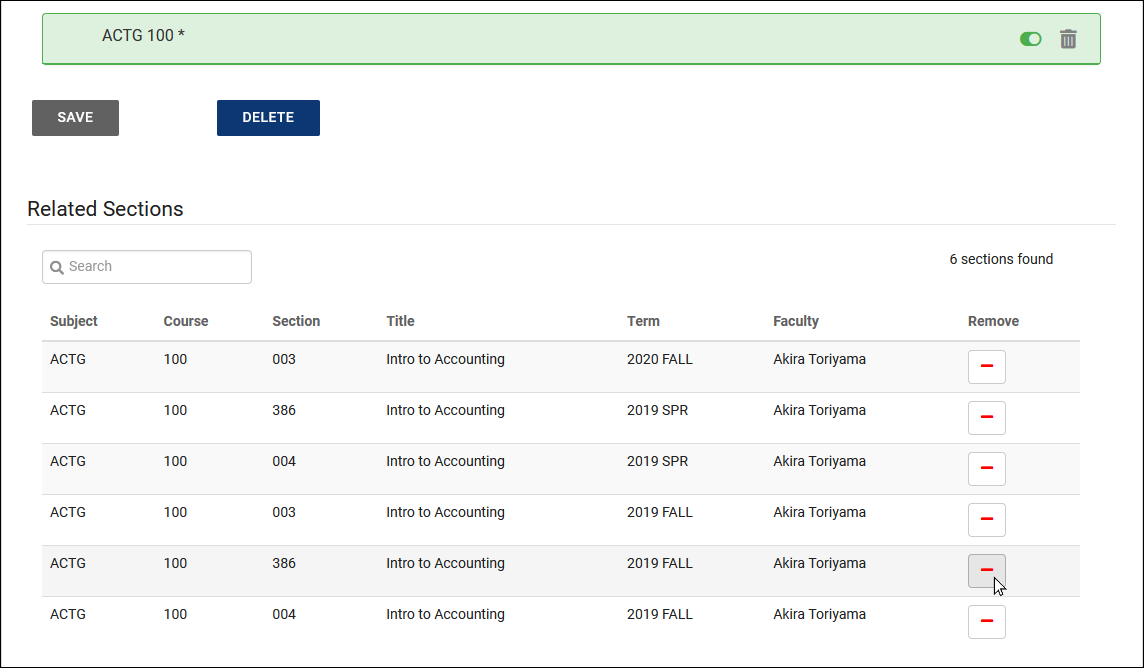
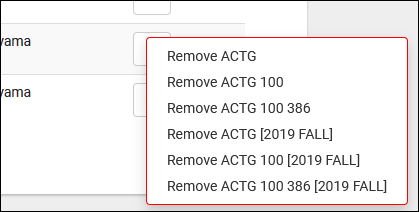
Clicking the icon prompts us to choose how specific we want to be with this exclusion. For our scenario, we would select “Remove ACTG 100 386.”
This will add the new item to the list automatically, excluded by default.

Center course lists are used to filter availability searches and affect what section options are available when creating availabilities and booking appointments from the dashboard, in addition to consultant specialties. In your Center entry window, you will see the highlighted options below.
Other > Other Options > Profiles > [Your Profile] > Centers > [Your Center]

- Ignore consultant specialties for this center
During the kiosk login or appointment booking process, students are asked what subject they need assistance with. When you select a consultant, the list of available subjects/reasons is restricted based on what the consultant is assigned to. By checking this box, these specialties are ignored, and a student can choose any subject/reason/consultant combination, only restricted by what’s assigned to the center itself. Typically used for writing centers.
- Course List for this Center
This option controls the courses assigned to this center. If you have a Math center, you may want to assign a course list containing all MATH courses. A writing center may have all sections assigned, etc.
Managing course lists for consultants is exactly the same as centers, with one exception. Consultants have course lists by default. After you create a new consultant account (Other > Listings > Staff > [Consultant] > Scroll down to "Course List of Specialties"). The consultant's default course list will always be the last option in this drop-down menu, even if you haven't created it manually. After selecting their course list, you can click the Edit button to immediately start modifying it, at which point it's exactly the same as described above.
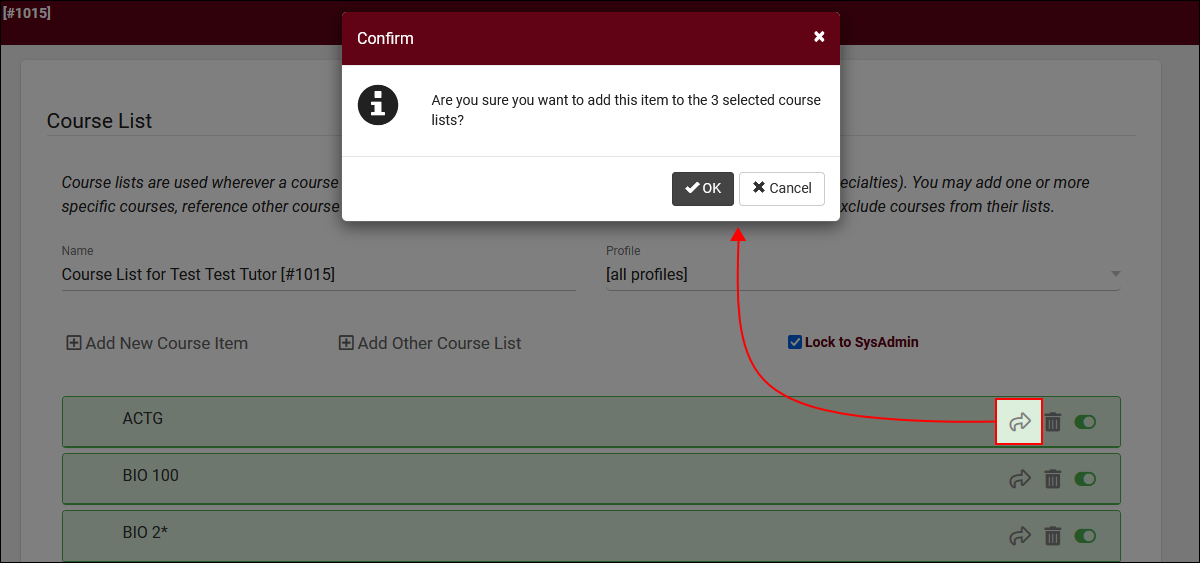
Another utility available for Course Lists is the ability to share items to other lists, effectively a way to make bulk changes to your specialties by adding or removing sections as needed. For example, if you recently added a non-enrolled course, this allows you to quickly assign it to everyone without editing every list individually.
First, use the selection buttons on the Course Lists listing to choose which Course Lists you want to share an item with.
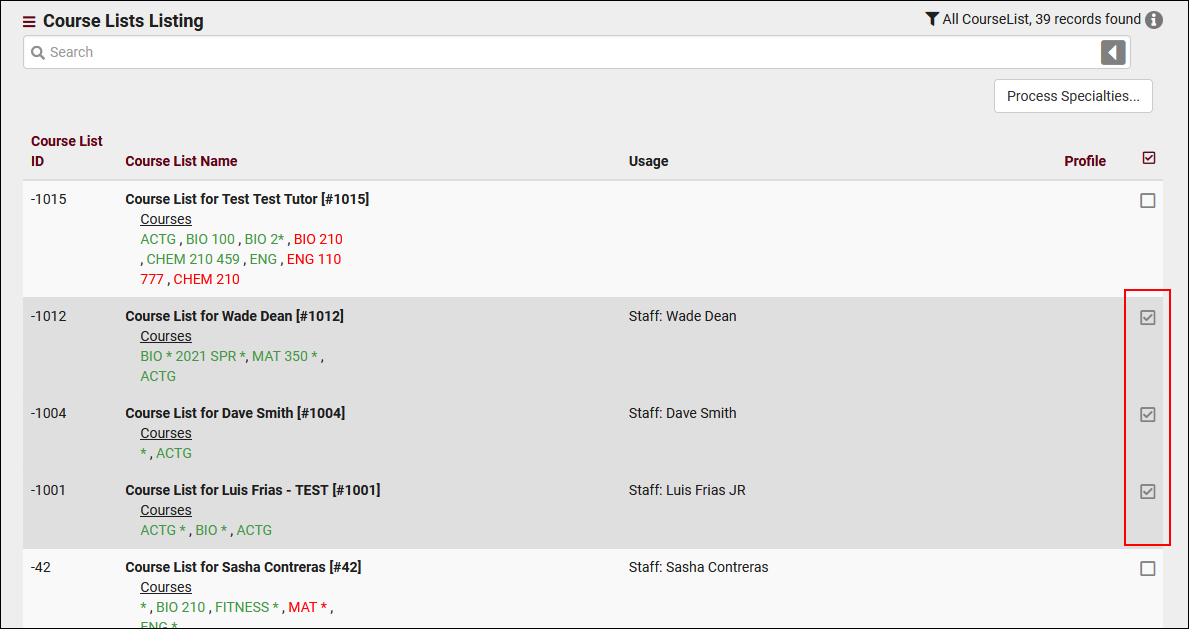
Second, open a Course List that contains the item you want to share. Click the arrow button on that item, and you will be shown a confirmation window. Clicking "OK" here will immediately add that item to your selected Course Lists.
Another use for Course Lists is as section groups for availabilities. For example, if you have a tutor who is available for MATH, ACTG, and CHEM, but you want to create an availability for MATH and ACTG exclusively, you would need to use a course list. The ability to link course lists to availabilities must be enabled in global preferences first by going to Other > Other Options > Preferences > Search Availability Options > Additional Settings > Allow Course Lists to be assigned to availabilities.
Once enabled, a new search glass icon will be shown in availabilities. You will be able to choose any course list that is assigned to the same profile that the center of the availability is in. Course lists designated as "All Profiles" will not appear in this list.
Profile Preferences
Prefs
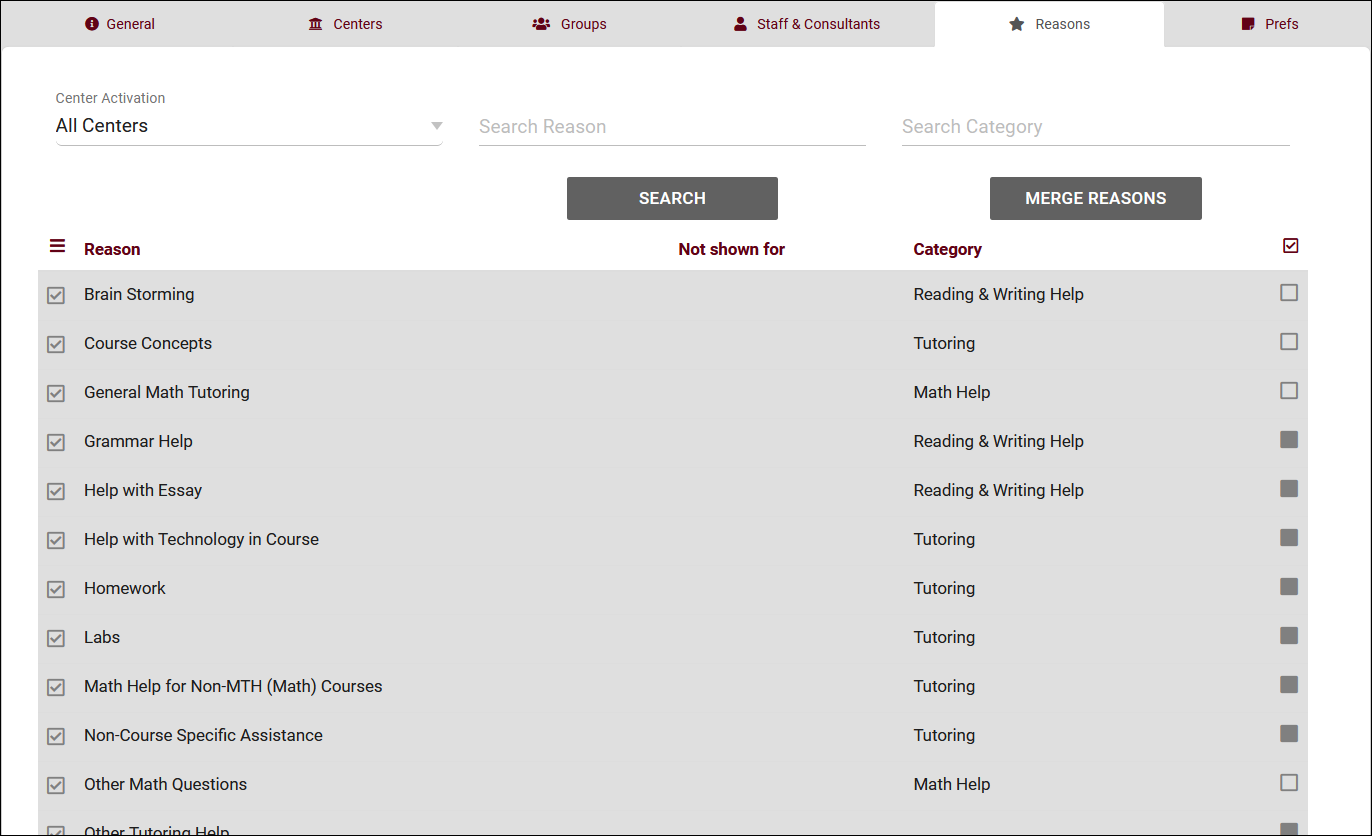
Reasons
Reasons/Services allow your staff and students to provide additional information and reasons for booking an appointment. For example, reasons such as “Counseling,” “Study Plan Help,” or “Exam.” This would let the consultants know what the student needs help with, provide preparation details and information as needed, and gives your staff additional information for reports. Reasons can be managed by going to Other > Other Options > Profiles > [Your Profile] > Reasons.
The hamburger icon contains several management options, detailed below.
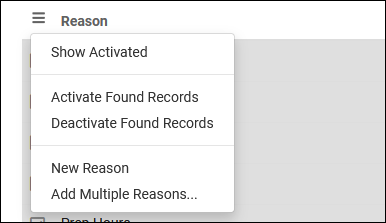
- Show Activated
- This will display globally activated reasons (left-side checkbox).
- This will display globally activated reasons (left-side checkbox).
- Activate/Deactivate Found Records
- Activate/Deactivate reasons in bulk, based on your last search result.
- Activate/Deactivate reasons in bulk, based on your last search result.
- New Reason
- Create a new reason.
- Create a new reason.
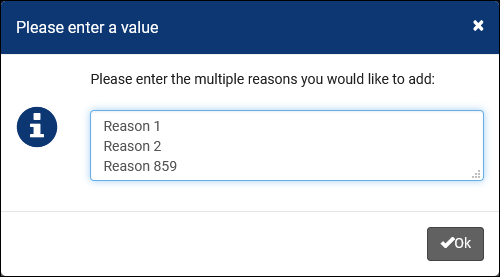
- Add Multiple Reasons
Creating Reasons
Click on the hamburger button, then select “New Reason” to be brought to the Reason creation menu.

- Profile
- By default, the profile we started creating this reason in will be selected, however, we can change this value or even choose “Available for All Profiles.”
- By default, the profile we started creating this reason in will be selected, however, we can change this value or even choose “Available for All Profiles.”
- Reason
- The name of the reason, this will be what’s selected by students or staff during appointment scheduling and kiosk logins.
- The name of the reason, this will be what’s selected by students or staff during appointment scheduling and kiosk logins.
- Category
- The category this reason is assigned to. More information on this can be found further into this article.
- The category this reason is assigned to. More information on this can be found further into this article.
- Sort Code
- Manually specify how your reasons are sorted during login or appointment search. This can be numeric, or you can simply paste your reason name to sort alphabetically.
- Manually specify how your reasons are sorted during login or appointment search. This can be numeric, or you can simply paste your reason name to sort alphabetically.
- Log Out Method & Visit Time
- There are three Methods available.
- Auto Logout After Time, which will automatically log the student out of the center when the time specified in Visit Time is reached.
- Auto Logout Immediately will log the student out immediately after they’re logged in and create a visit record of the length specified in Visit Time.
- Notify Time Expired, which will send out an email based on the checkboxes used when the time limit is reached. The contents of this email will be determined by your 'Visit Duration Notification' email in your Profile Prefs.

- There are three Methods available.
- Inactive
- We never recommend deleting records in TracCloud, as this removes them from reports and related records. In the event that you are no longer utilizing a reason, you’ll want to check the Inactive box instead of deleting it to keep the records available and accurate.
- We never recommend deleting records in TracCloud, as this removes them from reports and related records. In the event that you are no longer utilizing a reason, you’ll want to check the Inactive box instead of deleting it to keep the records available and accurate.
- Work Reason
- Work reasons allow consultants to login to TracCloud and track their work hours. This data will then be available to users with appropriate permissions via payroll reports. For more information on payroll tracking in general, click here.
- Work reasons allow consultants to login to TracCloud and track their work hours. This data will then be available to users with appropriate permissions via payroll reports. For more information on payroll tracking in general, click here.
- Ignore Section Specialties when Searching Availabilities with this Reason
- This functions similarly to the 'Ignore Specialties' options in Centers. If a student is searching for availabilities and selects a Reason with this checkbox enabled, they will see all consultants assigned to this Reason regardless of subject chosen. Typically used for Writing or Coaching-related Reasons.
- This functions similarly to the 'Ignore Specialties' options in Centers. If a student is searching for availabilities and selects a Reason with this checkbox enabled, they will see all consultants assigned to this Reason regardless of subject chosen. Typically used for Writing or Coaching-related Reasons.
- Do NOT SHOW for Students (staff only)
- If checked, this Reason will only appear for staff who are booking appointments on behalf of students. Students themselves will not see this Reason.
- If checked, this Reason will only appear for staff who are booking appointments on behalf of students. Students themselves will not see this Reason.
- Do NOT SHOW for Appointments
- Do NOT SHOW for KIOSKS
- Do NOT SHOW for Batch Visits
- Don’t show this reason under these specific circumstances.
- Don’t show this reason under these specific circumstances.
Assigning Reasons to Centers
There are two ways to assign Reasons to your Centers, first is directly from this tab in your Profile. The checkbox button on the right-side allows you to activate/deactivate reasons for the center selected in the top-left corner, or display all activated reasons for the selected center. This can also be used with “All centers” selected, allowing you to quickly add or remove a reason from all of your centers.

Reasons can also be assigned from your Center directly. From your Profile, click on the Centers tab followed by the Center you want to update. The very last option on this page is 'Active Reasons,' allowing you to add or Remove reasons for this specific Center.

Reason Categories
Categories allow you to group different reasons together. If you have several reasons available, it can be beneficial to group them into categories that staff and students can select when booking appointments.
These Categories will appear followed by “…”, which when clicked will prompt you to choose a Reason within the category.
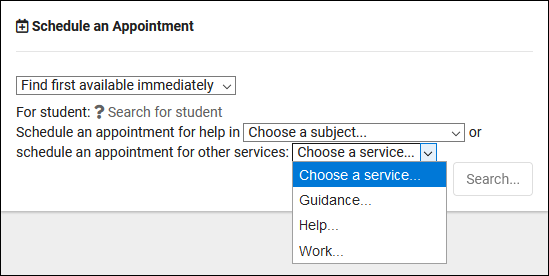
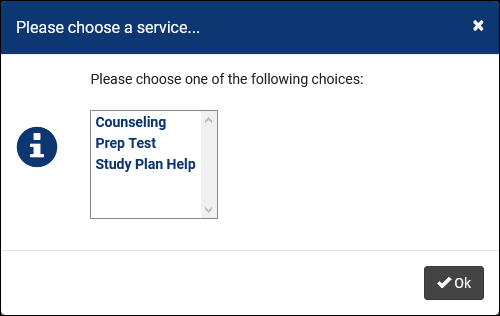
As an example, a “Placement Assessment” category that contains different assessment reasons for each course. A “Note-Taker” category, “Make-Up,” etc. If you have multiple reasons that would be better grouped together, putting them in the same category allows for improved organization and an easier appointment booking process for staff and students.
See Also
- Log In/Out Preferences - To require users select reason during visit login.
- Search Availability Options - To require users select reason during appointment searches.
- Staff & Consultants - Assigning reason specialties to staff.
Custom Lists, Dynamic Lists, & Watch Lists
Lists are used to group an arbitrary selection of students together. These lists can be used for a variety of reasons, from simply viewing a set of students, to sending mass emails, running reports, or even limiting a permission group’s student listing access to only a certain population of students. If you want to make a student stand out on the log listing or student listing, assigning them to a watch list is a great way to accomplish this. There are three types of lists in TracCloud, detailed below.
Static List
- Static lists are managed manually. If an individual student or a set of students need to be added or removed from a list, they will need to be added/removed by a user with the appropriate permissions. Max appointment rules can also be configured to add students to lists automatically, more information on these rules here.
- Static lists are managed manually. If an individual student or a set of students need to be added or removed from a list, they will need to be added/removed by a user with the appropriate permissions. Max appointment rules can also be configured to add students to lists automatically, more information on these rules here.
Dynamic List
- Dynamic lists are updated automatically based on a student search. For example, you can search for all students with a major of X and a class of Y, and a dynamic list created based on that search will keep itself up to date as that search result changes overtime. You can even base a dynamic list on a student search for other custom lists.
- Dynamic lists are updated automatically based on a student search. For example, you can search for all students with a major of X and a class of Y, and a dynamic list created based on that search will keep itself up to date as that search result changes overtime. You can even base a dynamic list on a student search for other custom lists.
Watch Lists
- A watch list can be based on any custom list, static or dynamic, and adds an indicator next to the student's name in a few different locations to make them stand out compared to students not on a watch list. These otherwise share the same functionality as the custom list they're linked to.
- A watch list can be based on any custom list, static or dynamic, and adds an indicator next to the student's name in a few different locations to make them stand out compared to students not on a watch list. These otherwise share the same functionality as the custom list they're linked to.
In order for a user to view or edit a student list, the list must be assigned to their permission group. It's also worth keeping in mind that only SysAdmins are allowed to create lists in the first place.
Within your global preferences, you will find the "Custom Lists" menu. This allows you to view the custom lists that have been created in your Trac System, which can be renamed, deactivated ("!" button), or deleted if needed. Deactivated lists no longer appear on the student list/reports, but can be reactivated later if needed. A new custom list can be created by clicking the + icon, only static lists can be created from this menu. For existing dynamic lists, you can view or edit the query by clicking the button.
Other > Other Options > Preferences > Custom Lists
Managing lists directly from the student listing is also possible and provides you the ability to create dynamic lists as well, which allow you to have an always-up-to-date list of students for any purpose.
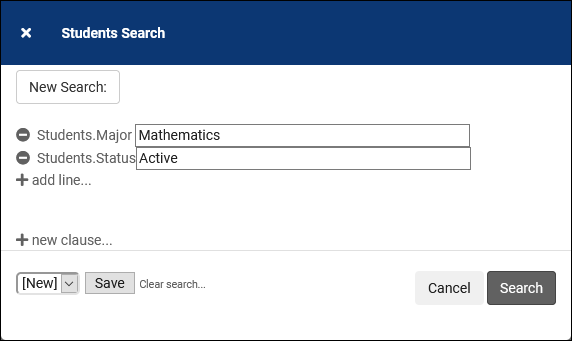
Before creating a list, you will almost always start with a search. This can be any search, from entering a student's name in the search bar, to power searches, and even utilizing the "Show These Students" options using the registrations or visits listing as a source. As an example, the power search in the screenshot below would show all students with a Major of “Mathematics” and a status of “Active."
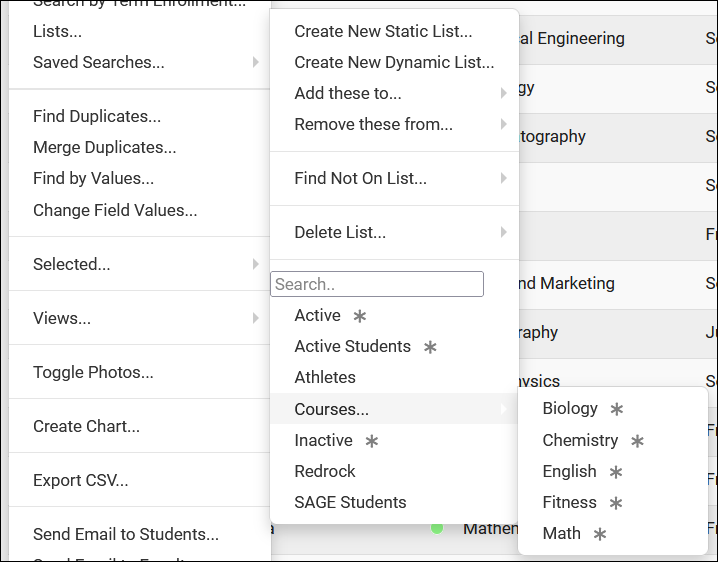
After you've reached the search results page, click on the hamburger icon > Lists, where you will find the following options.
- Create New Static List
- This will create a new static list and assign all students from your current search to itself. This list will not be updated automatically going forward. You will be prompted to enter a name for the list on selection.
- This will create a new static list and assign all students from your current search to itself. This list will not be updated automatically going forward. You will be prompted to enter a name for the list on selection.
- Create New Dynamic List
- This will create a new dynamic list based on your last search (e.g., Major and Status), and will keep itself up to date going forward based on that search. If a student changes majors, they will be removed, if a new student is imported with this major, they will be added, etc. You will be prompted to enter a name for the list on selection.
- This will create a new dynamic list based on your last search (e.g., Major and Status), and will keep itself up to date going forward based on that search. If a student changes majors, they will be removed, if a new student is imported with this major, they will be added, etc. You will be prompted to enter a name for the list on selection.
- Add these to...
- This allows you to quickly add your current selection of students to an existing static list.
- This allows you to quickly add your current selection of students to an existing static list.
- Remove these from...
- This allows you to quickly remove your current selection of students from an existing static list.
- This allows you to quickly remove your current selection of students from an existing static list.
- Find Not On List...
- This will further filter your selection of students by those who are not on another list (static or dynamic).
- This will further filter your selection of students by those who are not on another list (static or dynamic).
- Delete List...
- This allows you to quickly delete a list from your system.
- This allows you to quickly delete a list from your system.
Beneath these options you will also see all other lists that you have access to. Clicking a list will immediately display those students.
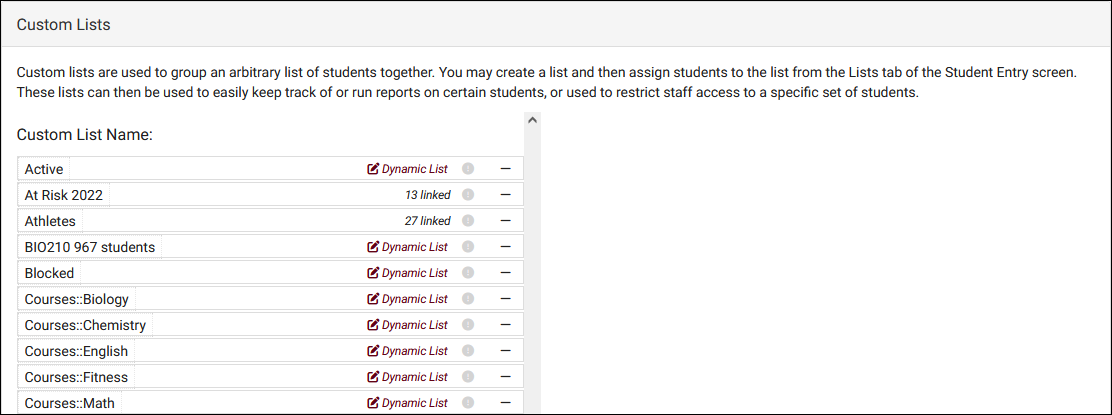
Lists can be grouped into categories for further organization. The name of your list should be in the format of Category::List Name. See example below.
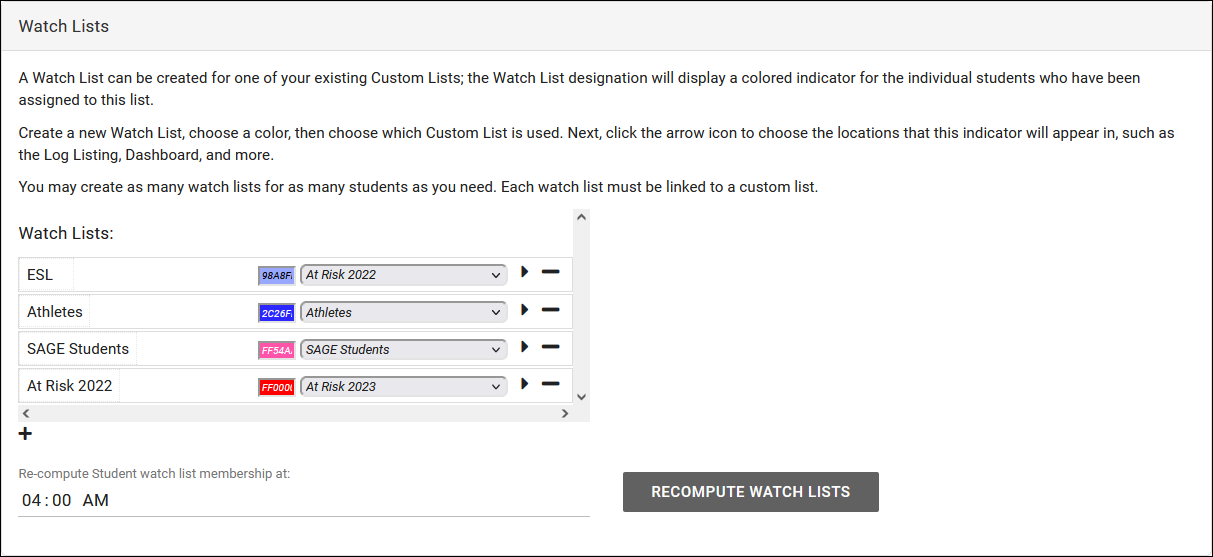
To create a new watch list indicator, head over to your global preferences, select "Watch Lists," and click the + icon. This will add a new watch list, clicking on the name lets you rename it, selecting the colored box lets you change the indicator color, and the box next to that determines which custom list this watch list is assigned to. After you’ve given it a name, color, and list, select the right-arrow to control where these indicators appear. Watch list indicator icons refresh daily at 4am, which can be changed here as well if needed.
Other > Other Options > Preferences > Watch Lists
Watch List Indicator Locations
The watch list indicator can be configured to display in various locations throughout the Trac System. Hovering over the indicator also provides the list name.
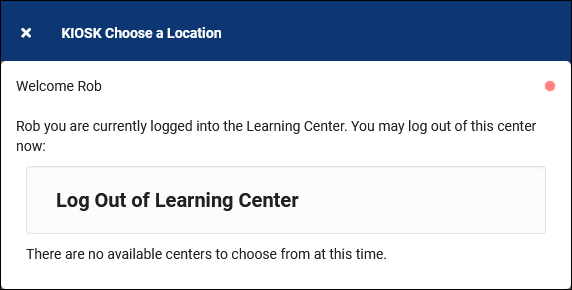
- Display on Log In/Out
- Displays in the upper-right corner of the login/logout process on the log listing.
- Display on Entry
- Display on Listing
- Displays the indicator on the student listing.

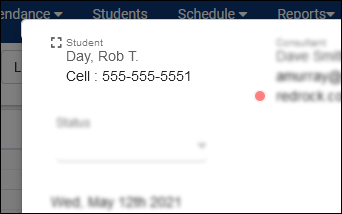
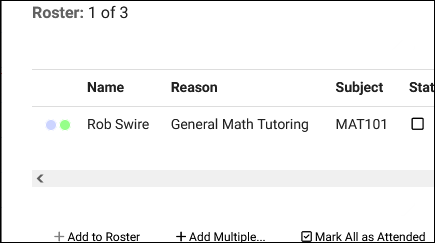
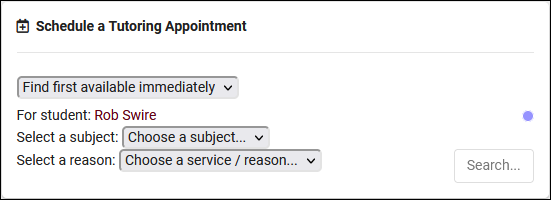
- Display on Appointment
- This makes the indicator visible during availability searches as a staff member, within appointment entry windows, and in group rosters.
- Display on Dashboard
- This will allow the list to be visible from the staff dashboard, within the “Watch List Students” box. Requires "Show the Watch Lists on Main Menu" to be enabled in the staff member's linked permission group.
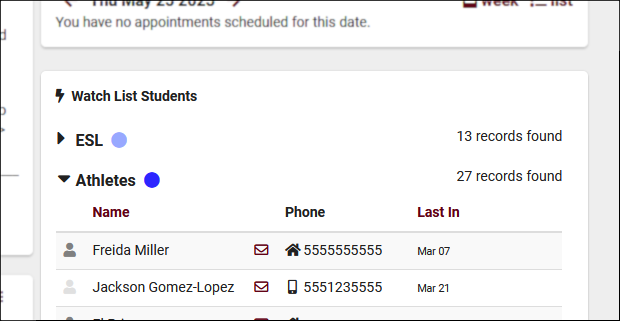
- Display on KIOSK login/out
- Displays in the upper-right corner of the login/logout process on the kiosk.

See Also
Terms & Conditions
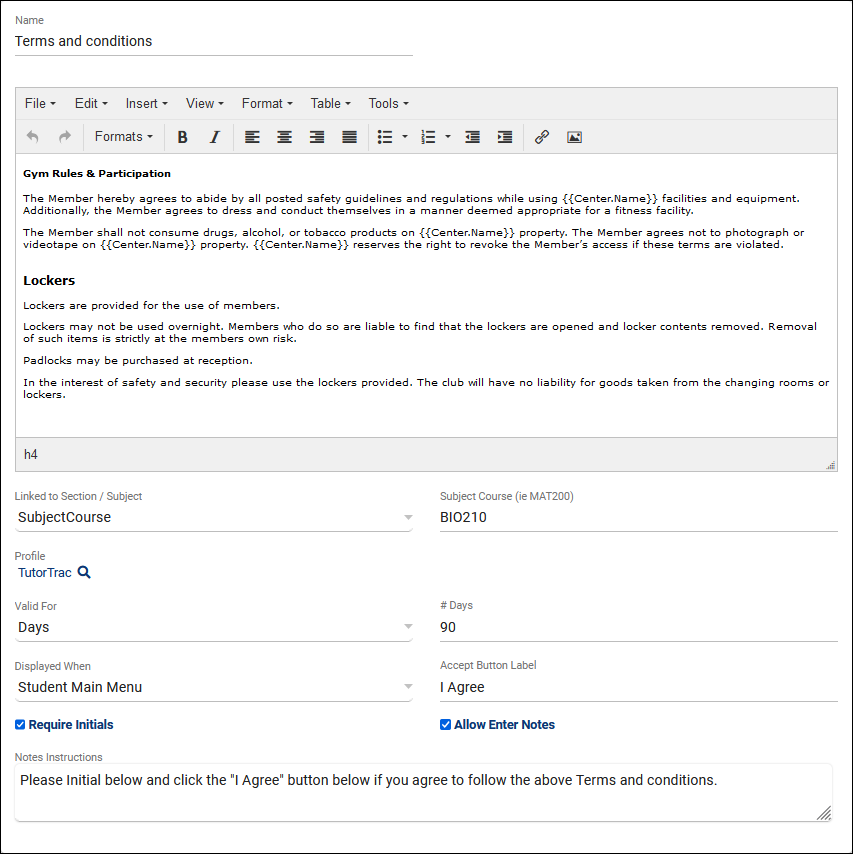
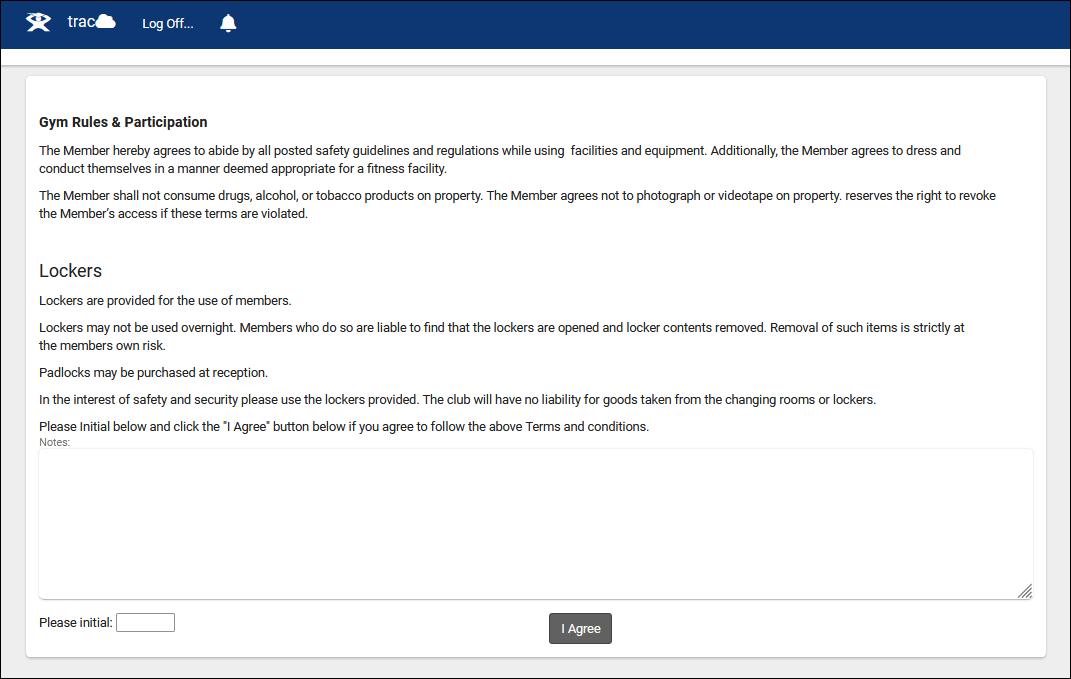
Terms & Conditions allows you to create a prompt that appears for students when they're logging in or booking an appointment. The prompt will contain a custom message, which the student will have to agree to before continuing. While Terms/Conditions are of course the typical use-case, this feature can also be used for any purpose where a student would need to agree to a statement before having full access to the system.
1. Creating a new Term/Condition
Navigate to Other > Listings > Terms and Conditions. This will take you to the Terms and Conditions listing, where you can view or edit and previous entries. To create a new Term/Condition, click the hamburger icon and select New Terms and Conditions.

If your SysAdmin account doesn't have access to these options, jump to step 2 and apply those same changes to your SysAdmin group.
This will take you to the Terms and Conditions entry screen.
- Name
- This will be the title of this Term/Condition. This will be displayed across the top of the prompt when shown to students.
- This will be the title of this Term/Condition. This will be displayed across the top of the prompt when shown to students.
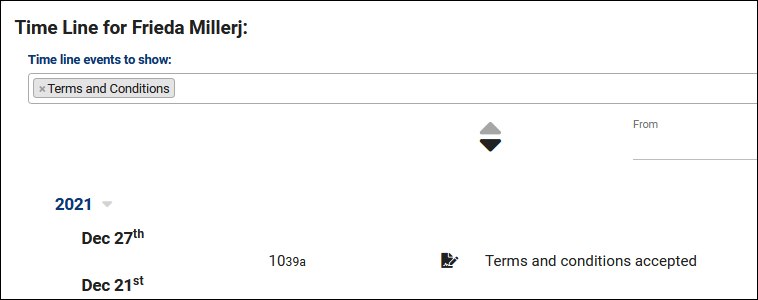
- Responses
- This will display a list of students who have accepted these terms/conditions and the date of acceptance.
- This will display a list of students who have accepted these terms/conditions and the date of acceptance.
- Text Entry Area
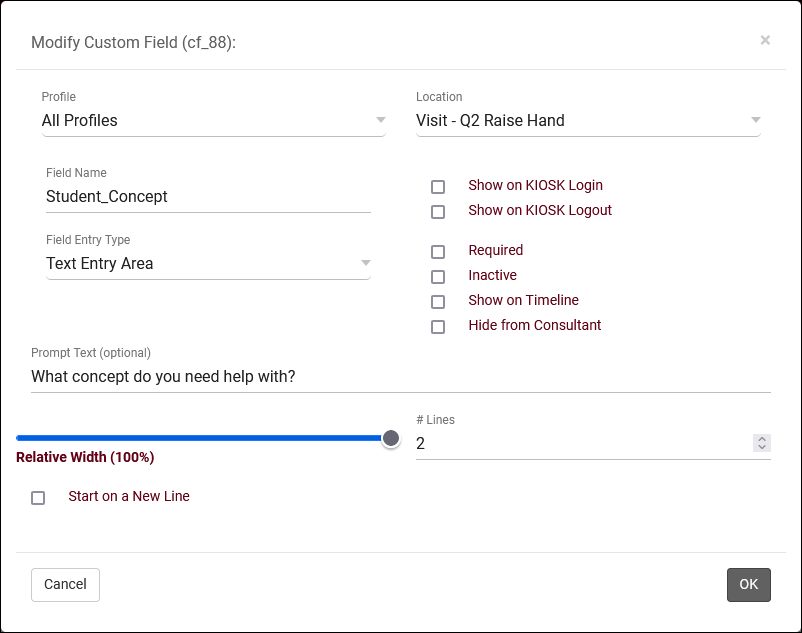
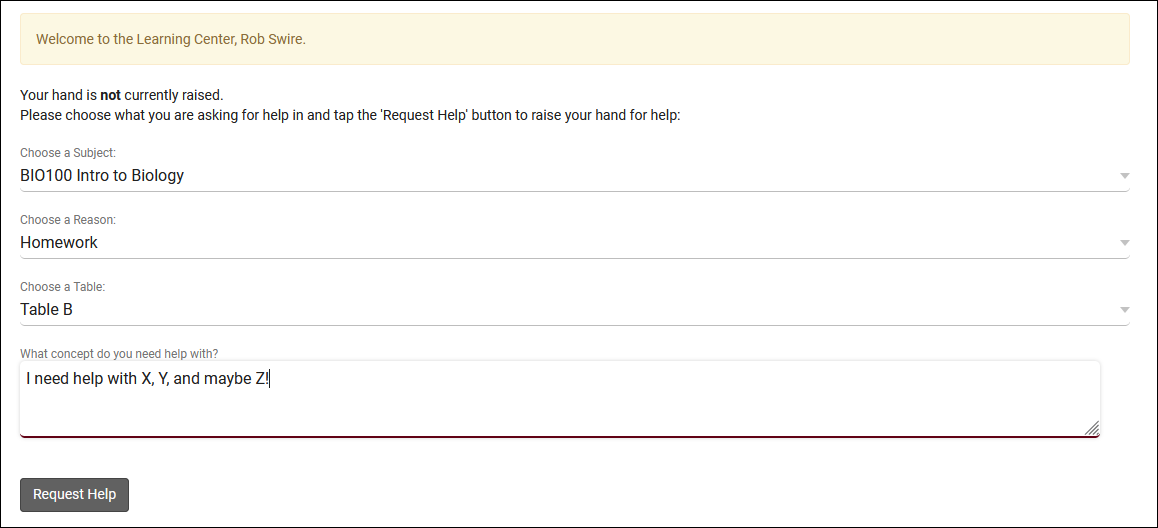
- This is where you can write out the text of this Term/Condition that students will need to agree to before continuing. If you wish to add custom field inputs to be answered by the student, this can be entered as {#custom:field_name#}. See example screenshots below. More information on custom fields can be found here.
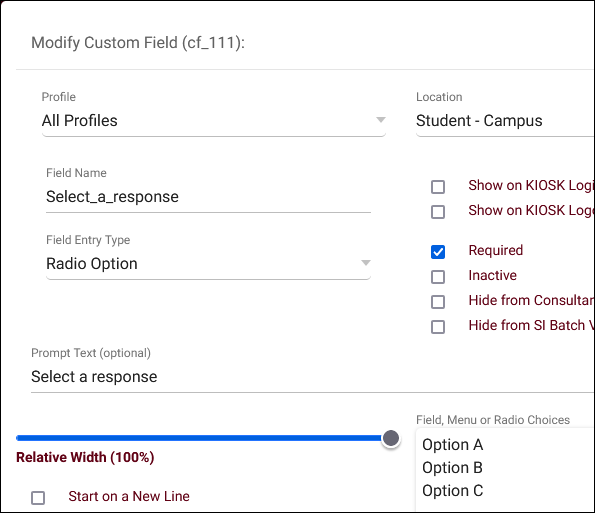
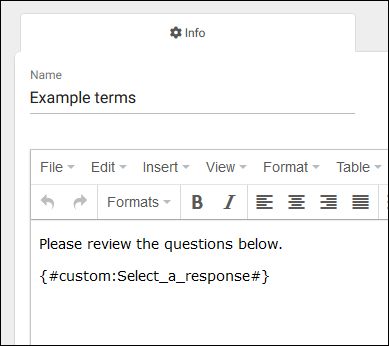
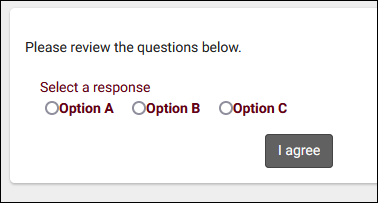
- Linked to Student List
- Only display these terms/conditions to students on the specified list.
- Only display these terms/conditions to students on the specified list.
- Linked to Section / Subject
- Terms and Conditions can be assigned to a specific subject, section, or all courses, depending on if this term/condition needs to be specific to a certain subject. If selected, an additional entry field will appear where you can choose the section/subject. This will only work with sections that students are registered for; non-enrolled courses will not trigger the terms/conditions to appear.
- Terms and Conditions can be assigned to a specific subject, section, or all courses, depending on if this term/condition needs to be specific to a certain subject. If selected, an additional entry field will appear where you can choose the section/subject. This will only work with sections that students are registered for; non-enrolled courses will not trigger the terms/conditions to appear.
- Profile / Center
- This is where you can assign this Term/Condition to a specific profile or center.
- This is where you can assign this Term/Condition to a specific profile or center.
- Valid For
- This option allows you to determine how long the Term/Condition agreement is valid for. There are three options.
- 1. Life – Never resets. Once Confirmed, the student will not see the Terms and Conditions again unless this option is changed.
- 2. Term – Resets after each semester. When next semester term switches over, the students will be asked again to agree to the Terms and Conditions once again.
- 3. Days - This option allows you set a custom length (e.g., 30 days, 90 days, etc).
- Displayed When
- This option determines where the student will see the Terms and Conditions prompt.
- 1. None - Inactive. This will deactivate this Term/Condition, and will no longer be displayed to students.
- 2. Student Main Menu - This will display as soon as the student logs into their account. Students will not be able to continue until the Terms/Conditions prompt has been confirmed.
- 3. Student Kiosk Login - This prompt will appear when a student attempts to login for a visit via a Kiosk, at which time they will be presented with the Terms and Conditions.
- 4. Student Booking Appointment - This prompt appears when a student selects an available time from the "Schedule an Appointment" widget on their dashboard. The Terms and Conditions must be confirmed before they can book an appointment.
- Accept Button Label
- This allows you to customize the name of the confirm button (e.g., "I agree").
- This allows you to customize the name of the confirm button (e.g., "I agree").
- Require Initials
- This requires the student to enter their initials before confirming, as a form of e-signature.
- This requires the student to enter their initials before confirming, as a form of e-signature.
- Allow Enter Notes
- This provides students the ability to enter in a note when filling out the Terms and Conditions.
- This provides students the ability to enter in a note when filling out the Terms and Conditions.
- Notes Instructions
- This is additional instructional text that will appear just above the notes field described above.
2. Group Settings
If you need to allow another set of staff members in your TracCloud instance to access/modify Terms and Conditions, you will need to apply a change to their permission group. Specifically, the Terms and Conditions option will need to be added to Table Access as seen below. This can either be set to View and Edit for full access, or View Only, if you don't want these users making any changes.
Other > Other Options > Groups > [The group you want to edit] > Admin / Modules > Table Access
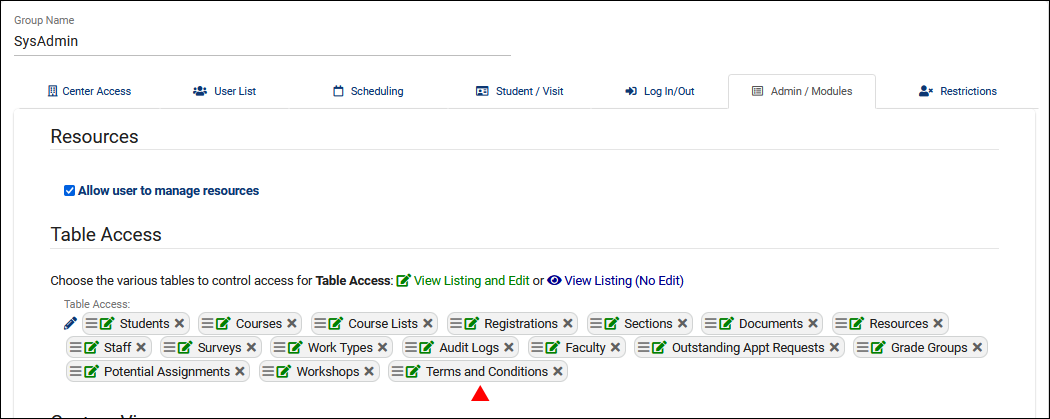
3. Example Configuration
The screenshot below shows an example of how Terms and Conditions can be configured, and how it displays to students.
Here's how that prompt looks to a student when logging into their account.
After the student agrees, the record of this agreement will appear in their Time Line as seen below.
4. Allowing Students to View Accepted Terms and Conditions
In order for students to be able to view terms and conditions that they've previously accepted, a system preference needs to be enabled. Go to Other > Other Options > Preferences > System Preferences > General Appointment Settings > Check "Allow students to view accepted Terms and Conditions on dashboard" > Save. Once enabled, students will see this button on their main menu next to the calendar URL. Clicking it will open a list of terms and conditions they've accepted, where they can see their response and the terms themselves by clicking on the arrow button.
Search Availability badges can be used to add information and indicators to availability slots. Each badge can appear for certain conditions, based on center, availability section/reason, location, skills/accommodations, etc.
Click "New Availability Badge" to begin. This will open a form where you can enter the details for your badge.
Manually Linked
Name
- Name of the Badge. This will not be displayed for students
- Name of the Badge. This will not be displayed for students
Availability Type
- Drop In, 1-on-1, or Group availability
- Drop In, 1-on-1, or Group availability
Consultant
- Assign a specific Staff
- Assign a specific Staff
Reason
- Assign a specific Reason
- Assign a specific Reason
Center
- Assign a specific Center
- Assign a specific Center
Section
- Assign a specific Subject
- Assign a specific Subject
Special Needs
- Select if applicable (more information)
- Select if applicable (more information)
Online
- Availability Type; Online, In Person, or Optional
- Availability Type; Online, In Person, or Optional
Location
- Location of the availability
- Location of the availability
Once you've decided where the badge is needed and have made your selections from the options above, you can now determine which icon, colors, and info work best for the badge created.
Color: Color of Icon
Icon: Choose from the list or use a custom icon
Info Text: Enter text that will display when users hover over the icon
In the example screenshot above, this badge will only appear on availabilities of staff who have been assigned the “ASL” accommodation and are available in the Learning Center. Once saved, your badge will appear in the profile preferences if you need to edit/delete it later.
Any fields left blank will not be considered for where this badge appears, you can be as specific or non-specific as needed. You can also create as many badges as you'd like, more than 1 tag can appear for the same availability. When students search for an availability, the badges will display to the right of the screen as shown below.
Additional Features
Q2 Tables
Q2 Tables offers a unique approach to attendance tracking specifically for study table centers, tracking the total time a student spends in the center in addition to recording the individual table visits where students received help from consultants. Students begin their center visit studying independently, while having the ability to request assistance as needed. Q2 offers the ability for students to virtually raise their hand and specify what they need help with, which consultants will be notified of. Smartphones and tablets drive the queuing system, for both students requesting help and staff viewing which students need assistance while recording table visit time.
At any point during a student's independent study time, they can request help. This is a three-step process.
- 1. The student opens the help request link from their email or scans a nearby QR code, enters their ID number, then specifies what they need help with and which table they're at.
- 2. A consultant sees that the student has requested help for a subject they can assist with. The consultant will go to that table (or send an online invite link for a virtual session) and begin the table visit.
- 3. Once the student has received all the assistance they need, the consultant will conclude the table visit. This process can repeat if the student needs more help later.
Usage
The end-user perspective of Q2. Students requesting and receiving help, with staff managing table visits, recording notes, and more.
A student logs into a Q2 center ("From Center") to record the start of their visit. A staff member can log a student in manually, or the student can log themselves in via a kiosk using a barcode scanner, QR code, or by typing their student ID directly into the search field.
Upon login, students will be asked if they would like to receive an email regarding the Q2 request for help process. This email will contain a Q2 Help Link that students can use to virtually raise their hand, indicating that they need assistance from a consultant. This prompt will contain the student's TracCloud email address by default, but they can be given the ability to enter a preferred email address instead.
If the student chooses not to receive an email containing the Q2 Help Link, they will also have the option to scan a QR code placed by your staff nearby. These QR codes can be table-specific, or you can share a single generic QR code and allow the student to choose their table from a drop-down menu. Both options are generated in your Q2 config.
Once the student scans the QR code or clicks on the emailed Q2 Help Link, they will end up at the window below. Here, the student will be asked to enter their email address or student ID number to request help.
After the student enters their ID or email address and clicks the continue button, they will be prompted to fill in some additional fields to describe what they need assistance with. The option to select a subject and reason can be toggled on or off in your Q2 config settings, depending on whether or not that information is relevant for your Q2 use-case. Once the request for help has been submitted, the student will be moved into a queue only visible from the consultant’s perspective, which will display all students currently requesting help, indicated by a raised-hand icon.
Students can also physically raise their hand or ask someone for help, and a staff member can then virtually raise the student's hand for them by clicking the box to the left of the student's name, as seen in the next portion of this article.
Staff will be able to open the Q2 queue directly from their dashboard to view logged in students and who has their hand raised. The list of options will be based on their permission group.
The staff Q2 Dashboard is split into two columns. On the left, students in the center working independently or with other consultants, and whether or not their hand is raised requesting assistance. On the right, students currently being helped by the consultant viewing this page. Each column can be collapsed by clicking on the button, which can be useful on smaller screens.
The icon in the lower-left corner also offers additional options.
- Log Out & Main Menu are self explanatory, allowing the staff member to return to the dashboard or log out of their browser session.
- allows the user to quickly access all of the QR codes relating to this Q2 config.
- Queue Mode hides the "Currently being helped" column, students who don't have their hand raised, and additional details such as student photo. This can be displayed on a screen in the center so that students can see where they are in the queue if several students are requesting help at once.
- Available Configurations allows the user to quickly switch to a different Q2 config, still limited by their permission group.
Staff members can be allowed to manage student's raised hands, and either raise or lower their hand by clicking the space to the left of their name. If your system has any Q2 Raise Hand custom fields, they can be viewed by clicking the icon.
In both cases, an additional pop-up will open to ask for more information and confirm that you want to raise/lower their hand. "Bump to top of list" can be used to artificially add wait time to the hand raise so that they're sorted to the top of the list.
Clicking on the entry will start a table visit with the student. This will lower the student's hand automatically (if it was raised in the first place), and they will now appear in the "Currently being helped" column for the consultant. This will also open a pop-up menu to edit the table visit, allowing the consultant to adjust the reason/subject or enter notes. If this pop-up menu is closed, it can be re-opened by clicking on the table visit entry in the right column at any time. Keep in mind that table visits cannot be managed from more than one device or browser session at a time. The table visit must be started and concluded in the same session.
Once the consultant is ready to conclude the table visit, they can click on the icon to end the visit and move the student back to the left column as they continue to work independently. This will also give the consultant a chance to enter any final notes before concluding the visit. If the visit was started by mistake and the table visit needs to be deleted rather than concluded, the button can be used instead.
Q2 can also be utilized in an Online context. Your availability should look something like this, set to Drop-in, Online, with the Online URL set to Q2Remote. This can also be made a drop-down option by modifying your Default Online Options in Global Preferences.
As a student, I can search for and click on this Drop-in session as usual.
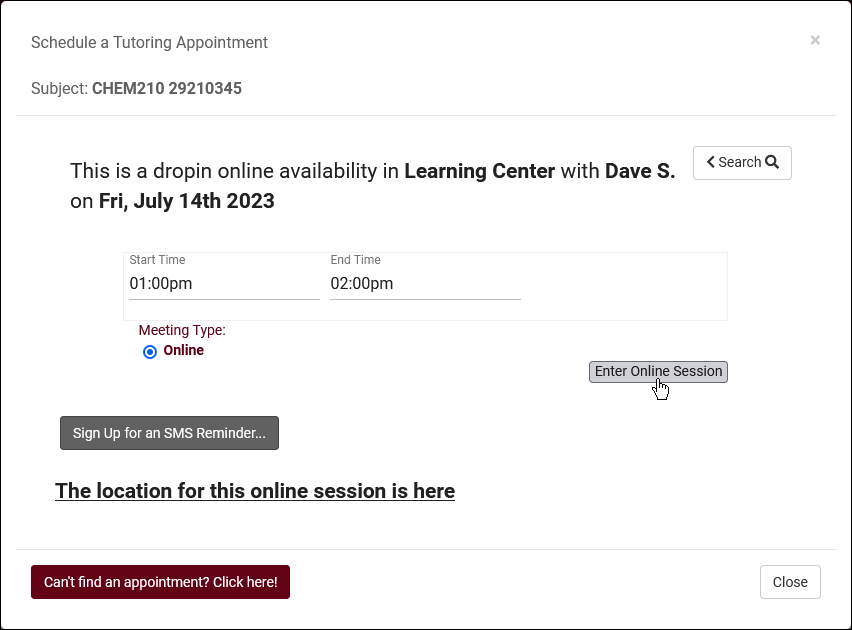
However, clicking 'Enter Online Session' in this case will take me to the following form rather than a meeting room. This allows me (the student) to specify what I need help with and virtually raise my hand, waiting at this form until a link is ready.
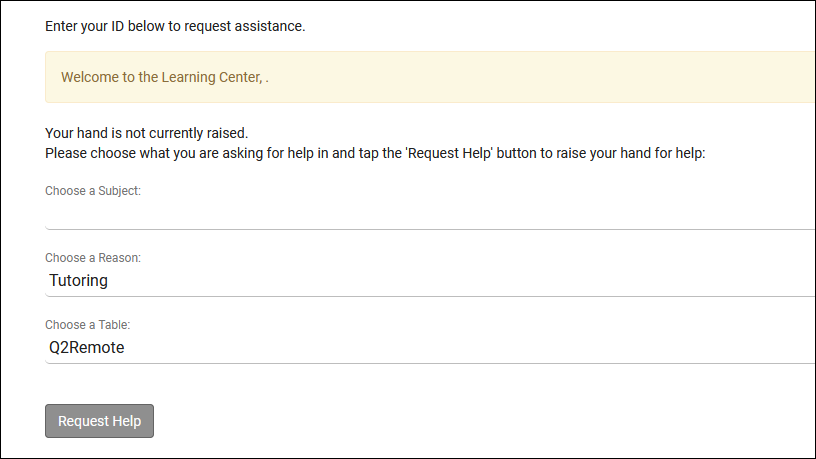
As a staff member monitoring this Q2 config, I can see a student has their hand raised for a remote session. Clicking on that entry prompts me to send them a remote meeting link, such as a Zoom or Webex room.

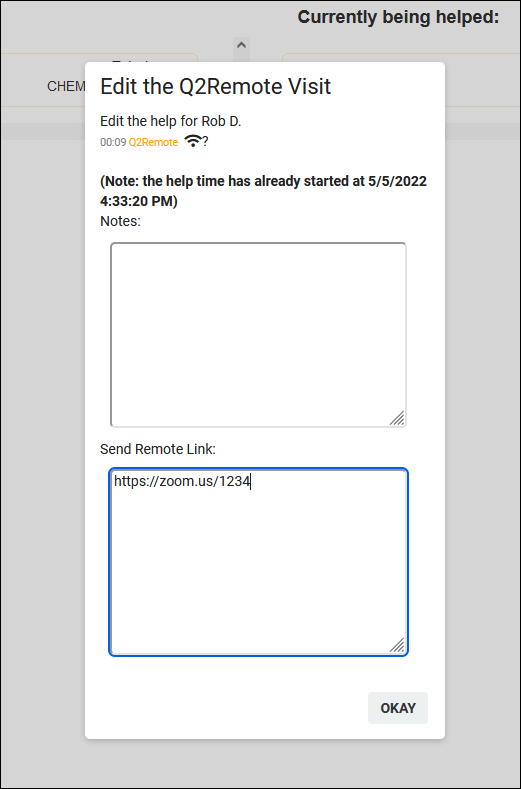
And once again as a student, I see that my meeting link is ready, which I can click to join. After the visit has concluded, the staff member will lower my hand as usual and the student can request help again if needed.
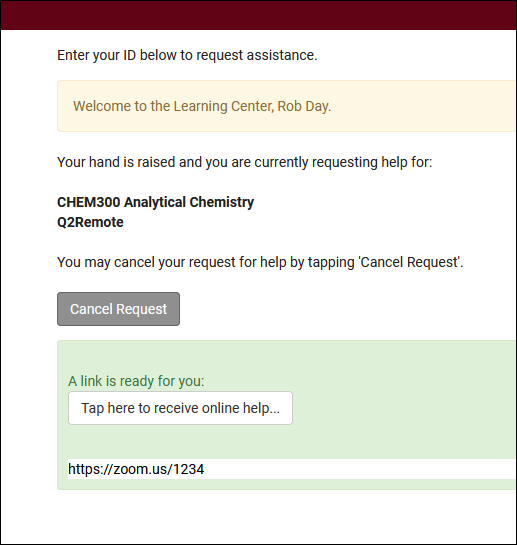
Q2 Configuration
Before you can track table visits, you will need to create your Q2 config and update group permissions to ensure that everything is configured to your needs.
To begin creating your Q2 Configuration. Click on Other > Q2 Tables: Configurations. Select the Hamburger icon and click New Q2 Configuration
- Q2 Configuration Name
- This is the name of this Q2 Config, which will appear on the dashboard to staff opening the Q2 queue.
- This is the name of this Q2 Config, which will appear on the dashboard to staff opening the Q2 queue.
- Profile
- This determines which profile this Q2 Config will be assigned to.
- This determines which profile this Q2 Config will be assigned to.
- From Center (Queue) & To Center (Center)
- Q2 requires two centers, a From Center (Queue) and a To Center (Center). The From Center/Queue is where the Trac System will record the total time a student spends in the center. The To Center/Center is where the Trac System records each individual contacts a student has with a staff member, also known as micro-visits or table visits.
- The From Center and To Center can both be created in your Profiles. Dashboard > Other > Other Options > [Your profile] > Centers > Create New Center. Your From and To centers will both need to be assigned a course list and reason(s), the same as your other centers.
- Ask for Consultant
- If checked, a consultant selection drop-down will be made available in the raise hand form for staff on the log listing specifically. This does not affect students who are raising their own hand.
- If checked, a consultant selection drop-down will be made available in the raise hand form for staff on the log listing specifically. This does not affect students who are raising their own hand.
- Ask for Reason & Ask for Subject
- If one or both of these options are checked, students (and staff on behalf of students) will be able to select a subject/reason when raising their hand. If checked, additional options will be made available to make each of these fields Required. Otherwise, it will be possible to leave these fields blank when requesting help.
- If one or both of these options are checked, students (and staff on behalf of students) will be able to select a subject/reason when raising their hand. If checked, additional options will be made available to make each of these fields Required. Otherwise, it will be possible to leave these fields blank when requesting help.
- Allow Enter Notes
- If checked, consultants will be able to enter notes during their table/micro visits.
- If checked, consultants will be able to enter notes during their table/micro visits.
- Show Reason/Subject in Queue Mode
- By default, these fields are hidden in the Q2 queue mode. These options allow you to display them.
- By default, these fields are hidden in the Q2 queue mode. These options allow you to display them.
- When Assigning Consultant - Logged in for work only
- If you allow your staff to raise student hands from the Log Listing (more information later in this article), they will have the ability to select a consultant to assign this request to. If this option is checked, only consultants currently logged in for work will be shown.
- If you allow your staff to raise student hands from the Log Listing (more information later in this article), they will have the ability to select a consultant to assign this request to. If this option is checked, only consultants currently logged in for work will be shown.
- Keep Center visit logged in
- This only applies to students logging in for Q2Remote drop-in sessions. If unchecked, a center visit is not recorded for students, only table visits. If checked, the first time the student goes to raise their hand will also log them into your center. That center visit must be concluded by a staff member or terminated automatically, students are not given the ability to manage their own visits.
- This only applies to students logging in for Q2Remote drop-in sessions. If unchecked, a center visit is not recorded for students, only table visits. If checked, the first time the student goes to raise their hand will also log them into your center. That center visit must be concluded by a staff member or terminated automatically, students are not given the ability to manage their own visits.
- Expected Duration
- Confirm Start Help on Initial Click
- If enabled, an additional step is added when beginning a table visit with a student to confirm that the visit should be started. Can be useful if staff are frequently accidentally starting table visits.
- If enabled, an additional step is added when beginning a table visit with a student to confirm that the visit should be started. Can be useful if staff are frequently accidentally starting table visits.
- Confirm Subject / Reason at Start
- If checked, consultants will be able to modify the subject/reason that was initially selected when the student raised their hand. This prompt will appear at the start of the table visit, when the consultant clicks on the students name in the list.
- If checked, consultants will be able to modify the subject/reason that was initially selected when the student raised their hand. This prompt will appear at the start of the table visit, when the consultant clicks on the students name in the list.
- Prevent Consultant from Raising Student's Hand
- Prevents consultants from raising students' hands on behalf of the students.
- Prevents consultants from raising students' hands on behalf of the students.
- Prevent Student from editing the email address for sending table help instructions
- Enforce that the Q2 help instructions prompt use the email address from their student profile, preventing them from using a different address.
- Enforce that the Q2 help instructions prompt use the email address from their student profile, preventing them from using a different address.
- Play sound when hand raised
- This will play a sound whenever a student raises their hand to get the attention of whoever is monitoring the queue.
- Table Listing
- This is where you can define the individual tables that students can request help from. Use Generate Table List QR Codes to display the QR codes for these specific tables. Table Locations can also be defined, which will be recorded for reporting purposes.
- This is where you can define the individual tables that students can request help from. Use Generate Table List QR Codes to display the QR codes for these specific tables. Table Locations can also be defined, which will be recorded for reporting purposes.
- Table Help Procedures
- This message will display when a student scans a QR code with their phone. The text will be visible immediately above the ID field.
- This message will display when a student scans a QR code with their phone. The text will be visible immediately above the ID field.
- KIOSK Login Instructions
- This message appears during the initial center login on a KIOSK or Log Listing. This text appears on the same screen where the student can email themselves the Raise Hand link.
- This message appears during the initial center login on a KIOSK or Log Listing. This text appears on the same screen where the student can email themselves the Raise Hand link.
- Student Instructions Email
- This is where you can customize the contents of the email sent to the student. The URL will always be included below the text you enter here. This field supports twig.
It is also possible to show Q2 information and options on the Log Listing for staff to manage. These options are found in Other > Other Options > Profiles > [Your Profile] > Prefs > Log In/Out > Log List Customization. This will only cover the Q2-specific options, for everything else, check out the dedicated Log List Customization article.
- Q2 Hand Raised
- This adds a 'Raise Hand' button to the Log Listing, allowing staff to raise or lower each student's hand. This will also display the table that the student has requested help at.
- This adds a 'Raise Hand' button to the Log Listing, allowing staff to raise or lower each student's hand. This will also display the table that the student has requested help at.
- Q2 Visits List
- This shows the student's currently ongoing table visits, if there are any.
- This shows the student's currently ongoing table visits, if there are any.
- Q2 Visit Flag
- If enabled, a wifi icon will be added to the log listing for students who are logged in for a Q2Remote session.
- If enabled, a wifi icon will be added to the log listing for students who are logged in for a Q2Remote session.
- Q2 Consultant
- Shows the name of the consultant that the student is requesting help with, or the name of the consultant who is currently helping the student.
- Shows the name of the consultant that the student is requesting help with, or the name of the consultant who is currently helping the student.
- Q2 Consultant Alias
- Shows the alias of the consultant that the student is requesting help with, or the alias of the consultant who is currently helping the student.
- Shows the alias of the consultant that the student is requesting help with, or the alias of the consultant who is currently helping the student.
- Q2 Current Reason/Subject
- These display the subject/reason the student is requesting help for.
- These display the subject/reason the student is requesting help for.
- Q2 Reason/Subject
- These display the reason/subject that the student is being helped with or was last helped with.
In order for staff to have access to Q2, their permission group will need to be modified and adjusted to enable that access. The Admin/Modules tab will allow you to add a Q2 Config to each group as needed. This can be found in Other > Other Options > Groups > [The group you want to modify] > Admin / Modules tab.
In the event that you need to create a custom question for students to answer while raising their hand, this can be accomplished with custom fields. To create a Q2 custom field, go to Other > Other Options > Custom Fields. For more information on configuring custom fields in general, take a look at our dedicated custom fields article. In this case, make sure the location of your new custom field is set to "Visit - Q2 Raise Hand."
Once your question has been created, students will be prompted to answer it when they request help through Q2. As a staff member, you can view student answers on the Q2 query screen by clicking on the icon to the right of the student's name.
Q2 Report
There is currently one report available to view Q2 table visit data found in its own report category, Q2 Tables, detailed below.
{{:TracCloud_Report:_Q2_Visits_by_%3F%3F}}
For information on purchasing the Q2 Module, reach out to sales@go-redrock.com
For Q2 functionality questions, reach out to helpdesk@go-redrock.com
Search Availability badges can be used to add information and indicators to availability slots. Each badge can appear for certain conditions, based on center, availability section/reason, location, skills/accommodations, etc.
Click "New Availability Badge" to begin. This will open a form where you can enter the details for your badge.
Manually Linked
Name
- Name of the Badge. This will not be displayed for students
- Name of the Badge. This will not be displayed for students
Availability Type
- Drop In, 1-on-1, or Group availability
- Drop In, 1-on-1, or Group availability
Consultant
- Assign a specific Staff
- Assign a specific Staff
Reason
- Assign a specific Reason
- Assign a specific Reason
Center
- Assign a specific Center
- Assign a specific Center
Section
- Assign a specific Subject
- Assign a specific Subject
Special Needs
- Select if applicable (more information)
- Select if applicable (more information)
Online
- Availability Type; Online, In Person, or Optional
- Availability Type; Online, In Person, or Optional
Location
- Location of the availability
- Location of the availability
Once you've decided where the badge is needed and have made your selections from the options above, you can now determine which icon, colors, and info work best for the badge created.
Color: Color of Icon
Icon: Choose from the list or use a custom icon
Info Text: Enter text that will display when users hover over the icon
In the example screenshot above, this badge will only appear on availabilities of staff who have been assigned the “ASL” accommodation and are available in the Learning Center. Once saved, your badge will appear in the profile preferences if you need to edit/delete it later.
Any fields left blank will not be considered for where this badge appears, you can be as specific or non-specific as needed. You can also create as many badges as you'd like, more than 1 tag can appear for the same availability. When students search for an availability, the badges will display to the right of the screen as shown below.
Profile Preferences
Prefs
Advanced (or rarely used) Preferences
The Advanced Prefs tab contains rarely used options, or options that we recommend against for typical use-cases. We recommend leaving these preferences blank unless instructed otherwise. While the documentation below explains what each of these preferences do, we still recommend reaching out to us before making changes.
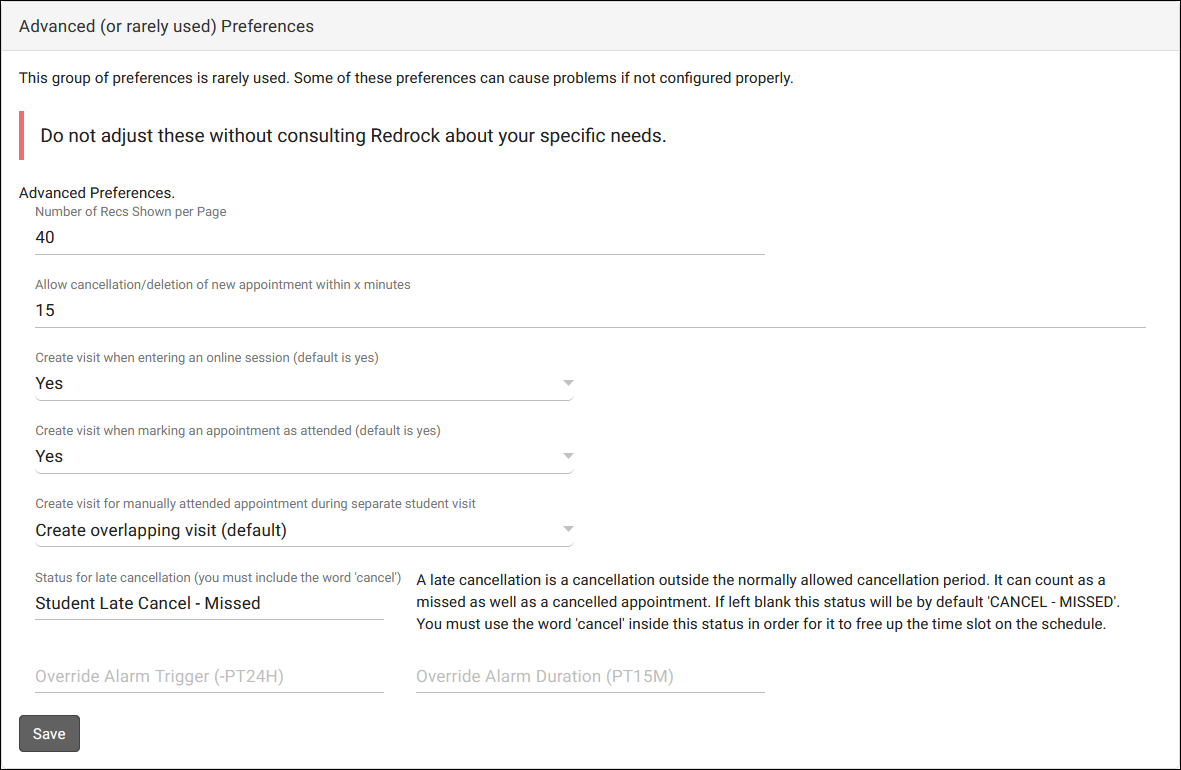
- Number of Recs Shown per Page
- This limits the number of students shown on one page of the Log Listing/Kiosk. Blank is unlimited, any other number will paginate this listing automatically.
- This limits the number of students shown on one page of the Log Listing/Kiosk. Blank is unlimited, any other number will paginate this listing automatically.
- Allow cancellation/deletion of new appointment within x minutes
- This option assumes you penalize students who cancel a certain number of appointments via max appointment rules. The value entered here acts as a buffer for when cancelled appointments will be deleted instead of set to a cancelled status. For example, if a student books an appointment and cancels 5 minutes later, you may not want to penalize that since the student wasn't holding the appointment for very long. If this preference was set to at least 5 minutes, the appointment would be deleted and would not count against your max appointment rules for that student.
- This preference is dangerous as if the value is set to high, it can inadvertently delete appointments that should've been recorded as cancelled.
- Create visit when entering an online session
- If blank or "yes," a visit will be recorded when a student joins an online session through the Trac System. Disabling this means that TracCloud will not automatically record the visit, so it must be recorded manually by a staff member.
- If blank or "yes," a visit will be recorded when a student joins an online session through the Trac System. Disabling this means that TracCloud will not automatically record the visit, so it must be recorded manually by a staff member.
- Create visit when marking an appointment as attended
- If blank or "yes," a visit will be created when marking an appointment as attended, assuming a visit doesn't already exist. Disabling this means that TracCloud will not create a visit when an appointment is marked as attended, it must be created elsewhere.
- If blank or "yes," a visit will be created when marking an appointment as attended, assuming a visit doesn't already exist. Disabling this means that TracCloud will not create a visit when an appointment is marked as attended, it must be created elsewhere.
- Create visit for manually attended appointment during separate student visit
- If "Do not create overlapping visit" is chosen, TracCloud will not create overlapping visits for students if an appointment is marked as attended. For example, if a student is logged in for a Q2 session and has an appointment during that time, another visit will not be created since the student is already logged in. If this preference is set to blank or "Create overlapping visit," TracCloud will create overlapping visits.
- If "Do not create overlapping visit" is chosen, TracCloud will not create overlapping visits for students if an appointment is marked as attended. For example, if a student is logged in for a Q2 session and has an appointment during that time, another visit will not be created since the student is already logged in. If this preference is set to blank or "Create overlapping visit," TracCloud will create overlapping visits.
- Status for late cancellation
- If left blank, a late cancellation will be recorded as "CANCEL - MISSED" (or your Profile's version of the "Missed" phrasing). You can use this to change the phrasing of this status entirely, but make sure to include the word "Cancel" somewhere in the status otherwise TracCloud will not send a cancellation email or open the time slot for other students.
- One valid reason to change this would be your Auto Cancellation from Student Cancellations preference in your email settings, as this will only apply when a status contains both the word "Student" and "Cancel." In this case, you may want to change this preference to something like "Student Cancel - Missed" if these appointments should count towards auto cancellation.
- Override Alarm Trigger & Override Alarm Duration
- These options allow you to set custom alarm timings for calendar clients. The format must be "-PT24H" and "PT15M" for the trigger and duration respectively. If left blank, 24H and 15M will be used.
Profile Preferences
Prefs
Emails
There are various Profile-specific emails that can be configured in TracCloud. Most are sent automatically, such as Confirmations and Reminders, while some are sent manually, like Visit Notes. This article will provide an overview of these email types, what they do, and how they can be customized for your use-case.
Other > Other Options > Profiles > [Your Profile] > Prefs > Emails.
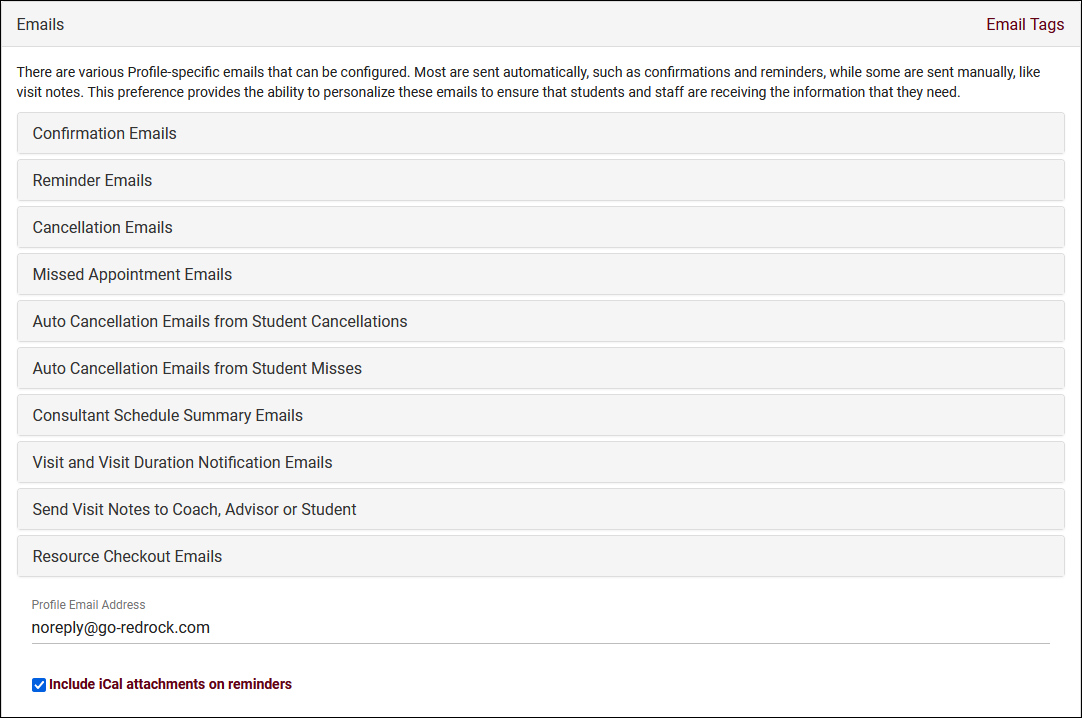
References:
- Twig
- Twig and Twig Tags are used extensively throughout emails. This includes simple elements, like using {{Student.First_Name}} to display a student's first name dynamically, to more advanced logic determining exactly what text is included in each email. This article will be referencing Twig, but will not being going into detail. For more information on this topic, take a look at our dedicated Twig Guide.
- In the top right corner of your 'Emails' menu is an 'Email Tags' list. This provides quick access to all of your available tags for these emails, which can also be clicked and dragged into text fields to populate them automatically.
- In the top right corner of your 'Emails' menu is an 'Email Tags' list. This provides quick access to all of your available tags for these emails, which can also be clicked and dragged into text fields to populate them automatically.
- Previewing Emails
- Every email in this menu has a Preview button to see how your email will display when it's sent. It is required to preview emails before saving any changes. The preview will show the most recent record of that time in the system by default, you can specify a different record to use as an example by clicking the "Sequence #" button the preview window.
- Every email in this menu has a Preview button to see how your email will display when it's sent. It is required to preview emails before saving any changes. The preview will show the most recent record of that time in the system by default, you can specify a different record to use as an example by clicking the "Sequence #" button the preview window.
- Loading Default Emails
- Most email prefs here offer a default that you can load, either to use as-is or as a template to build off of. Click the clipboard icon next to your email to load the default email format.
Select an email type below to learn more.
Confirmation Emails are sent to Students, Consultants, and an optional third address when an appointment is booked. Consultants and Students can receive unique versions of this email, depending on the information required for either party. You can also decide whether the email is sent the moment the appointment is booked, later in the night, or at a specific time in the morning.
- Send Confirmation Emails
- Disable this email, send immediately upon Appointment being booked, or send in a batch that night or the next morning at a time of your choice.
- Student/Consultant confirmation email subject
- The subject line of the email, supports Twig Tags just like the body of the email.
- Student/Consultant confirmation email
- The body of the email to be sent to Students/Consultants.
- Student/Consultant confirmation SMS Msg
- A separate message sent to the Student/Consultant's phone. Requires TextAlerts Module.
- Attempt Consultant as Reply To Address
- If enabled, TracCloud will try to use the consultant's email address as the reply-to address for the confirmation message to students. This would allow students to reply to the confirmation email with their consultant as the recipient.
- CC the Profile on Student/Consultant confirmation emails
- This option will send a copy of this email to your Profile email address if available.
- Send Confirmation to Consultant Also
- Allows you to independently disable the Consultant confirmation email, if they're more likely to rely on other resources to see their appointments for the day.
- Send Additional Email on New Appointment
- This allows you to enable one more Confirmation email to be sent to the email address defined below.
- Additional confirmation email address
- In the example above, we're using a Custom Field in the student's profile that contains their Assigned Advisor's email address. We can also choose to have a static email address in this field instead.
- Additional confirmation email subject
- Just like the standard Confirmation emails, we can write out our custom subject line...
- Additional confirmation email
- ...and the email body itself.
Reminder Emails are sent to Students and Consultants to remind them of upcoming appointments. Just like confirmations, this can be configured separately for students and consultants. You can set the exact time reminder emails are sent each day, either the night before or a custom time in the morning. Reminders can also be disabled for students, consultants, or both.
- Send Reminders Emails
- Disable Reminder emails or choose when reminder emails are sent at the specified time(s).
- Student/Consultant reminder email subject
- The subject line of the email, supports Twig Tags just like the body of the email.
- Student/Consultant reminder email
- The body of the email to be sent to Students/Consultants.
- Student/Consultant reminder SMS Msg
- A separate message sent to the Student/Consultant's phone. Requires TextAlerts Module.
- Attempt Consultant as Reply To Address
- If enabled, TracCloud will try to use the consultant's email address as the reply-to address for the reminder message to students. This would allow students to reply to the reminder email with their consultant as the recipient.
- CC the Profile on Student/Consultant reminder emails
- This option will send a copy of this email to your Profile email address if available.
- Send Reminder to Consultant Also
- Allows you to independently disable this email for Consultants. This is typically disabled if you plan to use Consultant Schedule Summary Emails instead.
Cancellation Emails will be sent to Students and Consultants immediately upon appointment cancellation. Each user-type will receive a unique email with information about the cancelled appointment.
- Send Cancellation Emails
- Enable or disable this email type.
- Student/Consultant cancellation email subject
- The subject line of the email, supports Twig Tags just like the body of the email.
- Student/Consultant cancellation email
- The body of the email to be sent to Students/Consultants.
- Student/Consultant cancellation SMS Msg
- A separate message sent to the Student/Consultant's phone. Requires TextAlerts Module.
- CC the Profile on Student/Consultant cancellation emails
- This option will send a copy of this email to your Profile email address if available.
Missed Appointment Emails are sent to the Student when an Appointment is missed. This email can be sent the evening of, or the day after the appointment should've taken place.
- Send Missed Appointment Emails
- Disable, or choose when this email is sent.
- Change missed appointment to Status
- When this process runs, it will automatically change the appointment status if there's no corresponding visit record. This setting determines what status the appointment is set to, which will typically be the same as your Profile 'Status for missed' definition.
- within x Minutes before/after appointment time
- A time buffer can be assigned here to determine when an appointment should be counted as 'Missed' if there's a Visit record in close proximity. For example, if a student has a 9:00am Appointment, but they started their Visit at 9:05am, we probably shouldn't mark this Appointment as missed, but if the Student is 25 minutes late, maybe that does qualify as a 'Miss' for your campus. 30 minutes in both fields is a typical value.
- Student appointment missed email subject
- The subject line of the email, supports Twig Tags just like the body of the email.
- Student appointment missed email
- The body of the email to be sent to Students.
- Student appointment missed SMS Msg
- A separate message sent to the Student's phone. Requires TextAlerts Module.
- CC the Profile on Student appointment missed emails
- This option will send a copy of this email to your Profile email address if available.
Student auto cancellation emails will be sent only if this functionality is enabled. The first two preferences in this menu allow you to define a limit for how many consecutive recurring appointments a student can cancel before TracCloud automatically cancels the entire series.
- Cancel recurring appointments after # consecutive student cancellations
- This enables or disables the auto-cancellation functionality for recurring appointments. If this is disabled ("No"), all other preferences in this menu can be ignored.
- Cancel recurring appointments after how man consecutive cancels
- This is the threshold of consecutive cancellations before the recurring appointment series is automatically cancelled. Default is 2.
- Student/Consultant auto cancellation email subject
- The subject line of the email, supports Twig Tags just like the body of the email.
- Student/Consultant auto cancellation email
- The body of the email to be sent to Students/Consultants.
- Student auto cancellation SMS Msg
- A separate message sent to the Student's phone. Requires TextAlerts Module.
- CC the Profile on Student/Consultant auto cancellation emails
- This option will send a copy of this email to your Profile email address if available.
Student auto cancellation emails will be sent only if this functionality is enabled. The first two preferences in this menu allow you to define a limit for how many consecutive recurring appointments a student can miss before TracCloud automatically cancels the entire series.
- Cancel recurring appointments after # consecutive student misses
- This enables or disables the auto-cancellation functionality for recurring appointments. If this is disabled ("No"), all other preferences in this menu can be ignored.
- Cancel recurring appointments after how man consecutive misses
- This is the threshold of consecutive misses before the recurring appointment series is automatically cancelled. Default is 2.
- Student/Consultant auto cancellation email subject
- The subject line of the email, supports Twig Tags just like the body of the email.
- Student/Consultant auto cancellation email
- The body of the email to be sent to Students/Consultants.
- Student auto cancellation SMS Msg
- A separate message sent to the Student's phone. Requires TextAlerts Module.
- CC the Profile on Student/Consultant auto miss cancellation emails
- This option will send a copy of this email to your Profile email address if available.
Consultant Schedule Summary Emails will be sent to consultants the evening before or the morning of their schedule appointments. This single email can contain information about multiple upcoming appointments, rather than receiving individual emails for each appointment. You can write the opening/top of the email, the repeating text box for appointment information, and the final/closing text.
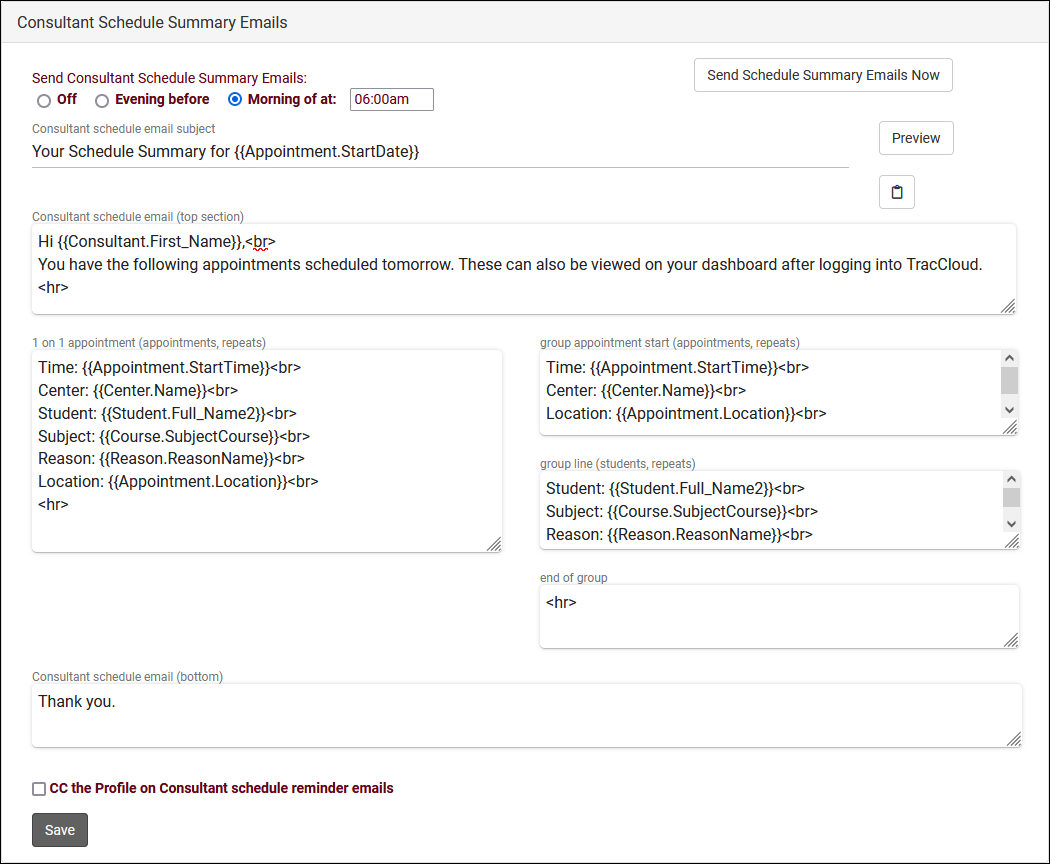
- Send Consultant Schedule Summary Emails
- Disable this email, or send in a batch the night before or the morning of their appointments at a time of your choice.
- Consultant schedule email subject
- The subject line of the email, supports Twig Tags just like the body of the email.
- Consultant schedule email (top section)
- This text will always be placed at the top of the email, frequently used for greetings or instructions.
- 1-on-1 appointment (appointments, repeats)
- This text will repeat for each of their upcoming appointments (the next day, or day of depending on when they're being sent). If the consultant has 4 appointments today/tomorrow, this section will repeat 4 times with information about each one, with the exception of Group Appointments...
- Group appointments
- Since you probably don't need to repeat the time, subject, center, and so on for each appointment of a group session, you can use this to format those sessions differently than 1-on-1's.
- group appointment start (appointments, repeats)
- Use this to write out the non-student-specific information. Time, Center, Subject, Location, etc. Will display once for each Group Session.
- group line
- Use this to write out the student-specific information. Student name, email address, subject if you're allowing to students to book the same session for different topics. This will repeat for each Appointment within a Group Session.
- end of group
- This concludes the Group Session summary. Typically, a couple line breaks or a horizontal line like in the example above.
- Since you probably don't need to repeat the time, subject, center, and so on for each appointment of a group session, you can use this to format those sessions differently than 1-on-1's.
- Consultant schedule email (bottom)
- This text will appear at the very bottom of the email, below all appointment information, and won't repeat.
- CC the Profile on Consultant schedule reminder emails
- This option will send a copy of this email to your Profile email address if available.
Visit and Visit Duration Notification Emails. Visit reasons can be configured with a “Notify Time Expired” setting. When that time limit is reached, an email can be sent to the center, consultant, or a specific email address automatically. This menu also allows you to configure an email that will be sent out after students conclude their visit.
- Send Visit Duration Notification Emails
- Choose whether or not to send notification emails when the Visit Time limit of a particular Reason is reached. [[TracCloudGuideProfileReasons|More information.]
- Visit duration notification email subject
- The subject line of the email, supports Twig Tags just like the body of the email.
- Visit duration notification email
- The body of the email to be sent to your selected users.
- Send Visit Email after Visit Conclusion
- Choose whether or not an email should be sent when a Student logs out of a Center.
- Visit email address
- Choose what email address receives this email. This can be a static email address, or dynamic with a Twig Tag as seen above. This can be used to send a summary of a visit to the Student themselves, their Tutor or Assigned Advisor, a Faculty member, or another email address entirely.
- Visit email subject
- The subject line of the email, supports Twig Tags just like the body of the email.
- Visit email
- The body of the email to be sent to Students/Consultants.
Send Visit Notes to Coach, Advisor or Student can be used to send visit information to any of the previously named users, or more. The prompt to send this email can appear on individual visit records to be selected by staff, or it can be automatically initiated during visit conclusion. One of the most common uses for this feature is for Consultants to send their Visit Notes (and general Visit information) to faculty.
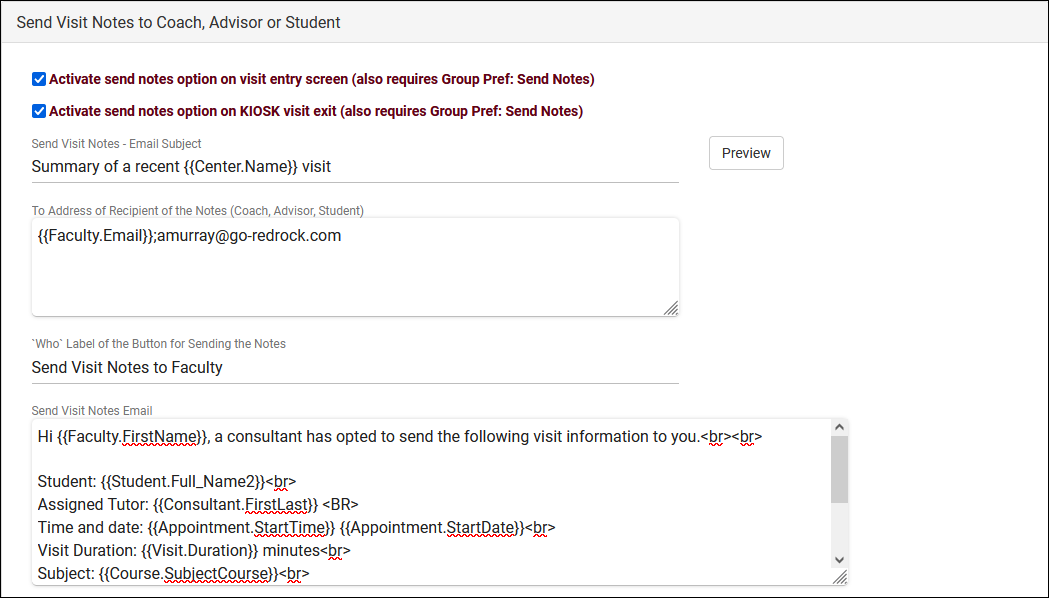
- Activate send notes option on visit entry screen
- Activate send notes option on KIOSK visit exit
- If enabled, this email will be sent immediately upon visit logout.
- Send Visit Notes - Email Subject
- The subject line of the email, supports Twig Tags just like the body of the email.
- To Address of Recipient of the Notes
- This controls which user these emails will be sent to.
- {{Faculty.Email}} for Faculty
- {{Student.Email}} for Students
- {{Consultant.Email}} for Consultants or Advisors
- Static email addresses, Twig Tags pointing to Custom Fields, and semi-colons for multiple email addresses can also be used.
- 'Who' Label of the Button for Sending the Notes
- The label/name of the button, as seen in the “Activate send notes” screenshot.
- Send Visit Notes email
- The body of the email to be sent to your selected users.
Resource Checkout Emails contains several emails relating to resource records. Emails can be sent when an item is overdue, upon checkout, prior to the due date, prior to a reservation date, and upon return.
- Send Overdue Emails
- Disable this email, or choose what time it should be sent. This email will send if a student has an overdue checkout.
- Student resource overdue email subject
- The subject line of the email, supports Twig Tags just like the body of the email.
- Resource overdue email
- The body of the email to be sent to Students.
- Resource overdue SMS Msg
- A separate message sent to the Student's phone. Requires TextAlerts Module.
- CC the Profile on Resource overdue emails
- This option will send a copy of this email to your Profile email address if available.
- Send additional overdue emails daily
- Resend the above email on a daily basis until the item is returned.
- Student resource confirmed subject
- This email is sent immediately upon resource checkout. This option affects the subject line of the email, which supports Twig tags just like the body of the email.
- Resource confirm email
- The body of the email to be sent to Students.
- Resource confirm SMS Msg
- A separate message sent to the student's phone. Requires TextAlerts Module.
- CC the Profile on confirmation emails
- This option will send a copy of this email to your Profile email address if available.
- This option will send a copy of this email to your Profile email address if available.
- Send Resource Reminder Emails (Pickup and Return)
- Choose when reservation and overdue reminders are sent. The reservation email will notify the student that an item they reserved is available for pickup based on the first day of their reservation. The return reminder will send prior to the item becoming overdue.
- Student resource pickup/return reminder email subject
- The subject line of the email, supports Twig tags just like the body of the email.
- Resource pickup/return reminder email
- The body of the email to be sent to Students.
- Resource pickup/return reminder SMS Msg
- A separate message sent to the Student's phone. Requires TextAlerts Module.
- A separate message sent to the Student's phone. Requires TextAlerts Module.
- Resource Return Confirmation
- This email allows you to send an email to the user confirming that they have returned the resource.
- Student resource return confirmation email subject
- The subject line of the email, supports Twig tags just like the body of the email.
- Resource return confirmation email
- The body of the email to be sent to the user.
- Resource return confirmation SMS Msg
- A separate message sent to the user's phone. Requires TextAlerts Module.
- CC the Profile on resource return confirmation emails
- This option will send a copy of this email to your Profile email address if available.
- This option will send a copy of this email to your Profile email address if available.
Workshop emails are sent when a student is added to a workshop, removed from a workshop (canceled), and as a reminder the night before or morning of the workshop taking place. These emails can be edited in Other > Other Options > Profiles > [Your profile] > Prefs > Emails > Workshops.
- Workshop enrollment confirmation email subject
- This email sends when a student is enrolled in a workshop. Enter the subject line of the email here, supports Twig just like the body below.
- This email sends when a student is enrolled in a workshop. Enter the subject line of the email here, supports Twig just like the body below.
- Workshop confirmation email
- The body of the workshop enrollment confirmation.
- The body of the workshop enrollment confirmation.
- Workshop enrollment confirmation SMS Msg
- A separate message to be sent to the student's phone. Requires TextAlerts module.
- A separate message to be sent to the student's phone. Requires TextAlerts module.
- CC the Profile on workshop enrollment confirmation emails
- This option will send a copy of this email to your Profile email address if available.
- This option will send a copy of this email to your Profile email address if available.
- Workshop enrollment cancellation subject
- This email is sent upon a student's enrollment in a workshop being canceled, supports Twig just like the body below.
- This email is sent upon a student's enrollment in a workshop being canceled, supports Twig just like the body below.
- Workshop cancellation email
- The body of the workshop enrollment cancellation.
- The body of the workshop enrollment cancellation.
- Workshop enrollment cancellation SMS Msg
- A separate message to be sent to the student's phone. Requires TextAlerts module.
- A separate message to be sent to the student's phone. Requires TextAlerts module.
- CC the Profile on workshop enrollment cancellation emails
- This option will send a copy of this email to your Profile email address if available.
- This option will send a copy of this email to your Profile email address if available.
- Send Workshop Reminder emails
- You can optionally send a reminder the day before or the morning of a workshop taking place to the student's email address and/or phone number. A specific time must be chosen for this email to send.
- You can optionally send a reminder the day before or the morning of a workshop taking place to the student's email address and/or phone number. A specific time must be chosen for this email to send.
- Upcoming workshop reminder email subject
- The subject like of the workshop reminder email, supports Twig just like the body below.
- The subject like of the workshop reminder email, supports Twig just like the body below.
- Upcoming workshop reminder email
- The body of the workshop reminder email.
- The body of the workshop reminder email.
- Upcoming workshop reminder SMS Msg
- A separate message to be sent to the student's phone. Requires TextAlerts module.
- A separate message to be sent to the student's phone. Requires TextAlerts module.
- CC the Profile on upcoming workshop reminder emails
- This option will send a copy of this email to your Profile email address if available.
- Profile Email Address is the address that all emails from this profile will be sent from. This is also the address used for "CC the Profile on..." settings.
- Include iCal attachments enables calendar attachments for your emails. These can be added to a user's personal calendar, but this is only a one-way communication.
Other Email Articles
Not all of TracCloud's email-related settings are found in your Profile Prefs. Here are some quick links to other email settings:
Mail Servers - Looking to start using TracCloud's email capabilities, but don't have an email server setup yet? Start here.
Email Templates - Write an email as a template, and re-use it as needed when manually sending emails to Students and Staff.
Notifications - Send Notifications to Students, displayed in TracCloud directly or sent over email.
SurveyTrac Module - Send Students Surveys over email when their visit concludes, batch send to entire lists, and more.
TextAlerts Module - Send Students and Staff a text message along with their email.

