TracCloudWhatsNew
From Redrock Wiki

This page highlights some of the recent changes made to the TracCloud platform, and how you can utilize them on your own instance. A list of past changes and a full changelog can be found in the tabs above.
If you have any questions about these changes, feel free to reach out to us on our helpdesk.
2024-01-02 | TracCloud features and changes from December 2023
Visit satisfaction questions, custom field icons, duplicating favorite reports, and more in TracCloud for the month of December 2023. Our full changelog can be found here.
Visit Satisfaction
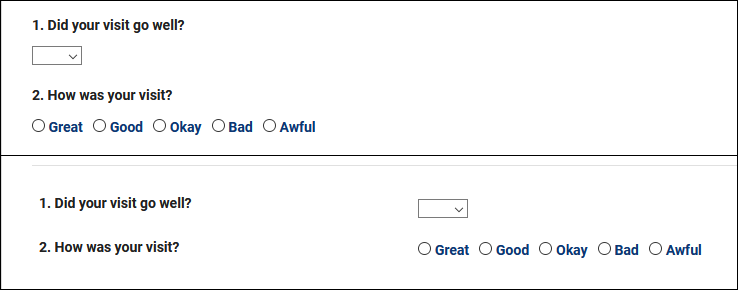
You can now ask for both student and consultant visit satisfaction on logout to see what both parties thought of their visit. This can be enabled in your Profile Log in/out preferences. These responses are only accessible to groups who have been provided access to these fields in the 'Student / Visit' tab. Responses will be visible on the student listing and in reports such as Visits by ??.

Custom Field Icons
There are two new custom field entry types that use icons instead of text, examples for both can be found in our custom fields documentation.


Reports
Favorite reports can now be duplicated using a copy button in Reports > Favorites. This will immediately take you to the "Edit Favorites" list so you can make further changes to the new report.

- Students Visits/Appointments by ?? has a new option to search for appointments that were modified in the selected date range rather than the date of the appointment itself. Additionally, another option was added to include deleted appointments in this report.
- User Detail now has date range options, allowing you to search for staff records that were modified or logged in within the selected date range.
- Center Schedule has new options to sort your data by up to 2 fields.
- An option to "Include Totals by Appointment Type" (i.e., drop-in, one-on-one, group) has been added to Visits by ?? and Students Visits Summary.
- Consultant custom fields can now be included as additional fields in Q2 Visits by ??.
Other Changes
- Watch list indicators can now be shown on the group roster view.

- Start dates/days can now be specified in Success Plan steps to prevent students from completing a step too early.
- It's no longer possible to delete certain records if they are already linked to data. For example, a center cannot be deleted if it contains visits, a group cannot be deleted if it contains staff, etc. This applies to Centers, Staff, Reasons, Groups, Courses, Sections, Students, Surveys, Referrals, Success Plans, Work Plans, and Resources.
- When adding notes from the appointment group roster screen, it's now possible to only add notes to selected appointments' visits.
2023-11-30 | TracCloud features and changes from November 2023
Improved max appointment rules, modify visit consultants/wait statuses from kiosks, sorting options on the log listing, and more in TracCloud for the month of November 2023. Our full changelog can be found here.
Kiosk Pass Phrase
You can now allow your staff to update the wait status or consultant of a visit from the kiosk. This passphrase can be set in your Log In/out preferences and you will be prompted to enter it upon clicking the consultant or wait status field on the kiosk.

Improved Max Appointment Rule Search Clauses
Search clauses in Max Appt Rules can now use # (not) and | (or) to allow for more flexible searches. The example search clause below would apply to all centers except "Library" and only for the reasons "Independent Study" and "Other."

Other Changes
- You can now sort the log listing by time, name, or subject.

- Visits can now be linked to inactive sections by checking the "Show Inactive" box.

- The Work Plans report is now available.
- Referral submission/deletion options are now always visible on the referral creation screen, rather than only being available at the bottom of the page.
- Asynchronous appointments can now be canceled by students or staff.
- You can now search by appointment status in Students Visits/Appointments by ??
Happy holidays from Redrock Software!
2023-10-31 | TracCloud features and changes from October 2023
Work plan tracking for staff, center-specific search availability widgets, new reporting options and more in TracCloud for the month of October 2023. Our full changelog can be found here.
Work Plans
Work Plans are a brand new feature that allow you to track progress in custom plans for consultants. If you're already familiar with the Success Plans module for students, you won't have any trouble creating Work Plans for consultants as they operate very similarly. Create steps for consultants to complete, send custom emails, and chain sub plans. More information on setting up Work Plans can be found in its own dedicated article here.

Reports
There are two brand new reports available. The first is Student Fields, which allows you to export a list of students with an arbitrary selection of fields to include. This offers a faster way to export students and fields compared to creating custom views and exporting the listing. More information on this report can be found in its own article here.

The second new report is Faculty Student Visits. This report is designed for (and only accessible to) faculty accounts, based on the existing Visits by Faculty and Subject report. This report will automatically filter the results to only visits for sections they're linked to.

A few other additions can be found in other reports as well.
- Reason Category has been added to Additional Search in most visit/appointment reports.
- Student Other ID has been added to Additional Search in most student reports.
- The Optional: In-Person vs Online Appointments report now has an option to include Asynchronous Appointments in the results.
- Total referrals and students can now be seen in the SAGE Referral Snapshot report.
- Appointments can now be grouped by who scheduled the appointment in Students Visits/Appointments by ??.
Other Changes
- Search availability widgets can now be linked to individual centers rather than only profiles. More information on managing your search availability widgets can be found here.
- Profile badges are now available to better identify centers in availability searches. This text can be added by going to Other > Other Options > Profiles > [Your Profile] > General > Profile Name / Badge on Scheduler. An example of this can be found in our Profiles article.

- The Appointments Listing now shows an indicator displaying whether or not the registration that the appointment was booked for is active. This can be useful to catch potential issues in advance, as if a student attempts to login for their appointment but their registration is inactive, they won't have any available courses to choose.

- The student timeline can be more specifically filtered beyond just "Extra Detail." You can now show or hide "Emails" and "Appointment Searches" independently.

- Watch List indicators configured to "Display on Appointment" will now also appear on the search availability widget and availability results page as a staff member.

- Max appointment rules can be created to apply to appointments in the same profile.
- Asynchronous appointments can now be marked as missed/no-show.
- When modifying the modality of an existing appointment, a warning message will now appear to confirm the change. That warning message can also contain a custom message configured in Other Schedule Options.
- You can now search for attendance records that conflict with the student's section schedule times (if section schedule is being imported). Go to Attendance > Attendance Listing > Search for "Visits.CustomData/isLoggedDuringClass=1". This functionality requires some additional configuration on Redrock's side. If you would like to utilize this, reach out to us at [email protected]
- The start/conclude visit buttons found in group rosters can now be disabled if this functionality isn't needed. Other > Other Options > Preferences > System Preferences > General Appointment Settings > Hide student login from class roster list.
- "Staff Members" added to "Name for Consultants" preference in Profile > General options.
- Student Username added to Batch Visit/Batch Scan fields.
2023-10-02 | TracCloud features and changes from September 2023
New features for Batch Visits, Success Plans, and more in TracCloud for the month of September 2023. Our full changelog can be found here.
Batch Visits
Custom fields have now been added to batch visits, along with an option to hide each custom field on batch visits if needed. Batch codes specifically have also gained a couple new options, there's now a notes field so you can automatically add notes to visits records via batch codes. Additionally, a new "Handle Overlap Visits" option has been added for the batch code. This allows TracCloud to modify existing visits if they conflict with visits recorded with the batch code. Details on that can be found in our batch visits article here.
A new profile preference has also been added to control how early batch visit and drop-in ad-hoc QR codes can be used. Other > Other Options > Profiles > [Your Profile] > Prefs > Scheduling > Time Restrictions > QR Codes active no sooner than. By default (blank), QR codes can be scanned to create visits at any point up to the expiration time.

Success Plans
Success plan visit steps can now be linked to multiple centers, allowing the student to visit any one of the listed centers to complete the step. Visit steps can now also be created to require a specific number of visits or hours, rather than one visit per step.

SAGE
"Potential Actions" have been added to SAGE. These actions can be created in your referral type and added to student referrals as needed. This allows you to record when certain events occurred, along with notes. Each action can prompt additional emails, and can be added to SAGE referral reports as well.


Two new twig tags have also been added for SAGE. The first tag below will mark a referral as processed/completed, and the second will add processed notes.
{% if "No recommendations at this time" in Recommendations %}
{{ setResultActions('SetProcessed', '1') }}
{{ setResultActions('SetProcessedNotes', 'Automatically completed!') }}
{% endif %}
Other Changes
- Support for multiple assigned advisors has been added, meaning a student can be assigned to both Dave Smith and Jane Doe and schedule appointments with them both, rather than being limited only a single assigned advisor. Utilizing this functionality may require changes to your import process, reach out to us using the "Support" options at the top of this page if this is something you want to setup.
- Watch List indicator locations have slightly changed. Previously, "Display on Log In/Out" applied to both the kiosk and log listing views. These locations have now been separated. "Log In/Out" now only applies to the log listing, and a new "Display on KIOSK login/out" location has been added. Click the hyperlink above to learn more about this.

- Students can now be given a utility to view their previously accepted terms and conditions. This can be enabled in Other > Other Options > Preferences > System Preferences > General Appointment Settings > Check 'Allow students to view accepted Terms and Conditions on dashboard' > Save.
- A new special search has been added to the students listing to find students who have searched for availabilities and found no results. The counter resets each time the student books an appointment, similar to the existing "SearchAvailsCounter" search. Both of these options can be quickly accessed by right-clicking the search bar and selecting them towards the bottom of the field list.

- The Center Schedule report has a new option to show appointment statuses in results.
- It's possible to search by full name on more listings. You can now search for a student's full name as "Last, First" on the Attendance Listing, a student's full name as "First M. Last" on the Student Listing (or just 'First Last" if you aren't importing middle name), and a staff member's full name as "First Last" on the Staff Listing.
- Max Appointment Rules can now be created to limit appointments of the same "Section" in addition to "Same Subject."
- A new option has been added to centers that allows you to hide individual centers during work visit login/logout.
- It's now possible to collapse the student list columns in Q2. This can be especially useful on phones to quickly access the list of students you're currently helping.


2023-08-31 | TracCloud features and changes from August 2023
There are some big changes to asynchronous availabilities and plenty of other noteworthy additions in TracCloud for the month of August 2023. Our full changelog can be found here.
- 2023-08-01: Subject/Course/Section search added to Appointments/Visits Utilization report
- For more information on this report, click here.
- For more information on this report, click here.
- 2023-08-02: It's now possible to apply center searches to appointments in the Students Visits Cleanup Data report
- 2023-08-03: "Navigators" phrasing added to "Name for Consultants" preference
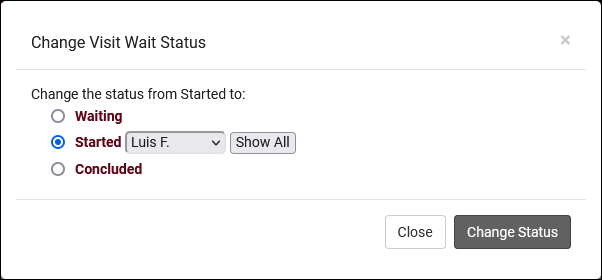
- 2023-08-07: It's now possible to override the linked advisor filter when changing a student's wait status
- This is only available to staff members on the log listing. Clicking "Show All" will display all advisors/consultants assigned to your center, instead of only the student's assigned advisor.

- 2023-08-11: It's now possible to hide inactive students/registrations when creating SI Batch Visits
- This checkbox will appear directly underneath the "Notes" field.


- 2023-08-11: Set a default value for availability max students
- Previously (and still if you haven't modified this preference), availabilities will default to 1-on-1 during creation. It's now possible to change this default by going to Other > Other Options > Profiles > [Your Profile] > Prefs > Scheduling > Other Schedule Options > Default value for availability max students. 0 = drop-in, 1 = one-on-one, 2+ = group, just like in the availabilities themselves.
- Previously (and still if you haven't modified this preference), availabilities will default to 1-on-1 during creation. It's now possible to change this default by going to Other > Other Options > Profiles > [Your Profile] > Prefs > Scheduling > Other Schedule Options > Default value for availability max students. 0 = drop-in, 1 = one-on-one, 2+ = group, just like in the availabilities themselves.
- 2023-08-11: The additional custom tabs in student profiles can now be independently hidden for each permission group

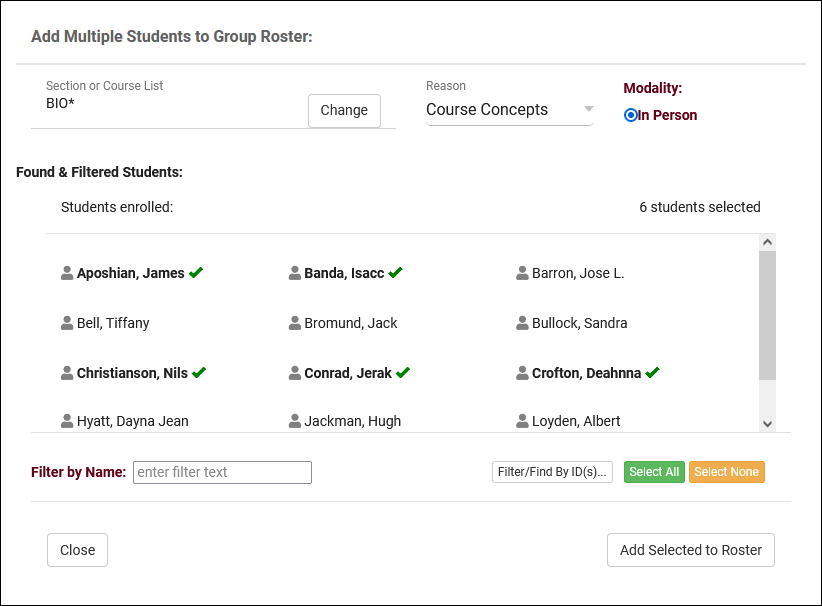
- 2023-08-15: Group rosters now have an "Add Multiple" utility to book appointments as a batch.
- The new "Add Multiple" button is right next to the existing "Add Student" button in Group Rosters. More information on group availabilities and appointments in general can be found here.

- 2023-08-16: The "Student Instructions Email" in Q2 Tables now supports twig tags
- 2023-08-17: Default profile emails
- If you haven't yet setup your TracCloud profile emails, you can now quickly load a basic default template to use by clicking the clipboard icon next to the email body. You can then modify this template further to match your needs, rather than starting from scratch.


- 2023-08-25: Manually choose example records in email previews in profiles
- If you've modified your profile emails, you'll be familiar with the "Preview" button which retrieves the most recent record in the system and shows it as an example. It's now possible to choose a different appointment/visit record to use as an example by clicking the "Sequence #" button and entering the sequence number. More information on profile emails in general can be found here.


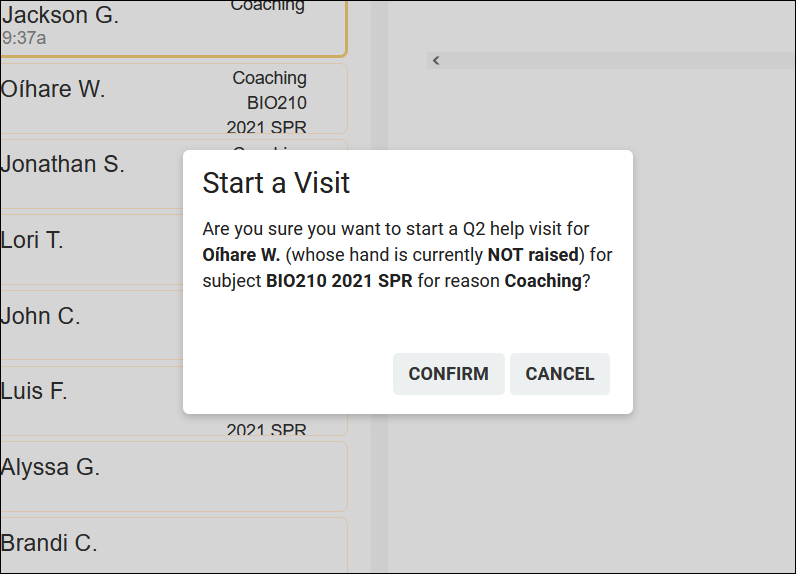
- 2023-08-25: There's a new option in Q2 to add a "Confirm" step when beginning a table visit with a student
- To enable this feature, go to Other > Q2 Tables: Configurations > [Your Q2 Config] > Check "Confirm Start Help on Initial Click" > Save.

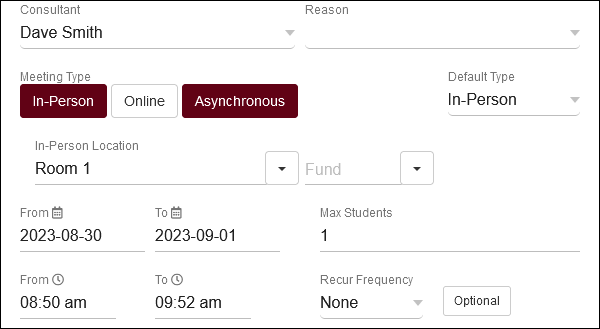
- 2023-08-28: Asynchronous availabilities can now be created as one-on-one time slots, and can be optional to give students the choice between In-Person/Online/Asynchronous.
- To enable asynchronous functionality, go to Other > Other Options > Profiles > [Your Profile] > Prefs > Scheduling > Other Schedule Options > Check "Allow Availabilities to be Asynchronous" > Save. More information on asynchronous availabilities can be found here.

- 2023-08-30: It's now possible to distinguish between all appointments or with same consultant in consecutive appointment rules
- This option can be found in Other > Other Options > Profiles > [Your Profile] > Prefs > Scheduling > Time Restrictions > Consecutive also means with same consultant. If you used this feature previously, the default value for this field would be checked/enabled. Unchecking it means that students won't be able to book consecutive appointments at all, regardless of consultant.


- 2023-08-30: Edit your visit auto termination emails
- The default auto termination emails can now be customized by going to Other > Other Options > Profiles > [Your Profile] > Prefs > Log Listing Message[...] > Auto Terminate Visits Longer Than. You will find two emails, one for visits that are modified by the auto termination process (changing the duration) and another for deletions (if "Delete visits waiting" is checked).
- The default auto termination emails can now be customized by going to Other > Other Options > Profiles > [Your Profile] > Prefs > Log Listing Message[...] > Auto Terminate Visits Longer Than. You will find two emails, one for visits that are modified by the auto termination process (changing the duration) and another for deletions (if "Delete visits waiting" is checked).
- 2023-08-31: Override individual availabilities directly
- An appointment override is when there's a break in a repeating availability. For example, if you had an availability running from Monday to Friday, and you moved Wednesday forward an hour, that would make the Wednesday slot an overridden availability. It's now possible to immediately override an availability by hovering over it and clicking the icon. This will allow you to edit that availability without affecting the rest of the series. This cannot be undone.


- 2023-08-31: Assigned Success Plans listing
- Similar to the SAGE referrals listing, registrations listing, etc, it's now possible to view a listing of all assigned Success plans. This can be enabled by going to Other > Other Options > Groups > [The group you want to modify] > Admin / Modules > Add "Assigned Success Plans" to Table Access > Save.
2023-07-31 | TracCloud features and changes from July 2023
Here are some of the noteworthy additions and changes in TracCloud for the month of July 2023. Our full changelog can be found here.
- 2023-07-28: Automatically timeout login sessions after X minutes
- With new options available in Other > Other Options > Preferences > Login & Security Settings, you can now automatically log users out if they're inactive for too long. Different lengths of time can be specified for each user type, and a warning message can appear a few minutes before they're logged out giving them the chance to stay logged in.


- 2023-07-27: New Twig tag to CC additional email addresses

- 2023-07-27: The Utilization widget now has an option to show visits from "Last Month."

- 2023-07-22: In SurveyTrac, the reason/subject fields now have search boxes to make selecting options much easier

- 2023-07-21: Batch send surveys to staff
- Previously, surveys set to the Initiated Via type of "Do not auto send" with questions directed to Tutor/Advisor could be individually sent to staff members in the "Actions" tab of their profile. Now, it's also possible to batch send these surveys to multiple staff at once from the staff listing, similar to how this survey type works when directed to students. More information on SurveyTrac can be found here.
- Previously, surveys set to the Initiated Via type of "Do not auto send" with questions directed to Tutor/Advisor could be individually sent to staff members in the "Actions" tab of their profile. Now, it's also possible to batch send these surveys to multiple staff at once from the staff listing, similar to how this survey type works when directed to students. More information on SurveyTrac can be found here.
- 2023-07-20: Custom text can now be entered above the notes field during work visit logout
- This text can be modified by going to Other > Other Options > Preferences > System Preferences > Consultant CourseLists, TimeCheck, Aliases > Prompt for enter work visit notes on conclusion. Notes must be enabled for this text to appear.


- 2023-07-11: New SurveyTrac question format, Range Slider

- 2023-07-10: Start or stop one-on-one visits for appointments from the staff schedule
- This can be enabled by adding the {{Appointment.SchedVisitStatusIcon|raw}} Twig tag in Other > Other Options > Profiles > [Your Profile] > Prefs > Scheduling > Appointment Display > Appointment Display to Staff on Schedule. This will appear as an icon on appointments that when clicked, will begin the visit, then conclude the visit when clicked again. Similar to the visit start/stop option found in group rosters, just for one-on-one appointments instead.


- 2023-07-07: It's now possible to preview system colors before saving in System Preferences

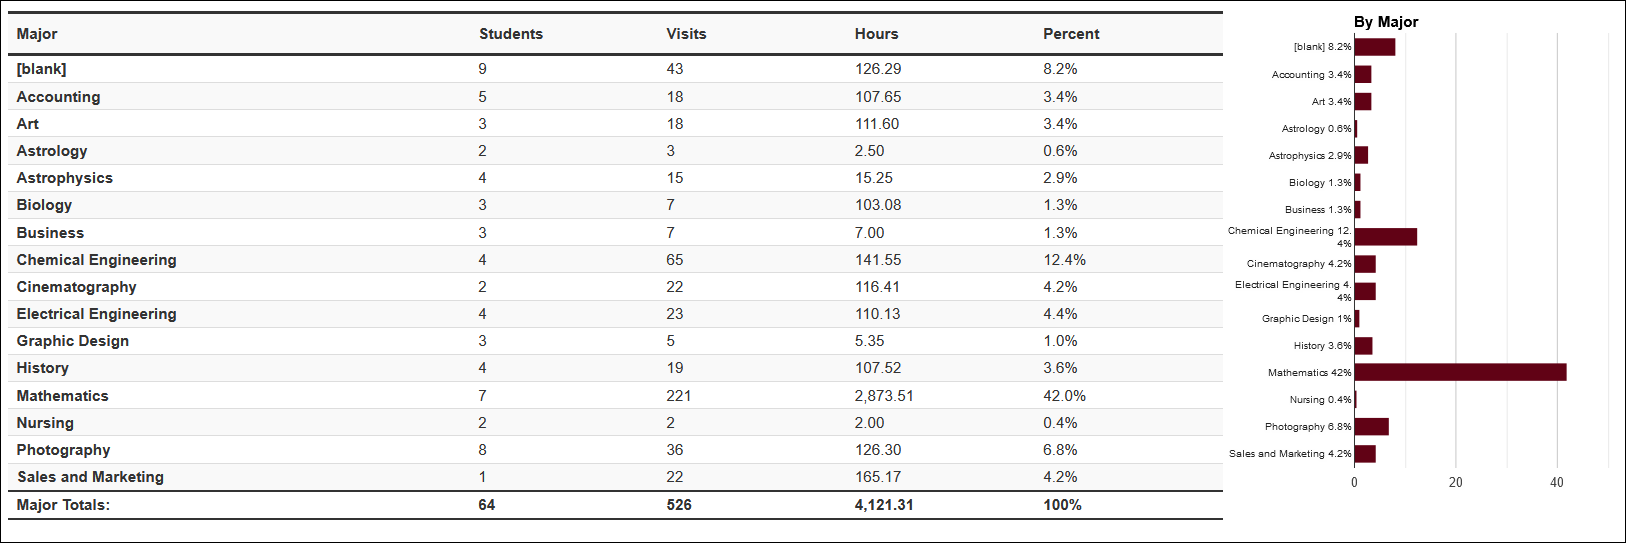
- 2023-07-05: New chart options in the Usage Snapshot report
- Aside from the default pie chart format, you can now also display your data in a bar or line chart format.

2023-07-03 | TracCloud features and changes from June 2023
Here are some of the noteworthy additions and changes in TracCloud for the month of June 2023. Our full changelog can be found here.
- 2023-06-30: "Time Out" has been added to the utilization widget

- 2023-06-28: Students with a raised hand now display more prominently in Q2

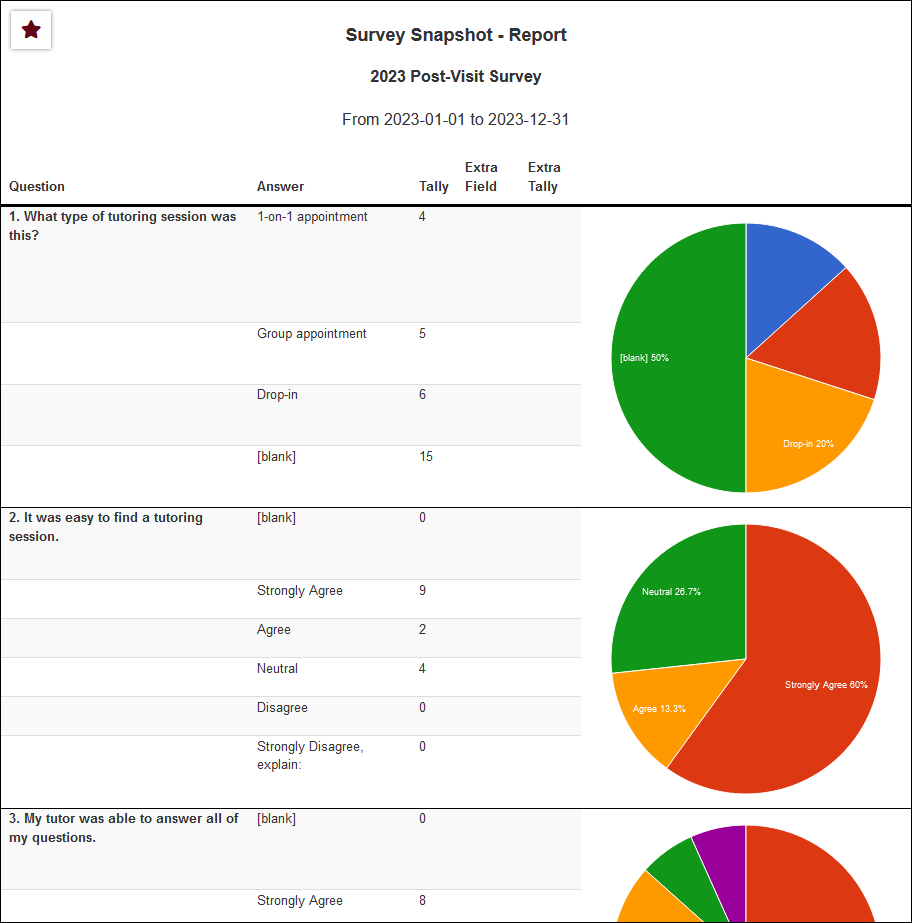
- 2023-06-27: The Survey Snapshot report can now include pie/bar charts
- These can be enabled when choosing your report settings.

- 2023-06-26: A twig tag list is now available in Welcome Messages and SurveyTrac emails
- The SurveyTrac tag list can be found in the top-right corner of the navigation bar when configuring your surveys.


- 2023-06-22: Q2 now has an option to play a sound when a student raises their hand
- This option can be found in Other > Q2 Tables > [Your Q2 Configuration].


- 2023-06-20: New SurveyTrac initiated via option, Email after # of visits
- Rather than sending a survey after the first visit or all visits, this option allows you to send the survey after an arbitrary number of visits.


- 2023-06-14: New options to hide notes from faculty specifically in SAGE
- These options can be enabled by going to Other > SAGE Referral Types > [Your Referral] > Check the applicable boxes from the screenshot below.


- 2023-06-14: Static QR codes for custom kiosks
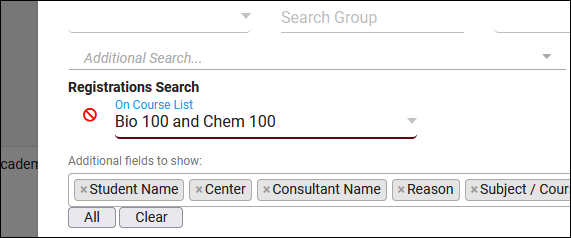
- 2023-06-07: Use Course Lists for additional searches in reports
- This option can be found in almost every report where you can perform a search based on registrations. Note that course lists only contain active sections, this should not be used when running reports on past semesters.

- 2023-06-07: The Success Plans report can now include visit details
- In the report settings, you'll find a new "Show Visit Details" checkbox to include this information in the report results.
- In the report settings, you'll find a new "Show Visit Details" checkbox to include this information in the report results.
- 2023-06-02: New SurveyTrac initiated via option, Email after 1st visit per consultant

This section of your profile preferences contains additional options relating to the Log Listing, KIOSKs, and more. Go to Other ➜ Other Options ➜ Profiles ➜ [Your profile] ➜ Prefs ➜ Log Listing Message, KIOSKS Notices, and Custom KIOSKs.

Messages
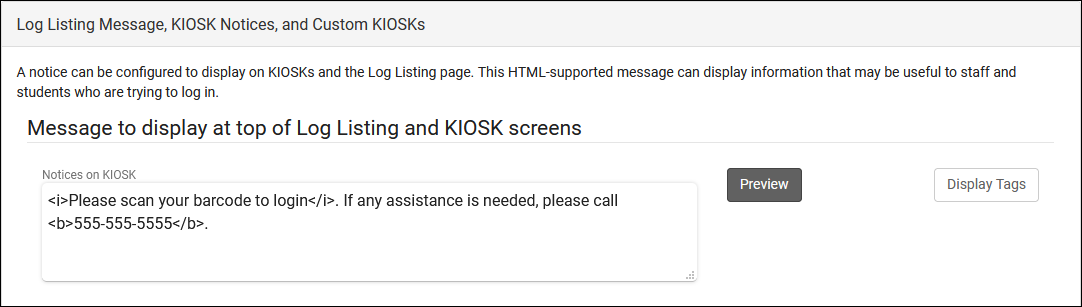
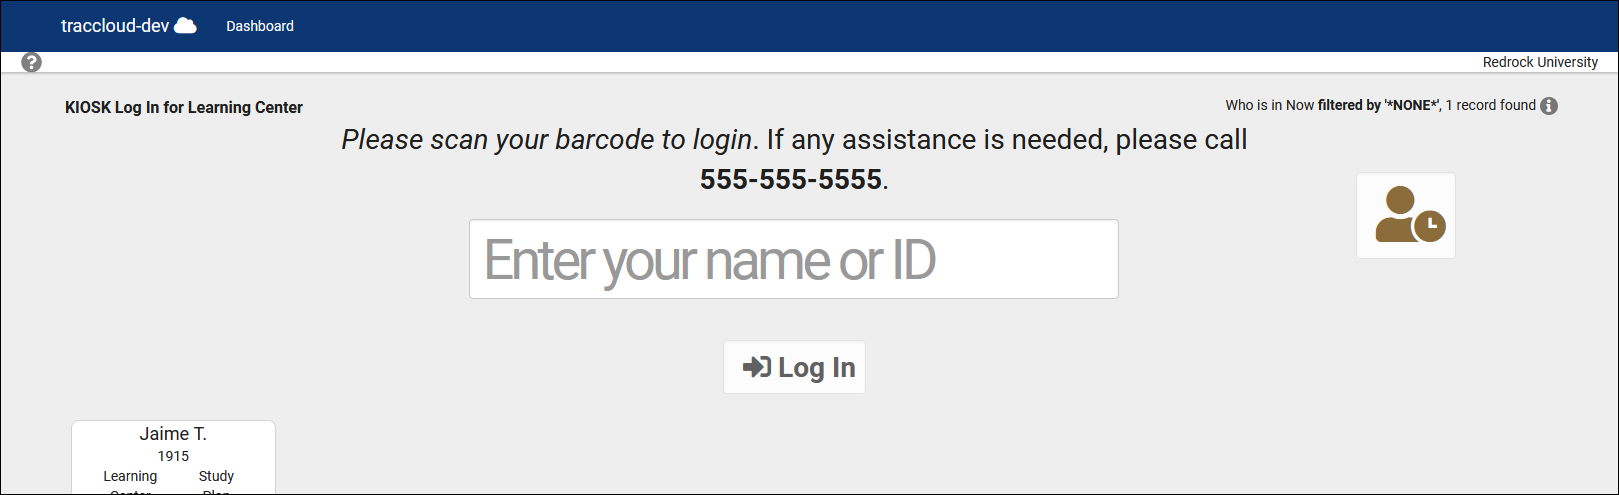
- Notices on KIOSK
- This message will display on kiosks/log listings above the QR code/ID box. This field supports Twig (center tags only) and HTML. If your center has a limit on the number of students that can be logged in at a time, there are two unique Twig tags that may be of use in this field. {{Center.Settings.MaxStudentsActive}} is the center's visit limit and {{Center.NumStudentsActive}} is the number of students who are currently in the center.


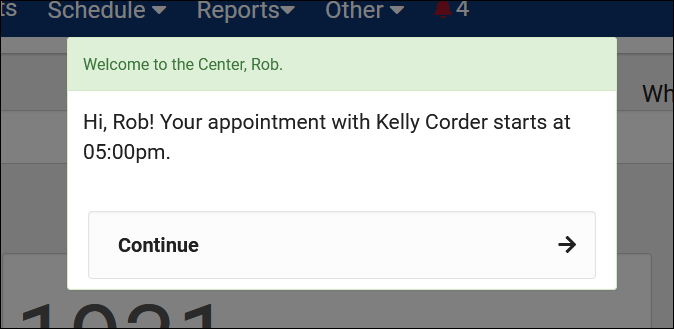
- Message to Display as student logs a visit into/out of a center
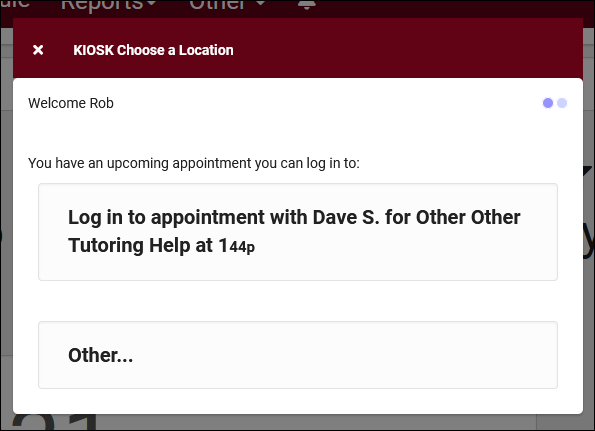
- These are custom, Twig and HTML-supported messages that can be displayed during the login and logout process on the kiosk/log listing. This allows you to display information to the student such as details of their upcoming appointment or contact info for the consultant.


Auto Terminate
- Terminate all still logged in
- This feature can be used to automatically conclude ongoing visits, so that if a student is not logged out, their visits don't continue indefinitely. If enabled, any ongoing visits by Time for Nightly Termination will be concluded and set to the duration set below.
- Auto set these visits time to (minutes)
- If an ongoing visit is terminated, this is the duration it will be set to in minutes. If this is set to 0 minutes, a terminated visit will be deleted instead.
- Open visit terminations applies to Work Visits
- If checked, the above logic also applies to consultant work visits as well.
- Auto terminate visits longer than (minutes)
- This is an additional process that can also correct visits that are too long, even if they were concluded. If this is a feature you wish to use, the the value should be set to your maximum possible visit duration to prevent accurate visits from being automatically modified. Leave this and the option below blank to disable this component of auto termination.
- Auto set visits time to (minutes)
- This is the duration visits will be changed to in the above scenario. If this is set to 0 minutes, a terminated visit will be deleted instead.
- Time for Nightly Termination
- This is the specific time the auto termination process runs each day. This should be set to a later time in the day, such as 11pm, to prevent actual in-progress visits from being logged out in the middle of a session.
- Send Email Notification to Student/Center Admin
- Toggling these options will send an email to the student or center admin letting them know that the student wasn’t logged out. If Center Admin is chosen, additional email addresses can be CC'd in the box below. "Center Admin" refers to the email address entered in [Your profile] ➜ Prefs ➜ Emails ➜ Profile Email Address.
- Delete visits waiting (not started)
- If a waiting visit hasn't begun by the auto termination time, you can choose if it's terminated normally (unchecked) or deleted (checked).
- Terminations apply to Work Visits
- If you would like to also terminate work visits using the duration-limit approach, you can check this box and define a different threshold and adjusted time.
- Termination deletion/modification email
- These allow you to override the default email that sends to students when their visit is terminated. You can modify the deletion and the modification email independently of each other. Leaving these blank is safe, TracCloud will use a default template in that case.
Other Log In/Out Preferences
- KIOSK Enter ID label and Batch KIOSK Enter ID label (IDs only)
- Changes the text shown in the kiosk/log listing and Batch Visit QR Code "Enter ID" boxes. This is typically changed to align with school branding (e.g., "Redrock ID") or to give more detailed instructions.

- Log out of this profile when student logs in to another profile
- If enabled, when a student logs into Center 1, then logs into Center 2, their visit in Center 1 will be automatically concluded.
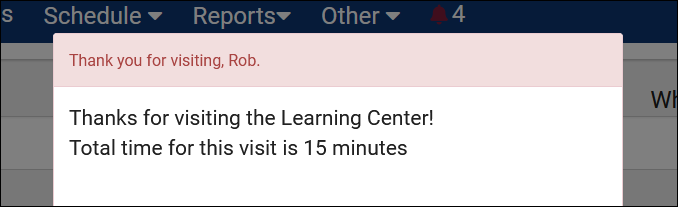
- Show total visit minutes when logging out
- This will show the visit duration in the relevant center during logout.


- Show Other Choice when logging in to single center even with appointment
- If enabled, students will be allowed to log into the center for a purpose other than their appointment (e.g., a quick drop-in visit), even if the login is close to the appointment time. Otherwise, TracCloud will assume they are logging in for their appointment and will not allow the student to login for another purpose. The window of time where this applies is based on the Within x minutes options in your missed appointment email settings.

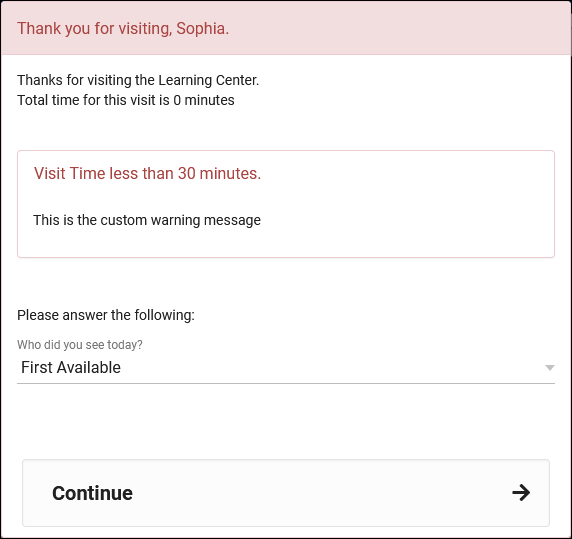
- Warn user if visit time is less than (minutes)
- If a duration is entered and a visit under that limit is being concluded by a staff member, they will be shown the warning message from Warning message to display. This message also supports Twig for displaying student data. To give the staff member the ability to cancel the logout as this stage (keeping the student logged in), Allow user to cancel logout should be checked.

- Obscure student ID (***) on login
- If enabled, IDs entered on the log listing will be hidden while typing (showing • characters, like a password field).
- Auto lock visits older than (days)
- This preference allows you to prevent visit records from being modified after a specified period of time. This restriction applies to all users except SysAdmins.
Custom Kiosks
Custom kiosks can be configured for specific visit scenarios. For example, if you need to track attendance for a specific center and reason combination, you can use a custom kiosk to ensure students are logging in with those fields preselected. You can also predetermine the location, consultant, section, meeting type (Online/In-Person), and even IP address zone.
These custom kiosks can be accessed from the same menu as your standard center kiosks. They will appear in the bottom half of the list, with a preceding icon. The only visual difference within the kiosk is that any fields preselected in the custom kiosk settings won't show up as an option to select during login since they've already been chosen. In addition to the expected kiosk functionality, custom kiosks also allow you to create static QR codes that can be reused with a rotating confirmation code.


- Allow Only Custom KIOSKs for Logging
- This disables the regular center kiosks that you would see by default, only allowing you to open custom kiosks.
- Static QR Codes expire
- If you're utilizing static QR codes, you can choose how frequently the codes expires. Daily or weekly.
- Previous Codes Overlap Time
- This adds a buffer allowing expired QR codes to be used for this amount of time after a new code is generated.
- Round Signin to Nearest
- This will automatically round logins to the nearest 15, 30, or 60 minutes. The purpose of this is to emulate batch visits, where the time would be static.
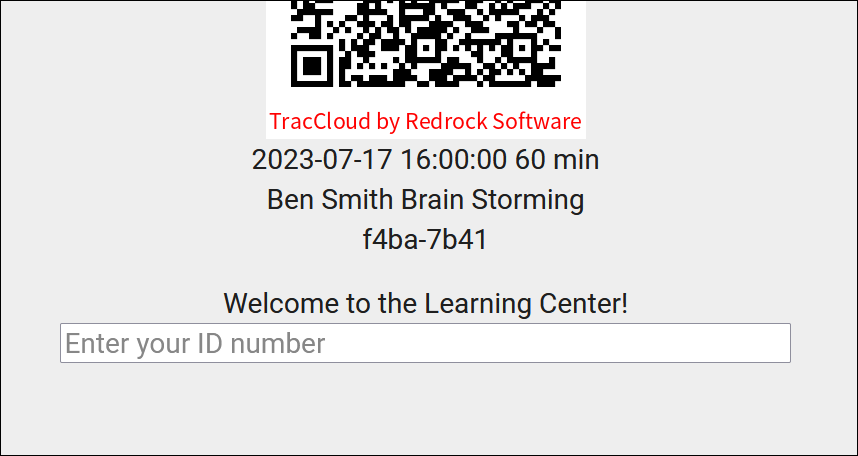
Within each custom kiosk, you will find the Static QR Code button. Clicking this opens the following form.

- Activate Static QR Code
- Enable or disable this QR code.
- Confirmation Code
- This is the current confirmation code for this QR code. Students will need to enter this value after scanning. This value will expire based on your above preferences. If you're creating a QR code for the first time, this code (and expiration date) will need to be set manually. Going forward, it will be updated daily or weekly automatically. If a consultant is linked to the custom kiosk, they will automatically receive new confirmation codes in an email.
- Expiration Date
- The expiration date of the corresponding code. This code will not be automatically updated until this date is reached (or if the code will expire within the next date period), a manual expiration date can be set further into the future than 1 day/week if needed.
- After a student scans the QR code, they will be prompted to enter the confirmation code followed by their ID. The login process is the same as a normal kiosk from this point onward.

Time Check
- Time check Available
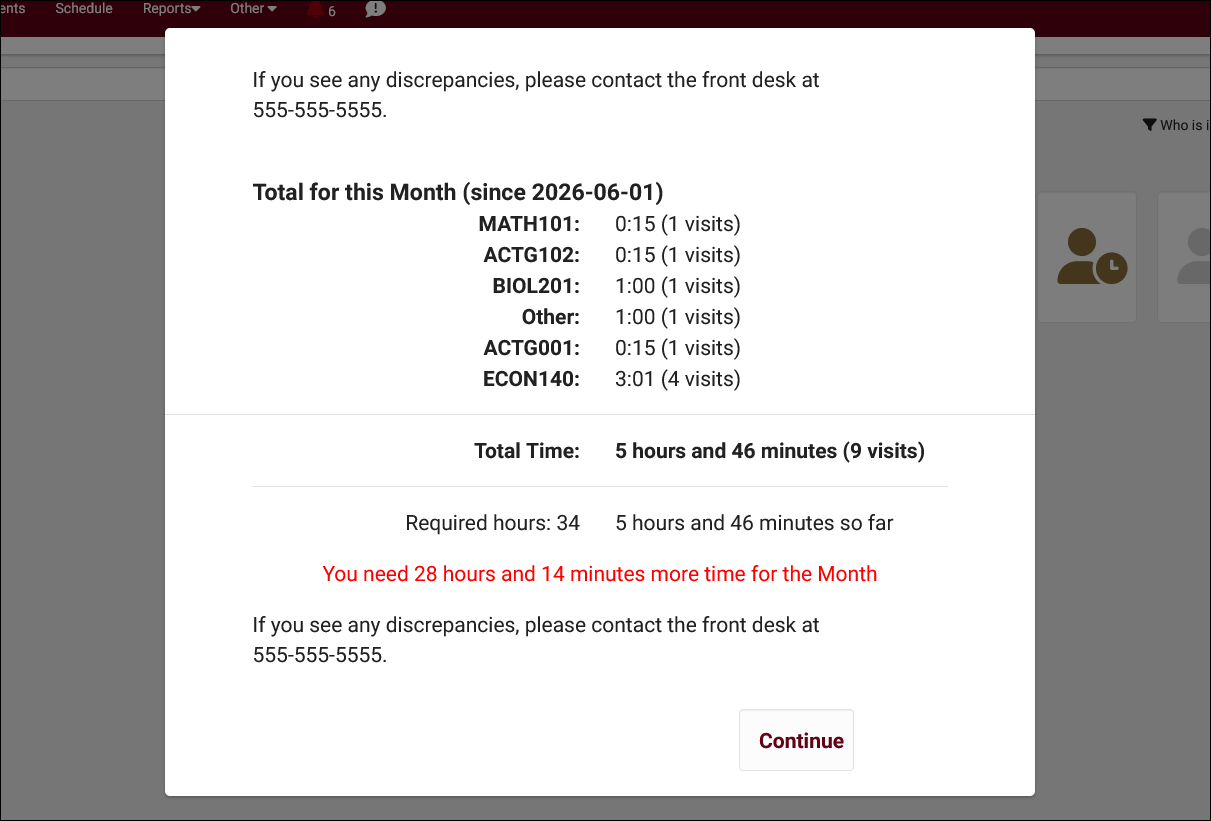
- Time Check will allow students (and staff on behalf of students) to view how many visit hours they have accumulated within a given time frame. This feature is typically utilized in athletic centers, where students may have a number of required hours per week or semester. If checked, this will enable the Time Check option for this profile. This adds the Time Check button to the kiosk and log listing pages, which staff or students can utilize.

- Show Semester totals
- This will display the student's total time based on the current term's date range.
- Show Week Totals
- This will display the student's total time based on a week date range. If checked, an additional drop-down menu will appear to the right titled Week Starts On. This option will allow you to adjust the day of week that the utility will calculate the hours for (e.g., Sunday will count visits from Sun-Sat).
- Show Required Time Per
- There are three options available.
- None – Will not display required hours or difference
- Weekly – Will show required hours and difference based on a one-week time frame.
- Semester - Will show required hours and difference based on the active term's date range.
- Required Time Field
- To display and use required hours, you will need to set the custom field from student records that contains that value. Required hours can be entered manually or imported.
- Required Time in
- Select the format of your required hours field, hours or minutes.
- Show On Login, LogOut, and Student Dashboard
- These checkboxes determine where the Time Check utility will appear for students.
- Compute totals for all profiles
- By default, Time Check will only compute the total time in centers related to this profile. If this option is checked, that search will be expanded to all profiles' centers.
- Timecheck Message Footer
- This message is shown at the top and bottom of the Time Check window. This field supports Twig.
Additional Features
The SurveyTrac module within TracCloud provides a versatile system for creating, distributing, and managing surveys directed at students, staff, or faculty. Surveys can be automatically triggered by various criteria, such as after a visit, a specified number of visits, new student record creation, or through manual initiation. Surveys can also be linked to particular reasons, subjects, or centers, allowing for highly customized feedback collection. The module supports anonymous surveys, allows survey link expiration, and offers options to automatically resend unanswered surveys to ensure higher response rates.
SurveyTrac features extensive reporting capabilities that include Survey Snapshots, Survey Responses, and Response Rate Comparison. These reports can be exported in various formats (HTML or CSV) and are customizable with additional fields, filtering options, and automated delivery settings. SurveyTrac also supports email and SMS notifications, providing a streamlined approach to survey management and feedback collection. The system's flexibility makes it ideal for various use cases, from general feedback collection to targeted academic progress assessments. Surveys and other tools in TracCloud can be used to increase student retention.

SurveyTrac Configuration
To create a new survey, head over to your SurveyTrac menu (within the “Other” menu in your Navigation Bar), click the hamburger icon, then select “New Survey.” This will bring you to a survey entry form where you can start configuring basic options relating to your survey. Additional options will become available after saving.


- Created By
- The staff member who created this survey.
- Profile
- The profile that this survey is assigned to.
- Active
- Enables or disables this survey.
- Survey Name
- The name of the survey. This will also appear within emails sent to students and staff.
- Survey Period From & To
- The active period of the survey. Used for Initiated Via options that specify "during survey period," such as "Email after 1st visit during survey period."
- Initiated Via
- This setting determines the send criteria for this survey, with the following options available.
- Display during visit entry: This displays within the “Surveys” tab of a visit record, allowing you to fill out and submit the survey from the visit record itself. This survey type only appears when questions are directed to staff.
- Email after visit: This will be sent to the student/staff after a visit takes place. Specifically after Kiosk logout, Log Listing logout, Quick & Batch Visit creation, and appointments being marked as attended (if a visit doesn't already exist).
- Email after 1st visit during survey period: Same as above, but only after the student’s first visit during the survey period specified. Subsequent visits will not initiate this survey.
- Email after # of visits during survey period: Similar to above, but you can choose when the survey sends based on the number of visits. E.g., send a student a survey after their 3rd visit in the center.
- Email after 1st visit per subject during survey period: Same as "1st visit during survey period," but on a per-subject basis. E.g., the student will receive a survey for their first (and only first) visit for MAT100, then another survey for their first visit for CHEM100, and so on.
- Email after 1st visit per consultant during survey period: Same as above, but on a per-consultant basis. E.g., the student will receive a survey for their first (and only first) visit with Dave Smith, then another survey for their first visit for Jane Doe, and so on.
- Email after new student record: This is emailed to the student immediately after their account is created. This only applies when manually creating student accounts, imported students will not receive this survey.
- Email after 1st booked appointment during survey period: This survey is emailed to the student immediately after they book their first appointment in the date range specified.
- Show at entry: This displays during the login process on a Kiosk or Log Listing. These responses will not appear in the visit record itself, as opposed to Display during visit entry.
- Show at entry before 1st visit during survey period: Same as above, but only after the student’s first visit during the survey period specified.
- Show at exit: This displays during the logout process on a Kiosk or Log Listing. Similar to Show at entry, these responses are not visible in visit records.
- Show at exit after 1st visit during survey period: Same as above, but only after the student’s first visit during the survey period specified
- Show at exit for first # of visits during survey period Similar to the above, but repeating for multiple visits. E.g., the first 3 visits in the survey period.
- Display as link on Main Menu: For each day that a user logs in, a new survey is created and will display as a link in the "Surveys/Documents" widget on their dashboard.
- Do not auto send: This survey can be manually sent on the Student/Staff/Faculty Listing as a batch, from individual Student/Staff/Faculty profiles under the "Actions" menu, during Batch Visit creation, from group rosters on the schedule, or from the SurveyTrac listing (including sending anonymous surveys to a list of email addresses).
- Static survey URL: This will provide a static URL and QR code that you can send to anyone. If your survey is not anonymous, users will be prompted to login when they visit the URL. If the survey is anonymous, users will not be prompted to login and anyone with the link can submit an answer.
- Link on edit student: Similar to Do not auto send, but more limited in where it appears as an option to send. This survey is only possible to send from the student listing as a batch or to individual student profiles manually, or from the SurveyTrac listing.
- Link on edit visit: This displays in a "Send Survey" prompt in each visit record under the "Surveys" tab. This allows you to initiate the visit survey email manually, as opposed to the non-email Display during visit entry option.
- Display on document posting: Similar to Link on edit student, except this "Survey" is under a new prompt in the actions menu labelled "Survey Document" and can only be sent to students individually.
- Display as Student Entry Form: Similar to Link on edit student, except this "survey" is under a new prompt in the actions menu labelled "Complete Survey Form" and can only be sent to students individually.
- Work Visits Only
- If checked, the survey will be sent to consultants after a work visit. This option only appears if the survey is directed to consultants/tutors and Initiated Via is set to Email after # of visits, Email after 1st visit, or Email after visit.
- 1-on-1 / Group and In-Person / Online / Phone / Asynchronous
- Choose the meeting type and modality criteria of the visits you wish to send this survey for.
- Do not send email, just show on dashboard
- This setting will only appear for surveys that are emailed to students. If this is checked, the email will not be sent, but it will still appear on the dashboard for students to access and fill out.
- Survey Link expires after # days
- Optionally have surveys expire if an answer has not been received within the specified number of days.
- Auto resend after # days & After initial auto resend, resend every # days (emailed surveys only)
- These options can be used to automatically resend unanswered surveys after a specific number of days. The first field determines when the survey will first be resent, and the second can be used to resend it again after every [number] days.
- Recipient Email Settings (emailed surveys only)
- Options relating to the emailed survey formatting. From email address and contact name, the subject line, and the body itself. Three unique Twig tags are available for use in this field:
- {{Survey.Link}} - This provides a hyperlink to the survey.
- {{Survey.URL}} - This provides a URL to the survey (if you want to write your own hyperlink with HTML).
- {{Survey.Name}} - This provides the name of the survey.
- Link to Centers
- Determines which centers this survey is assigned to.
- Instructions and Survey Head Text
- These messages will appear at the very top of the survey entry window. Head Text appears in bold at the top, typically a title for the survey. Instructions appears smaller just beneath Head Text, typically a description for the survey or basic instructions. Both fields support Twig to display information about the student, their visit, etc.
- Confirmation Message
- The confirmation message will display at the bottom of the survey after submitting responses.

- Allow modification
- This setting allows students/staff to re-open and edit their responses after the initial submission.
- Anonymous Survey
- Will not display student names in responses. Once an Anonymous Survey has responses, it is permanently anonymous.
- Questions directed to…
- These settings determine who this survey will be sent to. For example, if this is an “Email after visit” survey, you can control if the survey gets sent to the Student, the Consultant, the Faculty member, or even all three. For students, you can optionally choose to direct questions to a specific student list.
- Prevent responses from being submitted after survey period is over
- By default, surveys can still be answered after the survey period has ended as long as the survey was sent prior to the end date. This option changes that, preventing responses from being submitted after the survey end date has passed.
- Display unmet conditional questions as disabled / grayed-out
- Rather than hiding conditional questions when they aren't relevant, this option will display them as grayed-out/unavailable.

- Use Custom Display numbers for numbering the questions
- If checked, you will be able to use arbitrary text to 'number' your questions (e.g., A, B, C instead of 1, 2, 3).
- Do not display question numbers on the survey
- If checked, question numbers will be hidden on the recipient view.
- Do not record a blank response
- If a survey is shown during login or logout and there are no required questions, a student can continue their login/logout without answering any questions. In this case, a blank response will be recorded. Checking this box will not record a response in that scenario.
- Make this survey a quiz
- See Grade Groups and Assignments for more information.
- Send Rate
- Allows you to define a percentage chance of a survey being sent to a student. 100% will always send the survey when the 'Initiated Via' criteria is met.
- Notify results to emails
- Email addresses entered here will be notified when a survey has been completed. These emails will contain the questions and answers provided by the student/staff.
- Notify Results Email
- This is an additional email that can be sent as soon as a response is submitted, typically to a staff member to review responses as they're received. You can choose which email addresses receive the responses, the From address, as well as the subject line and body of the email. The recipient field supports Twig.
- Link Survey to Reasons/Subjects
- If you only want this survey to be sent out for visits/appointments of a specific reason or subject, you can list out the entries here. For example, “General Help,Exam Prep”. The icon can be used to search for and select specific options.
- Answers Position
- Position of answer fields, either below or to the right of the question, as seen below.

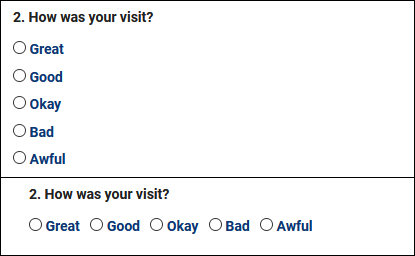
- Radio Button Style & Multi Checkbox Style
- Determines how Radio and Multi-Checkbox Choice style questions display. Tall vs Wide, as seen below.

The Questions tab is where we can configure the questions we’re asking within this survey. The Preview tab allows us to immediately take a look at our survey formatting to make sure everything is appearing as intended.

To begin creating a new question, go to the Hamburger menu ➜ New Question, or click the + icon on the right-hand side.

- Question #
- This determines the order that questions will appear in. 0/Blank will hide the question. This field supports Twig.
- Question Type
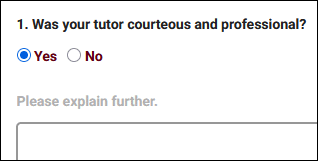
- There are various Question Types available for use, depending on the format of your question. You can use the Preview tab to review what your survey currently looks like, which is used in the screenshot below to show the different question types available.


- Required
- Determines whether or not the question requires an answer before being submitted.
- Question UID
- Unique identifier for each question, used for conditions (detailed further below).
- Size (Essay and Fill In only)
- This determines the size of the text field based on number of characters. For Fill In questions, this determines the width. Start with 25 and adjust from there. For Essay, this determines the height. Start with 3 and adjust as needed.
- Minimum, Maximum, Step, Default (Range Slider only)
- These options determine how the Range Slider will function in your survey.
- Minimum is the lower value on the left. Negative numbers are allowed.
- Maximum is the higher value on the right.
- Step is the increment that the slider can be moved, typically 1. For example, if this is set to "2", the slider can be moved to 2, 4, 6, and so on.
- Default is the default numeric position of the slider when the survey is first loaded.
- Question
- Write out your question here. There are also some optional text formatting tools available if you’d like to display the question in a specific way, including the ability to use standard HTML by selecting Tools ➜ Source Code.
- Choices
- Depending on the Question Type chosen, you may need to list out the available answers. If this box is available, include your answer choices on unique lines, as seen in the screenshot earlier in this article.
- Maximum # choices allowed (Multi-Check only)
- Set the maximum number of choices that can be checked at once in the response. For example, if this option is set to 3, the recipient could check 1, 2, or 3 boxes, but not 4 or more.
- Condition
- Set a condition so that this question only appears if a different question was answered in a particular way. Uses the UID of other questions. For example, if the condition was set to "ABC1:Great", this question would only appear if the answer to ABC1 was "Great." Multiple potential answers can be separated by a | character (ABC1:Great|Good) and you can set conditions for multiple fields on separate lines.
- It's also possible to set the condition to something like "ABC1:Great|Good|DEF2:Yes." A question with this condition would appear if ABC1 was Great or Good, or if DEF2 was answered "Yes."
This tab will display a list of all surveys sent to your users. You can click on the individual responses for review, or resend surveys from this tab by clicking the icon. Surveys can also be resent as a batch by clicking the icon and choosing the date range you wish to resend them for. Clicking the icon for a survey excludes it from being resent. will delete the response.

For information on purchasing the SurveyTrac Module, reach out to [email protected]
For SurveyTrac functionality questions, reach out to [email protected]
See Also:
Report: Survey Responses - Provides a summary of responses with totals for each of the possible responses for your questions.
Report: Survey Snapshot - Provides a list of the responses from each student, including additional information about the student or visit details.
Report: Survey Response Rate Comparison - Provides the number of surveys sent, responses received, and average response time.
Report: Unanswered Staff/Faculty Surveys - Provides the total number of surveys not answers by staff or faculty.