TracCloudGuideRegistrationsKeepActive: Difference between revisions
From Redrock Wiki
No edit summary |
No edit summary |
||
| Line 1: | Line 1: | ||
{{TracCloudGuideTabs}} | {{TracCloudGuideTabs}} | ||
{| style="width:100%; vertical-align:top; " | {| style="width:100%; vertical-align:top; " | ||
| style="width:250px; vertical-align:top; padding:2px 15px 2px 2px;" | {{ | | style="width:250px; vertical-align:top; padding:2px 15px 2px 2px;" | {{TracCloudGuideListingsTOC}} | ||
| style="vertical-align:top; padding:20px 20px 20px 2px;" | | | style="vertical-align:top; padding:20px 20px 20px 2px;" | | ||
{| style="width:100%; vertical-align:top; " | {| style="width:100%; vertical-align:top; " | ||
<big><b>Keeping Past Registrations Active</b></big><br> | <big><b>Keeping Past Registrations Active</b></big><br> | ||
A common question we receive is in regards to keeping registrations (and students) from prior semesters active. | A common question we receive is in regards to keeping registrations (and students) from prior semesters active. This may be due to incomplete registrations, grace periods between terms, or simply for testing purposes. There isn't a single answer for this, as there are different solutions depending on how your import is configured and what registrations you're trying to activate. This article will go into detail on some of the options available to accomplish this. If have additional questions, feel free to reach out to us on our helpdesk using the "Support" tab at the top of the screen. | ||
<hr> | <hr> | ||
==Understanding Import Activations== | ==Understanding Import Activations== | ||
Before making any changes | Before making any changes, it's important to understand how your system activates students and registrations. Keep these options in mind as you review the workarounds available to activate registrations outside of your current semester. | ||
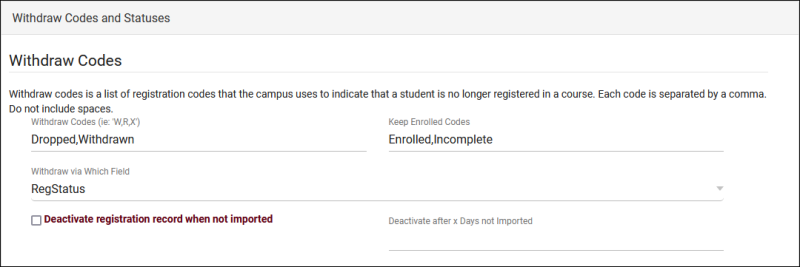
First, go to <i>Other > Other Options > Preferences > System Preferences > Withdraw Codes and Statuses</i> and review your configuration here. | First, go to <i>Other > Other Options > Preferences > System Preferences > Withdraw Codes and Statuses</i> and review your configuration here. | ||
| Line 18: | Line 17: | ||
{{#lst:TracCloudGuideGlobalSystem|ActivationSettings}} | {{#lst:TracCloudGuideGlobalSystem|ActivationSettings}} | ||
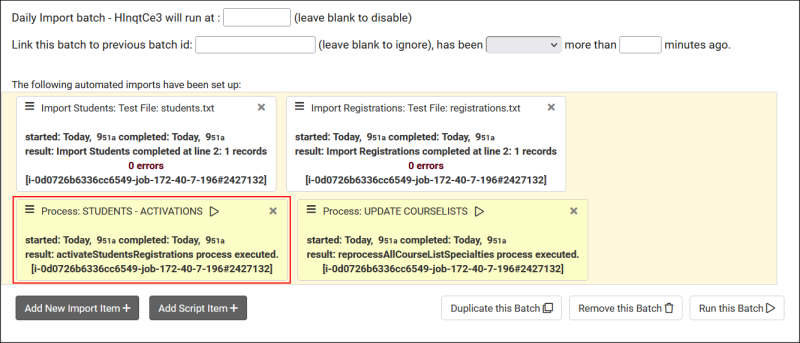
Next, go to <i>Other > Other Options > Preferences > Scheduled Daily Imports</i> and look for the "Process" boxes. You will likely see one of three activation processes. | Next, go to <i>Other > Other Options > Preferences > Scheduled Daily Imports</i> and look for the "Process" boxes. You will likely see one of three activation processes, other processes can be ignored. | ||
[[File:3273439.png|800px]]<br><br> | [[File:3273439.png|800px]]<br><br> | ||
| Line 29: | Line 28: | ||
* <b>Registrations - Date Activations</b> | * <b>Registrations - Date Activations</b> | ||
::This activation method will activate or deactivate registrations by the dates in the registration record itself. This is typically followed by a process to activate all students with active registrations. | ::This activation method will activate or deactivate registrations by the dates in the registration record itself. This is typically followed by a process to activate all students with active registrations.<br><br> | ||
After you've reviewed your current student/registration activation process, you can select which of the options below will work best for your campus. Keep in mind that regardless of which option is chosen, the [[TracCloudGuideGlobalTerms|term will still need to be activated]] in order for the registration to be available to select. | |||
<hr> | <hr> | ||
| Line 37: | Line 36: | ||
<br><br> | <br><br> | ||
Before activating registrations, you should consider whether or not students also need to be activated. An inactive student won't be able to login or book appointments | Before activating registrations, you should consider whether or not students also need to be activated. An inactive student won't be able to login or book appointments even if their registration is active. If you're activating additional registrations for students who are already active, this can be skipped. | ||
There are two ways to accomplish this, | There are two ways to accomplish this, which you use depends on why you're activating students and how your import is configured.<br><br> | ||
* <b>"Keep Active" List</b> | * <b>"Keep Active" List</b> | ||
:: | ::It's possible to keep students active by adding them to a list. [[TracCloudGuideGlobalLists|Details on creating those lists can be found here]]. To keep that list active, go to <i>Other > Other Options > Preferences > Terms > Activation / Deactivation Overrides</i>, then assign that list to "Set to ACTIVE." This will process the next time the import runs. This will work regardless of activation type. | ||
::[[File:1472155.png|700px]]<br><br> | |||
* <b>Add them to the import file</b> | * <b>Add them to the import file</b> | ||
:: | ::If possible, review with your IT which students need to be activated and how TracCloud currently processes activations. If your system uses <b>Students - Import Activations</b>, as long as your IT can add them to the student file, they will be activated. If your system only uses <b>Students - Activations</b> and they don't have a registration to import, a "Keep Active" list may need to be used instead. | ||
</div> | </div> | ||
<hr> | <hr> | ||
<div style="float: left; margin-top: 0em; margin-bottom: 1em"><big><b>Sections</b> | Non-enrolled | <div style="float: left; margin-top: 0em; margin-bottom: 1em"><big><b>Sections</b> | Non-enrolled sections, no registration required</big></div><div class="mw-collapsible mw-collapsed"> | ||
<br><br> | <br><br> | ||
This option allows you to bypass any registration concerns entirely, as all active students will be able to select non-enrolled sections instead of (or in addition to) their enrollments. [[TracCloudGuideBasicsNonEnrolled|Details on creating these non-enrolled courses can be found here.]] The benefit of this approach is that it requires no extra configuration in your import or in the individual sections/registrations, the potential downside is that all students will be able to access this non-enrolled section, even those who may not need it. | |||
[[File:5947126.png|800px]]<br><br> | |||
This option can be used in the following configurations:<br> | |||
::<i>Import activation</i>: Any<br> | |||
::<i>Deactivate when not imported</i>: Any<br> | |||
</div> | </div> | ||
<hr> | <hr> | ||
<div style="float: left; margin-top: 0em; margin-bottom: 1em"><big><b>Registrations</b> | Activation | <div style="float: left; margin-top: 0em; margin-bottom: 1em"><big><b>Registrations</b> | Activation registrations based on section</big></div><div class="mw-collapsible mw-collapsed"> | ||
<br><br> | <br><br> | ||
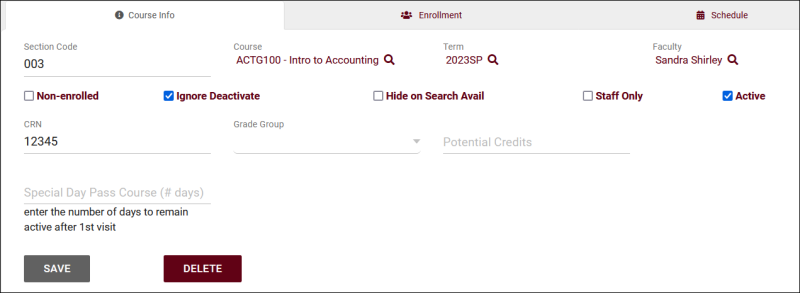
Within every <i> | Within every section record (<i>Other > Listings > Sections</i>) you will find a checkbox labelled "Ignore Deactivate." If checked, any active registrations linked to this section will remain active, overriding the import. Manually deactivated registrations can still be automatically reactivated, only deactivations are ignored. The benefit of this option is that it requires no changes from your IT and is an easy change to implement. A potential downside is that this applies to all students enrolled in the section. It's not possible to only ignore deactivation for a single registration. | ||
[[File:8637877.png|800px]]<br><br> | [[File:8637877.png|800px]]<br><br> | ||
This option can be used in the following configurations:<br> | This option can be used in the following configurations:<br> | ||
<i>Import activation</i>: Any<br> | ::<i>Import activation</i>: Any<br> | ||
<i>Deactivate when not | ::<i>Deactivate when not imported</i>: Any<br><br> | ||
After checking this box, go to <i>Other > Listings > Registrations > [The record you want to activate]</i> and uncheck "Inactive." This will not be overwritten when the import next runs. | |||
[[File:4623532.png|800px]] | |||
</div> | </div> | ||
| Line 71: | Line 80: | ||
<div style="float: left; margin-top: 0em; margin-bottom: 1em"><big><b>Registrations</b> | Override registration dates</big></div><div class="mw-collapsible mw-collapsed"> | <div style="float: left; margin-top: 0em; margin-bottom: 1em"><big><b>Registrations</b> | Override registration dates</big></div><div class="mw-collapsible mw-collapsed"> | ||
<br><br> | <br><br> | ||
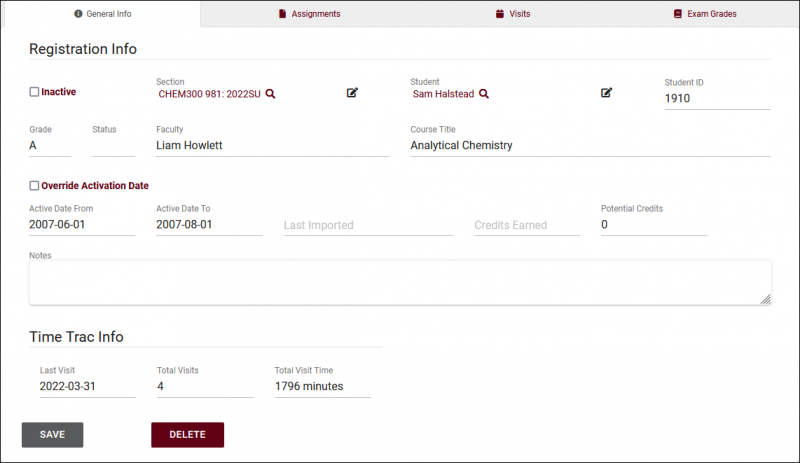
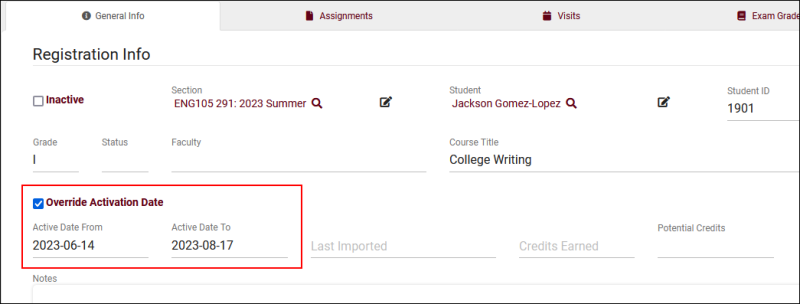
This option is only available when using <b>Registrations - Date Activations</b>, and allows you to override activation dates for individual registrations by going to <i>Other > Listings > Registrations > [The registration you want to update]</i>. | This option is only available when using <b>Registrations - Date Activations</b>, and allows you to override activation dates for individual registrations by going to <i>Other > Listings > Registrations > [The registration you want to update]</i> and checking the "Override Activation Date" box. Having this option available is one of the benefits of using date activations. Changes can be made to individual registrations and you can specify exactly how long they should be active for. This setting has no effect when using different activation methods. | ||
[[File:7234370.png|800px]]<br><br> | [[File:7234370.png|800px]]<br><br> | ||
This option can be used in the following configurations:<br> | This option can be used in the following configurations:<br> | ||
<i>Import activation</i>: Registrations - Date Activations<br> | ::<i>Import activation</i>: Registrations - Date Activations<br> | ||
<i>Deactivate when not | ::<i>Deactivate when not imported</i>: Any<br> | ||
</div> | </div> | ||
<hr> | <hr> | ||
<div style="float: left; margin-top: 0em; margin-bottom: 1em"><big><b>Registrations</b> | Continue importing past registrations</big></div><div class="mw-collapsible mw-collapsed"> | <div style="float: left; margin-top: 0em; margin-bottom: 1em"><big><b>Registrations</b> | Continue importing past registrations</big></div><div class="mw-collapsible mw-collapsed"> | ||
<br><br> | <br><br> | ||
If your IT are able to continue sending these specific registrations in their import file, the "Deactivate when not imported" option can be leveraged to keep only those registrations active from the prior term. As an alternate but similar option, if your IT can send the entire past semester of data with registration status codes filled in for all of them, that can also be used to only keep specific registrations active. You will need to discuss with your IT to see if this is an option for your system.<br><br> | |||
This option can be used in the following configurations:<br> | This option can be used in the following configurations:<br> | ||
<i>Import activation</i>: Students - Activations or Students - Import Activations<br> | ::<i>Import activation</i>: Students - Activations or Students - Import Activations<br> | ||
<i>Deactivate when not | ::<i>Deactivate when not imported</i>: Yes<br> | ||
OR | |||
::<i>Import activation</i>: Students - Activations or Students - Import Activations<br> | |||
::<i>Deactivate when not imported</i>: Any<br> | |||
::<i>Withdraw/Enrolled Codes</i>: Provided for both inactive and active registration statuses | |||
</div> | </div> | ||
<hr> | <hr> | ||
|} | |} | ||
[[Category:TracCloud]] | [[Category:TracCloud]] | ||
Revision as of 16:49, 27 June 2023
Listings |
Keeping Past Registrations Active A common question we receive is in regards to keeping registrations (and students) from prior semesters active. This may be due to incomplete registrations, grace periods between terms, or simply for testing purposes. There isn't a single answer for this, as there are different solutions depending on how your import is configured and what registrations you're trying to activate. This article will go into detail on some of the options available to accomplish this. If have additional questions, feel free to reach out to us on our helpdesk using the "Support" tab at the top of the screen. Understanding Import ActivationsBefore making any changes, it's important to understand how your system activates students and registrations. Keep these options in mind as you review the workarounds available to activate registrations outside of your current semester. First, go to Other > Other Options > Preferences > System Preferences > Withdraw Codes and Statuses and review your configuration here.
Next, go to Other > Other Options > Preferences > Scheduled Daily Imports and look for the "Process" boxes. You will likely see one of three activation processes, other processes can be ignored.
After you've reviewed your current student/registration activation process, you can select which of the options below will work best for your campus. Keep in mind that regardless of which option is chosen, the term will still need to be activated in order for the registration to be available to select. Students | Do your student accounts also need to be activated?
Before activating registrations, you should consider whether or not students also need to be activated. An inactive student won't be able to login or book appointments even if their registration is active. If you're activating additional registrations for students who are already active, this can be skipped. There are two ways to accomplish this, which you use depends on why you're activating students and how your import is configured.
Sections | Non-enrolled sections, no registration required
This option allows you to bypass any registration concerns entirely, as all active students will be able to select non-enrolled sections instead of (or in addition to) their enrollments. Details on creating these non-enrolled courses can be found here. The benefit of this approach is that it requires no extra configuration in your import or in the individual sections/registrations, the potential downside is that all students will be able to access this non-enrolled section, even those who may not need it. This option can be used in the following configurations:
Registrations | Activation registrations based on section
This option can be used in the following configurations:
After checking this box, go to Other > Listings > Registrations > [The record you want to activate] and uncheck "Inactive." This will not be overwritten when the import next runs. Registrations | Override registration dates
This option can be used in the following configurations:
Registrations | Continue importing past registrations
This option can be used in the following configurations:
OR
|
