TracCloudGuideBasicsResources: Difference between revisions
From Redrock Wiki
No edit summary |
No edit summary |
||
| (17 intermediate revisions by the same user not shown) | |||
| Line 1: | Line 1: | ||
{{TracCloudGuideTabs}} | {{TracCloudGuideTabs}} | ||
<div class="tcWidgetPage"> | |||
<div class="categoryWide"> | |||
{{TracCloudGuideProfileTOC}} | |||
</div> | |||
<big><b>Resources</b></big | <big><b> | ||
Resources are items that may be checked in and out of your Center(s) and lent to students. The borrowing of resources at your center(s) can be tracked, recorded, and the data collected can be displayed through Reports. Resources can be utilized in many ways, but common examples include Laptops, Calculators, or Books that | ==Resources== | ||
</b></big> | |||
Resources are items that may be checked in and out of your [[TracCloudGuideProfileCenters|Center]](s) and lent to students or staff. The borrowing of resources at your center(s) can be tracked, recorded, and the data collected can be displayed through [[TracCloudReports|Reports]]. Resources can be utilized in many ways, but common examples include Laptops, Calculators, or Books that users can reserve, checkout, and return.<br> | |||
[[File: | [[File:9327007.png|800px]] | ||
<hr> | <hr> | ||
= | <!-------------------------------------------- Creating resources --------------------------------------------> | ||
To begin creating a resource, go to Other > Resources > Resources | <div style="float: left; margin-top: 0em; margin-bottom: 1em"><big><b>Creating a Resource</b></big></div><div class="mw-collapsible mw-collapsed"><br><br> | ||
To begin creating a resource, go to Other > Resources > Resources > Hamburger menu {{#fas:bars}} > New Resource. | |||
[[File: | [[File:7114507.png|800px]]<br><br> | ||
* <b>BarCode</b> is the unique identifier for this item. Can be used to log resources in and out via a barcode scanner or swipe system, in addition to manually entering the value. | * <b>BarCode</b> is the unique identifier for this item. Can be used to log resources in and out via a barcode scanner or swipe system, in addition to manually entering the value. | ||
| Line 19: | Line 22: | ||
* <b>Title</b> is the name of this resource. | * <b>Title</b> is the name of this resource. | ||
* <b>Profile</b> is the linked Profile for this resource. | * <b>Profile</b> is the linked [[TracCloudGuideProfileGeneral|Profile]] for this resource. | ||
* <b>Checked Out To</b> shows which | * <b>Checked Out To</b> shows which user currently has this item checked out (if applicable). | ||
* <b>Collateral</b> | * <b>Collateral</b> will store the collateral item collected due to the option below being enabled. This should be left blank when creating a new resource, as it will be automatically filled in when the item is checked out and collateral is collected. | ||
::* <b>Collateral Logic</b> enables Collateral functionality if checked. This will ask the staff member logging the resource in/out whether or not collateral has been gathered/returned. | ::* <b>Collateral Logic</b> enables Collateral functionality if checked. This will ask the staff member logging the resource in/out whether or not collateral has been gathered/returned. | ||
| Line 29: | Line 32: | ||
* <b>Reserved For</b> shows who currently has this resource reserved. | * <b>Reserved For</b> shows who currently has this resource reserved. | ||
* <b>Always Available</b> indicates that this resource doesn't need to be individually checked out or reserved, multiple | * <b>Always Available</b> indicates that this resource doesn't need to be individually checked out or reserved, multiple users can check out the same resource at any time. | ||
* <b>Reserved Date</b>, <b>Last Date Out</b>, and <b>Due Date</b> display the exact times of reservations, checkouts, and when the resource is due to be returned. | * <b>Reserved Date</b>, <b>Last Date Out</b>, and <b>Due Date</b> display the exact times of reservations, checkouts, and when the resource is due to be returned. | ||
* <b>Resource Type</b> allows you to categorize this resource into a type for reporting purposes, or to | * <b>Resource Type</b> allows you to categorize this resource into a type for reporting purposes, or to restrict certain students from accessing this resource. | ||
* <b>Length of Checkout</b> determines how long an item can be checked out for before an overdue notification is sent. | * <b>Length of Checkout</b> determines how long an item can be checked out for before an overdue notification is sent. | ||
| Line 43: | Line 46: | ||
* <b>Keywords</b> are the related words for this resource, delimited by commas or semicolons. For example, if you have a Laptop as an available resource, you may want to create keywords like "Computer, PC, Macbook" to make this resource easier to search for. | * <b>Keywords</b> are the related words for this resource, delimited by commas or semicolons. For example, if you have a Laptop as an available resource, you may want to create keywords like "Computer, PC, Macbook" to make this resource easier to search for. | ||
</div> | |||
<hr> | <hr> | ||
= | <!-------------------------------------------- Resource Types --------------------------------------------> | ||
Resource Types can be used to group resources together | <div style="float: left; margin-top: 0em; margin-bottom: 1em"><big><b>Resource Types</b></big></div><div class="mw-collapsible mw-collapsed"><br><br> | ||
Resource Types can be used to group resources together for the purpose of reporting or to block certain students from accessing certain resources. These can be managed by going to <i>Other > Resources > Resource Types</i>. Click the hamburger menu {{#fas:bars}} > <i>New Resource Type</i> to begin creating a new type. | |||
[[File: | [[File:6606629.png|800px]]<br><br> | ||
After creating a new resource type or clicking on an existing one, you will find the following options. | |||
[[File:1005878.png|800px]]<br><br> | |||
* <b> | * <b>Resource Type Name</b> | ||
:: | ::The type/category for your resources.<br><br> | ||
* <b>Resource Type Description</b> | |||
::Information about this resource type.<br><br> | |||
* <b>Linked to Profile</b> | * <b>Linked to Profile</b> | ||
::Allows you to link this Resource Type for use in a specific profile. | ::Allows you to link this Resource Type for use in a specific [[TracCloudGuideProfileGeneral|profile]].<br><br> | ||
* <b>Allowed Student List</b> | * <b>Allowed Student List</b> | ||
::Allows you to only allow students on this list to checkout this resource, blocking everyone else. If left blank, anyone can checkout this resource (assuming they aren't blocked from resource usage entirely). | ::Allows you to only allow students on this [[TracCloudGuideGlobalLists|list]] to checkout this resource, blocking everyone else. If left blank, anyone can checkout this resource (assuming they aren't blocked from resource usage entirely).<br><br> | ||
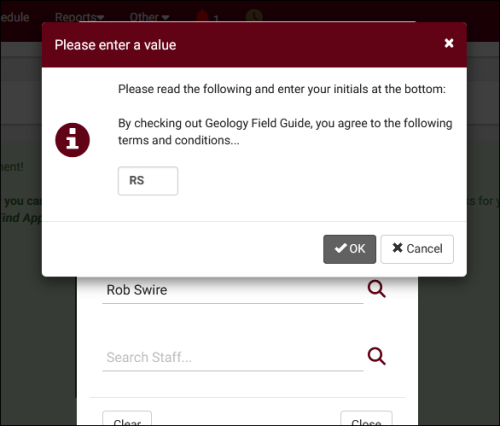
* <b>Display Notice and Require Initials when Checking Out Resources of this Type</b> | |||
::If enabled, a prompt will appear during checkout requiring that the user agree to terms and conditions before continuing. Terms can be entered in the <b>Logout Notice to Student</b> field ([[TracCloudGuideProfilePrefsTwig|Twig]] supported), and a copy of the terms can be automatically forwarded to the student by checking <b>Send Terms and Conditions as Email to Recipient</b>. | |||
::[[File:1164007.png|500px]] | |||
</div> | |||
<hr> | <hr> | ||
= | <!-------------------------------------------- Permissions --------------------------------------------> | ||
<div style="float: left; margin-top: 0em; margin-bottom: 1em"><big><b>Permission Groups</b></big></div><div class="mw-collapsible mw-collapsed"><br><br> | |||
There are a couple settings of note within your permission group(s) relating to Resources. | There are a couple settings of note within your [[TracCloudGuideProfileGroups|permission group]](s) relating to Resources. | ||
<span style="color:grey"><i>Other > Other Options > Groups > [Your Group] > Log In/Out</i></span><br> | <span style="color:grey"><i>Other > Other Options > Groups > [Your Group] > Log In/Out</i></span><br> | ||
| Line 77: | Line 88: | ||
<span style="color:grey"><i>Other > Other Options > Groups > [Your Group] > Admin/Modules</i></span><br> | <span style="color:grey"><i>Other > Other Options > Groups > [Your Group] > Admin/Modules</i></span><br> | ||
[[File: | [[File:1292806.png|800px]]<br><br> | ||
* <b>Table Access</b> provides access to the <i>Other > Resources</i> view of resources. You can also assign <b>Resource Types</b> here to allow this group to view and edit these as well. | |||
* <b>Table Access</b> provides access to the <i>Other > Resources</i> view of resources. You can also assign | |||
</div> | |||
<hr> | <hr> | ||
== | <!-------------------------------------------- Utilization --------------------------------------------> | ||
<div style="float: left; margin-top: 0em; margin-bottom: 1em"><big><b>Using Resources</b></big></div><div class="mw-collapsible mw-collapsed"><br><br> | |||
After creating your resource and updating your groups, you're ready to start checking out resources. This option can be found by going to <i>Other > Log Resource</i>. | After creating your resource and updating your groups, you're ready to start checking out resources. This option can be found by going to <i>Other > Log Resource</i>. | ||
| Line 90: | Line 101: | ||
[[File:3393501.png|400px]]<br><br> | [[File:3393501.png|400px]]<br><br> | ||
You will then be brought to the following screen with two text entry areas available. The first is where you select a resource (searching by Barcode, Title, or Keywords), the second allows you to select a student. Once one or both fields are selected, additional options become available to check out, return, or reserve this item. | You will then be brought to the following screen with two text entry areas available. The first is where you select a resource (searching by Barcode, Title, or Keywords), the second allows you to select a student or staff member. Once one or both fields are selected, additional options become available to check out, return, or reserve this item. | ||
[[File: | [[File:4360537.png|450px]]<br><br> | ||
In the event that Collateral Logic is being utilized, more options will be available in regards to collecting/returning the collateral item. | In the event that Collateral Logic is being utilized, more options will be available in regards to collecting/returning the collateral item. | ||
[[File: | [[File:8676920.png|450px]] | ||
</div> | |||
<hr> | |||
<!-------------------------------------------- Emails--------------------------------------------> | |||
<div style="float: left; margin-top: 0em; margin-bottom: 1em"><big><b>Resource Emails</b></big></div><div class="mw-collapsible mw-collapsed"><br><br> | |||
Resource emails can be customized to inform students of the due date of their checked-out resource, or if the resource is overdue. These options are part of your profile preferences, in <i>Other > Other Options > Profiles > [Your Profile] > Prefs > Emails > Resource Checkout Emails</i>. | |||
Similar to your [[TracCloudGuideProfilePrefsEmails|other Profile Emails]], you can write a subject line and body of your email, an additional SMS text, and choose when this email is sent. Unique to resource emails is <b>Send additional overdue emails daily</b>, which will resend the overdue notice for each day the item is still checked out. | |||
[[File:9910946.png|700px]] | |||
</div> | |||
<hr> | <hr> | ||
= | <!-------------------------------------------- Reports --------------------------------------------> | ||
<div style="float: left; margin-top: 0em; margin-bottom: 1em"><big><b>Resource Reporting</b></big></div><div class="mw-collapsible mw-collapsed"><br><br> | |||
A resource report is available to obtain data regarding how your resources are being utilized. This can be found by going to <i>Reports > Management > Resources</i>. | A resource report is available to obtain data regarding how your resources are being utilized. This can be found by going to <i>Reports > Management > Resources</i>. | ||
| Line 105: | Line 128: | ||
{{:TracCloudReportsManagement10}} | {{:TracCloudReportsManagement10}} | ||
</div> | |||
<HR> | |||
[[Category:TracCloud]] | |||
</div> | |||
Revision as of 16:32, 18 March 2024
Profile Preferences
Prefs
Resources
Resources are items that may be checked in and out of your Center(s) and lent to students or staff. The borrowing of resources at your center(s) can be tracked, recorded, and the data collected can be displayed through Reports. Resources can be utilized in many ways, but common examples include Laptops, Calculators, or Books that users can reserve, checkout, and return.

To begin creating a resource, go to Other > Resources > Resources > Hamburger menu > New Resource.

- BarCode is the unique identifier for this item. Can be used to log resources in and out via a barcode scanner or swipe system, in addition to manually entering the value.
- Title is the name of this resource.
- Profile is the linked Profile for this resource.
- Checked Out To shows which user currently has this item checked out (if applicable).
- Collateral will store the collateral item collected due to the option below being enabled. This should be left blank when creating a new resource, as it will be automatically filled in when the item is checked out and collateral is collected.
- Collateral Logic enables Collateral functionality if checked. This will ask the staff member logging the resource in/out whether or not collateral has been gathered/returned.
- Reserved For shows who currently has this resource reserved.
- Always Available indicates that this resource doesn't need to be individually checked out or reserved, multiple users can check out the same resource at any time.
- Reserved Date, Last Date Out, and Due Date display the exact times of reservations, checkouts, and when the resource is due to be returned.
- Resource Type allows you to categorize this resource into a type for reporting purposes, or to restrict certain students from accessing this resource.
- Length of Checkout determines how long an item can be checked out for before an overdue notification is sent.
- Max Renewals Allowed determines how many times a checkout can be renewed.
- Description is an internal description of this particular resource.
- Keywords are the related words for this resource, delimited by commas or semicolons. For example, if you have a Laptop as an available resource, you may want to create keywords like "Computer, PC, Macbook" to make this resource easier to search for.
Resource Types can be used to group resources together for the purpose of reporting or to block certain students from accessing certain resources. These can be managed by going to Other > Resources > Resource Types. Click the hamburger menu > New Resource Type to begin creating a new type.

After creating a new resource type or clicking on an existing one, you will find the following options.

- Resource Type Name
- The type/category for your resources.
- The type/category for your resources.
- Resource Type Description
- Information about this resource type.
- Information about this resource type.
- Linked to Profile
- Allows you to link this Resource Type for use in a specific profile.
- Allows you to link this Resource Type for use in a specific profile.
- Allowed Student List
- Allows you to only allow students on this list to checkout this resource, blocking everyone else. If left blank, anyone can checkout this resource (assuming they aren't blocked from resource usage entirely).
- Allows you to only allow students on this list to checkout this resource, blocking everyone else. If left blank, anyone can checkout this resource (assuming they aren't blocked from resource usage entirely).
- Display Notice and Require Initials when Checking Out Resources of this Type
- If enabled, a prompt will appear during checkout requiring that the user agree to terms and conditions before continuing. Terms can be entered in the Logout Notice to Student field (Twig supported), and a copy of the terms can be automatically forwarded to the student by checking Send Terms and Conditions as Email to Recipient.

There are a couple settings of note within your permission group(s) relating to Resources.
Other > Other Options > Groups > [Your Group] > Log In/Out

- Allow user to log resources in and out provides users in this group the ability to record resource usage.
- Allow user to view what resource the student has logged out provides users in this group the ability to view a student's currently logged out item.
Other > Other Options > Groups > [Your Group] > Admin/Modules

- Table Access provides access to the Other > Resources view of resources. You can also assign Resource Types here to allow this group to view and edit these as well.
After creating your resource and updating your groups, you're ready to start checking out resources. This option can be found by going to Other > Log Resource.

You will then be brought to the following screen with two text entry areas available. The first is where you select a resource (searching by Barcode, Title, or Keywords), the second allows you to select a student or staff member. Once one or both fields are selected, additional options become available to check out, return, or reserve this item.

In the event that Collateral Logic is being utilized, more options will be available in regards to collecting/returning the collateral item.

Resource emails can be customized to inform students of the due date of their checked-out resource, or if the resource is overdue. These options are part of your profile preferences, in Other > Other Options > Profiles > [Your Profile] > Prefs > Emails > Resource Checkout Emails.
Similar to your other Profile Emails, you can write a subject line and body of your email, an additional SMS text, and choose when this email is sent. Unique to resource emails is Send additional overdue emails daily, which will resend the overdue notice for each day the item is still checked out.

A resource report is available to obtain data regarding how your resources are being utilized. This can be found by going to Reports > Management > Resources.
Resources
This report exports resource usage, showing the students who have checked out a particular resource, the checkout date and time, as well as total hours. This can either be run on overall Utilization, or specifically on Past Due resources.

- Time Frame
- The date range for the data in this report. Beyond entering a date range manually, you can also choose a preset date range (Today, This Month, This Semester, etc) from the dropdown list above.
- Show Inactive Resources
- Include resources in results that have a status of 'Inactive.'
- Show Summary
- Only show data totals, excluding details of individual records.
- For Past Due, Show All Checkouts
- If this is checked, currently checked out resources will be included in report results. Unchecked would exclude these.
- Include Checkout Notes
- Adds the checkout notes field as an additional column in report results.
- Show Totals Bar Chart
- Adds a visual bar chart of totals to your report data.
- Group by
- Group records by the selected field. Some reports allow you to add secondary and tertiary groupings as well.
- Student ID, Resource Type, Resource Title, Barcode, Keywords, Profile
- Search by Student ID, Resource Type, Resource Title, Resource Barcode, Keywords, or the Profile of your resources.
- Output format
- Use HTML to view report data in your browser, or export this report to a CSV file (available for most reports). Some reports offer additional CSV options depending on if you want to include totals and/or data grouping in your export.
- Deliver to
- Display this report immediately in your browser ("Screen"), or send the report to a specified email address ("Email"). Multiple email addresses can be specified, use ; to separate them (example@example.edu;sample@example.edu).
- View Utilization or View Past Due
- Utilization will show all checked out resources and the individual checkouts. Past Due will only display overdue checkouts, items that were not returned soon enough, filtering out checkouts that were returned in time.
HTML

CSV
