TracCloudWhatsNew
From Redrock Wiki

This page highlights some of the recent changes made to the TracCloud platform, and how you can utilize them on your own instance. A list of past changes and a full changelog can be found in the tabs above.
If you have any questions about these changes, feel free to reach out to us on our helpdesk.
Terms & Conditions allows you to create a prompt that appears for students when they're logging in, booking an appointment, or enrolling in a workshop. The prompt will contain a custom message which the student will have to agree to before continuing. While terms and conditions are the typical use-case, this feature can also be used for any purpose where a student would need to agree to a statement before having full access to the system.
Creating a New Term/Condition
Navigate to Other ➜ Listings ➜ Terms and Conditions. This listing is where you can view or edit previous T&Cs. To create a new T&C, click the hamburger icon ➜ New Terms and Conditions. If your SysAdmin account doesn't have access to these options, read the group permissions portion of this article and apply those same changes to the SysAdmin group.

This will take you to the Terms and Conditions entry screen.

- Name
- This will be the title of this T&C. This will be displayed across the top of the prompt when shown to students.
- Responses
- This will display a list of students who have accepted these T&Cs and the date of acceptance.
- Text Entry Area
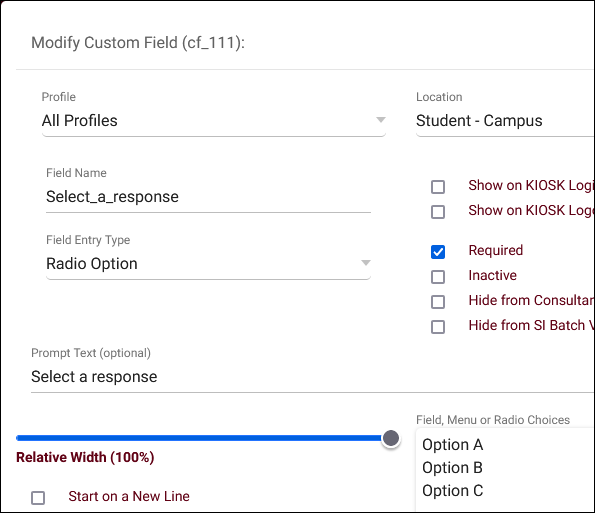
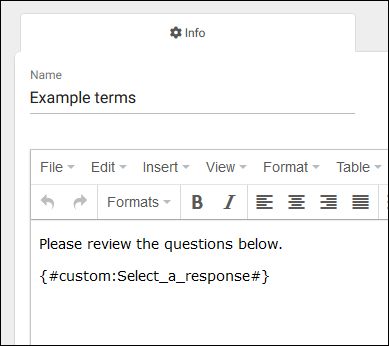
- This is where you can write out the text of this T&C that students will need to agree to before continuing. If you wish to add custom field inputs to be answered by the student, this can be entered as {#custom:field_name#}. See example screenshots below.


- Linked to Student List
- Optionally only display these T&Cs to students on the specified list.
- Linked to Section / Subject
- Terms and conditions can be assigned to a specific subject, section, or all courses, depending on if this T&C needs to be specific to a certain subject. If selected, an additional entry field will appear where you can choose the section/subject. This will only work with sections that students are registered for; non-enrolled courses will not trigger the T&C to appear.
- Profile / Center
- This is where you can assign this T&C to a specific profile or center.
- Valid For
- This option allows you to determine how long the T&C agreement is valid for. There are three options:
- Life – Never resets. Once Confirmed, the student will not see the T&C again unless this option is changed.
- Term – Resets after each semester. When next semester term switches over, the students will be asked again to agree to the T&C once again. If this T&C record appears on login and the student's registration has overridden dates, the end date of their registration will be used instead.
- Days - This option allows you set a custom length (e.g., 30 days, 90 days, etc).
- Displayed When
- This option determines where the student will see the T&C prompt.
- None - Inactive. This will deactivate this T&C. It will no longer be displayed to students.
- Student Main Menu - This will display as soon as the student logs into their account. Students will not be able to continue until the T&C prompt has been agreed to.
- Student Kiosk Login - This prompt will appear when a student attempts to login for a visit via a Kiosk, at which time they will be presented with the T&C.
- Student Booking Appointment - This prompt appears when a student selects an available time from the search availability widget on their dashboard. The T&C must be confirmed before they can book an appointment.
- Workshop Only - This prompt appears as an option when enrolling in workshops.
- Accept Button Label
- This allows you to customize the name of the confirm button (e.g., "I agree").
- Require Initials
- This requires the student to enter their initials before confirming, as a kind of e-signature.
- Allow Enter Notes
- This provides students the ability to enter in a note when filling out the T&C.
- Notes Instructions
- This is additional instructional text that will appear just above the notes field above.
Group Settings
If you need to allow another set of staff members in your TracCloud instance to access or modify Terms and Conditions, you will need to apply a change to their permission group. The Terms and Conditions option will need to be added to Table Access as seen below. This can either be set to View and Edit for full access, or View Only if you don't want these users making any changes.
Other ➜ Other Options ➜ Groups ➜ [The group you want to edit] ➜ Admin / Modules ➜ Table Access.

Example Configuration
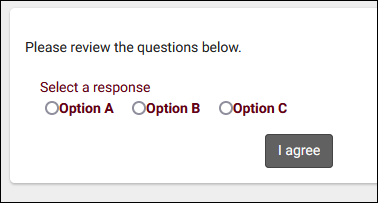
The screenshot below shows an example of how Terms and Conditions can be configured and how it displays to students.

Here's how that prompt looks to a student when logging into their account.

After the student agrees, the record of this agreement will appear in their timeline as seen below.

Allowing Students to View Accepted Terms and Conditions
In order for students to be able to view Terms and Conditions that they've previously accepted, a system preference needs to be enabled. Go to Other ➜ Other Options ➜ Preferences ➜ System Preferences ➜ General Appointment Settings ➜ Check Allow students to view accepted Terms and Conditions on dashboard ➜ Save. Once enabled, students will see this button on their main menu next to the calendar URL. Clicking it will open a list of T&Cs they've accepted, where they can see their response and the terms themselves by clicking on the arrow button.


These preferences, found in Other ➜ Other Options ➜ Profiles ➜ [Your profile] ➜ Prefs ➜ Log In/Out, control how the log listing displays, kiosk preferences, additional kiosk features, and more. This article will go through every preference in this menu, explaining exactly how they function.

- Choose Consultant on Login, Ask for Subject, Ask for Reason, and Field Size
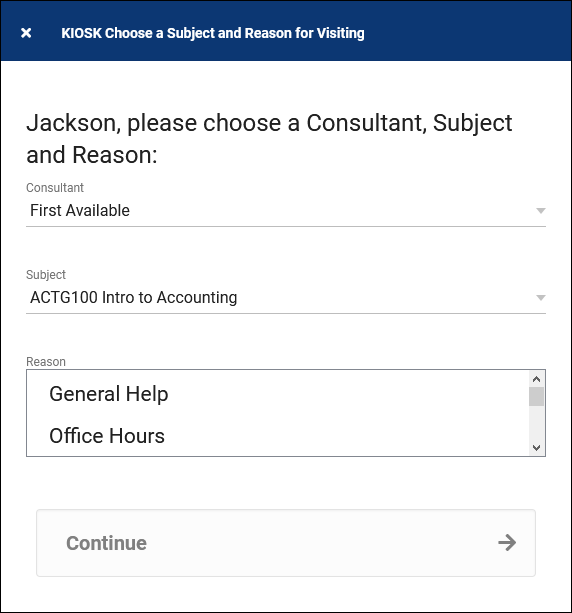
- These settings control which options appear during the login process, as well as how many options appear at once. As an example, the screenshot below matches the configuration above. Since we have the Reason choices set to 2, we can see 2 reasons at once in the login window, and can scroll down to see all available options. If Subject and Reason are enabled, they are inherently required. Consultant is optional unless "Yes (Required)" is chosen.

- Choose Consultant on Logout & # Choices
- If enabled, TracCloud will ask what consultant the student visited with while concluding their visit. Consultant is optional unless "Yes (Required)" is chosen. # of choices behaves just like the preference above.
- Set initial status to waiting on log in
- If enabled, when a student logs in, the visit status will be “waiting” by default rather than immediately starting the visit with their consultant. This would be utilized when you need to keep track of wait time in addition to actual visit time.
- Maximum wait time
- When this time limit is reached, the “Wait Time” counter on the Log Listing/Kiosk changes color to be more noticeable.
- Format to display Subject
- This preference controls how the subject field is displayed during the login process. For example, you can choose to only display the Subject (MAT500) or the Title (Introduction to Example), or you can include the full Subject Section Title (MAT100 01 Introduction to Example) if needed.
- Order for KIOSK Login
- This preference controls the order of questions asked during the login process. For example, if you want the student/staff to select a consultant first, then select a subject that the consultant can assist with, you would put “Consultant” prior to “Subject” in this section. This also works in reverse, if you want you want to select a subject first, then a consultant that is able to assist.
- ________ choice determines list of ________
- This preference changes depending on the KIOSK order defined above. If you choose subject before consultant, these checkboxes ask if you want to let the staff/student’s Subject choice determine the list of consultants, based on the consultants assigned course list.
- Only show Consultants that are available for dropin during KIOSK visit login
- If enabled, only consultants that have a currently available drop-in availability will appear in the Consultant box.
- Only show Consultants that are logged in to Work during KIOSK visit login
- If enabled, only consultants who are currently logged in for a Work visit will appear in the consultant choice box.
- Only show Consultants that are logged in to Work is same center (if previous option selected)
- A more strict version of the above option, only showing consultants who are logged in for work in the center that the student is attempting to log in to.
- Only show if linked to Student record as Primary Consultant
- Students can be imported with a linked "PrimaryConsultantID" value, and enabling this preference will only show that consultant on login. This is separate from the linked advisor settings found in your centers, and should typically be left unchecked.
- Allow ‘First Available’ as a choice
- If enabled, “First Available” will be an available consultant choice during the login process. A consultant can be selected during the Waiting to Started visit status change, during the logout process, or manually changed within the student’s visit record after the fact. Show 'First Available' for only these centers will also appear if this is enabled, allowing you to select which centers "First Available" will be available in.
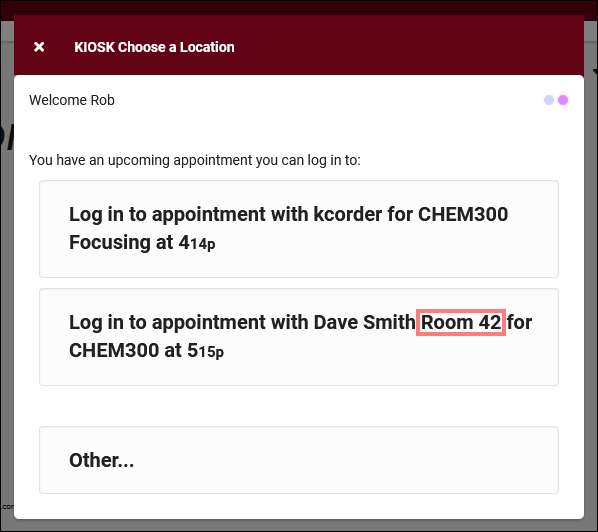
- Show Location when Logging in to an Appointment
- When a student logs in on a Kiosk near the start time of their appointment, the student will be asked if they're logging in for that appointment to help speed up the login process (and to link the Visit record to the Appointment). Enabling this option will include the Location of their appointments in this prompt.

- Override: show all appointments in all related centers if logging in via KIOSK
- If enabled, students will be allowed to login to other centers from a specific center's kiosk.
- Delay for Welcome and Goodbye Message (seconds)
- Controls how long the Login and Logout prompts on Kiosks and Log Listings display before automatically closing. For example, if a student starts logging in and walks away from the Kiosk before completion, you may want the menu to close after 30 seconds of inactivity to allow the next student to login normally.
- Delay for log listing refresh (seconds)
- This setting controls the frequency of automatic log listing refreshes, allowing you to see the most up to date visit data.
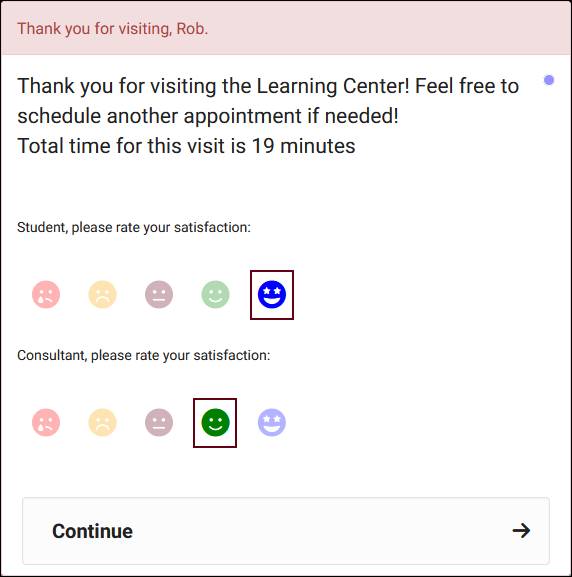
- Ask Student Satisfaction on Logout & Ask Consultant Satisfaction on Logout
- Enabling these options adds a "please rate your satisfaction" question to the logout process of both the log listing *and* kiosk. These responses are only accessible to groups who have been provided access to these fields in the 'Student / Visit' tab. Responses will be visible on the student listing and in reports such as Visits by ??.

- Show Resources Checked Out on Logout
- Show what resources the student has checked out during logout.
- List the Appointment/Visit Location Choices
- Allows to you to customize the default locations available to choose from in visits and Availability/Appointment entry. If used, this would typically be a more specific location than what your centers already describe. E.g., "Room 42 (location) in Peer Tutoring (center)."
- Quick Visit Required Fields
- Choose which fields must be filled in by staff when editing existing visits or creating new quick visits.
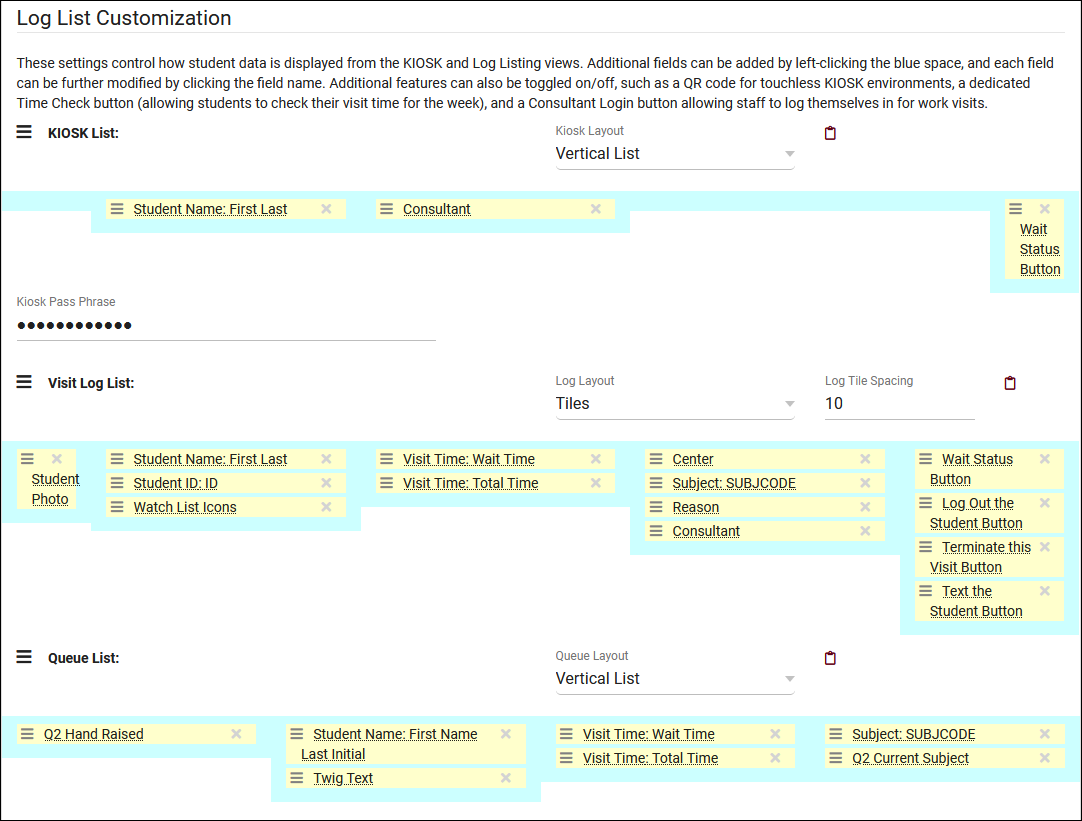
- Log List Customization
- These settings determine what and how information is displayed on the Log Listing, from both the staff and Kiosk point of view. More information on customizing this view along with more examples can be found in its own dedicated article.


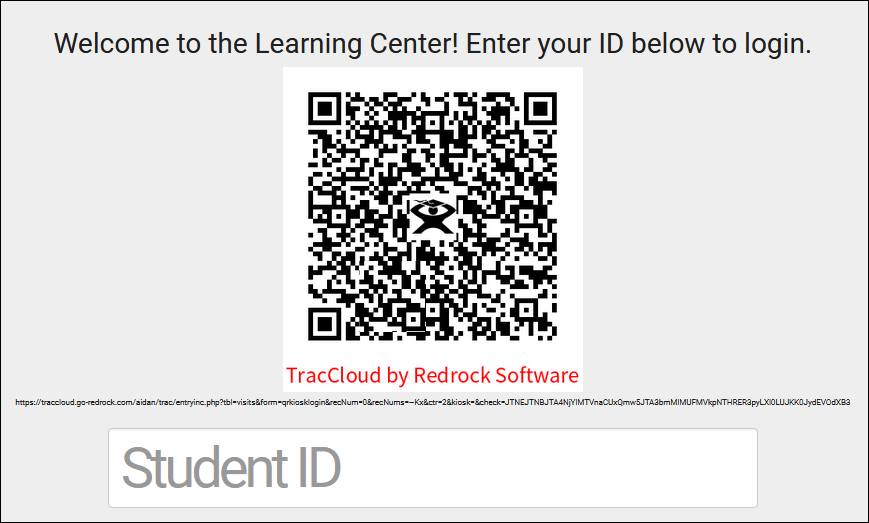
- Show Touchless QR Code for KIOSK Student Signin on Phone
- This preference adds a QR code to your Kiosk. Students can scan this with their phones, which will take them to a URL where they can enter their ID to login/logout. This QR code automatically regenerates after several minutes, so students can’t keep the URL for later use. QR Code Width allows you to adjust the size of the QR code on your screen.

- Utilize SSO for Touchless KIOSK
- If checked, any students who use the kiosk QR code to login will be required to sign in via single sign-on before they can start or end their visit. This is typically left unchecked.
- QR Code is clickable
- If checked, the kiosk QR code can be clicked on to open the login form. This option is typically disabled.
- Show Queue and Consultant login buttons
- This preference adds separate login prompt on the log listing and kiosk for work visits. If selected, users are prompted to enter their IDs, and as long as they have a valid consultant account, they can directly login for a work visit. Allow Consultant Login for Custom KIOSKs as well also enables this feature on Custom Kiosks. This additionally enables the "Queue" button on the Log Listing to view a more restricted list of students who are logged in (typically for a queue TV).
- Prevent Login Via Name
- If checked, it will not be possible to log a student in on the Log Listing or Kiosk by name (e.g., 'Sam Smith'). ID, Barcode, etc, must be used instead.
- Require Single Record Found
- Typically used if Prevent Login Via Name is unchecked. This requires that any Log Listing/Kiosk login attempts must return only a single student to continue. If unchecked, a student might search for 'Dave' to login, and scroll through other existing students to find their own name. Checking this box would prevent that, requiring that the student be specific enough to only return a single applicable student profile to continue.
- Prevent Logins
- The "Via [field]" options can be used to prevent students from logging in by typing in that value at a kiosk to log their visit. It's very common to prevent students from logging in via name, the other options are less commonly checked. "During Class Time" can be used if section schedule data is being imported. You can block students from logging in for visits during their scheduled class time by checking this box.
- Filter registrations allowed for Sign In
- This option can be used restrict which registrations students are allowed to login for, in addition to the regular course list filtering. If you intend on using this option, you must create a saved search on the Registrations Listing to define which registrations students can login for.
- Allow User to Generate a Prospect
- Adds an option to the log listing and kiosk pages to create new prospective student accounts. Requires additional configuration in global settings, click here to learn more.
- Choose contact options for prospective students
- By default, prospective students can create their account via an email or a phone number. This option can be used to restrict them to one or the other.
- Label of Button & Subtitle
- Optionally override the name of the button on the log listing/kiosk to create an account and the subtitle/description that appears when the "New Prospective Student" button is clicked.
- Prompt for Prospect Log In & Create Prospect
- Optionally override the instructional text that appears when the prospect button is clicked on the log listing/kiosk.
Student data is some of the most important in TracCloud. In addition to being the record that all their visits, appointments, documents, etc are assigned to, there's also the data stored directly in their account. You can run reports on visits grouped by student majors or send emails to students of a certain class, cohort, etc. This article goes over some of the ways you can search for these records.

The Students Listing itself (found by clicking "Students" in the navigation bar) contains all student records uploaded to TracCloud. From this page, you're able to manage student data in bulk, create lists, send emails, submit SAGE referrals, etc. You can alternatively open a specific student record and manage just that account.
Each column of information displayed has a clickable header that will sort the listing accordingly. Clicking once sorts ascending, a second click will sort descending.

Using the search bar on this screen, you can easily perform quick searches to find specific students. Right-clicking in the search bar (shown below) will provide a list of available student fields to search by. Click any of these to add that field to your query.

Example Searches:
- Find a student by a single value, such as ID. Specifying 'Students.ID=' actually isn't required for ID or Name searches, but it works well as an example.
- Students.ID=1931
- Students.ID=1931
- ...or name. Names should be formatted as 'Last, First' or 'First M Last'. 'First Last' will also work if middle names are not being imported.
- Day, Rob
- Day, Rob
- Search multiple fields at once, separate your searches by a space.
- Students.Major=Mathematics Students.Class=Sophomore
- Students.Major=Mathematics Students.Class=Sophomore
- When performing multiple searches where at least one field contains a space, make sure to surround the contents you're searching for with quotation marks.
- Students.Major="Chemical Engineering" Students.Status=Active
- Students.Major="Chemical Engineering" Students.Status=Active
- Search in Custom Fields. It's recommended to use the right-click menu to select these, as it will always auto-fill the correct field name.
- #sql:InState#=Yes
- #sql:InState#=Yes
- Date searches such as this are required to be formatted as YYYY-MM-DD
- Students.BirthDate=1993-07-16
- Students.BirthDate=1993-07-16
- TracCloud also has a special search to find students who's birthday is today.
- birthdaytoday
- birthdaytoday
- It's also possible to search for students who received a batch email from TracCloud. The search below would return all students who received a batch email from TracCloud on 2024-10-23 where the subject contained the phrase "Upcoming Event".
- MailQueue.CreatedOn="2024-10-23@" MailQueue.Category=batch_email MailQueue.Subject="@Upcoming Event@"
- MailQueue.CreatedOn="2024-10-23@" MailQueue.Category=batch_email MailQueue.Subject="@Upcoming Event@"
Students Search
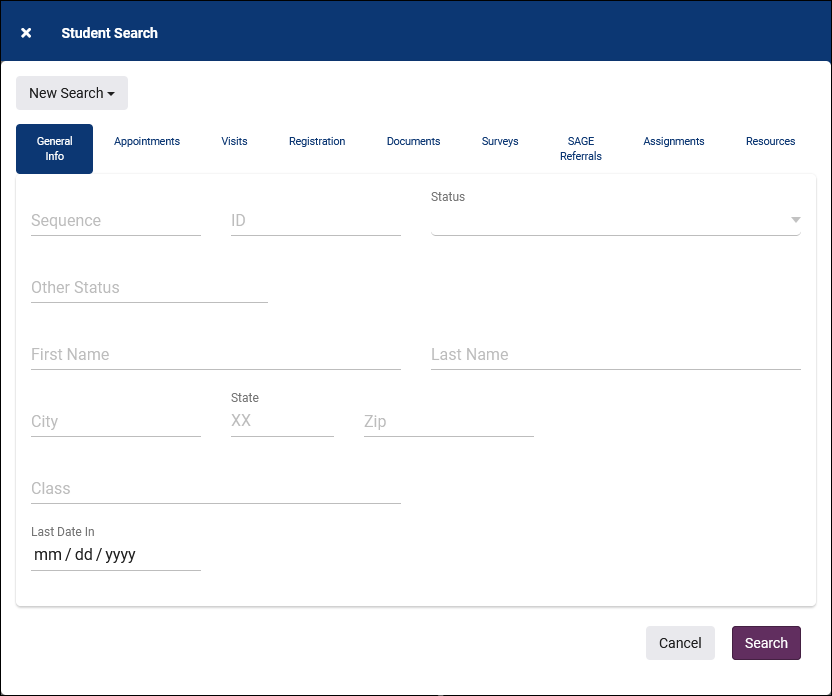
The Student Listing also has a unique Search utility found in the hamburger menu . This utility has the ability to search related tables to find relevant students. This includes the ability to run searches such as "students who have had appointments in the last 7 days" or "students who have ongoing referrals."

- Search Type
- This can be set to New Search, Search Selection, Remove found from Selection, or Add found to Selection, depending on the desired effect of this search.
- General Info tab
- This tab is where you can search for basic information about the student. ID, Status, Name, etc.
- Appointments
- This tab allows you to search for students by appointment information. For example, "students who had an appointment from 02/10 to 02/20 with a status of Missed." Any fields that support wildcards additionally support the | character for "or."
- Visits
- This tab allows you to search for students by visit info. For example, "students who visited more than 2 times from 02/10 to 02/20 where the subject was MAT100." Any fields that support wildcards additionally support the | character for "or."
- Registration
- This tab allows you to search for students by registration info. For example, "students who are actively enrolled in more than one math course." Any fields that support wildcards additionally support the | character for "or."
- Documents
- This allows you to search for students by documents. "Students who have a document of a certain filename uploaded in the last month."
- Surveys
- Students who have received or responded to a survey in a certain time period. Requires SurveyTrac.
- SAGE Referrals
- Students who have ongoing or completed referrals of a specific type in a specified date range. Requires SAGE. Any fields that support wildcards additionally support the | character for "or."
- Assignments
- This tab allows you to search by potential assignments. Any fields that support wildcards additionally support the | character for "or."
- Resources
- This tab allows you to search for students by their resource usage, whether they have certain items checked out or overdue. Any fields that support wildcards additionally support the | character for "or."
- Terms & Conditions
- Search by accepted terms and conditions. Any fields that support wildcards additionally support the | character for "or."
- Success Plans
- Search by assigned Success Plans.
Hamburger Menu
Every listing page in TracCloud features a hamburger menu with utilities to search for or interact with your list of records. Some of these options are specific to to certain listings and record types, others are shared. The following list includes definitions for the hamburger menu options available on this listing and how they can be utilized.

- List All
- This option will show all records on the current listing. Some listings have an additional toggle for only showing active records, such as the student and registration listing, which will override a List All search if checked.
- Search
- This utility will open a pop-up window unique to each Listing it's present on, allowing you to search your records by a number of different fields. In the case of the Student Listing, you could use this to search related records, such as 'Students who have at least 2 Visits in the Learning Center' or 'Students with a recent Document upload in their timeline.'

- Power Search
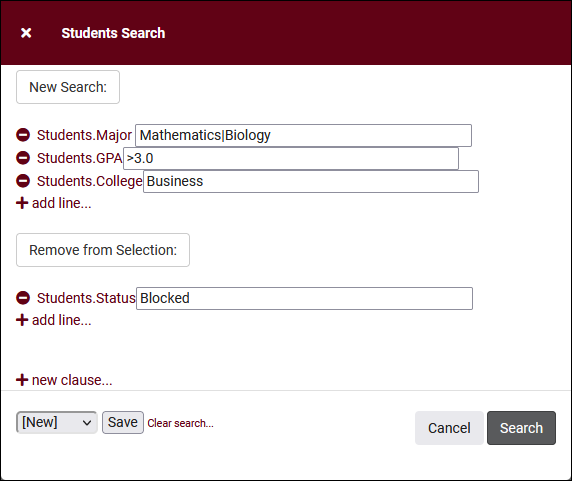
- This option provides a simple but powerful search utility to find the records you need. String together multiple searches, adding or removing results for each. Use Search Symbols to include ranges of data, and Save Searches for later use if needed. The search term 'blankornull' can be used to find all records with a value of nothing ("") or null ().

- Search by Term Enrollment
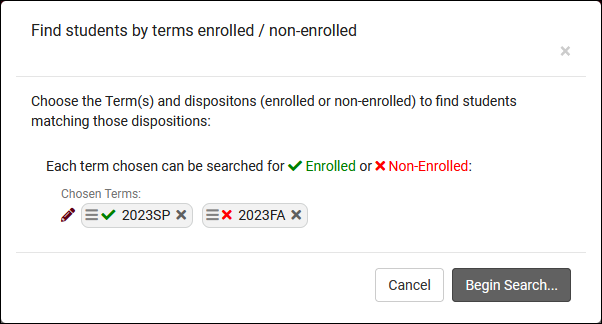
- Allows you to search based on the students' enrollment in a specific term or multiple terms. The example search below would show students who are enrolled in a 2023SP registration AND are not enrolled in a 2023FA registration.
- Allows you to search based on the students' enrollment in a specific term or multiple terms. The example search below would show students who are enrolled in a 2023SP registration AND are not enrolled in a 2023FA registration.

- Lists
- See Student Lists and Watch Lists for more information.
- Saved Searches
- See Saved Searches for more information.
- Find/Merge Duplicates
- These utilities can be used to cleanup duplicate records in your Trac System. We highly recommend reaching out to Redrock Support directly for assistance in cleaning up this data.
- Find by Values
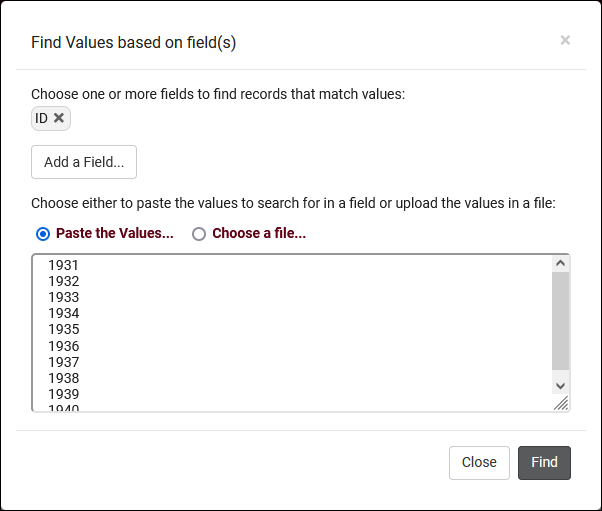
- This utility can be used to search one field for multiple values. If you have a spreadsheet containing a list of student IDs, this is an easy way to pull up the same list of students in TracCloud by copying the ID column into this search field.

- Change Field Values
- This utility allows you to make modifications in to your records in bulk. Similar to the Merge Duplicates utility, we highly recommend coordinating with Redrock Support directly on this setting.
- Selected...
- The Selection Tool offers several options to filter and manage your records. More information on this feature can be found in its own dedicated article here.
- Views
- See Views for more information.
- Send Survey
- Allows you to send a survey to the current user list. More information.
- Register In
- Allows you to quickly enroll a student in a new registration. Depending on your import configuration, manually recreated registrations may be deactivated during your auto-import.
- Assign Success Plan
- Allows you to assign a new Success Plan to the current student list. More information.
- Create Referral
- Allows you to create a batch referral through SAGE. More information.
- Create Task
- Allows you to send a task to the current student list. More information.
- Toggle Photos
- Enable or disable student photos on the Student Listing.
- Create Chart
- Based on the data currently being viewed a chart can be generated to visually illustrate the relationships in the data.
- Export CSV
- Export current listing contents to a CSV file.
- Send Email
- Allows you to send an email directly to a list of users.
- Send Email to Faculty
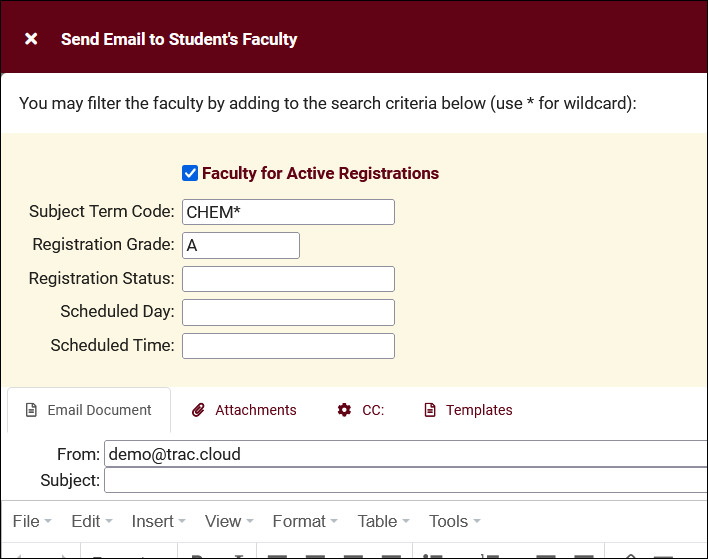
- This email utility allows you to email faculty linked to student registrations. The faculty recipients can be determined by subject, status, and grade. One email will be sent per linked registration, so if there are 3 students listed enrolled in MAT100 with Dave Smith, Dave Smith will receive 3 emails. Faculty recipients can also be filtered by scheduled day/time if section schedule is being imported.

- Show these <records>
- This utility takes your selection of records, finds the related records, and takes you to that listing with the resulting records. For example, on the Registration listing, you can "Show these Students" to display the student records for the registrations that you were viewing.
- Allows you to print the contents of the current listing, by extension this also allows you to export the current list as a PDF file.
- New <Record>
- Allows you to create a new record based on your selected listing.
See Also