The Trac System has the ability to send out emails to students or tutors confirming appointments, notifying of missed or cancelled appointments, and a wide range of other reasons. There are a couple of steps that we need to walk through in order to get the email settings setup correctly.
General Settings
First step is to have your Mail Server set up to send emails from your Trac System. This may involve your IT department if the Mail Server has not been set up.
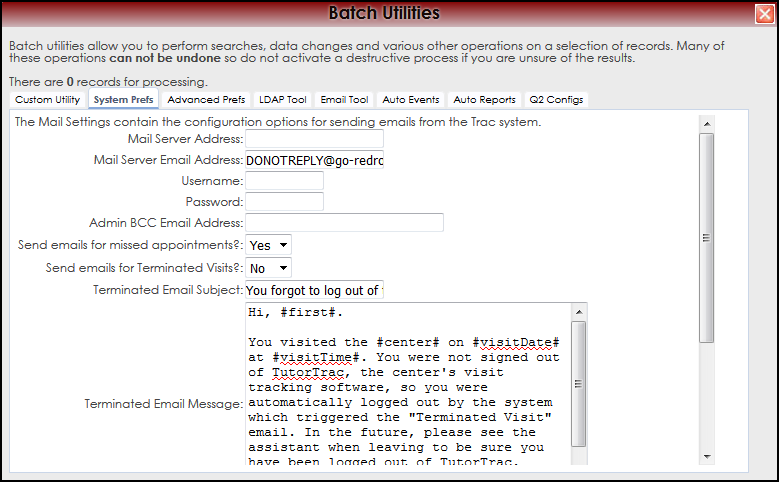
In Trac Navigation > Trac Man icon > Utilities and Prefs > System Prefs, click on Mail Settings. This will allow you to fill out the fields for the address of the mail server that will handle all outgoing mail from The Trac System. This needs to be an SMTP mail server in order to work properly. Also, the email address that your students will see as the From address.

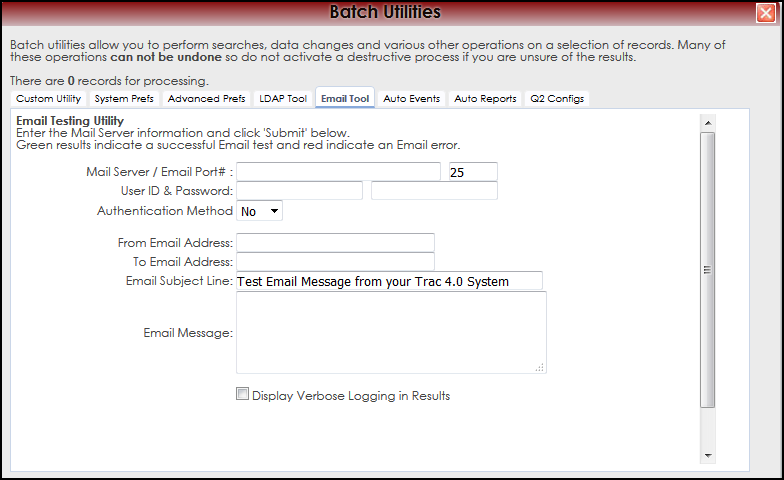
If you’re not sure if your mail server will work, you can click on the "Email Tool" tab and run a test on your mail server to see if it will send mail.

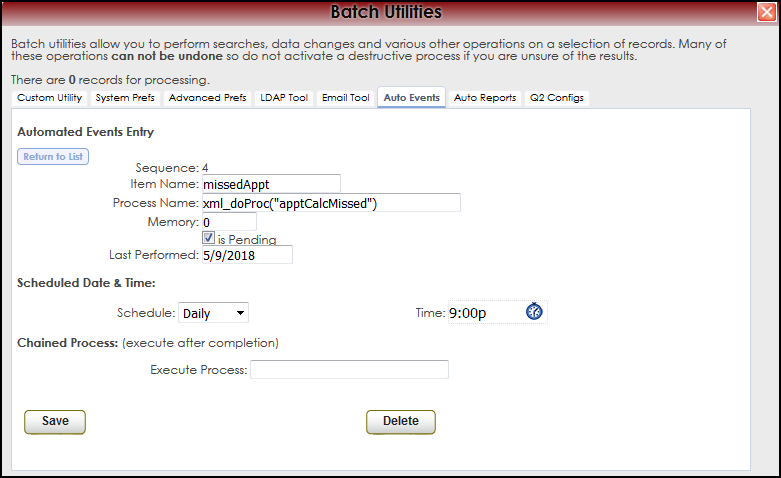
- Note: To set up the time that emails are sent out, you’ll need to go to Trac Nav. > Trac Man > Utilities and Prefs > Auto Events. There are preferences named "Send Email Reminders" and "missedAppt". These determine what time emails are sent out. You can click on each event to adjust what time each day those emails are sent out.

Profile Settings
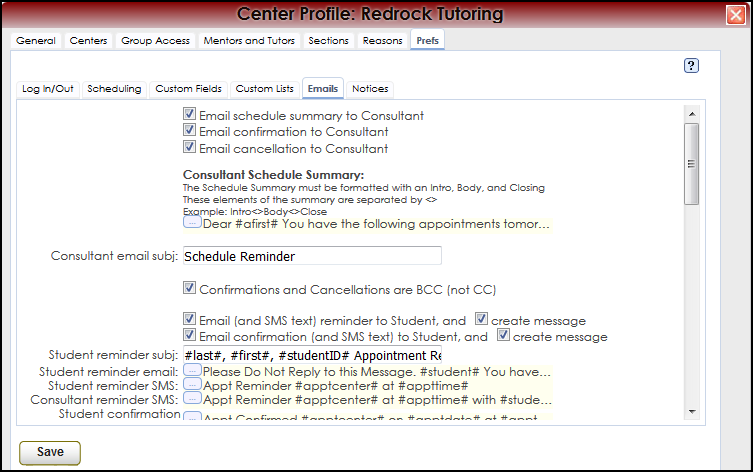
Now that we have the Mail Server set up, we need to adjust your email settings and create the automatic emails that will be sent out. To do this, navigate back to the Main Menu, go to Trac Nav. > Search Glass > Center Profiles. Choose your Profile, then click on the "Prefs" tab. In the Preferences Tab there is a sub tab named "Emails".

Here you need to make sure that all of your preferences are set up to send out the emails that you want to go out to the people you want them to go out to.
- A. The first three checkboxes deal with emails that will go to Consultants, then there is the first email to be set up. The “Consultant Schedule Summary” email is what will go to the consultant the day before the appointment with a student. Click on the icon to expand the text field, and then type the message that you would like to go to the consultants.
- B. The student Confirmation and Cancellation email have two checkboxes labeled “create message”, if enabled, these emails will be included in the student’s message history in their student entry window.
- C. “Student reminder email” is the email that a student receives the day before their appointment, it doubles as the confirmation email for the consultant as well. Because of the nature of this email, it is recommended to keep it as generic as possible since both consultants and students will be receiving it.
- D. “Center’s email address” is the email address that will show in the “From” field on all emails. The Send Immediate checkbox is the option to send the confirmation emails and cancellation emails immediately, or to wait until the notification time to send those emails out.
- E. Just to the right of “Send immediate” is a drop-down box which allows you to choose the message type. This can be set to also include an ICAL link in the email, so students and consultants can easily add that appointment to their personal calendars.
- F. “Email ____ to Center” will send their respective emails to the above center email address as well.
- G. “Send reminders for repeating appointments”, if checked, students and consultants will receive reminders for recurring appointments.
Now that you have your mail server settings placed in TutorTrac/AdvisorTrac and your Mail Preferences have been set up, you are ready to start sending emails.
Email Codes
You can create a template email and enter in the codes below to personalize the emails. Enter in the code with the hashtags. For example, if you want to send out a reminder email to students, your email could look similar to this:
Dear #first#,
You have scheduled an appointment with #tutor# on #apptdate# at #appttime#.
Everything between the hashtags will be replaced with the appropriate data.
Student Fields
| Field
|
Code
|
| Student Full Name (last, first)
|
#student#
|
| Student Full Name (first last)
|
#firstlast#
|
| Student First Name
|
#first#
|
| Student Last Name
|
#last#
|
| Student ID
|
#studentID#
|
| Student Formatted ID
|
#formattedID#
|
| Student Other ID
|
#barcode#
|
| Student Handle
|
#Account#
|
| Student Street
|
#Address#
|
| Student City
|
#City#
|
| Student State
|
#State#
|
| Student Zip
|
#Zip#
|
| Student Street, City, State, Zip
|
#fullAddress#
|
| Student Email
|
#studentEmail#
|
| Student Home Phone
|
#phone#
|
| Student Work Phone
|
#phone2#
|
| Student Text Message Address
|
#txtMsgAddress#
|
| Student Gender
|
#gender#
|
| Student Birthdate
|
#birthdate#
|
| Student Ethnicity
|
#ethnicity#
|
| Student Class
|
#class#
|
| Student College
|
#college#
|
| Student Cohort
|
#cohort#
|
| Student Major
|
#major#
|
| Student Grad_Und
|
#gradund#
|
| Student GPA
|
#GPA#
|
| Student Accumulated Hours
|
#TotalHours#
|
| Student Graduation Date
|
#GradDate#
|
| Student Graduation Degree
|
#GradDegree#
|
| Student Condition Code
|
#CondCode#
|
| Student Flag Text
|
#FlagText#
|
| Student Special Status
|
#status#
|
| Student ReferredBy
|
#referredby#
|
| Student HS Name
|
#HSName#
|
| Student Degree Goal
|
#degree#
|
| Student Custom Field1
|
#Field1#
|
| Student Custom Field2
|
#Field2#
|
| Student Custom Field3
|
#Field3#
|
| Student Custom Field4
|
#Field4#
|
| Student Custom Field5
|
#Field5#
|
| Student Custom Field6
|
#Field6#
|
| Student Custom Field7
|
#Field7#
|
| Student Custom Field8
|
#Field8#
|
| Student Custom Field9
|
#Field9#
|
| Student Custom Field10
|
#Field10#
|
Consultant Fields
| Field
|
Code
|
| Consultant Full Name
|
#tutor#
|
| Consultant Full Name
|
#advisor#
|
| Consultant Full Name
|
#counselor#
|
| Consultant Full Name
|
#Staff#
|
| Consultant First Name
|
#afirst#
|
| Consultant First Name
|
#tfirst#
|
| Consultant Last Name
|
#alast#
|
| Consultant Last Name
|
#tlast#
|
| Consultant Alternate Name
|
#AltName#
|
| Consultant Email
|
#tutoremail#
|
| Consultant Email
|
#advisoremail#
|
| Consultant Email
|
#staffemail#
|
| Consultant Phone
|
#tutorPhone#
|
| Consultant Phone
|
#advisorPhone#
|
| Consultant Phone
|
#staffPhone#
|
| Consultant CellPhone
|
#tutorPhone2#
|
| Consultant CellPhone
|
#tutorCellPhone#
|
| Consultant CellPhone
|
#advisorCellPhone#
|
| Consultant CellPhone
|
#staffCellPhone#
|
| Consultant WorkPhone
|
#tutorWorkPhone#
|
| Consultant WorkPhone
|
#advisorWorkPhone#
|
| Consultant Pager
|
#tutorPager#
|
| Consultant Pager
|
#advisorPager#
|
| Consultant Pager
|
#staffPager#
|
| Consultant Location
|
#tLocation#
|
| Consultant Location
|
#aLocation#
|
| Consultant Location
|
#sLocation#
|
| Consultant Notes2
|
#tutorNotes#
|
| Consultant Notes2
|
#advisorNotes#
|
| Consultant Notes2
|
#staffNotes#
|
Current Date Fields
| Field
|
Code
|
| Current Date
|
#date#
|
| Current Time
|
#time#
|
| Current Day of Week
|
#apptday#
|
Appointment Fields
| Field
|
Code
|
| Appointment Location
|
#apptlocation#
|
| Appointment Status
|
#ApptStatus#
|
| Appointment Full Date
|
#apptfulldate#
|
| Appointment Date
|
#apptdate#
|
| Appointment Time
|
#appttime#
|
| Recurring Appointment Start Date
|
#firstApptDate#
|
| Recurring Appointment End Date
|
#lastApptDate#
|
| Appointment Start Time
|
#apptstarttime#
|
| Appointment End Time
|
#apptendtime#
|
| Appointment Day of Week
|
#apptday#
|
| Appointment Center
|
#apptcenter#
|
| Appointment Subject
|
#apptsubject
|
| Appointment Notes
|
#apptnotes#
|
| Appointment Duration
|
#apptduration#
|
| Appointment Custom Field
|
#apptCust1#
|
| Appointment Fund
|
#apptfund#
|
| Appointment Total Missed
|
#missedApptTotal#
|
Availability Fields
| Field
|
Code
|
| Availability Location
|
#availlocation#
|
Center Fields
| Field
|
Code
|
| Center Name
|
#center#
|
| Center Sequence
|
#centerID#
|
| Profile Name
|
#profileCenter#
|
Survey Fields
| Field
|
Code
|
| Survey Response Sequence
|
#responseID#
|
| Survey Sequence
|
#surveyID#
|
Visits Fields
| Field
|
Code
|
| Visit Date In
|
#dateIn#
|
| Visit Date Out
|
#dateOut#
|
| Visit Time In
|
#visitTime#
|
| Visit Time Out
|
#timeOut#
|
| Visit Total Time
|
#duration#
|
| Visit Day of Week
|
#visitday#
|
| Visit Subject
|
#subject#
|
| Visit Reason
|
#reason#
|
| Visit Custom Field1
|
#Custom1#
|
| Visit Custom Field2
|
#Custom2#
|
| Visit Custom Field3
|
#Custom3#
|
| Visit Custom Field4
|
#Custom4#
|
| Visit Custom Field5
|
#Custom5#
|
| Visit Custom Field6
|
#Custom6#
|
| Visit Custom Field7
|
#Custom7#
|
| Visit Custom Field8
|
#Custom8#
|
| Visit Notes
|
#visitnotes#
|
| Visit Student Remarks
|
#visitStudRemarks#
|
Resources
| Field
|
Code
|
| Resource Barcode
|
#resID#
|
| Resource Title
|
#resTitle#
|
| Resource Description
|
#resDescrioon#
|
| Resource Due Date
|
#resDueDate#
|
| Resource LastDateOut
|
#resDateOut#
|
| Resource LastTimeOut
|
#resTimeOut#
|
More Questions?
We hope that you find this newsletter helpful and as always if you have any questions on this or any other features, please feel free to let us by emailing Helpdesk@go-redrock.com or submitting a ticket.
Thank you for your continued support!
|