| Auto Termination Function: Make it Work for Your Center
In this newsletter, we will discuss an important function of the Trac system called Auto Termination. The Auto Termination process has two functionalities, the first, is to log out any and all visits which remain on the log listing at the end of the night and set the end time of those visits to a duration you designate. The Second functionality, reviews the duration time of all visits logged for the day and if the visit time is greater than the time you have specified, the system will then adjust the duration of that visit to the time you have designated.
Configuration and Setup
As a SysAdmin- Go to the Magnifying Glass-> Choose your Profile -> Select the “Prefs” tab -> Click the “Log in/out” Tab. Scroll down the list of settings to the “Auto Terminate Visits Longer Than” Section to begin the configuration.
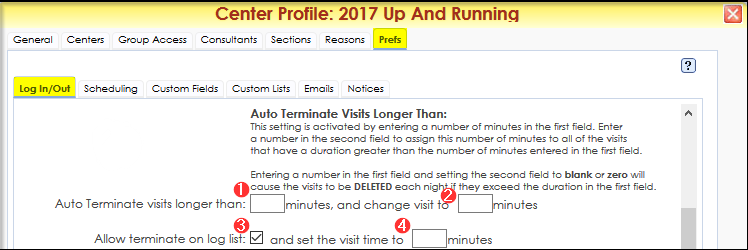
Auto-Terminate Visits Longer Than
The auto terminate visits setting is activated by entering a number of minutes in field one. Entering a number of minutes in field two, will assign all visits for the current day that have a duration greater than the number of minutes entered in field one, to the duration set in field two, when the Auto Termination process runs.
For example, if field one is set to 120 minutes and field two is set to 60 minutes, the system will review all recorded visits for the day and If a student’s visit time is greater than 120 minutes, the Auto Termination process will change the visit duration to the second field, in this example is 60 minutes

Entering a number in the field one and setting field two to blank or zero will cause the visits to be deleted, if the student visit time exceeds the duration in field one.
For example, if field one is set to 120 minutes and field two is set to either blank or zero – If a student’s visit time is greater than 120 minutes when the Auto Termination process runs, the visit will then be deleted from the system.

Allow Terminate on Log Listing
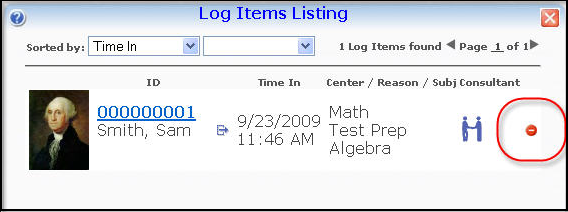
Checking the check box labeled as three (Allow Terminate on Log Listing) This will place a terminate button on the log listing. Clicking this button will Automatically delete the visit from the Trac system if there is not a specified number of minutes in field four.
If there is a specified number of minutes in field four and the Auto Terminated button is clicked, the visit will automatically be log out and the duration will be set to the duration specified in field four.
Field four is activated as its own setting if a number of minutes is entered in field four. When the Auto Termination process runs, it will log out any and all student visits which remain on the Log Listing. If the student does not log out or forgets to log out, this process will log the student out and set the students visit duration time to a time that you designate in field four.
Auto-Termination Auto-Event
The Auto Termination Auto Event sets the time of day that the system will terminate all remaining visits on the log listing as well as adjust visit durations based on the settings set up in the center Profile Prefs. This Auto Event is typically ran each day after all of the centers have closed and no longer offering services. This Auto Event can only be managed by System Administrators of your Trac system.
To Manage this Auto Event:
As a SysAdmin- Go to the Trac Navigation -> Tracman Icon -> Utilities and Prefs -> Auto Events Tab -> Select Auto Termination
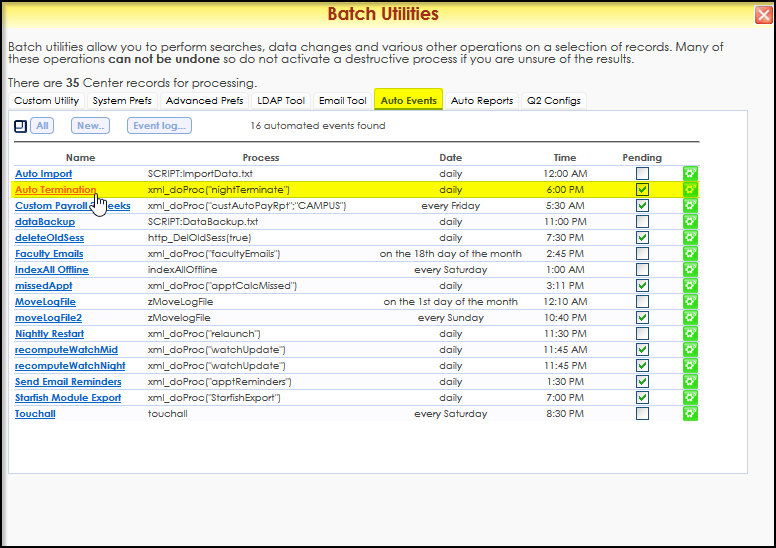
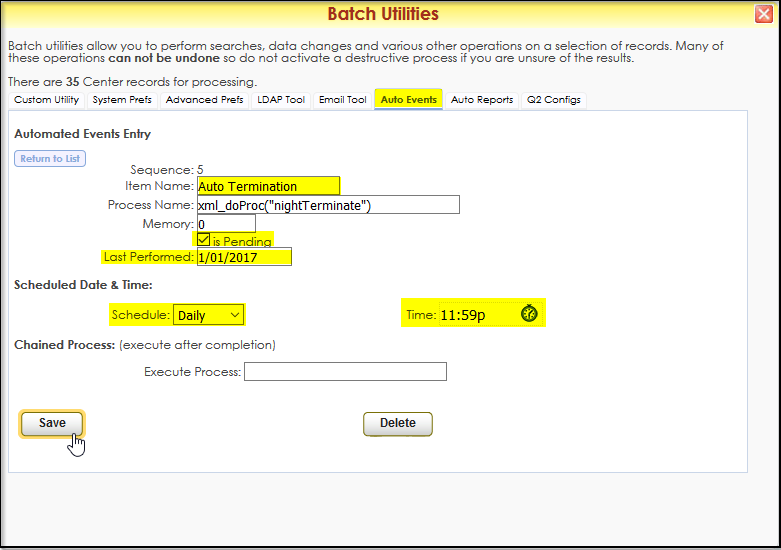
Click on the link for Auto Termination to View the Configuration. Check the Box “is Pending” to Activate. Last Preformed should be set to the previous days Date. For Example; if today’s date is 1/2/2017 set Last preformed date to 1/1/2017.
Under the Schedule Date & Time – Schedule set to “Daily”. The Time should be set to a time after your center has closed and before midnight. Click save to complete the setup of the Auto Event.
Note: Do not set the process time to midnight, rather set the time for 11:59 pm if needed.
Emails Related to Auto-Termination
When a student’s visit is Auto Terminated from the Log Listing the system can also send one customizable email to all students. To edit this custom email: Utilities and Prefs> Advanced Prefs> In the Search Bar Search for “TerminatedEmail”. Here is an Example of a terminated email:
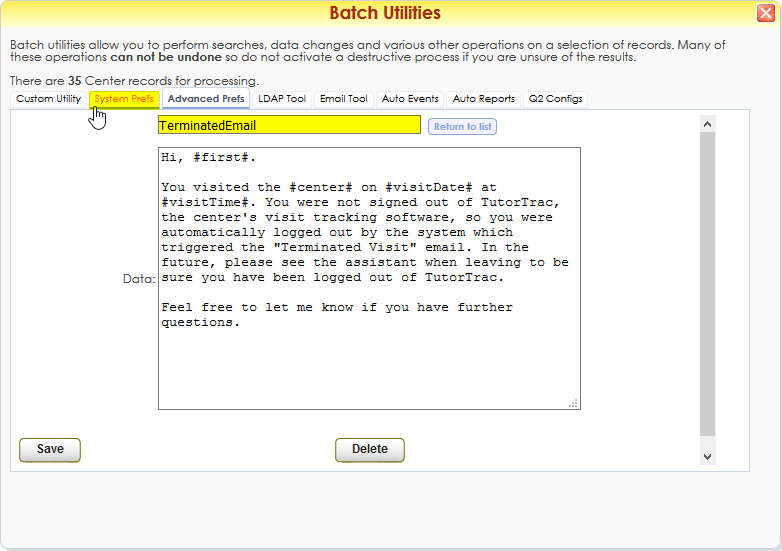
This Email can be enabled or disabled. To Disable the email, follow these steps: Utilities and Prefs> Advanced Prefs> In the Search Bar Search for “SendterminatedEmails”. Click the Preference and set to “no” to disable, and yes to make the Terminated emails active.
More Questions?
We hope that you found this article helpful, and as always if you have any questions about this or any other features, please feel free to let us know by emailing Helpdesk@go-redrock.com or by submitting a ticket.
Thank you for your continued support!
| 


