TracCloudNews21: Difference between revisions
From Redrock Wiki
TracCloudNews21
No edit summary |
No edit summary |
||
| Line 3: | Line 3: | ||
| style="vertical-align:top; padding:20px 20px 20px 2px;" | | | style="vertical-align:top; padding:20px 20px 20px 2px;" | | ||
{| style="width:100%; vertical-align:top; " | {| style="width:100%; vertical-align:top; " | ||
== | ==Watch Lists== | ||
Are you interested in exploring additional methods to allow your staff to easily identify students from specific lists at a glance? Watch lists can be built on top of any existing custom lists that you’ve created for your students (<i>[[TracCloudGuideGlobalLists|more information on those custom lists can be found here]]</i>), which adds a color-coded indicator which can be displayed in different areas of the Trac System.<br> | |||
For example, you could create a watch list to make certain students stand out on the student listing, like in the screenshot below.<br> | |||
[[File:3618163.png|500px]]<br><br> | |||
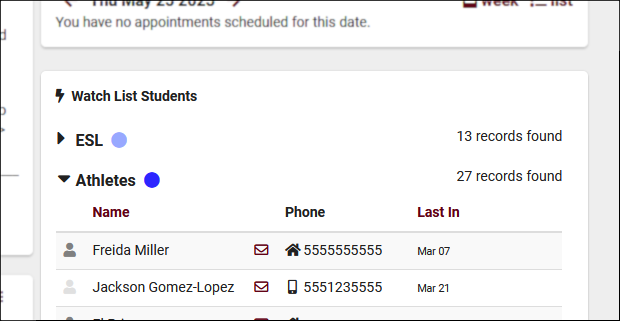
You can even add watch lists to the dashboard to keep track of certain student populations, including their contact information and last visit date.<br> | |||
[[File:6679254.png|500px]]<br><br> | |||
reating a watch list is easy, start by going to <i>Other > Other Options > Preferences > Watch Lists</i>. This menu is only accessible to [[TracCloudNewsUserLevel|SysAdmin]] accounts. Create a new watch list with the <b>+</b> icon, choose a color, select the source list, and then select where you want those indicator dots to appear.<br> | |||
[[File:2011567.png|500px]]<br><br> | |||
Access to watch lists is based on the list access permissions granted to your [[TracCloudGuideProfileGroups|permission groups]]. When you provide access to a (watch) list, the indicator dot will appear automatically in the configured locations. For instance, they can quickly identify that the color blue represents a watch list for ESL students requiring an appointment with a specific staff member. | |||
For more information on lists and watch lists, [[TracCloudGuideGlobalLists|check out our full wiki article here.]] | |||
<hr> | <hr> | ||
{{NewsletterContactInfo}} | {{NewsletterContactInfo}} | ||
|} | |} | ||
[[Category:TracCloud]] | [[Category:TracCloud]] | ||
Revision as of 17:37, 26 May 2023
| Template:TracCloudNewslettersTOC |
Watch ListsAre you interested in exploring additional methods to allow your staff to easily identify students from specific lists at a glance? Watch lists can be built on top of any existing custom lists that you’ve created for your students (more information on those custom lists can be found here), which adds a color-coded indicator which can be displayed in different areas of the Trac System. For example, you could create a watch list to make certain students stand out on the student listing, like in the screenshot below. You can even add watch lists to the dashboard to keep track of certain student populations, including their contact information and last visit date. reating a watch list is easy, start by going to Other > Other Options > Preferences > Watch Lists. This menu is only accessible to SysAdmin accounts. Create a new watch list with the + icon, choose a color, select the source list, and then select where you want those indicator dots to appear. Access to watch lists is based on the list access permissions granted to your permission groups. When you provide access to a (watch) list, the indicator dot will appear automatically in the configured locations. For instance, they can quickly identify that the color blue represents a watch list for ESL students requiring an appointment with a specific staff member. For more information on lists and watch lists, check out our full wiki article here. More Questions? |

