TracCloud: Success Plans: Difference between revisions
From Redrock Wiki
No edit summary |
No edit summary |
||
| Line 67: | Line 67: | ||
* <b>Prompt / Confirmation Directed To</b> | * <b>Prompt / Confirmation Directed To</b> | ||
:: | ::(EDITING NOTE: RE-CONFIRM WHAT THIS DOES)<br><br> | ||
[[File:3799967.png|700px]]<br><br> | [[File:3799967.png|700px]]<br><br> | ||
* <b>Override Confirmation for this Step</b> | * <b>Override Confirmation for this Step</b> | ||
::By default, your steps will follow the Plan's Staff Confirmation preference. This option allows you to override that for a specific step, requiring or not requiring that a staff member must confirm the completion of this step. ( | ::By default, your steps will follow the Plan's Staff Confirmation preference. This option allows you to override that for a specific step, requiring or not requiring that a staff member must confirm the completion of this step. (DOUBLE-CHECK THIS)<br><br> | ||
* <b>Is an Optional Step</b> | * <b>Is an Optional Step</b> | ||
| Line 124: | Line 124: | ||
[[File:2436561.png|900px]]<br><br> | [[File:2436561.png|900px]]<br><br> | ||
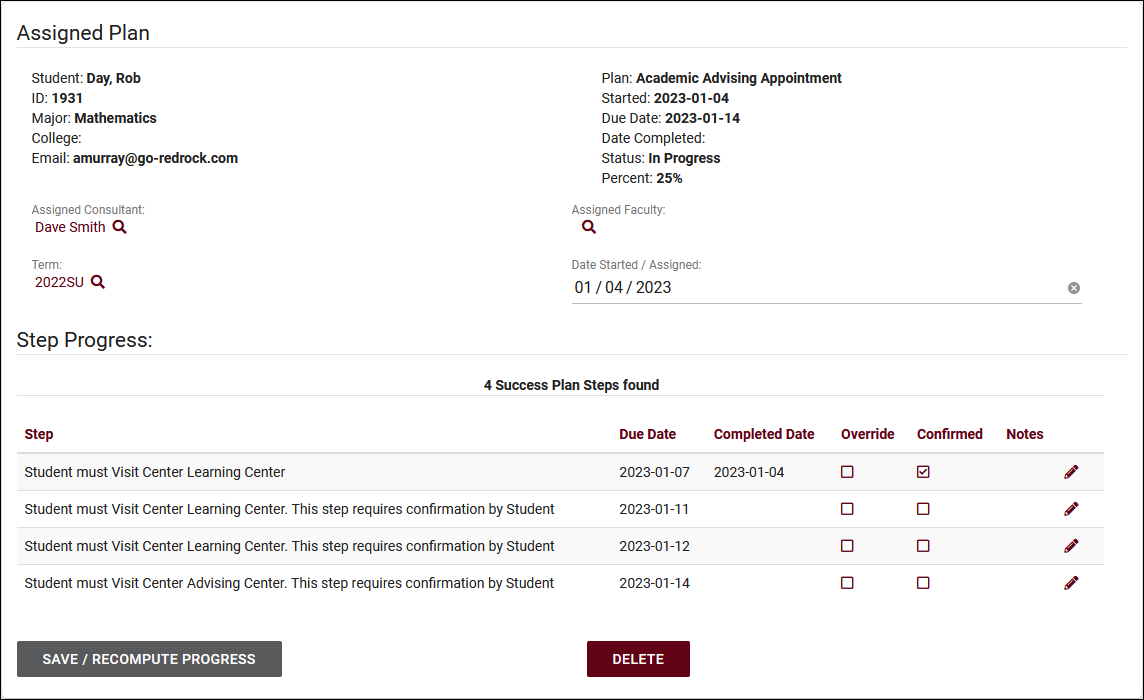
After creating a new Plan for the student (or opening an existing one), you will find the following options. This includes basic details about the student, their plan details such as due date and progress, the assigned consultant, faculty, and term, and the individual steps. | |||
[[File:6976440.png|900px]]<br><br> | |||
The options available within each Step can differ based on your Plan options. <b>Override Completion</b> allows you to specify if and when a Step was completed, bypassing TracCloud's automated tracking. <b>Completion Confirmed</b> is used to confirm that this Step has been concluded, allowing it to count towards Plan completion percentage. <b>Notes</b> can be used for any purpose to record additional information regarding each Step. | |||
[[File:5418866.png|900px]] | |||
<hr> | <hr> | ||
==<b>Group Permissions</b>== | ==<b>Group Permissions</b>== | ||
Revision as of 17:17, 4 January 2023
Additional Features
|
Success Plans The Success Plan module allows you to track students' progress in their Success Plans. Each Success Plan contains Steps for students to complete. Each Step represents a type of task, such as visiting a center, responding to a survey, uploading a document, and more. Creating a Success PlanTo create a success plan, go to Other > Success Plans > Hamburger menu (File:Hamburger.png) > New Success Plan. Once you save your Success Plan with a name, the following options will be available.
StepsClick on the New Step button to create your first Step. Based on which Step Type you choose, the rest of the options on this page can differ.
Dashboard DisplayStudents can be shown information about their success plans on their dashboard. The information and formatting contained here can be customized to better suit your requirements. The screenshot below is the student dashboard with the default display configuration. This is customized from the Dashboard Display tab of your Success Plan Type. This is the default value, which can be loaded by clicking the clipboard icon in the top-left corner of this menu. Both Twig and HTML can be used to personalize this. Header displays once at the top of this form, and is expected to contain instructions or details on their Success Plan. Line Display repeats for each Step the student has been assigned, using Twig to determine if the formatting needs to change for each entry. Footer Display is the final block of text in this menu. If these fields are left blank, the Success Plan widget will not be shown on the student dashboard at all. Emailsaaaaaaaaaaaaaaaaaaa OptionsThe final tab in your Success Plan Type is Options. This contains various options to fine-tune the functionality of this Success Plan.
Assigning and Managing Success Plans for StudentsPlans can be assigned to individual students from the Success Plans tab of their profile. Click on Assign Plan to Student and choose the Plan type that you want to use. This page also lists the current and past Plans for this student, including assigned and due date, completion status, term, and more. Clicking the pencil icon on the left provides quick access to that Plan's options. After creating a new Plan for the student (or opening an existing one), you will find the following options. This includes basic details about the student, their plan details such as due date and progress, the assigned consultant, faculty, and term, and the individual steps. The options available within each Step can differ based on your Plan options. Override Completion allows you to specify if and when a Step was completed, bypassing TracCloud's automated tracking. Completion Confirmed is used to confirm that this Step has been concluded, allowing it to count towards Plan completion percentage. Notes can be used for any purpose to record additional information regarding each Step. Group PermissionsIn order to give a staff member the ability to manage Success Plan types, they must be given access to the Success Plan Table. Go to Other > Other Options > Groups > [The group you want to modify] > Admin / Modules > Table Access > Add "Success Plans" > Save. You can use the colored icon to determine what level of access is provided, as with other tables. Staff and Faculty DashboardThis is being implemented later. ReportsThis is being implemented later. For information on purchasing the Success Plans Module, reach out to sales@go-redrock.com |


