TracCloud: Custom Forms
From Redrock Wiki
Additional Features
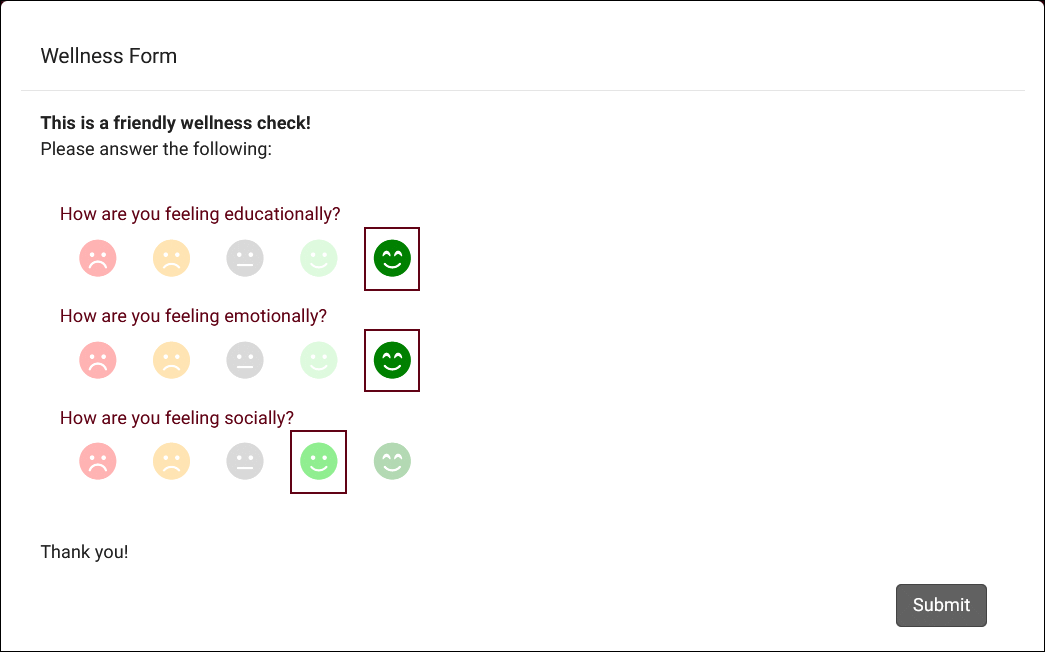
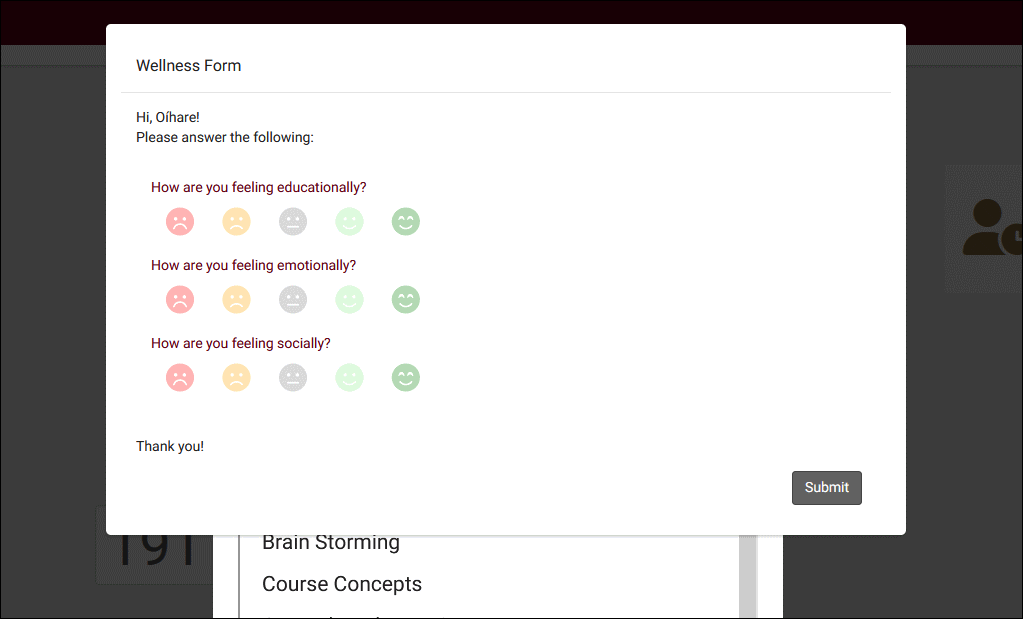
This feature in TracCloud offers extensively customizable forms that can be displayed to students, staff, or faculty. Forms can periodically be displayed to recipients or they can be manually initiated via a button on the main menu. These forms have three primary purposes.
1. Wellness Check-ins
- Check in with students to see how they're feeling, not just educationally but socially and environmentally as well. Ask simple or open ended question to prompt the student to consider ways of improving their learning experience or to reach out for assistance.
2. Reflective Prompts
- Reflection is a powerful tool in student learning. Periodically prompt students to reflect on their academic habits, identifying areas needing additional support, and encourage them to think about their learning process. Students can be prompted form their dashboard to take a few minutes to answer the reflective form, which additionally gives your staff insight into how students are applying the support they received.
3. Custom Forms
- In addition to wellness check-ins and reflective prompts, custom forms can be used for virtually anything. If this approach of periodic or manually prompted forms sounds like it may work for other questions you want to ask people in your center, you'll be able to take advantage of this feature too.
- In addition to wellness check-ins and reflective prompts, custom forms can be used for virtually anything. If this approach of periodic or manually prompted forms sounds like it may work for other questions you want to ask people in your center, you'll be able to take advantage of this feature too.
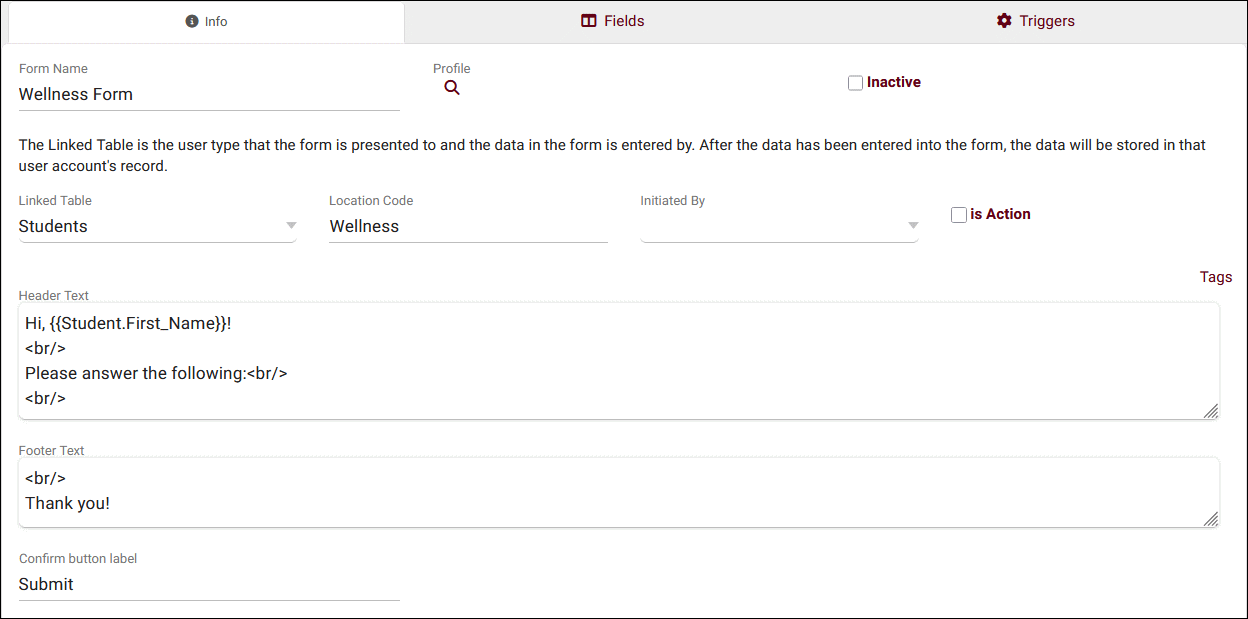
Forms can be managed in Other > Other Options > Custom Forms.
- Form Name
- Enter the name of your form. E.g., "Wellness check-in" or "Reflective prompt." This text will be visible to the recipient at the top of the form.
- Enter the name of your form. E.g., "Wellness check-in" or "Reflective prompt." This text will be visible to the recipient at the top of the form.
- Profile
- Choose which profile this form is linked to.
- Choose which profile this form is linked to.
- Inactive
- If you're no longer using one of your forms, it can be deactivated to prevent it from appearing to your students, staff, or faculty going forward.
- If you're no longer using one of your forms, it can be deactivated to prevent it from appearing to your students, staff, or faculty going forward.
- Linked Table
- Choose the recipient of this form. Students, Staff, or Faculty. This should never be changed after creating your custom form.
- Choose the recipient of this form. Students, Staff, or Faculty. This should never be changed after creating your custom form.
- Location Code
- The location that your questions (custom fields) will be assigned to. This should never be changed after creating your custom form.
- The location that your questions (custom fields) will be assigned to. This should never be changed after creating your custom form.
- Initiated by
- Choose who is filling out this form for another user type in the system. For example, if Linked Table is Students and Initiated By is Faculty, then faculty will be able to open this custom form, select a student, and submit the form to that student's account. This field should be left blank if users will be submitting these forms for themselves.
- Choose who is filling out this form for another user type in the system. For example, if Linked Table is Students and Initiated By is Faculty, then faculty will be able to open this custom form, select a student, and submit the form to that student's account. This field should be left blank if users will be submitting these forms for themselves.
- is Action
- If enabled, it will be possible to submit this form from a student, staff, or faculty member's account via the "Actions" button at the top of their profile.
- If enabled, it will be possible to submit this form from a student, staff, or faculty member's account via the "Actions" button at the top of their profile.
- Header Text
- This text appears above your questions, allowing you to introduce the form to the student and ask them to fill out the questions below. This field supports HTML and Twig.
- This text appears above your questions, allowing you to introduce the form to the student and ask them to fill out the questions below. This field supports HTML and Twig.
- Footer Text
- This text appears beneath your questions. This field supports HTML and Twig.
- This text appears beneath your questions. This field supports HTML and Twig.
- Confirm button label
- The name of the button to submit their responses and complete the form. For example, "Save," "Submit," or "Ok."
This tab contains all of the questions you're asking on your reflective prompt, wellness check-in, or custom form. This is essentially a shortened version of the custom fields listing, showing only the custom fields assigned to your chosen form. You can add new fields by clicking the "Add new field" button. Information about creating or managing these fields can be found here.
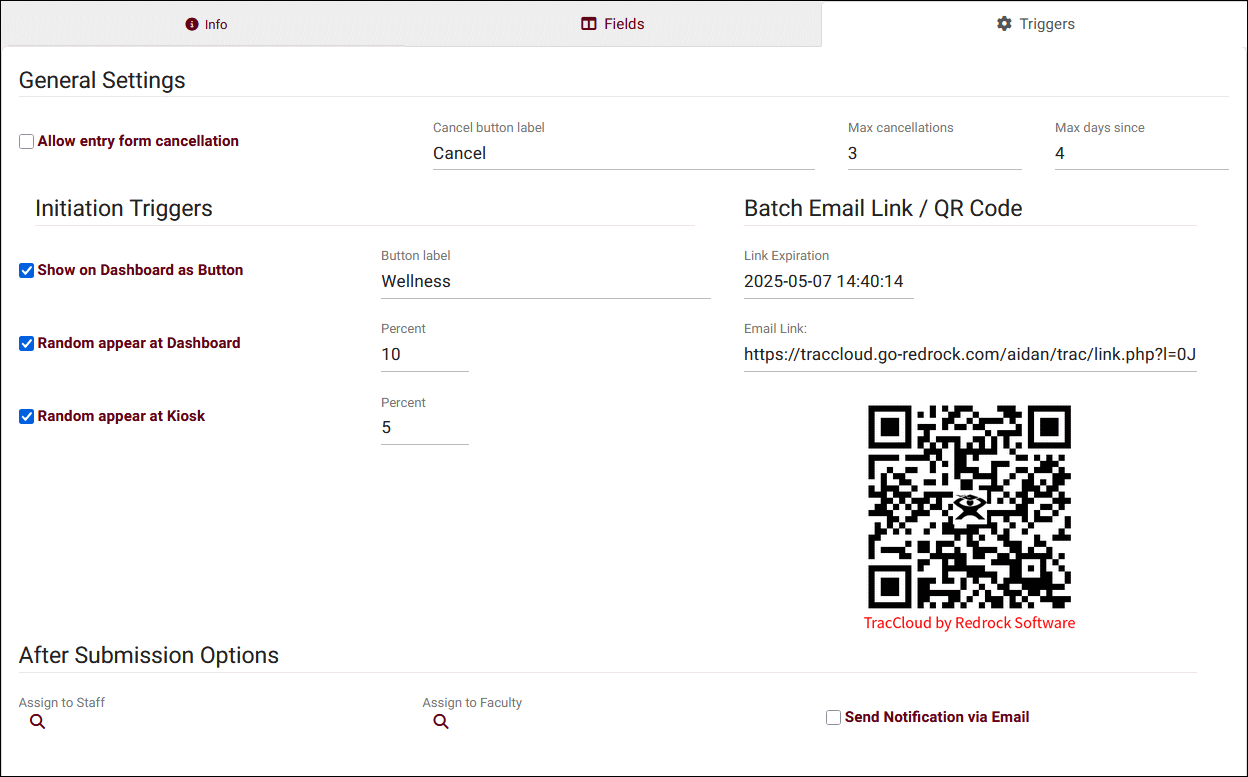
This tab allows you to control when your form appears to recipients, including random chances to appear on the dashboard or on kiosks as well as how many times recipients can postpone or cancel their response before it becomes required.
- Allow entry form cancellation
- Choose whether or not recipients are allowed to cancel to avoid answering the form.
- Choose whether or not recipients are allowed to cancel to avoid answering the form.
- Cancel button label
- Choose the name of the cancel button (e.g., "Cancel", "Maybe later", etc).
- Choose the name of the cancel button (e.g., "Cancel", "Maybe later", etc).
- Maximum cancellations
- If recipients are allowed to cancel, choose how many times they can cancel before TracCloud will require that they answer the form.
- If recipients are allowed to cancel, choose how many times they can cancel before TracCloud will require that they answer the form.
- Maximum days since
- Set a limit for how long a recipient can go before they must submit an answer for this form. For example, if your form has a 10% chance of appearing, it is statistically possible that the recipient doesn't see the form even after 10 days. Once this chosen threshold is reached or surpassed, the recipient will be shown the form until they submit an answer regardless of the chance to display. This additionally overrides how many times the recipient may cancel/postpone their answer. If this limit is passed, the cancel button will be hidden even if they have not yet reached the maximum cancellations threshold.
- Set a limit for how long a recipient can go before they must submit an answer for this form. For example, if your form has a 10% chance of appearing, it is statistically possible that the recipient doesn't see the form even after 10 days. Once this chosen threshold is reached or surpassed, the recipient will be shown the form until they submit an answer regardless of the chance to display. This additionally overrides how many times the recipient may cancel/postpone their answer. If this limit is passed, the cancel button will be hidden even if they have not yet reached the maximum cancellations threshold.
- Show on dashboard as Button
- Allow recipients to manually initiate the form and submit answers. If enabled, you can choose the name of the button in the "Button label" field.
- Allow recipients to manually initiate the form and submit answers. If enabled, you can choose the name of the button in the "Button label" field.
- Random appear at Dashboard
- If enabled, the recipient will be randomly prompted X% of the time when they load the dashboard. You can choose the percentage in the "Percent" field to the right. TracCloud will only trigger this chance once per day.
- If enabled, the recipient will be randomly prompted X% of the time when they load the dashboard. You can choose the percentage in the "Percent" field to the right. TracCloud will only trigger this chance once per day.
- Random appear at Kiosk
- If enabled, the recipient will be randomly prompted X% of the time when they login on a kiosk. You can choose the percentage similar to the dashboard option above, however for kiosk logins the chance will trigger each time the student logs in rather than once per day.
- If enabled, the recipient will be randomly prompted X% of the time when they login on a kiosk. You can choose the percentage similar to the dashboard option above, however for kiosk logins the chance will trigger each time the student logs in rather than once per day.
- Batch Email Link / QR Code
- Enter a link expiration date and you will be provided a URL and a QR code for this custom form. This URL can be shared with students, which when opened/scanned will prompt them to answer your custom form questions. Multiple responses can be submitted, and the response(s) will be linked to the student who answered it.
- Enter a link expiration date and you will be provided a URL and a QR code for this custom form. This URL can be shared with students, which when opened/scanned will prompt them to answer your custom form questions. Multiple responses can be submitted, and the response(s) will be linked to the student who answered it.
- Assign to Staff/Faculty
- When a response is recorded, you can automatically assign it to a staff/faculty for review/follow-up. If Send Notification via Email is checked, the assigned person will receive an email upon a response being received with a link to view the response data.
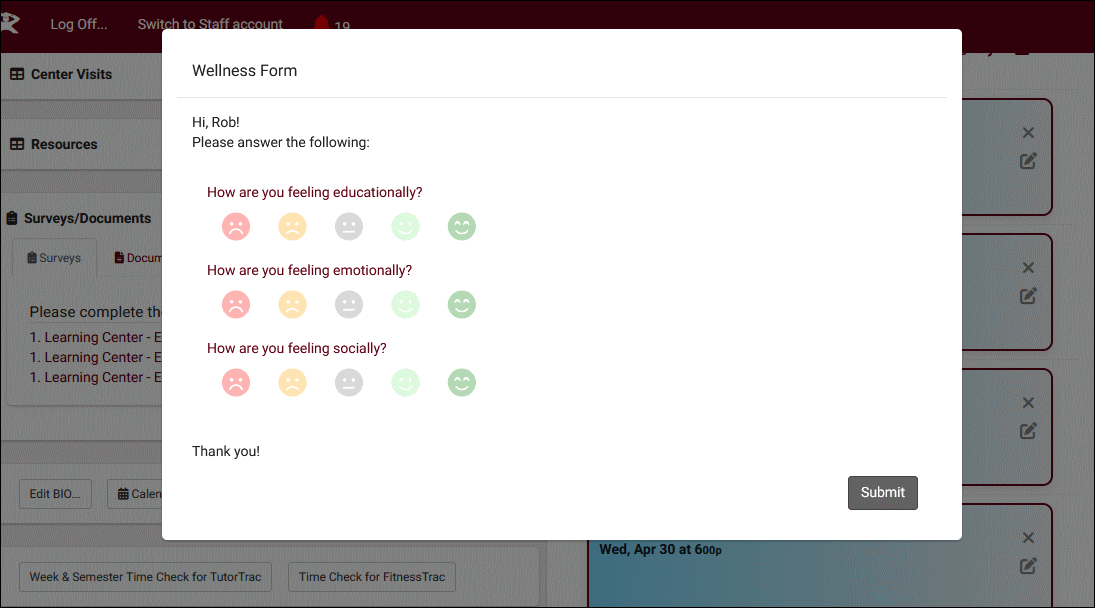
From the recipient's main menu, depending on your form settings, the form can either pop-up randomly or be triggered by clicking the form button below.
Once opened, the form will appear giving the student, staff, or faculty the ability to answer the questions you've defined for them. The cancel button will only appear if they are currently allowed to cancel based on your form settings.
Similarly, if configured to do so, the form can randomly appear during kiosk login prior to the student selecting their subject, reason, etc.
Form responses can be accessed from the student's timeline or through the dedicated Custom Form Responses listing. Access this to this listing can be provided by going to Other > Other Options > Groups > [The group you wish to edit] > Admin/Modules > Add "Custom Form Responses" to "Table Access" > Save.
The Submission Info tab will show the original response from the recipient, while the Follow Up / Notes tab will allow you to record when the form was followed up on or completed. A notes field is also provided to record additional information about this response or follow-ups.
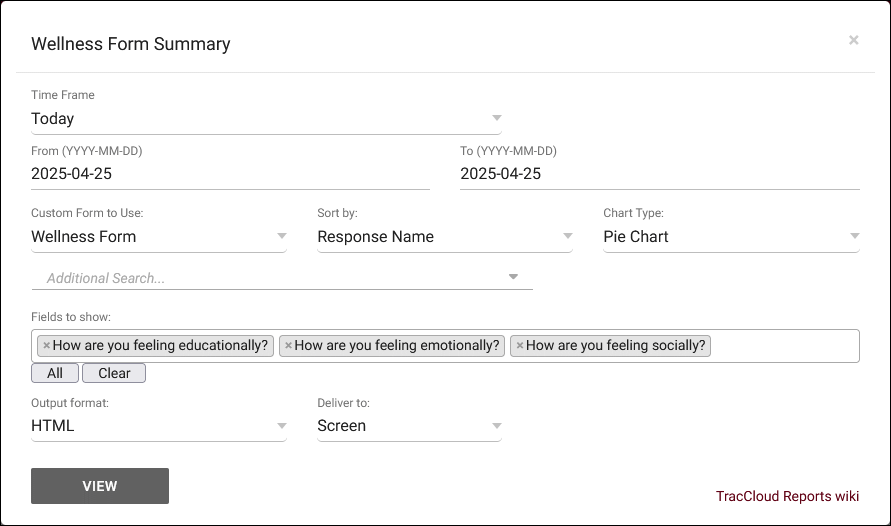
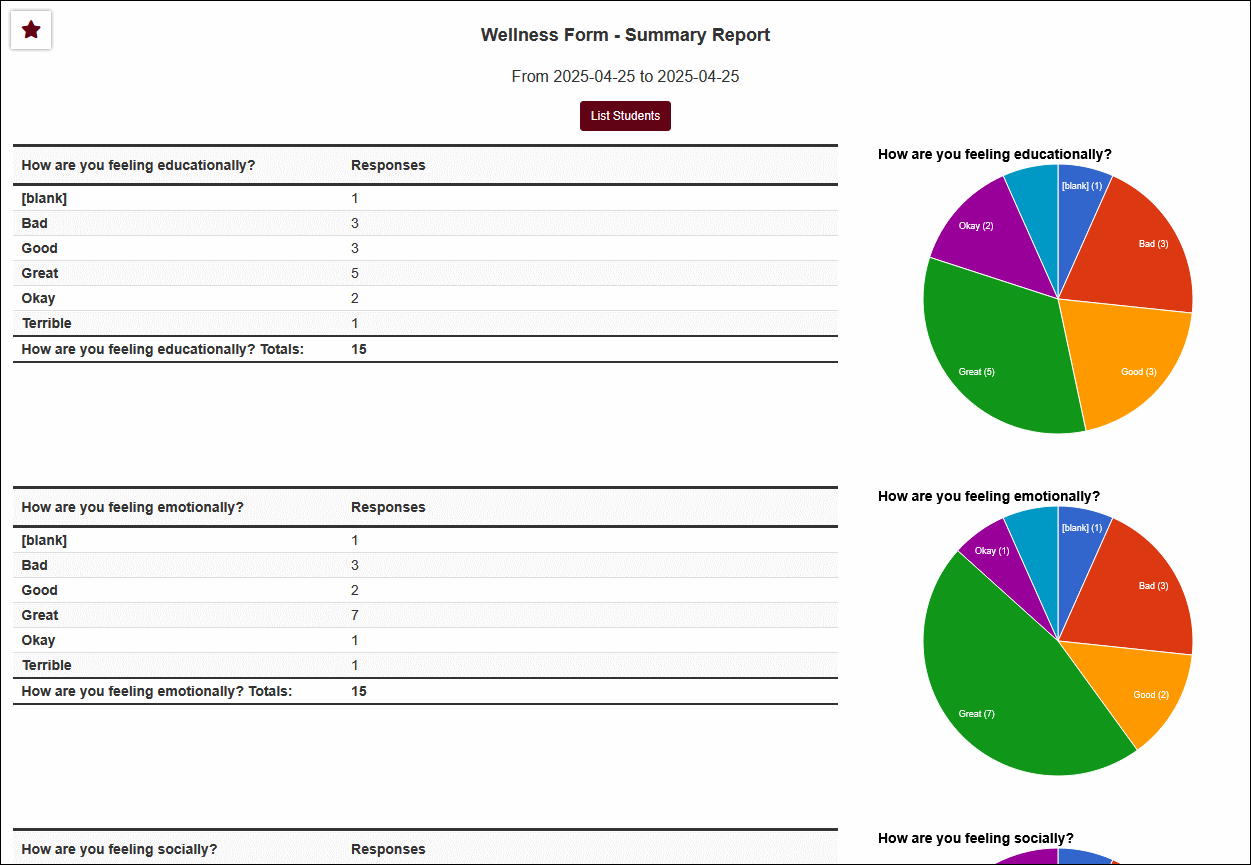
The Custom Form Summary report found in the Retention category allows you to run reports on answers submitted via custom forms. This report has a unique function that allows you to filter results after generating the report.
- Time Frame
- The date range for the data in this report. Beyond entering a date range manually, you can also choose a preset date range (Today, This Month, This Semester, etc) from the dropdown list above.
- Custom Form to Use
- Choose which form to pull responses from. Once selected, you will be able to choose your fields to show.
- Sort by
- Choose how the selected data is sorted.
- Chart Type
- This allows you to select the format of the chart. Pie, bar, or line.
- Additional Search
- Filter your results by a selected field.
Use * as a wildcard (Subject: MAT*)
| as "or" (Major: Mathematics|Biology)
# as "Not" (Status: #Inactive)
&& as "And" (Major: #Mathematics&&#Biology)
blankornull as a keyword to find records where the field is blank (Reason: blankornull)
Multiple fields can be added to further narrow down your results.
- Filter your results by a selected field.
- Additional fields to show
- This can be used to add additional data fields to the report results. For example, you could use this to add a student's email address in a visit report.
- Output format
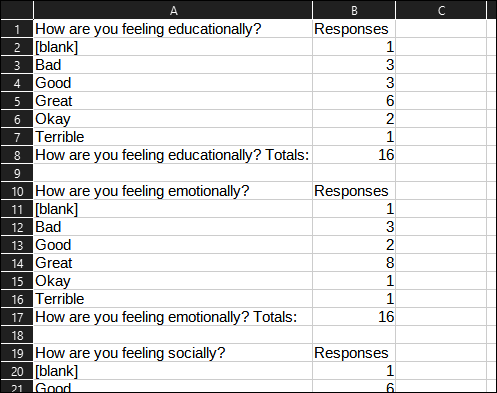
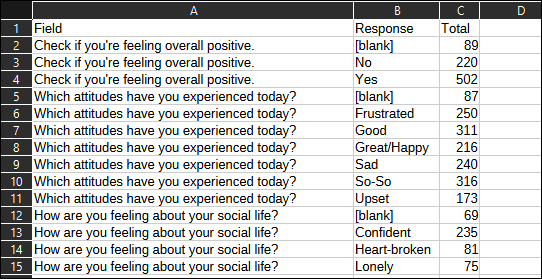
- Use HTML to view report data in your browser, or export this report to a CSV file (available for most reports). Some reports offer additional CSV options depending on if you want to include totals and/or data grouping in your export.
- Deliver to
- Display this report immediately in your browser ("Screen"), or send the report to a specified email address ("Email"). Multiple email addresses can be specified, use ; to separate them (example@example.edu;sample@example.edu). Alternatively, "FTP Export" can be chosen to send the report file to your SFTP directory (same location as your import files). If you save a report as a favorite with the FTP Export option chosen, the name of the file will match the name of your favorite report. If automating the FTP report, an email address will be required, but an email will not be sent.
Filtering by Responses
A unique feature of this report is the ability to filter responses from the results screen. Hover over a response and you can choose to either filter to only responses with that answer or to exclude responses with that answer. This applies to all questions in the report, so for example, you could see how students who answers X to Question A responded to question B.
After applying filters, you can scroll up to the top of your report screen to reset your filters or click "List Students" to be taken to the students listing to see which students submitted the responses you're currently viewing.
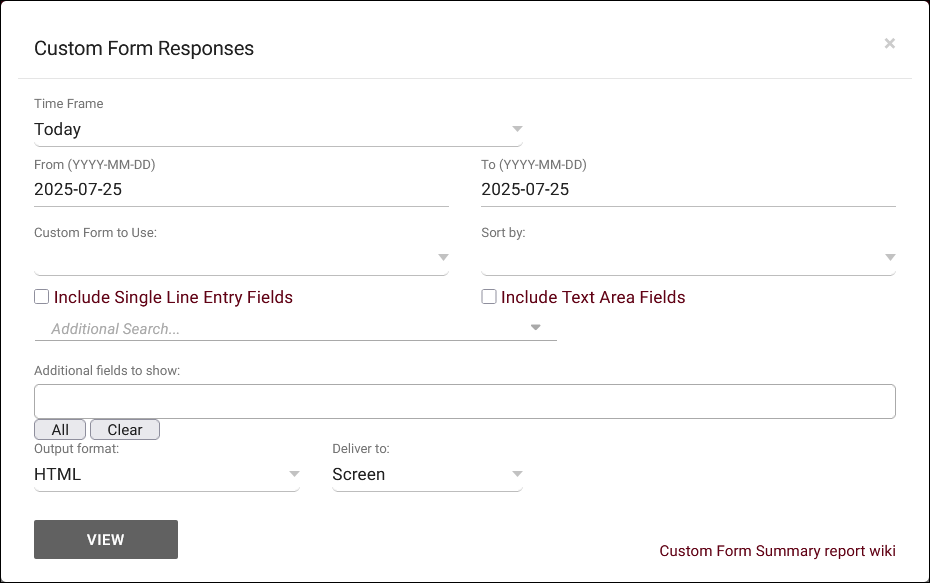
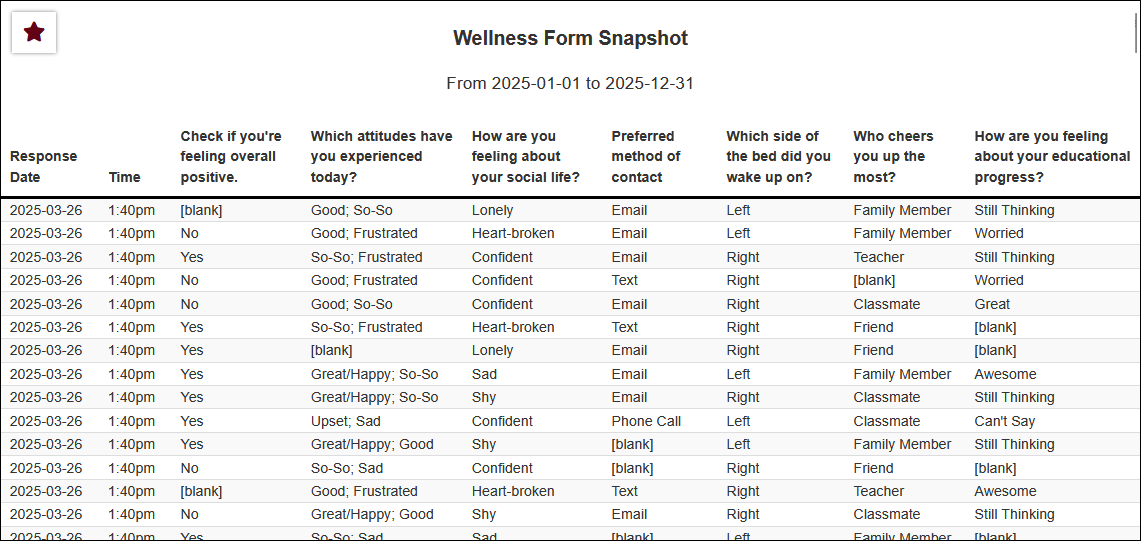
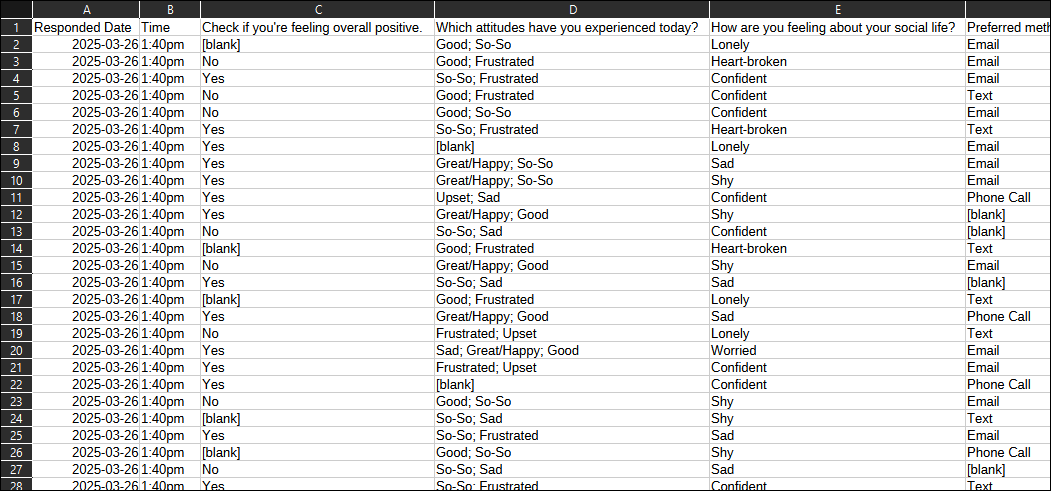
The Custom Form Responses report found in the Retention category allows you to run reports on answers submitted via custom forms. This report lists out each response in the date range chosen, along with any additional columns you opt to include.
- Time Frame
- The date range for the data in this report. Beyond entering a date range manually, you can also choose a preset date range (Today, This Month, This Semester, etc) from the dropdown list above.
- Custom Form to Use
- Choose which form to pull responses from. Once selected, you will be able to choose your fields to show.
- Sort by
- Choose how the selected data is sorted.
- Include Single Line Entry Fields and Include Text Area Fields
- Choose whether or not you want to include open text fields like these in your report results.
- Additional Search
- Filter your results by a selected field.
Use * as a wildcard (Subject: MAT*)
| as "or" (Major: Mathematics|Biology)
# as "Not" (Status: #Inactive)
&& as "And" (Major: #Mathematics&&#Biology)
blankornull as a keyword to find records where the field is blank (Reason: blankornull)
Multiple fields can be added to further narrow down your results.
- Filter your results by a selected field.
- Additional fields to show
- This can be used to add additional data fields to the report results. For example, you could use this to add a student's email address in a visit report.
- Output format
- Use HTML to view report data in your browser, or export this report to a CSV file (available for most reports). Some reports offer additional CSV options depending on if you want to include totals and/or data grouping in your export.
- Deliver to
- Display this report immediately in your browser ("Screen"), or send the report to a specified email address ("Email"). Multiple email addresses can be specified, use ; to separate them (example@example.edu;sample@example.edu). Alternatively, "FTP Export" can be chosen to send the report file to your SFTP directory (same location as your import files). If you save a report as a favorite with the FTP Export option chosen, the name of the file will match the name of your favorite report. If automating the FTP report, an email address will be required, but an email will not be sent.
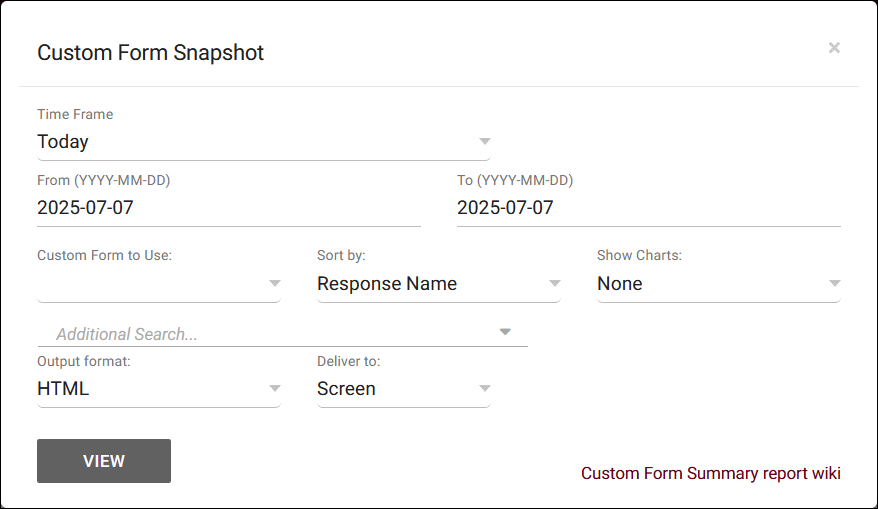
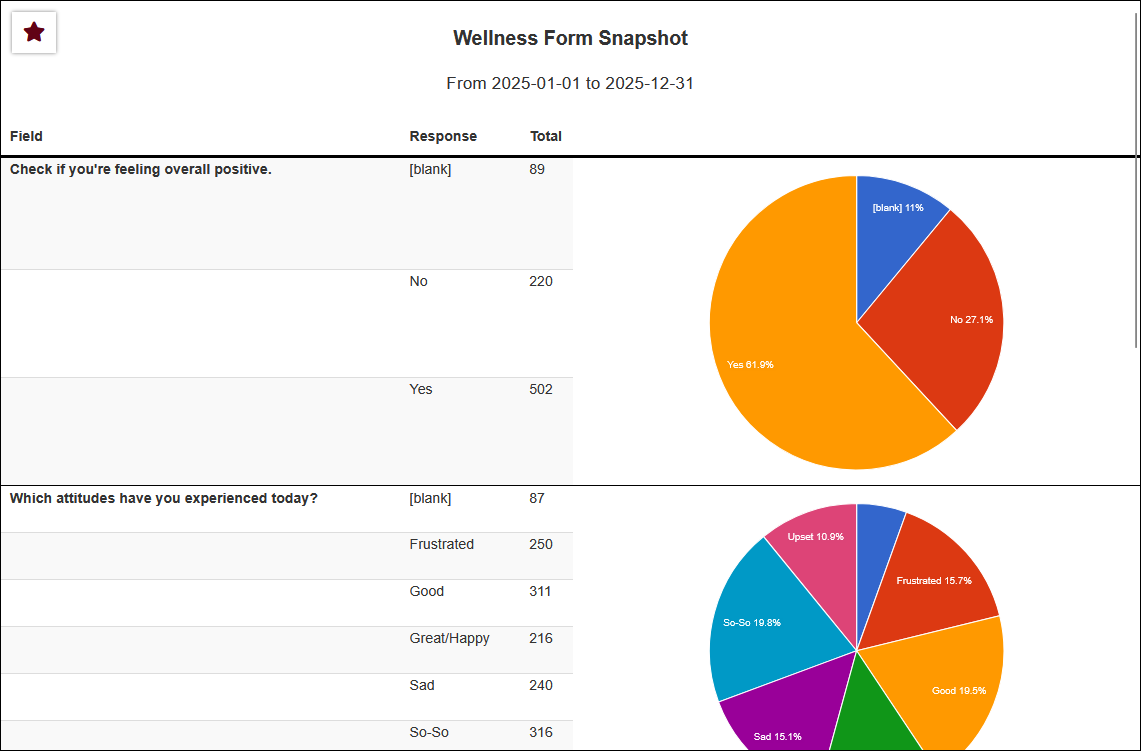
The Custom Form Snapshot report found in the Retention category allows you to run reports on answers submitted via custom forms. This report will tally results from all responses in the date range chosen and can optionally include charts to visualize this data.
- Time Frame
- The date range for the data in this report. Beyond entering a date range manually, you can also choose a preset date range (Today, This Month, This Semester, etc) from the dropdown list above.
- Custom Form to Use
- Choose which form to pull responses from. Once selected, you will be able to choose your fields to show.
- Sort by
- Choose how the selected data is sorted.
- Chart Type
- This allows you to select the format of the chart. Pie, bar, or line.
- Additional Search
- Filter your results by a selected field.
Use * as a wildcard (Subject: MAT*)
| as "or" (Major: Mathematics|Biology)
# as "Not" (Status: #Inactive)
&& as "And" (Major: #Mathematics&&#Biology)
blankornull as a keyword to find records where the field is blank (Reason: blankornull)
Multiple fields can be added to further narrow down your results.
- Filter your results by a selected field.
- Additional fields to show
- This can be used to add additional data fields to the report results. For example, you could use this to add a student's email address in a visit report.
- Output format
- Use HTML to view report data in your browser, or export this report to a CSV file (available for most reports). Some reports offer additional CSV options depending on if you want to include totals and/or data grouping in your export.
- Deliver to
- Display this report immediately in your browser ("Screen"), or send the report to a specified email address ("Email"). Multiple email addresses can be specified, use ; to separate them (example@example.edu;sample@example.edu). Alternatively, "FTP Export" can be chosen to send the report file to your SFTP directory (same location as your import files). If you save a report as a favorite with the FTP Export option chosen, the name of the file will match the name of your favorite report. If automating the FTP report, an email address will be required, but an email will not be sent.
