TracCloud: Custom Views: Difference between revisions
From Redrock Wiki
Created page with "{{TracCloudGuideTabs}} {{TracCloudGuideListingsTOC}} <big><b>Custom Views</b></big><br> {{DISPLAYTITLE:<span style="position: absolute; clip: rect(1px 1px 1px 1px); clip:..." |
No edit summary |
||
| (14 intermediate revisions by the same user not shown) | |||
| Line 1: | Line 1: | ||
{{TracCloudGuideTabs}} | {{TracCloudGuideTabs}} | ||
<div class="tcWidgetPage"> | |||
<div class="categoryWide"> | |||
{{TracCloudGuideListingsTOC}} | {{TracCloudGuideListingsTOC}} | ||
</div> | |||
<div class="pageTitle">Custom Views</div> | |||
Custom Views allow you to modify which data columns are visible on certain Listings. These columns can even be made editable, so you can quickly review and update data as needed. | |||
Custom Views can be created on the following pages:<br> | |||
*<i>[[TracCloudGuideListingsAppts|Appointment Listing]]<br></i> | |||
*<i>[[TracCloudGuideListingsStudents|Student Listing]]<br></i> | |||
*<i>[[TracCloudGuideListingsRegistrations|Registration Listing]]<br></i> | |||
*<i>[[TracCloudGuideListingsVisits|Attendance Listing]]<br></i> | |||
*<i>[[TracCloudGuideProfileStaff|Staff Listing]]<br></i> | |||
*<i>[[TracCloud:_Documents#Documents_Listing|Document Listing]]<br></i> | |||
*<i>[[TracCloudGuideListingsFaculty|Faculty Listing]]<br></i><br> | |||
For the rest of this article, we'll be using the Student Listing as an example. But the configuration is very similar across all listings, with the primary difference being the data columns available. | |||
{{ | <div class="line"></div> | ||
==Setting up our Custom View== | |||
First, let's start with an idea. I want my student listing to contain the students' first and last names, their usernames, birthdates, and I want their emails visible and editable. | |||
From the student listing, we're going to click the hamburger icon {{#fas:bars}}, hover over <i>Views</i>, and click <b>Create Custom View</b>. | |||
[[File:6896473.png|400px]]<br><br> | |||
That takes us to the following screen. I'm going to call my view "Birthdates and Emails." Within the <i>Columns Available</i> list, I'm going to add the fields I mentioned previously by clicking the <b>+</b> icon, I'm also clicking the <i>A-Z</i> icon for Birthday to sort by this field by default. | |||
[[File:7841487.png|900px]]<br><br> | |||
Next up, I want to make the Email field editable. To do this, I'm going to click on the Pencil icon for Email, which will open the following window. | |||
[[File:2256035.png|900px]]<br><br> | |||
*<b>Column Title</b> allows you to rename the column title if preferred. Defaults to the standard field name. | |||
*<b>Optional Calculation</b> allows you to calculate this data by Sum, Count, Max, Min, or Avg. | |||
*<b>Optional Format</b> allows you to change the formatting of this field, see examples below. | |||
::{| class="wikitable" | |||
|- | |||
! Original Value !! Format !! Adjusted Value | |||
|- | |||
| 1234567890 || Phone || (123) 456-7890 | |||
|- | |||
| 1234567890 || $###,##0.00 || $1,234,567,890.00 | |||
|- | |||
| 1234567890 || $#####0.00 || $1234567890.00 | |||
|- | |||
| 1234567890 || $#####0 || $1234567890 | |||
|- | |||
| 1234567890 || #,##0.00 || 1,234,567,890.00 | |||
|- | |||
| 1234567890 || #,##0.0 || 1,234,567,890.0 | |||
|- | |||
| 1234567890 || #,##0 || 1,234,567,890 | |||
|- | |||
| 12345,67890 || ###0 || 12345 | |||
|- | |||
| 2024-01-31 14:30:00 || Y-m-d H:i:s || 2024-01-31 14:30:00 | |||
|- | |||
| 2024-01-31 14:30:00 || Y-m-d h:ia || 2024-01-31 02:30pm | |||
|- | |||
| 2024-01-31 14:30:00 || Y-m-d || 2024-01-31 | |||
|- | |||
| 2024-01-31 14:30:00 || H:i:s || 14:30:00 | |||
|- | |||
| 2024-01-31 14:30:00 || h:ia || 02:30pm | |||
|} | |||
::If "Custom" is chosen, you can enter your own translations for different values. For example, a field like Appointments.Online is formatted as 0, 1, 2, or 3, representing in-person, online, asynchronous, or phone respectively. However, if you add that field to a custom view, you will only see the numeric value unless you use a custom format. For that example, here is how you would write your custom format: <i>choices:0|In-person;1|Online;2|Async;3|Phone</i> | |||
::Always start the custom format with "choices:" followed by the value and the replacement text separated by a vertical bar/pipe. Multiple replacements can be entered delimited by a semicolon. | |||
*<b>Optional Alignment</b> determines where in the column this data sits. Default is Left. | |||
*<b>Show On Line Detail</b> lets you hide the contents of the field while keeping the column visible. | |||
*<b>Hide this Column</b> will entirely hide this column from view while keeping it searchable. | |||
*<b>Column Editable</b> will make the field editable directly from the listing.<br><br> | |||
The only change I'll be making for my example is checking <b>Column Editable</b>. Next up, I'll click <b>Save View</b> to save my changes. Going forward, I can always find my custom View in the Hamburger {{#fas:bars}} > Views menu. I can also edit data in the email column as defined above. | |||
[[File:7873839.png|260px]] [[File:2586144.png|880px]] | |||
<hr> | |||
==Sharing this View with Other Users & Groups== | |||
If your Custom View would be useful for other users, you can easily assign that view to their [[TracCloudGuideProfileGroups|permission group]]. Go to <i>Other > Other Options > Groups > [The group you want to modify] > Admin / Modules > Custom Views</i>. Add your custom view here and save. Going forward, users in this group will be able to access this View in the same way you can. | |||
[[File:6509276.png|500px]] [[File:4739799.png|500px]] | |||
<hr> | |||
==Edit a Custom View== | |||
Need to make a change? Load your custom view like you would normally. Click <i>Hamburger {{#fas:bars}} > Edit View</i>. You also have a few other utilities here as well if needed, such as downloading the list to a CSV file. | |||
[[File:2018394.png|500px]] | |||
<hr> | |||
==Deleting a Custom View== | |||
Don't need this particular view anymore? From the main listing, click <i>Hamburger {{#fas:bars}} > Views > Remove Custom View</i>, and select the View you wish to delete. | |||
[[File:8605583.png|500px]] | |||
[[Category:TracCloud Manual]] | |||
</div> | |||
Latest revision as of 16:23, 29 July 2025
Custom Views allow you to modify which data columns are visible on certain Listings. These columns can even be made editable, so you can quickly review and update data as needed.
Custom Views can be created on the following pages:
- Appointment Listing
- Student Listing
- Registration Listing
- Attendance Listing
- Staff Listing
- Document Listing
- Faculty Listing
For the rest of this article, we'll be using the Student Listing as an example. But the configuration is very similar across all listings, with the primary difference being the data columns available.
Setting up our Custom View
First, let's start with an idea. I want my student listing to contain the students' first and last names, their usernames, birthdates, and I want their emails visible and editable.
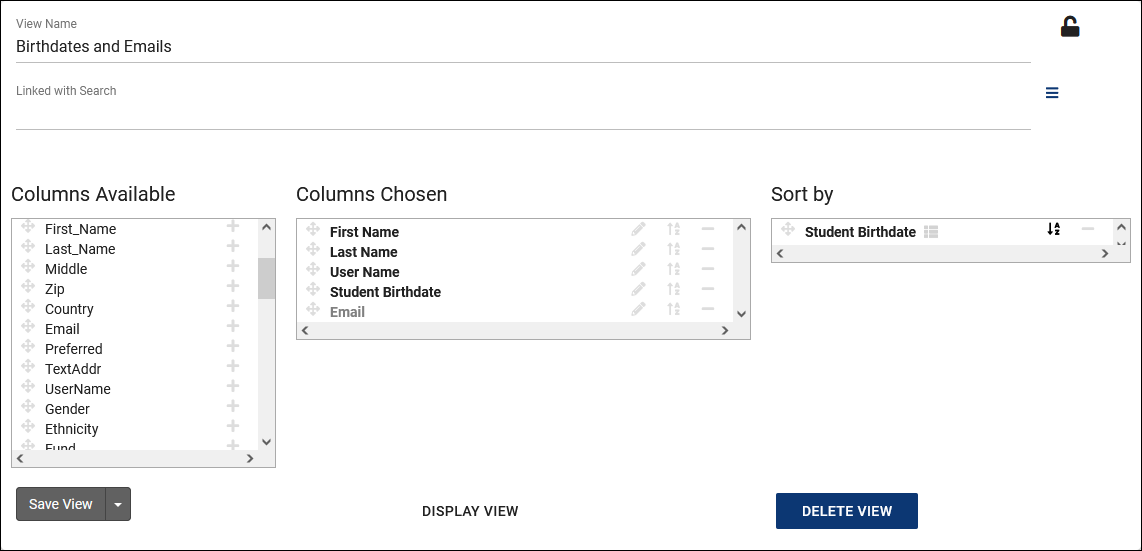
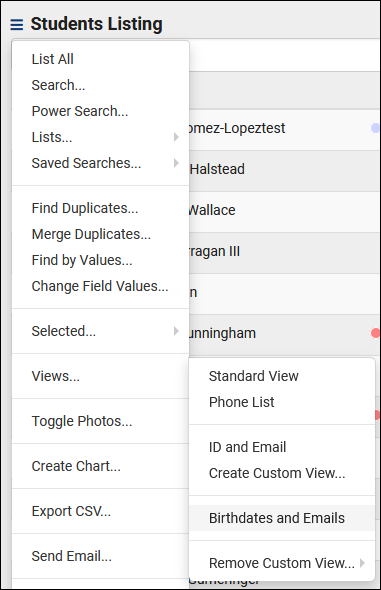
From the student listing, we're going to click the hamburger icon , hover over Views, and click Create Custom View.
That takes us to the following screen. I'm going to call my view "Birthdates and Emails." Within the Columns Available list, I'm going to add the fields I mentioned previously by clicking the + icon, I'm also clicking the A-Z icon for Birthday to sort by this field by default.
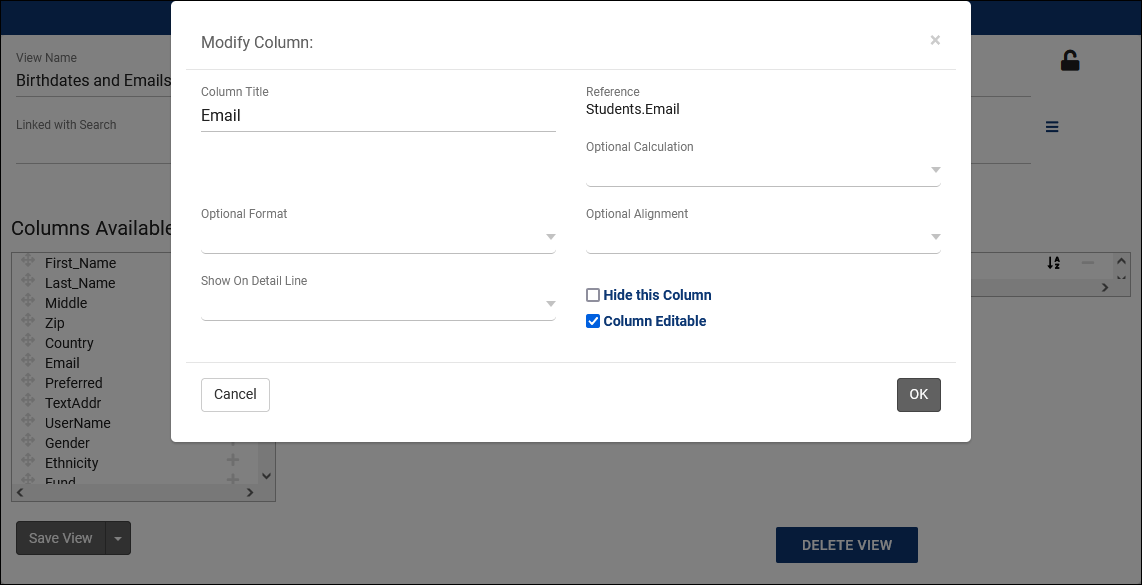
Next up, I want to make the Email field editable. To do this, I'm going to click on the Pencil icon for Email, which will open the following window.
- Column Title allows you to rename the column title if preferred. Defaults to the standard field name.
- Optional Calculation allows you to calculate this data by Sum, Count, Max, Min, or Avg.
- Optional Format allows you to change the formatting of this field, see examples below.
Original Value Format Adjusted Value 1234567890 Phone (123) 456-7890 1234567890 $###,##0.00 $1,234,567,890.00 1234567890 $#####0.00 $1234567890.00 1234567890 $#####0 $1234567890 1234567890 #,##0.00 1,234,567,890.00 1234567890 #,##0.0 1,234,567,890.0 1234567890 #,##0 1,234,567,890 12345,67890 ###0 12345 2024-01-31 14:30:00 Y-m-d H:i:s 2024-01-31 14:30:00 2024-01-31 14:30:00 Y-m-d h:ia 2024-01-31 02:30pm 2024-01-31 14:30:00 Y-m-d 2024-01-31 2024-01-31 14:30:00 H:i:s 14:30:00 2024-01-31 14:30:00 h:ia 02:30pm
- If "Custom" is chosen, you can enter your own translations for different values. For example, a field like Appointments.Online is formatted as 0, 1, 2, or 3, representing in-person, online, asynchronous, or phone respectively. However, if you add that field to a custom view, you will only see the numeric value unless you use a custom format. For that example, here is how you would write your custom format: choices:0|In-person;1|Online;2|Async;3|Phone
- Always start the custom format with "choices:" followed by the value and the replacement text separated by a vertical bar/pipe. Multiple replacements can be entered delimited by a semicolon.
- Optional Alignment determines where in the column this data sits. Default is Left.
- Show On Line Detail lets you hide the contents of the field while keeping the column visible.
- Hide this Column will entirely hide this column from view while keeping it searchable.
- Column Editable will make the field editable directly from the listing.
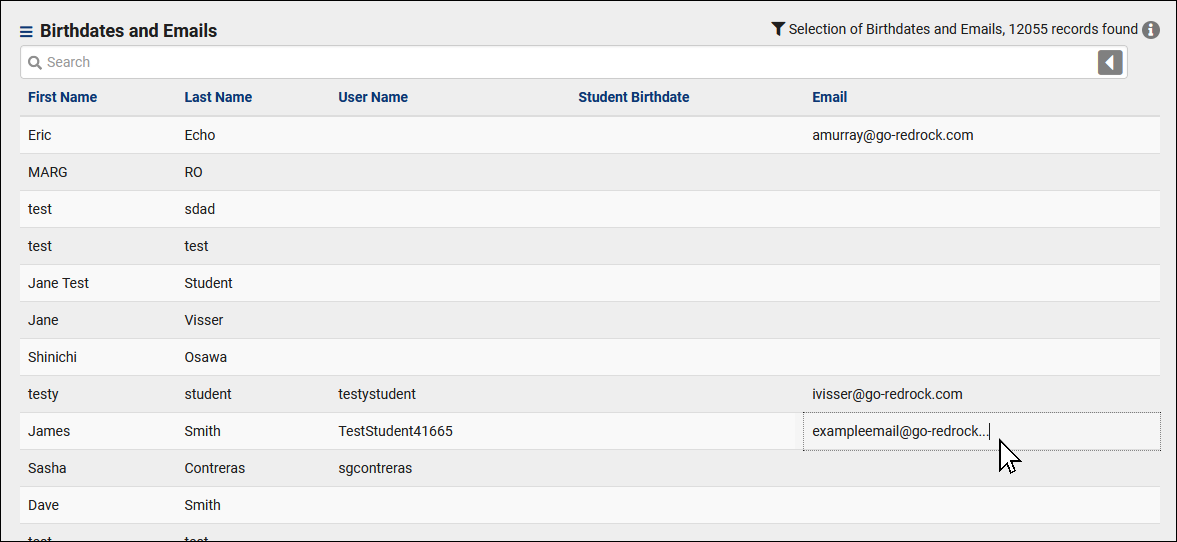
The only change I'll be making for my example is checking Column Editable. Next up, I'll click Save View to save my changes. Going forward, I can always find my custom View in the Hamburger > Views menu. I can also edit data in the email column as defined above.
Sharing this View with Other Users & Groups
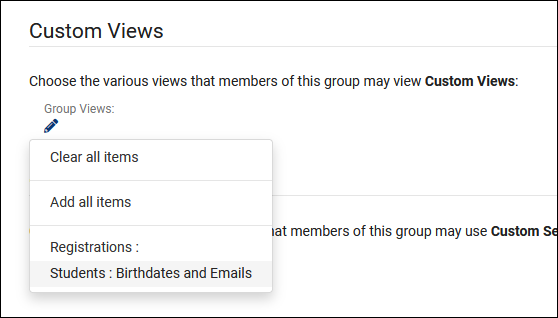
If your Custom View would be useful for other users, you can easily assign that view to their permission group. Go to Other > Other Options > Groups > [The group you want to modify] > Admin / Modules > Custom Views. Add your custom view here and save. Going forward, users in this group will be able to access this View in the same way you can.
Edit a Custom View
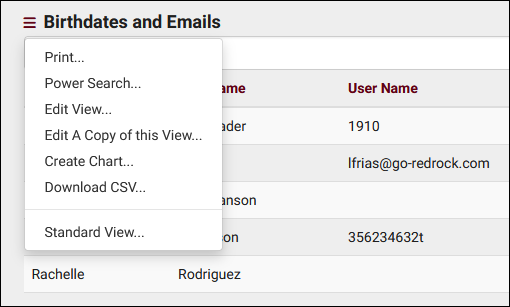
Need to make a change? Load your custom view like you would normally. Click Hamburger > Edit View. You also have a few other utilities here as well if needed, such as downloading the list to a CSV file.
Deleting a Custom View
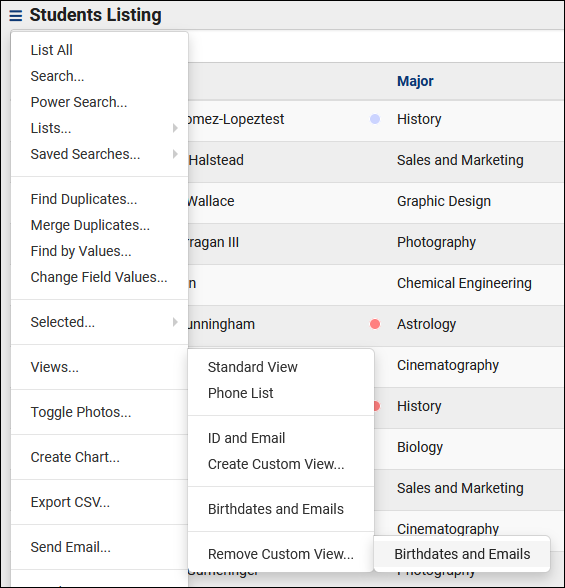
Don't need this particular view anymore? From the main listing, click Hamburger > Views > Remove Custom View, and select the View you wish to delete.

