TracCloud: Schedule Management: Difference between revisions
From Redrock Wiki
No edit summary |
No edit summary |
||
| Line 5: | Line 5: | ||
{| style="width:100%; vertical-align:top; " | {| style="width:100%; vertical-align:top; " | ||
<big><b>Schedule Management</b></big><br> | <big><b>Schedule Management</b></big><br> | ||
The TracCloud schedule is where you can create and manage your consultant’s availabilities. The | |||
The TracCloud schedule is where you can create and manage your consultant’s availabilities. The availability blocks created here will appear when staff or students are searching for appointments based on the criteria chosen during the search process. This article will walk you through how to utilize these features, from creating availabilities to booking appointments.<br><br> | |||
The schedule can be reached by clicking the “Schedule” button at the top of the dashboard. Click the "Expand" options below to view more information on different parts of the schedule management process. | |||
<hr> | |||
<!-------------------------------------------- Navigating Schedule --------------------------------------------> | |||
<div style="float: left; margin-top: 0em; margin-bottom: 1em"><big><b>Navigating the Staff Schedule</b></big></div><div class="mw-collapsible mw-collapsed"><br><br> | |||
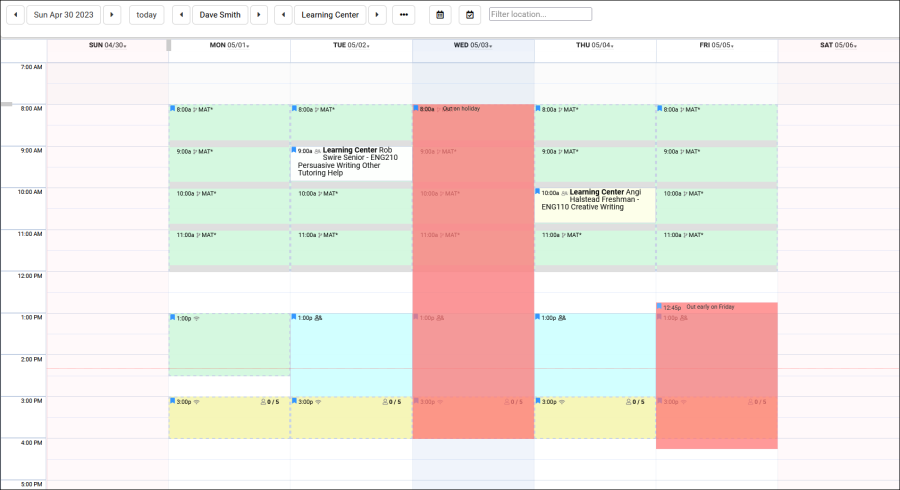
Navigating the staff schedule is a crucial part of managing your Trac System if you host appointment-based sessions. This is where you can create new availabilities/time slots, review past and future appointments, and even book new appointments on behalf of students. | |||
[[File:4062955.png|900px]] | |||
<br><br> | <br><br> | ||
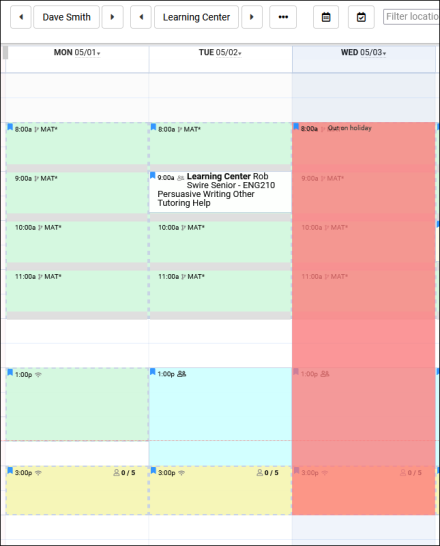
This | Starting at the top of the schedule view, you'll find options for changing your date range and selected consultant. The date field can be clicked on so that you can select a specific day or week (depending on your current consultant selection), and you can cycle through past/upcoming dates using the arrow buttons. The "Today" button will always take you to the current date.<br><br> | ||
<br> | |||
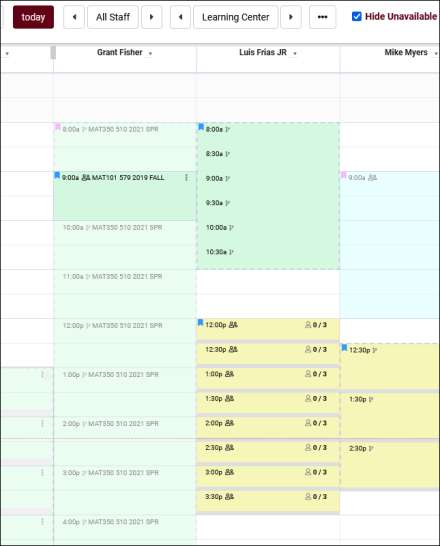
[[File: | Following this is the consultant menu. Your consultants will be grouped by the centers they're assigned to (or profiles then centers for systems with 5+ profiles). Selecting an individual consultant will display their schedule for the selected week. You can alternatively select "All of this center" to view all of your consultant schedules for a single day. This option also allows you to hide unavailable consultants with a checkbox along the schedule settings bar. You can also choose your selected center, which applies to both the "all of this center" view as well as individual consultants who work across multiple centers. | ||
[[File:2492377.png|440px]] [[File:4782273.png|440px]]<br><br> | |||
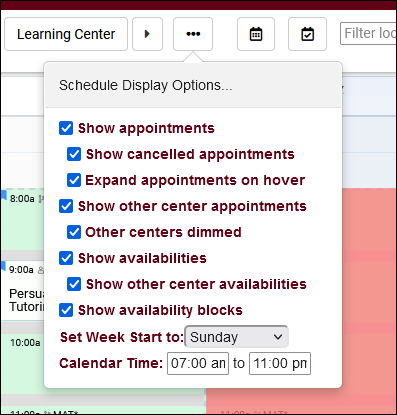
Lastly, you will find your <b>Schedule Display Options</b>. These can be used to change your visible time on the calendar, as well as hide certain record types. Changes made here will only affect your own account, and only in your current browser session. The {{#fas:calendar-days}} icon indicates whether or not you have the ability to modify availabilities, and the {{#far:calendar-check}} icon indicates the same for appointments.<br> | |||
[[File:4613107.png|400px]] | |||
</div> | |||
<hr> | |||
<!-------------------------------------------- Standard Availabilities --------------------------------------------> | |||
<div style="float: left; margin-top: 0em; margin-bottom: 1em"><big><b>Creating Availabilities</b> / 1-on-1, group, and drop-in</big></div><div class="mw-collapsible mw-collapsed"><br><br> | |||
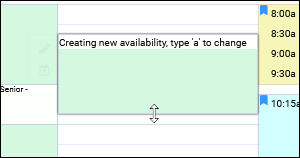
After selecting the consultant you want to create an availability for, click-and-drag to begin creating an availability block in an open space on their schedule. Before you let go of left-click, tapping the 'a' key on your keyboard will cycle through different options. Adhoc appointments (white), reserve blocks (red), and standard availabilities (green). Standard availability is what you'll want to select to create a new time slot on your consultant schedule.<br> | |||
[[File:Y43u5j3j425jh23h.png|400px]]<br><br> | |||
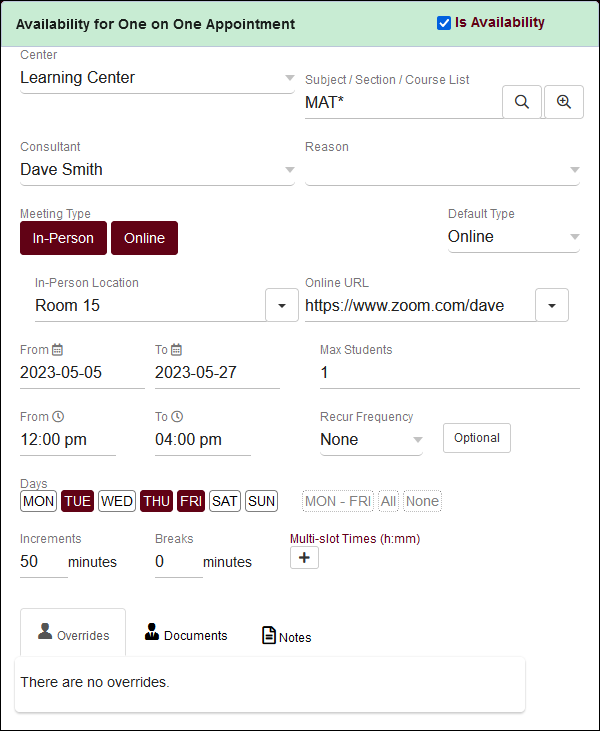
Once you release left-click, you will be brought to the availability entry window where you can configure the time slot.<br> | |||
[[File:6132639.png|600px]]<br><br> | |||
<b>Subject</b> and <b>Reason</b> allow you to restrict what this time slot can be utilized for. If left blank, which is a typical choice, the consultant and center course lists will be used. If you wanted to restrict the availability to a specific subject, you can select it from the search menu, or use a wildcard entry (such as "MATH*" for all sections that start with "MATH) or a course list if your preferences allow it.<br><br> | |||
The following option, <b>Meeting Type</b>, determines if this is a remote/online availability, in-person, or asynchronous. The latter option will be covered in the next portion of this wiki article. Depending on which option you choose, additional <b>Location</b> fields will be made available. In-person availabilities may be assigned to a specific room or building number, while online sessions will be assigned a specific online invite link. That link can be the consultant's specific invite link from their profile, a breakout room, or a new invite can be copy/pasted directly into the "Online URL" field. Students can join these online appointments from their dashboard, as TracCloud will provide a hyperlink to them at the appointment start time.<br><br> | |||
The <b>Max Students</b> option determines the availability type. <b>0</b> would be a drop-in event, <b>1</b> is a one-on-one meeting, and <b>2</b> or more would be a multi-person group.<br><br> | |||
The <b>date range</b> and <b>days of the week</b> fields allow you to determine how this availability will repeat going forward. By default, just the one day you created the block on will be active, however, you can push the “To” date farther out and deselect the days of the week that this availability shouldn’t be active for to create a schedule such as “Every Monday, Tuesday, and Friday until May 30th.”<br><br> | |||
<b>Increments</b> and <b>Breaks</b> control how the block is split into different times. If you create a 5-hour block on the schedule, setting the Increments to 60 minutes will split that into 5 1-hour blocks instead. Breaks allow you to schedule breaks for your consultants in-between appointments. For example, you could set Increments to 55 and Breaks to 5 to give your consultants 5-minute breaks in between their 55-minute appointments.<br><br> | |||
<b>Overrides</b> will show you gaps in the series. For example, if you have an availability that repeats for some time, but a block in that series is removed (maybe the consultant isn't available that week or their time changes on that one day), that will appear as an override date for the rest of the series.<br><br> | |||
<b>Documents</b> can be uploaded to the availability, which will automatically be carried through to booked appointments so that students can access them.<br><br> | |||
<b>Notes</b> is an internal notes field for staff to share information about this availability with each other. This field is not shown to students, and can be used for any purpose. | |||
<br><br> | <br><br> | ||
Click “Save” once you’re happy with the availability configuration. | |||
<br> | </div> | ||
[[File: | <hr> | ||
<br><br> | <!-------------------------------------------- Asynchronous --------------------------------------------> | ||
<div style="float: left; margin-top: 0em; margin-bottom: 1em"><big><b>Asynchronous Availabilities</b> / Document sharing & asynchronous messaging <span style="color:green"><b><i>New!</i></b></span></big></div><div class="mw-collapsible mw-collapsed"><br><br> | |||
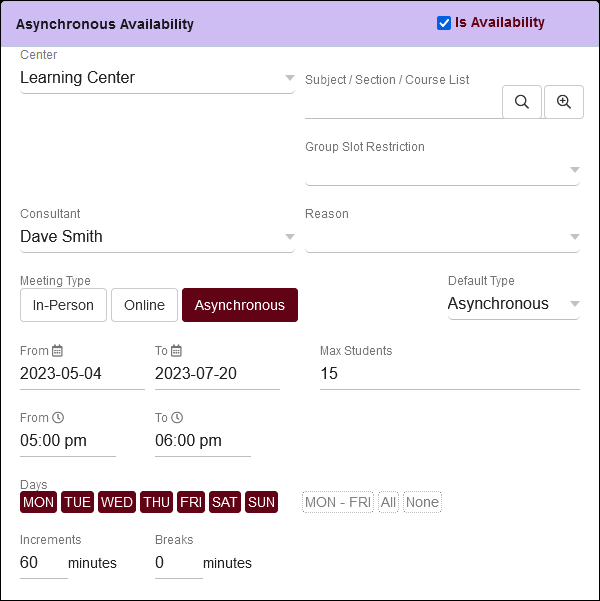
<br> | <b>Asynchronous</b> is an additional meeting type available for multi-person availabilities. These are created like normal availabilities, but appointments are held asynchronously. A text chat will be provided for a student and consultant to communicate with each other, and documents can be uploaded to the appointment for each user to download and review. This functionality must be enabled in your profile before it can be used, go to <i>Other > Other Options > Profiles > [Your Profile] > Prefs > Scheduling > Other Schedule Options > Allow multi person group availabilities to be asynchronous</i><br><br> | ||
[[File: | |||
<br><br> | Some concepts in availabilities are less important in the context of asynchronous sessions. For example, the time of day and max students, since there isn't a strict time limit for when each conversation is concluded, and the consultant can respond to multiple independent conversations from their dashboard. In the example below, I'm creating an availability at 5:00pm, after the rest of my standard availabilities (which gives students more time to book compared to the morning), and I've set the max student limit to 15.<br> | ||
<br> | [[File:7515788.png|600px]]<br><br> | ||
[[File: | |||
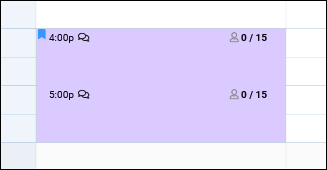
Asynchronous availabilities are shown on the schedule view as a purple box with a {{#far:comments}} icon. Students will see the same color in their availability searches, and the availability time will be hidden as it's irrelevant for asynchronous sessions. Similar to drop-in sessions, asynchronous availabilities also ignore the "Schedule no later than" preference in your profile. Students can book these slots at any point up to the start time of the availability. | |||
[[File:2401863.png|400px]]<br> | |||
[[File:7491176.png|600px]]<br><br> | |||
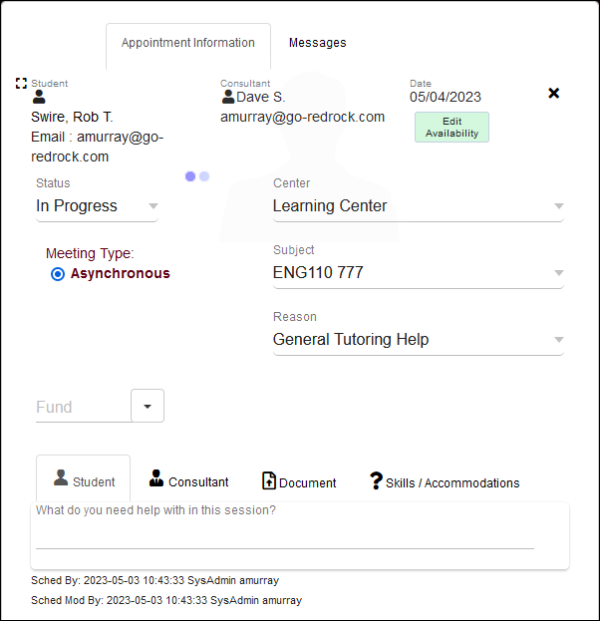
After the appointment has been booked, you will notice a couple differences compared to standard appointments. The <b>Status</b> field now contains only "In Progress" and "Concluded", as standard synchronous statuses no longer apply, and an additional <b>Messages</b> tab has been added. This tab will contain all communications between the consultant and the student.<br> | |||
[[File:1127095.png|600px]]<br><br> | |||
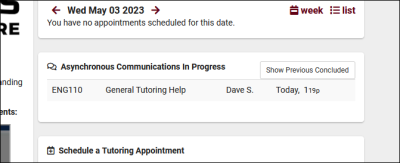
Students and consultants will primarily be communicating and managing the session from the dashboard. This will display all "In Progress" asynchronous sessions that you (a consultant or student) are a part of. Clicking "Show Previous Concluded" will let you review past asynchronous sessions, download documents, or even re-open the session if needed.<br> | |||
[[File:6417001.png|400px]]<br><br> | |||
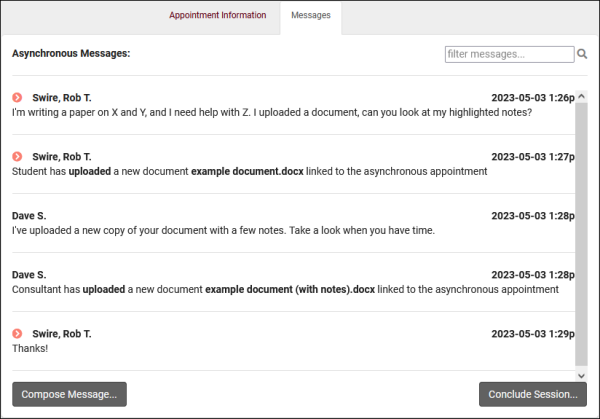
Clicking on one of these entries will open the appointment record with two tabs available. <b>Appointment Information</b> contains the current status of the appointment, any custom fields, as well as uploaded documents. <b>Messages</b> (pictured below) shows the current discussion between the student and their consultant, along with a log of document uploads/deletions. Either party can conclude or reopen the session at any time with the button in the lower-right corner.<br> | |||
[[File:7156891.png|600px]]<br><br> | |||
</div> | |||
<hr> | <hr> | ||
<!-------------------------------------------- Reserve Blocks --------------------------------------------> | |||
<div style="float: left; margin-top: 0em; margin-bottom: 1em"><big><b>Reserve Blocks</b> / Prevent booking and cancel appointments</big></div><div class="mw-collapsible mw-collapsed"><br><br> | |||
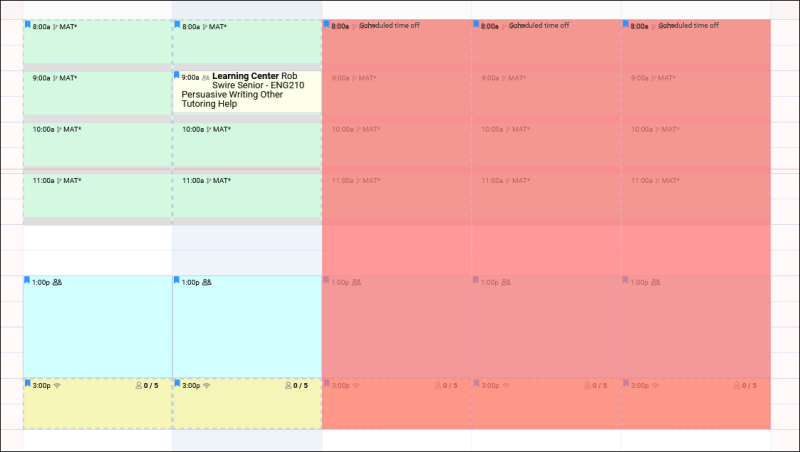
<b>Reserve Blocks</b> can be created over existing availabilities and appointments, to prevent booking and automatically cancel conflicting appointments. This is typically used for holiday breaks, sick days, or to block off specific times of the day when a consultant will not be available.<br><br> | |||
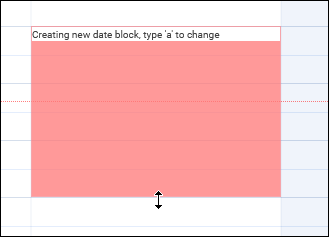
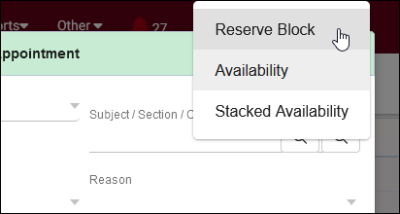
There are two ways to create a reserve block. You can click-and-drag an availability as usual, then tap the 'a' key to cycle to a reserve block, or create a normal availability then uncheck "is Availability" in the top-right corner.<br> | |||
<br><br> | |||
[[File:7288779.png|400px]] [[File:5861695.png|400px]]<br><br> | |||
<br><br> | |||
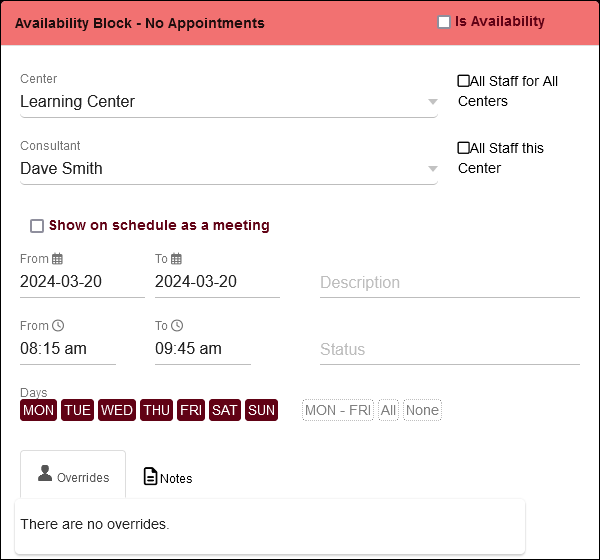
Once you've started creating your reserve block, you will find a few options that don't exist in normal availabilities which have been detailed below.<br> | |||
<br> | |||
[[File: | [[File:9957871.png|600px]]<br><br> | ||
<br><br> | |||
* <b>All Staff this Center</b> is used to create a block for all consultants across your selected center, rather than exclusively for the consultant account that you had originally selected. | |||
* <b>All Staff for All Centers</b> goes beyond what the "this center" option does, placing this block on all consultant schedules across all centers. | |||
<b> | * <b>Description</b> can be used to record why this reserve block exits. For example, "Time off for holiday." | ||
<br><br> | |||
* <b>Status</b> will apply to all overlapping appointments. For example, "Canceled - Holiday" to differentiate these cancellations when running reports. If this field is left blank, a generic "Canceled" status will be used instead.<br><br> | |||
<br>< | |||
The rest of the reserve block is created like a standard availability, set the time and days that should be blocked, then click "Save" to add it to the schedule.<br> | |||
[[File:3436868.png|800px]] | |||
</div> | |||
<hr> | <hr> | ||
= | <!-------------------------------------------- Booking Appointments --------------------------------------------> | ||
<div style="float: left; margin-top: 0em; margin-bottom: 1em"><big><b>Booking Appointments</b></big></div><div class="mw-collapsible mw-collapsed"><br><br> | |||
The process for booking appointments is almost identical between the staff and student point of view. If your permission group allows you to schedule appointments, you will see the following box on your TracCloud dashboard. | The process for booking appointments is almost identical between the staff and student point of view. If your permission group allows you to schedule appointments, you will see the following box on your TracCloud dashboard. | ||
<br> | <br> | ||
| Line 63: | Line 128: | ||
<br> | <br> | ||
[[File:4460435.png|800px]] | [[File:4460435.png|800px]] | ||
</div> | |||
<hr> | |||
<!-------------------------------------------- Moving Appointments --------------------------------------------> | |||
<!--<div style="float: left; margin-top: 0em; margin-bottom: 1em"><big><b>Moving Appointments</b> / example {{#fas:circle-xmark}}</big></div><div class="mw-collapsible mw-collapsed"><br><br>--> | |||
<!--</div>--> | |||
<!--<hr>--> | |||
|} | |} | ||
[[Category:TracCloud]] | [[Category:TracCloud]] | ||
Revision as of 15:14, 3 May 2023
Getting Started / Basics |
Schedule Management The TracCloud schedule is where you can create and manage your consultant’s availabilities. The availability blocks created here will appear when staff or students are searching for appointments based on the criteria chosen during the search process. This article will walk you through how to utilize these features, from creating availabilities to booking appointments. The schedule can be reached by clicking the “Schedule” button at the top of the dashboard. Click the "Expand" options below to view more information on different parts of the schedule management process. Navigating the Staff Schedule Navigating the staff schedule is a crucial part of managing your Trac System if you host appointment-based sessions. This is where you can create new availabilities/time slots, review past and future appointments, and even book new appointments on behalf of students.
Following this is the consultant menu. Your consultants will be grouped by the centers they're assigned to (or profiles then centers for systems with 5+ profiles). Selecting an individual consultant will display their schedule for the selected week. You can alternatively select "All of this center" to view all of your consultant schedules for a single day. This option also allows you to hide unavailable consultants with a checkbox along the schedule settings bar. You can also choose your selected center, which applies to both the "all of this center" view as well as individual consultants who work across multiple centers. Lastly, you will find your Schedule Display Options. These can be used to change your visible time on the calendar, as well as hide certain record types. Changes made here will only affect your own account, and only in your current browser session. The icon indicates whether or not you have the ability to modify availabilities, and the icon indicates the same for appointments. Creating Availabilities / 1-on-1, group, and drop-in After selecting the consultant you want to create an availability for, click-and-drag to begin creating an availability block in an open space on their schedule. Before you let go of left-click, tapping the 'a' key on your keyboard will cycle through different options. Adhoc appointments (white), reserve blocks (red), and standard availabilities (green). Standard availability is what you'll want to select to create a new time slot on your consultant schedule. Once you release left-click, you will be brought to the availability entry window where you can configure the time slot. Subject and Reason allow you to restrict what this time slot can be utilized for. If left blank, which is a typical choice, the consultant and center course lists will be used. If you wanted to restrict the availability to a specific subject, you can select it from the search menu, or use a wildcard entry (such as "MATH*" for all sections that start with "MATH) or a course list if your preferences allow it. The following option, Meeting Type, determines if this is a remote/online availability, in-person, or asynchronous. The latter option will be covered in the next portion of this wiki article. Depending on which option you choose, additional Location fields will be made available. In-person availabilities may be assigned to a specific room or building number, while online sessions will be assigned a specific online invite link. That link can be the consultant's specific invite link from their profile, a breakout room, or a new invite can be copy/pasted directly into the "Online URL" field. Students can join these online appointments from their dashboard, as TracCloud will provide a hyperlink to them at the appointment start time. The Max Students option determines the availability type. 0 would be a drop-in event, 1 is a one-on-one meeting, and 2 or more would be a multi-person group. The date range and days of the week fields allow you to determine how this availability will repeat going forward. By default, just the one day you created the block on will be active, however, you can push the “To” date farther out and deselect the days of the week that this availability shouldn’t be active for to create a schedule such as “Every Monday, Tuesday, and Friday until May 30th.” Increments and Breaks control how the block is split into different times. If you create a 5-hour block on the schedule, setting the Increments to 60 minutes will split that into 5 1-hour blocks instead. Breaks allow you to schedule breaks for your consultants in-between appointments. For example, you could set Increments to 55 and Breaks to 5 to give your consultants 5-minute breaks in between their 55-minute appointments. Overrides will show you gaps in the series. For example, if you have an availability that repeats for some time, but a block in that series is removed (maybe the consultant isn't available that week or their time changes on that one day), that will appear as an override date for the rest of the series. Documents can be uploaded to the availability, which will automatically be carried through to booked appointments so that students can access them. Notes is an internal notes field for staff to share information about this availability with each other. This field is not shown to students, and can be used for any purpose.
Asynchronous Availabilities / Document sharing & asynchronous messaging New! Asynchronous is an additional meeting type available for multi-person availabilities. These are created like normal availabilities, but appointments are held asynchronously. A text chat will be provided for a student and consultant to communicate with each other, and documents can be uploaded to the appointment for each user to download and review. This functionality must be enabled in your profile before it can be used, go to Other > Other Options > Profiles > [Your Profile] > Prefs > Scheduling > Other Schedule Options > Allow multi person group availabilities to be asynchronous Some concepts in availabilities are less important in the context of asynchronous sessions. For example, the time of day and max students, since there isn't a strict time limit for when each conversation is concluded, and the consultant can respond to multiple independent conversations from their dashboard. In the example below, I'm creating an availability at 5:00pm, after the rest of my standard availabilities (which gives students more time to book compared to the morning), and I've set the max student limit to 15. Asynchronous availabilities are shown on the schedule view as a purple box with a icon. Students will see the same color in their availability searches, and the availability time will be hidden as it's irrelevant for asynchronous sessions. Similar to drop-in sessions, asynchronous availabilities also ignore the "Schedule no later than" preference in your profile. Students can book these slots at any point up to the start time of the availability. After the appointment has been booked, you will notice a couple differences compared to standard appointments. The Status field now contains only "In Progress" and "Concluded", as standard synchronous statuses no longer apply, and an additional Messages tab has been added. This tab will contain all communications between the consultant and the student. Students and consultants will primarily be communicating and managing the session from the dashboard. This will display all "In Progress" asynchronous sessions that you (a consultant or student) are a part of. Clicking "Show Previous Concluded" will let you review past asynchronous sessions, download documents, or even re-open the session if needed. Clicking on one of these entries will open the appointment record with two tabs available. Appointment Information contains the current status of the appointment, any custom fields, as well as uploaded documents. Messages (pictured below) shows the current discussion between the student and their consultant, along with a log of document uploads/deletions. Either party can conclude or reopen the session at any time with the button in the lower-right corner. Reserve Blocks / Prevent booking and cancel appointments Reserve Blocks can be created over existing availabilities and appointments, to prevent booking and automatically cancel conflicting appointments. This is typically used for holiday breaks, sick days, or to block off specific times of the day when a consultant will not be available. There are two ways to create a reserve block. You can click-and-drag an availability as usual, then tap the 'a' key to cycle to a reserve block, or create a normal availability then uncheck "is Availability" in the top-right corner. Once you've started creating your reserve block, you will find a few options that don't exist in normal availabilities which have been detailed below.
The rest of the reserve block is created like a standard availability, set the time and days that should be blocked, then click "Save" to add it to the schedule. Booking Appointments The process for booking appointments is almost identical between the staff and student point of view. If your permission group allows you to schedule appointments, you will see the following box on your TracCloud dashboard.
|
