TracCloud: Single Sign-On: Difference between revisions
From Redrock Wiki
No edit summary |
No edit summary |
||
| Line 60: | Line 60: | ||
<div style="float: left; margin-top: 0em; margin-bottom: 1em"><big>SAML Configuration</big></div><div class="mw-collapsible mw-collapsed"><br><br> | <div style="float: left; margin-top: 0em; margin-bottom: 1em"><big>SAML Configuration</big></div><div class="mw-collapsible mw-collapsed"><br><br> | ||
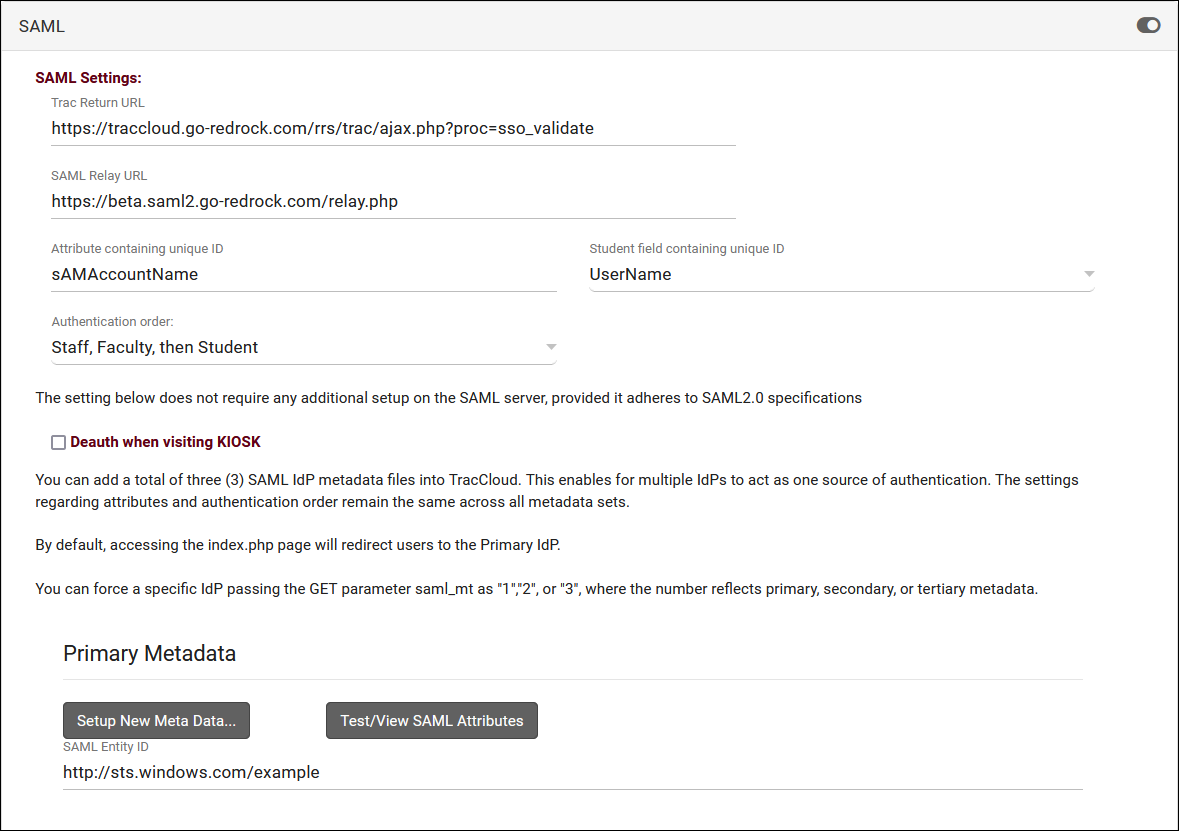
<i>Other > Other Options > Preferences > Login & Security Settings > SAML</i> | <i>Other > Other Options > Preferences > Login & Security Settings > SAML</i> | ||
[[File: | [[File:8589517.png|800px]] | ||
<big>1. Install our Metadata</big> | <big>1. Install our Metadata</big> | ||
::Redrock Metadata: https://sso.trac.cloud/simplesaml/module.php/saml/sp/metadata.php/trac5-saml | ::Redrock Metadata: https://sso.trac.cloud/simplesaml/module.php/saml/sp/metadata.php/trac5-saml<br><br> | ||
<big>2. Fill out SAML settings</big> | <big>2. Fill out SAML settings</big> | ||
| Line 80: | Line 79: | ||
:::Your staff may have more than one account type in the Trac System. You can use the "Authentication Order" preference to determine which account type authenticates first. | :::Your staff may have more than one account type in the Trac System. You can use the "Authentication Order" preference to determine which account type authenticates first. | ||
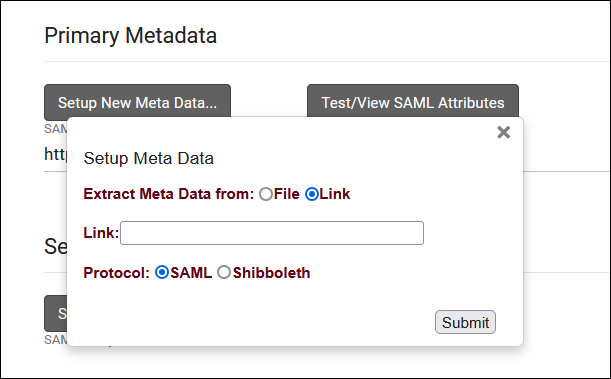
:* <b>Install your Metadata</b> | :* <b>Install your Metadata in the Primary Metadata field</b> | ||
:::[[File: | :::[[File:2807471.png|500px]] | ||
:::After submitting, your Entity ID field will be populated automatically. | :::After submitting, your Entity ID field will be populated automatically. If you require a duel-tenant configuration, reach out to us at [mailto:helpdesk@go-redrock.com helpdesk@go-redrock.com] for assistance.<br><br> | ||
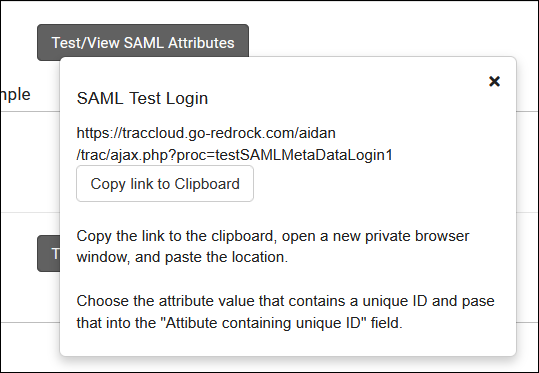
<big>3. Retrieve your attributes</big> | <big>3. Retrieve your attributes</big> | ||
:[[File: | :[[File:6978515.png|500px]] | ||
:Navigate to the provided URL in a Private/Incognito browser and login, you will be provided with a list of attributes and their value for the account that you used. Find the attribute that works for your system (e.g., first part of email address) and copy the name of that attribute into the "Attribute containing unique ID" field in TracCloud. This will need to correspond to the Username fields of accounts in the system. | :Navigate to the provided URL in a Private/Incognito browser and login, you will be provided with a list of attributes and their value for the account that you used. Find the attribute that works for your system (e.g., first part of email address) and copy the name of that attribute into the "Attribute containing unique ID" field in TracCloud. This will need to correspond to the Username fields of accounts in the system.<br><br> | ||
<big>4. Enable SAML</big> | <big>4. Enable SAML</big> | ||
:Enable the toggle option in the top-right corner of your SAML window to enable SAML authentication for future logins. | :Enable the toggle option in the top-right corner of your SAML window to enable SAML authentication for future logins. | ||
:[[File:75kj5yh56j56kj5ryh.png|800px]] | :[[File:75kj5yh56j56kj5ryh.png|800px]]<br><br> | ||
</div> | </div> | ||
<HR> | <HR> | ||
| Line 139: | Line 132: | ||
</div> | </div> | ||
<HR> | <HR> | ||
<div style="float: left; margin-top: 0em; margin-bottom: 1em"><big>Additional Login/Logout Settings</big></div><div class="mw-collapsible mw-collapsed"><br><br> | |||
After setting up the SSO protocol, there are a few optional settings to configure, detailed below. | |||
[[File:1811987.png|800px]]<br><br> | |||
* <b>Log Off Redirect URL</b> | |||
::This is the URL that users will be taken to when logging out of the Trac System, typically used to redirect users to a page that ends their single sign-on session.<br><br> | |||
* <b>Custom "No Access" Page URL</b> | |||
::By default, if a user attempts to access a page that they don't have access to, a generic "Access Denied" page will display from TracCloud. If you would prefer to override this with a different page, enter that URL here.<br><br> | |||
* <b>Block SSO users from kiosk</b> | |||
::If enabled, anyone who logs in via SSO will not be allowed to open student-facing kiosks. This should only be enabled if your single sign-on service doesn't support single logout, otherwise if a user opens a kiosk, their campus account will still be logged in. | |||
</div> | |||
|} | |} | ||
[[Category:TracCloud]] | [[Category:TracCloud]] | ||
Revision as of 17:42, 21 April 2023
TracCloud Technical Documentation
|
TracCloud Single Sign-on Configuration TracCloud supports SAML, CAS, and LDAP for user authentication. Information on each of these options is available below. We can be reached at helpdesk@go-redrock.com With Redrock Software's Assistance SAMLTo setup SAML authentication, the following steps will need to be completed. At least one of the attributes being sent must match the contents of the username field in your Trac System, typically the first part of the email address. We can also use ID number, full email address, or other unique identifiers, but handle/username is preferred. 1. Install our Metadata 2. Send us your Metadata
3. Send us a test account
CASTo setup CAS authentication: 1. Add Redrock as an authorized service
2. Send us your CAS settings
LDAPTo setup LDAP authentication: 1. Send us your LDAP settings
Multiple base DN searches can be performed if needed. Without Redrock Software's Assistance If you're comfortable applying changes here and already have the information above, you can put these settings in place with any SysAdmin account. If you're having any trouble with these settings, feel free to reach out to us at helpdesk@go-redrock.com or by submitting a helpdesk ticket. LDAP currently requires additional configuration not available to non-Redrock accounts, reach out to us directly if you plan on using LDAP. SAML Configuration Other > Other Options > Preferences > Login & Security Settings > SAML
1. Install our Metadata 2. Fill out SAML settings
3. Retrieve your attributes
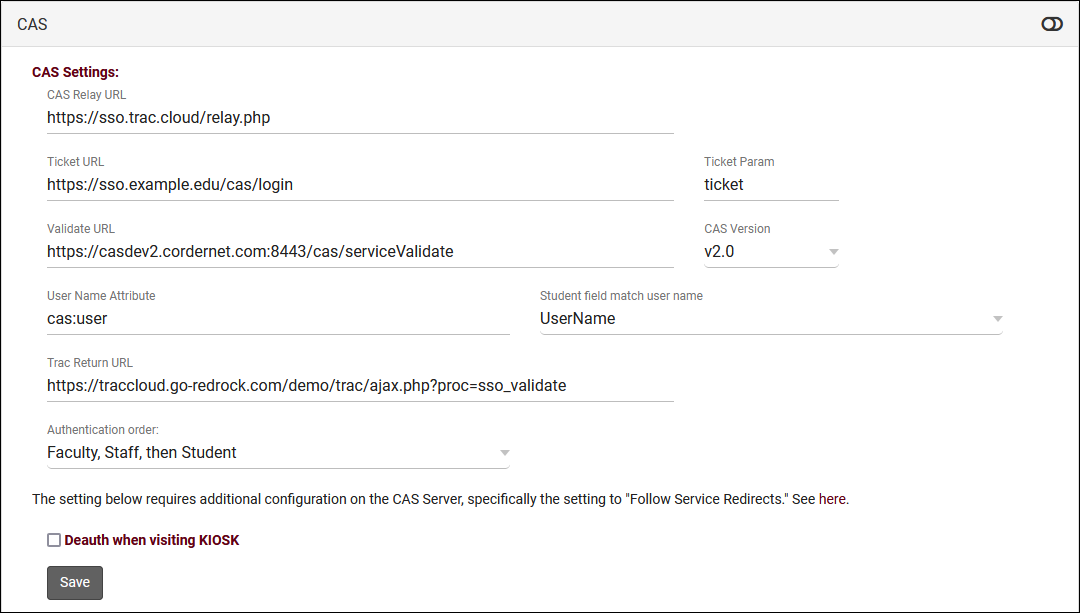
4. Enable SAML CAS Configuration Other > Other Options > Preferences > Login & Security Settings > CAS
2. Fill out CAS settings
3. Enable CAS Additional Login/Logout Settings After setting up the SSO protocol, there are a few optional settings to configure, detailed below.
|


