TracCloud: Listing Selection Tool
From Redrock Wiki
(Redirected from TracCloud: Listing Selection Tool)
The selection tool can be found across many listings in TracCloud. Students, attendance, appointments, etc. This utility is found within the hamburger menu and can be used to quickly filter results for use in other utilities, to merge records, or to delete records.
The example screenshot below shows the student listing. The right-most column shows which records are selected. Records can either be individually selected by clicking the checkboxes or selected in bulk. Within the hamburger menu (or by clicking the header over the checkboxes), you will find the Selected menu. This is where you can find utilities for selecting/deselecting records in bulk as well as utilizing your selection for other actions.

- Select / Unselect Found Records
- Choosing either of these options will immediately select or deselect the current list of records. This will only affect your current search, meaning you can perform multiple unique searches and continuously add students to your selection. The same applies for deselecting records as well, if you select records 1, 2, and 3, then search for 1 and deselect found records, 2 and 3 will still be selected. If you instead want to deselect all records, Clear Selection should be used instead.
- Show All Selected
- This updates the listing to only show the records you've selected. You can use this option to retrieve your final list of selected students for the purpose of sending a batch email, exporting the listing to a CSV file, or for other utilities in the hamburger menu.
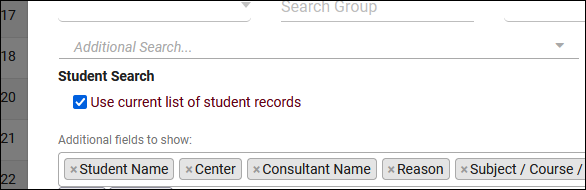
- Another utility to be aware of is the "Use current list of student records" additional search found in most student reports. This will allow you to run the report on the current list of student records rather than using other searches or saved lists. This will use the current search results, not only the selected records. If you want to run this report on selected records specifically, Show All Selected must be used first.

- Hide Selected
- This filters out the selected records from your current listing. The hidden records will remain selected.
- Copy [field]
- These utilities allow you to copy the specified fields from the selected records. For example, you could copy student IDs to record batch visit batch scans, or copy staff usernames to quickly search for your staff members' student accounts using the "Find by Values" utility on the student listing.
- Clear Selection
- This option will deselect all selected records, regardless of whether or not those records are shown in the current listing.
There are two more utilities in the menu that should be used with extreme caution, as these actions cannot be undone. If you think you need to use these options but aren't confident or comfortable using them, reach out to Redrock Software for guidance.
- Delete Selected
- This deletes all records that were selected. This can be useful to quickly delete visits from an erroneous batch visit or to clean up incorrect records from a bad import. This should never be used as an alternative to merging records, as this does not reassign related records. For example, deleting a duplicate student record will not move their visits, appointments, registrations, etc to the remaining account. This only deletes the current selected record.
- Merge Records
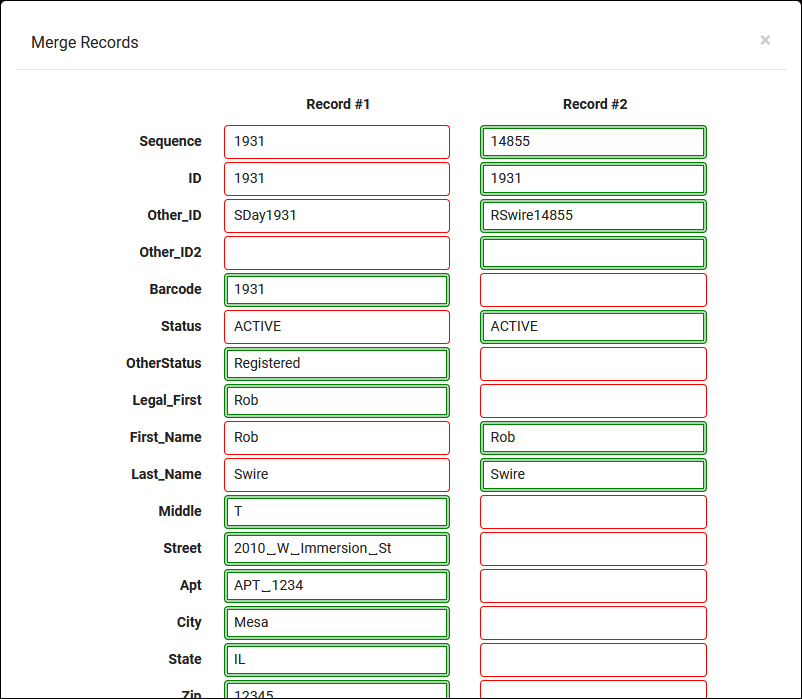
- This utility allows you to merge up to 3 records at once. When you open this utility, you will see a list of fields from the selected records. This allows you to choose what data you would like to keep from the accounts. By default, TracCloud will select whichever field is not blank. In the event that multiple accounts have data in a field, the newer account's field is prioritized. You can scroll through the list of fields and manually choose which fields you want to keep or select the record number at the top of the page to select all fields from one of the displayed records.
- As opposed to deleting records, this will also move related records to the remaining account. If student profile A was enrolled in section 1 and profile B was enrolled in section 2, the end result of the merge will be one account enrolled in both section 1 and 2. The same applies to other records like visits, appointments, referrals, etc.
- If your system has many duplicate records that need to be addressed, reach out to Redrock Software for assistance as we may be able to automatically merge records for you.