TracCloud: Case Management: Difference between revisions
From Redrock Wiki
No edit summary |
No edit summary |
||
| Line 37: | Line 37: | ||
</div> | </div> | ||
<hr> | <hr> | ||
<!--------------------------------------- Types ---------------------------------------> | <!--------------------------------------- Case Types ---------------------------------------> | ||
<div class='collapsible'> | <div class='collapsible'>Case Type Configuration</div><div class="mw-collapsible mw-collapsed"> | ||
<br><br> | <br><br> | ||
| Line 156: | Line 156: | ||
</div> | </div> | ||
<hr> | <hr> | ||
<!--------------------------------------- | <!--------------------------------------- Case Analysis ---------------------------------------> | ||
<div class='collapsible'> | <div class='collapsible'>Case Analysis</div><div class="mw-collapsible mw-collapsed"> | ||
<br><br> | <br><br> | ||
Description | |||
</div> | |||
<hr> | |||
==<b>Creating and Managing Cases</b>== | |||
Description | |||
<hr> | <hr> | ||
<!--------------------------------------- | <!--------------------------------------- Creating a Case ---------------------------------------> | ||
<div class='collapsible'> | <div class='collapsible'>Creating a Case</div><div class="mw-collapsible mw-collapsed"> | ||
<br><br> | <br><br> | ||
Description | Cases are most often created from the TracCloud dashboard. Description. | ||
Cases listing. | |||
</div> | </div> | ||
<hr> | <hr> | ||
<!--------------------------------------- | <!--------------------------------------- Activity Reports ---------------------------------------> | ||
<div class='collapsible'> | <div class='collapsible'>Activity Reports</div><div class="mw-collapsible mw-collapsed"> | ||
<br><br> | <br><br> | ||
Description | Description. | ||
Activity report listing. | |||
</div> | </div> | ||
<hr> | <hr> | ||
Revision as of 23:50, 27 May 2026
This page is still in progress! Come back later to learn more.
Additional Features
Description

Case Management Configuration
Learn how to create case types, activity report types, configure automated email notifications, and more.
Every case type must be linked to a category. When creating a case, the available types will be grouped by category to allow you to easily locate the case type you're trying to submit.
Other > Modules > Case Management > Categories

To create a new case, click the hamburger menu and select "New Case Category." Enter the name of the category and describe its purpose. The next section of this article will explain how case types can be linked to these categories.

The above example would display like this during case creation. Clicking the button would then show the available case types within this category.

Case Types represent the various types of incidents or issues that may need to be reported. For example, you may have an incident type for maintenance requests, another for policy violations, and another for safety issues. To create a new case type, go to the hamburger menu > New Case Type.
Other > Modules > Case Management > Types

This tab contains general settings for the case type, including its name, description, subtypes, and who is allowed to submit this type of case.

- Inactive
- If a case type is no longer being used, it can be deactivated. If your case type has cases, it should always be deactivated instead of deleted.
- Allow all students/Staff/Instructors to Open/Report
- Choose which user types are allowed to create cases of this type.
- Category
- Select the category (as configured above) that this type should be a part of.
- Name
- This is the name of the case type, which will also be the name of the button when creating cases.
- Button Title
- todo
- Description / Instructions
- This text appears beside the button above when beginning to create a case of this type as well as on the case creation screen.
- Issue Name
- Choose your preferred language for the type of form this is. For example, 'Case,' 'Incident,' or 'Report.'
- Auto-Choose if it's the only type in the category
- If this case type is the only case type in its category, it will be automatically chosen when clicking the category during case creation.
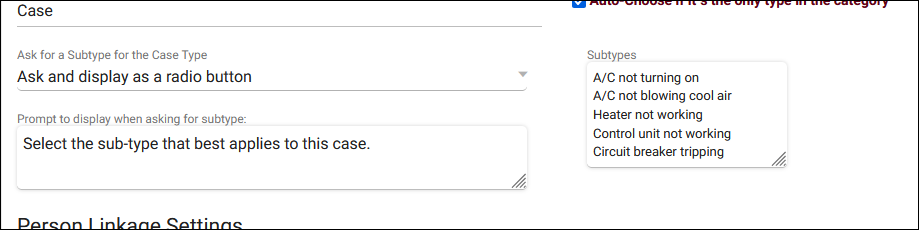
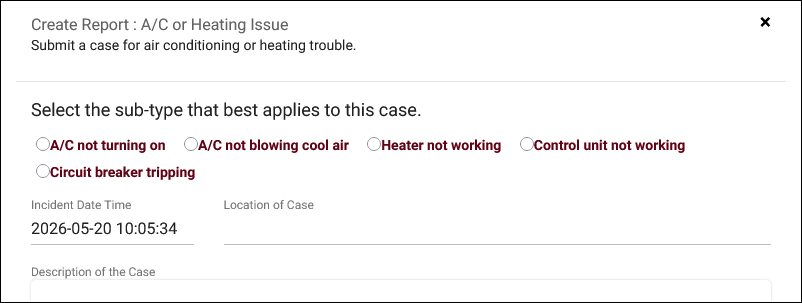
- Ask for a Subtype for the Case Type
- If enabled, an additional "Sub-type" field will be added to the case. Your list can be provided as a menu field (drop-down list), radio choices, or a list (scrollable list).


- Ask for Contact Info on Report
- Ask for Location and Description/Notes when Opened
- Both of these options toggle on or off these fields in the case entry screen.
- Hide Incident Date Time
- If checked, the separate "Incident On" and "[Case] Reported on" fields will be replaced with a single "[Case] Opened" date field.
Activity Reports allow you to append additional information and actions to cases, as well as specify the parties involved with a particular case. For example, you may have a report for data gathering at the start of a case, potentially multiple for different stages of the case as progress is made, and another for the resolution of the case. This isn't a requirement by any means, you can structure these activity reports to best fit your needs. Click Add Report Type to begin.

These are the available activity report settings.

- Report Type Name
- This will be the name of the activity report. Students, Staff, and/or Faculty will select this in order to begin the process of adding the activity.
- Report Description
- This is an internal notes field for this activity report, only visible here.
- Ask for Severity
- Choose how users can report the severity of this activity. None hides this field, Severity Only provides a drop-down menu of options including Low, Moderate, High and Critical, and Urgency, Impact, and Severity (pictured below) includes all three of those listed fields, with Urgency and Impact automatically setting Severity. Severity can still be overridden manually if preferred.


- Ask for Report Status
- This adds a drop-down menu of statuses to the activity report. If enabled, you can list the statuses on separate rows beside the checkbox. This can later be used in Notification Preferences to automatically notify individuals if a status is chosen or has remained for an extended period of time.
- Ask for Persons Involved and Witnesses
- These add fields to the activity report that allow you to choose who was involved with, affected by, or witnessed the issue regarding this case.
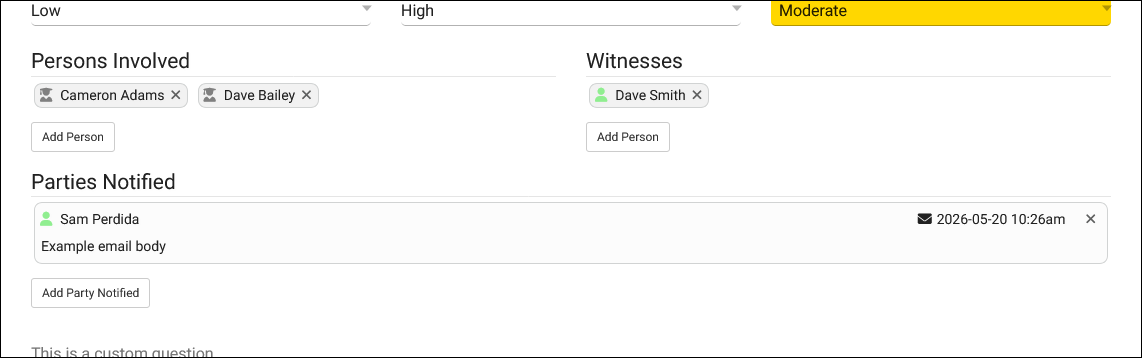

- Ask for Parties Notified
- This field (also pictured above) allows you to link an individual to be notified with an email regarding this case. The email can be sent immediately or scheduled to send later.
This tab allows you to configure the email and SMS notifications that may be sent when this case is created or when status conditions are met.

Notifications when [case] is Created/Opened will send as soon as the case is opened. You can have as many messages as you need, and each message can be sent to one or multiple staff members.

Notifications when [case] or Activity Report Status changes can conditionally send based on the case or activity report status. For example, you may send an email after 0 days (i.e., immediately) when the case status is changed to "Closed." Another example would be notifying someone when the status of a particular activity report has been unchanged for a few days.

You can have multiple messages with multiple recipients, each with their own timing and status condition. You can either choose a specific staff member to notify or an individual related to the particular case using the arrow button. Case Worker is the individual that has been manually linked to the case, and Case Supervisor is that person's supervisor. Investigator is TBD. Opened By and Reported By will typically refer to the person who created the case.

Description
Creating and Managing Cases
Description
Cases are most often created from the TracCloud dashboard. Description.
Cases listing.
Description.
Activity report listing.
For information on purchasing the Case Management Module, reach out to [email protected]
For Case Management functionality questions, reach out to [email protected]
See Also: