TracCloud: Grade Groups & Potential Assignments: Difference between revisions
From Redrock Wiki
No edit summary |
No edit summary |
||
| (27 intermediate revisions by the same user not shown) | |||
| Line 1: | Line 1: | ||
{{NoTier}} | |||
<div class="categoryDynamic"> | |||
{{TracCloudGuideTabs}} | {{TracCloudGuideTabs}} | ||
{{TracCloudGuideGlobalTOC}} | |||
</div> | |||
<div class="pageTitle">Grade Groups & Potential Assignments</div> | |||
Grade Groups can be used to calculate registration grades based on the student's number of visits, total time, | Grade Groups can be used to calculate [[TracCloudGuideListingsRegistrations|registration]] grades based on the [[TracCloudGuideListingsStudents|student]]'s number of [[TracCloud:_Attendance_Listing|visits]], total time, or completed Assignments. You can control which of those values affect their grade, how many points are awarded, and the threshold of total points required to achieve a certain grade. This feature is primarily utilized in fitness centers, but can be used for any center where grade calculations are needed. | ||
==Creating a Grade Group== | |||
The Grade Group is where you'll define how many points students will receive per action. To begin, go to Other ➜ Other Options ➜ Grade Groups, click on an existing group or create a new one by going to the hamburger menu {{#fas:bars}} ➜ New Grade Group. | |||
[[File:1313877.png|800px]]<br><br> | |||
* '''Grade Group Name''' | |||
: This is the name of this particular Grade Group. | |||
* '''Points Per Visit''' and '''Points Per Minute''' | |||
: Both of these settings allow you to choose how many points students receive per unique visit and per minute logged in. You should consider how you want students to accumulate points when setting these values. For example, if you want students to visit for 10 hours to achieve an A grade, you can give them 0 points per visit, 1 point per minute, and make 600 points the threshold for an ''A''. This means students could get an A by having 5 2-hour visits or 20 30-minute visits. If you want to encourage students to have more shorter visits, that's where you can start adjusting ''both'' of these values to create a balance, such as rewarding 20 points per visit ''and'' 1 point per minute. In that case, 2 280-minute visits would be worth the same number of points as 10 40-minute visits. | |||
: Leave either field set to 0 to not give points based on that metric. | |||
* '''Calculation Mode''' and the '''Grade Chart''' | |||
: The Grade Chart is where you will list out all of the possible grades and the point threshold for each. ''Calculation Mode'' determines how points are counted. Click the ''New'' button to add grades to the chart. | |||
:* '''Combined Total''' | |||
:: This ''combines'' the points given for visits, time, and assignments, then calculates grade based off that number alone. You would simply set the threshold for each grade, and when the student hits that threshold of points they will receive that grade level. | |||
::[[File:4041177.png|250px]] | |||
:* '''Min Points''' | |||
:: This means that a student's grade will only be as high as their minimum score across visits, time, and assignments. This provides grater flexibility in preventing students from over-scoring in one of the three metrics while ignoring others. With this option, you can create a grade level for each possible source of points, and the student's final grade will be the lowest of the set. As an example, if a student has maxed out their visit and time scores (for 1300pts) but they've only scored 400 in their assignments (1700 total), this would result in an A grade if the above ''Combined Total'' table was being used. If you want to discourage this approach, you can create a table similar to what's shown below. The student's lowest score in each column will determine their final grade. This example student would receive a C in this case due to insufficient assignment points. | |||
::[[File:4760024.png|250px|Screenshot: The Grade Group grading table using Min Points.]] | |||
:: | * '''Maximum Visit/Time/Assignment Points''' | ||
: These settings allow you to set a limit on how many points a student can receive from each source. For example, you may not want to give a student an A grade if they've completed twice the assignments as expected while never visiting the center. By capping the assignment points to 800, the student must visit the center to score greater than 800 points. These should ''not'' be set to 0. | |||
* | |||
::This | * '''Minimum''' and '''Maximum Visit Time to Count''' | ||
: These settings allow you to not count time outside of this duration window. For example, if you set these to 20 and 60, then a 5-minute visit won't be counted at all and a 90-minute visit would be counted as a 60-minute visit. | |||
* | |||
: | * '''Maximum Minutes Per Day''' | ||
: Use this setting to determine the max number of minutes that are counted per day. For example, if this is set to 60 minutes and the student visits for 90 minutes, they will only get points for 60 minutes. | |||
* | |||
: | * '''Grade Book Columns''' | ||
: These are the possible assignments that can contribute to a student's grade, which will be covered in the next section. Each assignment can be set to ''Checkbox'' or ''Entered Value'' depending on how you are tracking points. | |||
After creating your Grade Group, it must be linked to section records in order for it to set grades for the related registrations. Go to Other ➜ Listings ➜ Sections ➜ [The section record you want to update] ➜ Grade Group, then select your Grade Group. | |||
* | |||
[[File:4851972.png|800px]] | |||
==Potential Assignments== | |||
: | Potential Assignments are another way that students can gain points towards their grade. Assignments can be linked to a Grade Group via the ''Grade Book Column'' field mentioned above. To create a new Potential Assignment, go to Other ➜ Other Options ➜ Potential Assignments ➜ Hamburger menu {{#fas:bars}} ➜ New Potential Assignment. | ||
[[File:9216348.png|800px]]<br><br> | |||
: | * '''Name''' | ||
: This is the name of this Assignment. | |||
* '''Max Points''' | |||
: This is the number of points that will contribute to a student's overall grade upon completion. | |||
* '''Description''' | |||
: This is the description of this Assignment. | |||
* '''Link a Quiz''' and '''Allowed Retries''' | |||
: This ties into [[TracCloud:_SurveyTrac|SurveyTrac]]'s ability to send students a quiz. More information on this will be covered further into this article. | |||
Assignments can also be linked to registrations individually by going to the [[TracCloud:_Registrations_Listing|Registrations Listing]] or Students ➜ [Your student] ➜ Registrations ➜ [The registration you want to link an assignment to] ➜ Assignments. Click the ''Add New Assignment'' button, which will take you to the following screen. Assignments added this way will immediately give students the points for completion. | |||
[[File:8120363.png|800px]]<br><br> | |||
* '''Assignment''' | |||
: Select your Potential Assignment type here. | |||
* '''Date''' | |||
: Date of Assignment creation. | |||
* '''Grade Points''' | |||
: Choose how many points the student received for this assignment (overrides the maximum points defined in the potential assignment). | |||
* '''Comments''' | |||
: An optional field for additional information. | |||
==Assignment Grid== | |||
Now that you have your Grade Groups and Potential Assignments configured, you can view progress, grades, and mark assignments as completed from the Assignment Grid on the Registration Listing. This can be accessed by going to Other ➜ Listings ➜ Registrations ➜ Hamburger menu {{#fas:bars}} ➜ Views ➜ Assignment Grid. | |||
[[File: | [[File:3165083.png|800px]]<br><br> | ||
< | |||
There are several actions that can be completed from this screen, alongside reviewing individual grades and points. | |||
* '''Recalculating Grades''' | |||
: If you've made an adjustment to your grade scores or recently recorded new visits for a student, you may need to recalculate grades manually to see the most up-to-date information. From the Assignment Grid, click on the Hamburger icon {{#fas:bars}} ➜ Recalc These Grades. After a moment, the screen will refresh showing the latest information. | |||
* '''Mark Assignments as Completed (Checkbox)''' | |||
: Any Potential Assignments linked to your Grade Group will appear as an additional column on this screen (pictured above). Click the checkbox to mark the assignment as completed, updating the student's total points. | |||
* | * '''Assign a Value to Assignments (Entered Value)''' | ||
: If you switched your assignments to ''Entered Value'' instead of ''Checkbox'' in your Grade Group settings, you will see a slightly different view. Here, you can instead enter custom point values for this assignment on a per-student basis. Click the '''+''' icon to add points to the total, click '''-''' to subtract. | |||
:[[File:9851563.png|250px]] | |||
: | |||
* '''Export the List to CSV''' | |||
: If you would like to export this grade data to a CSV file, go to the hamburger menu ➜ Export CSV. | |||
: [[File:3145248.png|700px]] | |||
==SurveyTrac Quizzes== | |||
[[ | The assignment functionality can be further expanded with [[TracCloud:_SurveyTrac|SurveyTrac]]. This allows you to send quizzes to students, where the results of those quizzes can be used to calculate their grade. This portion of the article will only be covering the functionality unique to Grade Groups and assignments, for information on general SurveyTrac functionality, [[TracCloudST|click here.]] | ||
== | ====Assignment-Specific Survey Settings==== | ||
After creating a survey as usual, you will then need to mark it as a quiz. This is found under the ''Options'' tab in your survey settings. | |||
[[File:8362415.png|800px]] | |||
* '''Correct / Incorrect Answer Feedback''' | |||
: This text is displayed when the student responds to a question with the correct or incorrect answer. | |||
* '''Scoring System''' | |||
: Just like standard Assignments, points are rewarded for the completion of a survey. There are three ways to reward points. | |||
:* '''Quiz Question Points''' - Each question provides points if answered correctly, the student's total survey score is also their Assignment score. | |||
:* '''Percentage of Points''' - Each question provides points if answered correctly, the percentage of points obtained will be used to give the student that same percentage of the assignment max points. | |||
:* '''Pass/Fail''' - A threshold of points can be defined if this option is used. If the student passes this point threshold, they're given the maximum Assignment score. | |||
* | * '''Highlight correct/incorrect answers''' | ||
: | : Highlights incorrect answers in red, correct answers in green. | ||
* '''Show correct answers after final submission''' | |||
: | : If checked, after the final allowed attempt at the survey, the correct answers will be displayed to the student. | ||
::< | There are also unique question fields when a survey is marked as a Quiz. | ||
[[File:7182243.png|800px|Screenshot: Question entry for Survey/Quiz.]]<br><br> | |||
: | * '''Answers''' | ||
: This is where you will define which answer is correct. Multiple correct answers can be listed by putting them on separate lines, similar to Choices. | |||
: | * '''Points''' | ||
: How many points this question is worth if answered correctly. Each question can have a different point value, allowing you to add more weight to certain questions. | |||
* '''Correct/Incorrect Answer Feedback''' | |||
: | : Allows you to define custom feedback for this question, bypassing the quiz-wide preference described above. | ||
====Linking a Quiz to a Potential Assignment==== | |||
In order to make this Quiz available to your students, it must be linked to their assignments. Start by opening your Potential Assignment record once again, you will find quiz-specific fields in the bottom half of the entry window. | |||
[[File:2099818.png|600px|Screenshot: Potential Assignments Entry.]] | |||
* '''Quiz''' | |||
: | : Select the survey/quiz that you've just created. | ||
* '''Allowed Retries''' | |||
: | : Choose how many times a student can attempt this quiz. -1 allows for unlimited retries, 0 only allows a single attempt, otherwise you can set your own limit. The highest scoring attempt will be the one to count towards their assignment score. | ||
====Sending a Quiz==== | |||
After you've linked this quiz to your Potential Assignments, you can start sending it to students as an actual assignment. This can be performed in bulk from the Assignment Grid or individually from a registration record. | |||
From the Assignment Grid, if a quiz is available, you will see a ''Send Quiz'' button directly above the Assignments column. Click this and select the quiz you would like to send, which will then be sent to the students' emails. | |||
: | [[File:6228988.png|800px]] | ||
If you'd like to send a quiz to an individual student, this can be done from their registration record under the Assignments tab. | |||
[[File:5296489.png|700px]] | |||
[[Category:TracCloud Manual]] | |||
Latest revision as of 19:01, 23 June 2026
Global Preferences
Grade Groups can be used to calculate registration grades based on the student's number of visits, total time, or completed Assignments. You can control which of those values affect their grade, how many points are awarded, and the threshold of total points required to achieve a certain grade. This feature is primarily utilized in fitness centers, but can be used for any center where grade calculations are needed.
Creating a Grade Group
The Grade Group is where you'll define how many points students will receive per action. To begin, go to Other ➜ Other Options ➜ Grade Groups, click on an existing group or create a new one by going to the hamburger menu ➜ New Grade Group.

- Grade Group Name
- This is the name of this particular Grade Group.
- Points Per Visit and Points Per Minute
- Both of these settings allow you to choose how many points students receive per unique visit and per minute logged in. You should consider how you want students to accumulate points when setting these values. For example, if you want students to visit for 10 hours to achieve an A grade, you can give them 0 points per visit, 1 point per minute, and make 600 points the threshold for an A. This means students could get an A by having 5 2-hour visits or 20 30-minute visits. If you want to encourage students to have more shorter visits, that's where you can start adjusting both of these values to create a balance, such as rewarding 20 points per visit and 1 point per minute. In that case, 2 280-minute visits would be worth the same number of points as 10 40-minute visits.
- Leave either field set to 0 to not give points based on that metric.
- Calculation Mode and the Grade Chart
- The Grade Chart is where you will list out all of the possible grades and the point threshold for each. Calculation Mode determines how points are counted. Click the New button to add grades to the chart.
- Combined Total
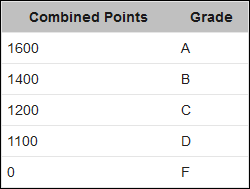
- This combines the points given for visits, time, and assignments, then calculates grade based off that number alone. You would simply set the threshold for each grade, and when the student hits that threshold of points they will receive that grade level.
- Min Points
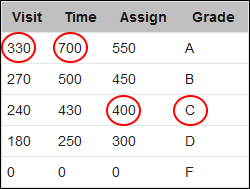
- This means that a student's grade will only be as high as their minimum score across visits, time, and assignments. This provides grater flexibility in preventing students from over-scoring in one of the three metrics while ignoring others. With this option, you can create a grade level for each possible source of points, and the student's final grade will be the lowest of the set. As an example, if a student has maxed out their visit and time scores (for 1300pts) but they've only scored 400 in their assignments (1700 total), this would result in an A grade if the above Combined Total table was being used. If you want to discourage this approach, you can create a table similar to what's shown below. The student's lowest score in each column will determine their final grade. This example student would receive a C in this case due to insufficient assignment points.


- Maximum Visit/Time/Assignment Points
- These settings allow you to set a limit on how many points a student can receive from each source. For example, you may not want to give a student an A grade if they've completed twice the assignments as expected while never visiting the center. By capping the assignment points to 800, the student must visit the center to score greater than 800 points. These should not be set to 0.
- Minimum and Maximum Visit Time to Count
- These settings allow you to not count time outside of this duration window. For example, if you set these to 20 and 60, then a 5-minute visit won't be counted at all and a 90-minute visit would be counted as a 60-minute visit.
- Maximum Minutes Per Day
- Use this setting to determine the max number of minutes that are counted per day. For example, if this is set to 60 minutes and the student visits for 90 minutes, they will only get points for 60 minutes.
- Grade Book Columns
- These are the possible assignments that can contribute to a student's grade, which will be covered in the next section. Each assignment can be set to Checkbox or Entered Value depending on how you are tracking points.
After creating your Grade Group, it must be linked to section records in order for it to set grades for the related registrations. Go to Other ➜ Listings ➜ Sections ➜ [The section record you want to update] ➜ Grade Group, then select your Grade Group.

Potential Assignments
Potential Assignments are another way that students can gain points towards their grade. Assignments can be linked to a Grade Group via the Grade Book Column field mentioned above. To create a new Potential Assignment, go to Other ➜ Other Options ➜ Potential Assignments ➜ Hamburger menu ➜ New Potential Assignment.

- Name
- This is the name of this Assignment.
- Max Points
- This is the number of points that will contribute to a student's overall grade upon completion.
- Description
- This is the description of this Assignment.
- Link a Quiz and Allowed Retries
- This ties into SurveyTrac's ability to send students a quiz. More information on this will be covered further into this article.
Assignments can also be linked to registrations individually by going to the Registrations Listing or Students ➜ [Your student] ➜ Registrations ➜ [The registration you want to link an assignment to] ➜ Assignments. Click the Add New Assignment button, which will take you to the following screen. Assignments added this way will immediately give students the points for completion.

- Assignment
- Select your Potential Assignment type here.
- Date
- Date of Assignment creation.
- Grade Points
- Choose how many points the student received for this assignment (overrides the maximum points defined in the potential assignment).
- Comments
- An optional field for additional information.
Assignment Grid
Now that you have your Grade Groups and Potential Assignments configured, you can view progress, grades, and mark assignments as completed from the Assignment Grid on the Registration Listing. This can be accessed by going to Other ➜ Listings ➜ Registrations ➜ Hamburger menu ➜ Views ➜ Assignment Grid.

There are several actions that can be completed from this screen, alongside reviewing individual grades and points.
- Recalculating Grades
- If you've made an adjustment to your grade scores or recently recorded new visits for a student, you may need to recalculate grades manually to see the most up-to-date information. From the Assignment Grid, click on the Hamburger icon ➜ Recalc These Grades. After a moment, the screen will refresh showing the latest information.
- Mark Assignments as Completed (Checkbox)
- Any Potential Assignments linked to your Grade Group will appear as an additional column on this screen (pictured above). Click the checkbox to mark the assignment as completed, updating the student's total points.
- Assign a Value to Assignments (Entered Value)
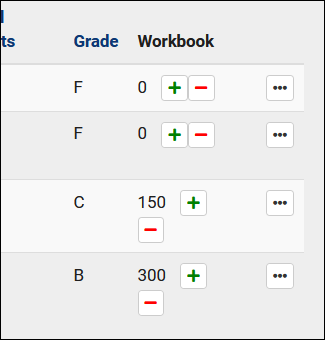
- If you switched your assignments to Entered Value instead of Checkbox in your Grade Group settings, you will see a slightly different view. Here, you can instead enter custom point values for this assignment on a per-student basis. Click the + icon to add points to the total, click - to subtract.

- Export the List to CSV
- If you would like to export this grade data to a CSV file, go to the hamburger menu ➜ Export CSV.


SurveyTrac Quizzes
The assignment functionality can be further expanded with SurveyTrac. This allows you to send quizzes to students, where the results of those quizzes can be used to calculate their grade. This portion of the article will only be covering the functionality unique to Grade Groups and assignments, for information on general SurveyTrac functionality, click here.
Assignment-Specific Survey Settings
After creating a survey as usual, you will then need to mark it as a quiz. This is found under the Options tab in your survey settings.

- Correct / Incorrect Answer Feedback
- This text is displayed when the student responds to a question with the correct or incorrect answer.
- Scoring System
- Just like standard Assignments, points are rewarded for the completion of a survey. There are three ways to reward points.
- Quiz Question Points - Each question provides points if answered correctly, the student's total survey score is also their Assignment score.
- Percentage of Points - Each question provides points if answered correctly, the percentage of points obtained will be used to give the student that same percentage of the assignment max points.
- Pass/Fail - A threshold of points can be defined if this option is used. If the student passes this point threshold, they're given the maximum Assignment score.
- Highlight correct/incorrect answers
- Highlights incorrect answers in red, correct answers in green.
- Show correct answers after final submission
- If checked, after the final allowed attempt at the survey, the correct answers will be displayed to the student.
There are also unique question fields when a survey is marked as a Quiz.

- Answers
- This is where you will define which answer is correct. Multiple correct answers can be listed by putting them on separate lines, similar to Choices.
- Points
- How many points this question is worth if answered correctly. Each question can have a different point value, allowing you to add more weight to certain questions.
- Correct/Incorrect Answer Feedback
- Allows you to define custom feedback for this question, bypassing the quiz-wide preference described above.
Linking a Quiz to a Potential Assignment
In order to make this Quiz available to your students, it must be linked to their assignments. Start by opening your Potential Assignment record once again, you will find quiz-specific fields in the bottom half of the entry window.

- Quiz
- Select the survey/quiz that you've just created.
- Allowed Retries
- Choose how many times a student can attempt this quiz. -1 allows for unlimited retries, 0 only allows a single attempt, otherwise you can set your own limit. The highest scoring attempt will be the one to count towards their assignment score.
Sending a Quiz
After you've linked this quiz to your Potential Assignments, you can start sending it to students as an actual assignment. This can be performed in bulk from the Assignment Grid or individually from a registration record.
From the Assignment Grid, if a quiz is available, you will see a Send Quiz button directly above the Assignments column. Click this and select the quiz you would like to send, which will then be sent to the students' emails.

If you'd like to send a quiz to an individual student, this can be done from their registration record under the Assignments tab.
