|
|
SAGE (Student Alert and Group Events) is an additional module available for the Trac System. SAGE allows your faculty members to submit referrals, progress reports, or evaluations for the students enrolled in their courses. Based on the choices made while creating the referral, an automated email could be sent out to the student's assigned advisor, a professor, or otherwise, that way you and your staff can be as proactive as possible in helping your students.
You can think of SAGE like a three-step process.
- 1. Creation, a referral is submitted, emails are sent out.
- These emails could be sent to advisors, professors, or the student themselves, notifying us of something the student may be struggling with.
- 2. Follow-up, more information is given, new emails are sent out.
- The follow-up email lets relevant users know how this referral is going, what has been done, and what we are doing to help this student.
- 3. Resolution, a final email is sent out to wrap everything up.
- Once the referral has been processed, we can fill out some additional information letting the relevant users know what we did to help this student.
Faculty View / Roster AnnotationsFaculty Members are typically the primary user-type submitting referrals, and as such, they have a streamlined view of the referral submission process. Within the faculty dashboard, you'll find their class rosters along with the referrals that have been designated as Roster Annotations (which we'll cover more later). This allows faculty to immediately access important referrals for each of their rosters.
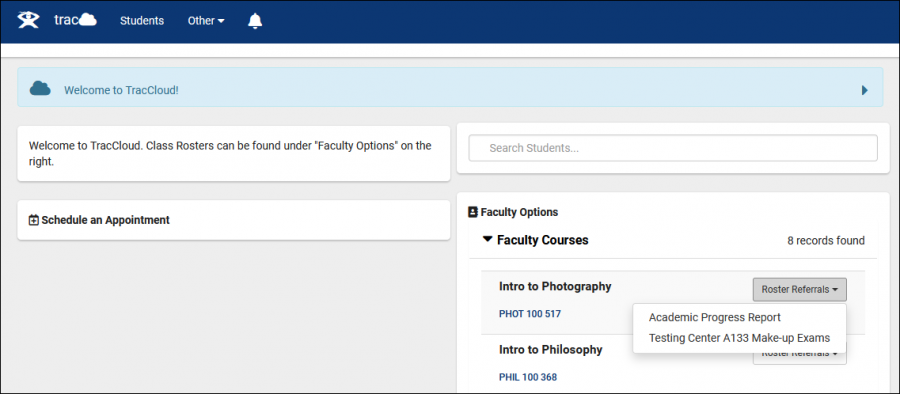
As a faculty member, let's say we wanted to submit a referral for one of our classes. We can simply click on the referral we want to submit for any given roster, and we'll be given access to a batch-referral tool.
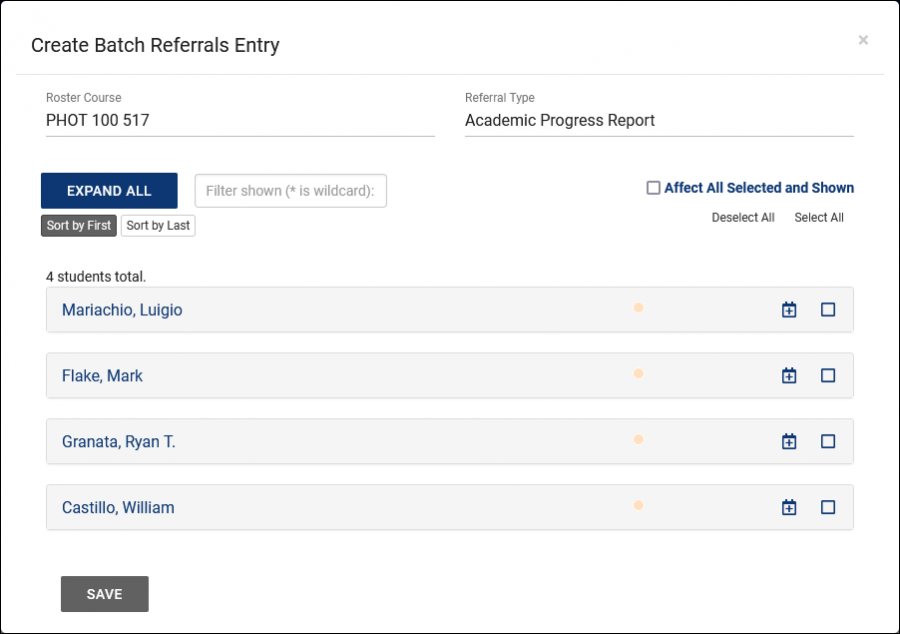
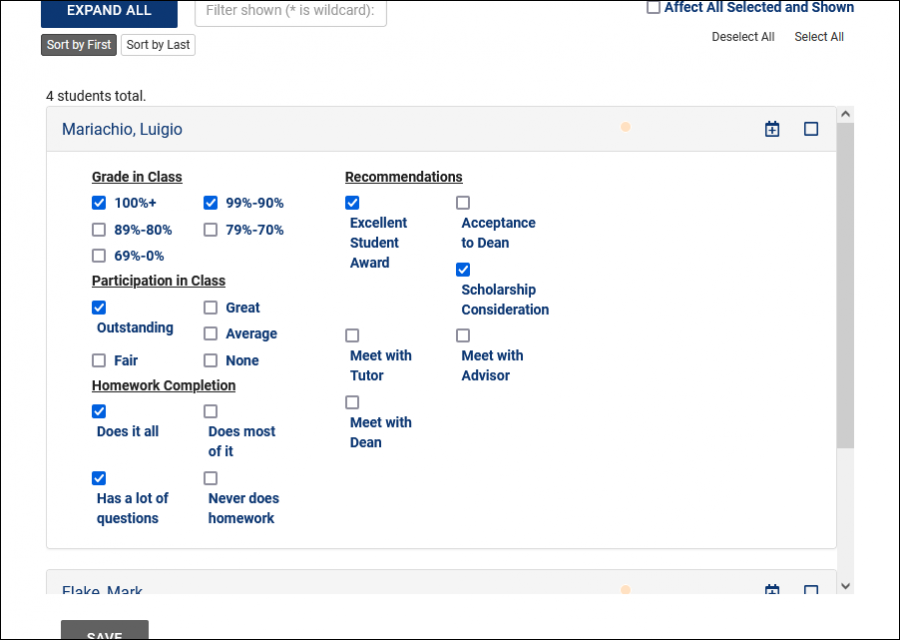
From this menu, we can click on individual students and fill out unique referrals for each without leaving this screen. Once we've filled out referrals for the specific students, we click save, and we're all set. The referral process has begun for each of these students that we filled out a referral for.
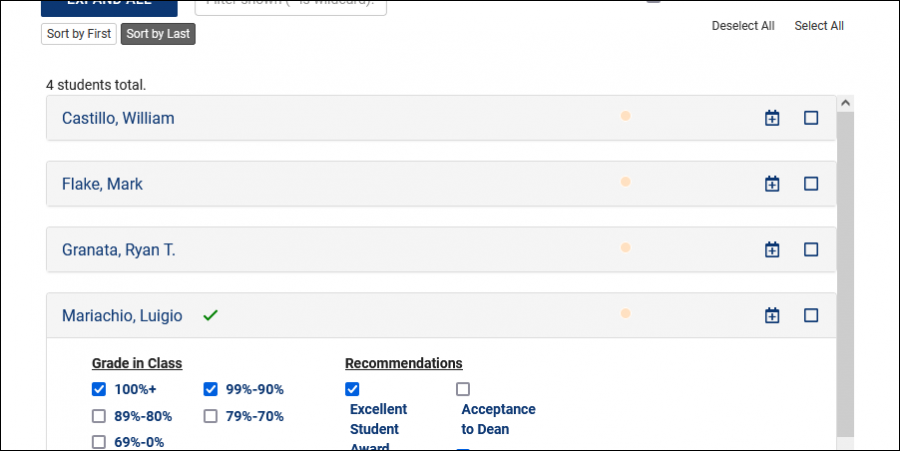
If the referral is configured as a roster annotation for [X] days (we'll cover this later), we can even open this batch-referral tool later (but within the day limit) and continue where we left off. The green check-marks indicate a referral that has already been opened. Clicking it again lets us pick up right where we left off.
We also have the ability to apply the same Reason/Recommendation to multiple students at once. Select Affect All Selected and Shown and check the checkboxes for each student we want to affect. Now when we make a recommendation or apply a reason to one student, it will also affect all other checked students. Students that have been affected by this approach will be designated by a ... icon as seen in the image below.

As a faculty member, we can also book an appointment for the student from this screen as well (assuming our permission group allows it). This can be accomplished by clicking on the calendar icon on the right-hand side for the relevant student.
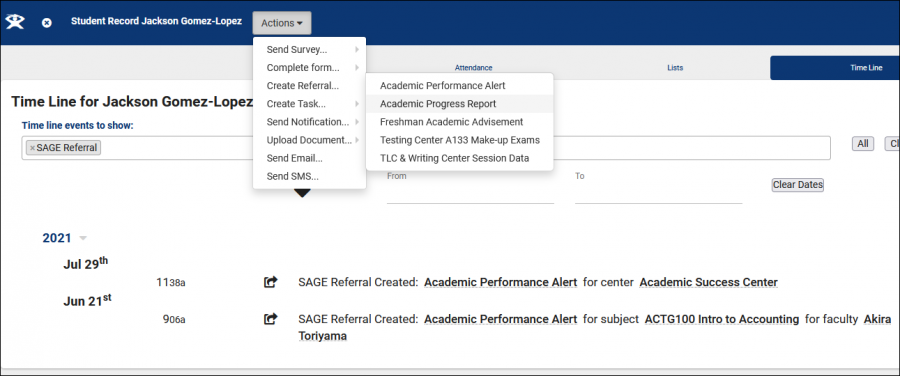
Individual Student ReferralsReferrals can also be submitted individually from students' profiles. As non-faculty users don't have access to the class roster view, this will be their primary tool for submitting referrals, but faculty can of course use this method as well. New referrals can be created through the Actions button, past referrals can be viewed on the student time line.
After selecting the referral type that we want to submit, we're taken to the full referral submission screen. We'll cover more on configuring this side of SAGE later in this guide.
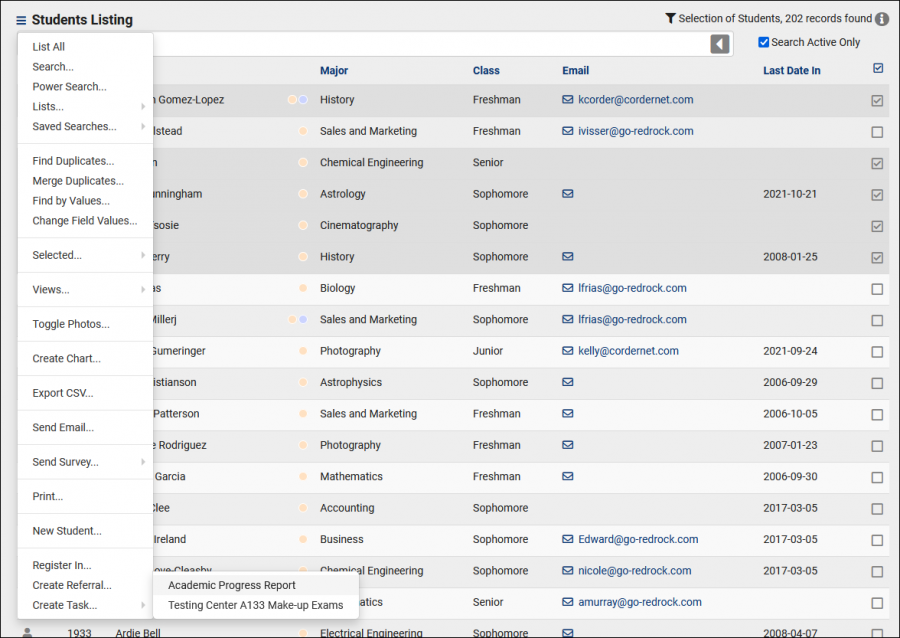
Student List Mass Referral ToolWe can also submit referrals from the student listing. This allows us to search for students enrolled in a specific course, pull up a list, or just search for a couple students manually and create referrals in bulk. This screen will operate in the same way as the faculty roster referral tool. Students are selected with the checkboxes on the right-side.

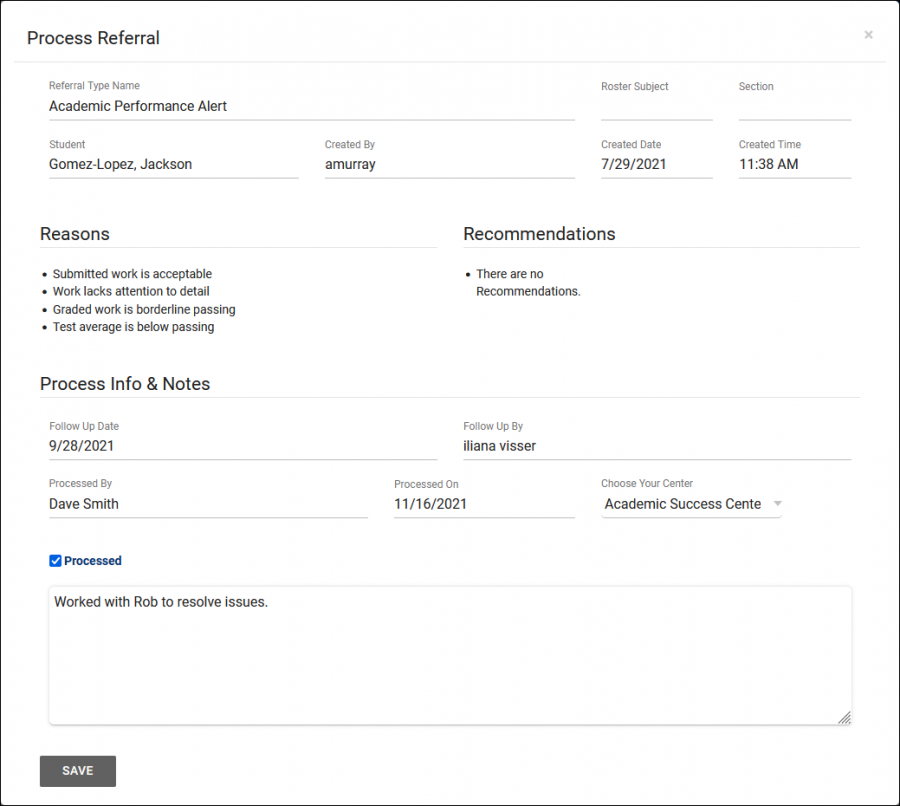
ProcessedAfter a referral is marked as processed, we will see the following screen summarizing basic information about this referral, and providing a location to write additional notes about how this situation was resolved. Once saved, the final "Processed" email will be sent out (which we'll learn more about later).
Admin View and SAGE ManagementFrom an admin's perspective, we can submit referrals, create new referral types, and run reports on our SAGE data. The majority of this section will be spent going over SAGE configuration.
SAGE ConfigurationTo create new SAGE Referral Types, modify existing, or simply review your current configuration, go to Other > SAGE > Referral Types. This will bring you to the Referral Type Listing. To create a new Referral Type, you would click the hamburger icon (File:Hamburger.png), then select New Referral Type. But for our Example, we're going to take a look at an existing referral.
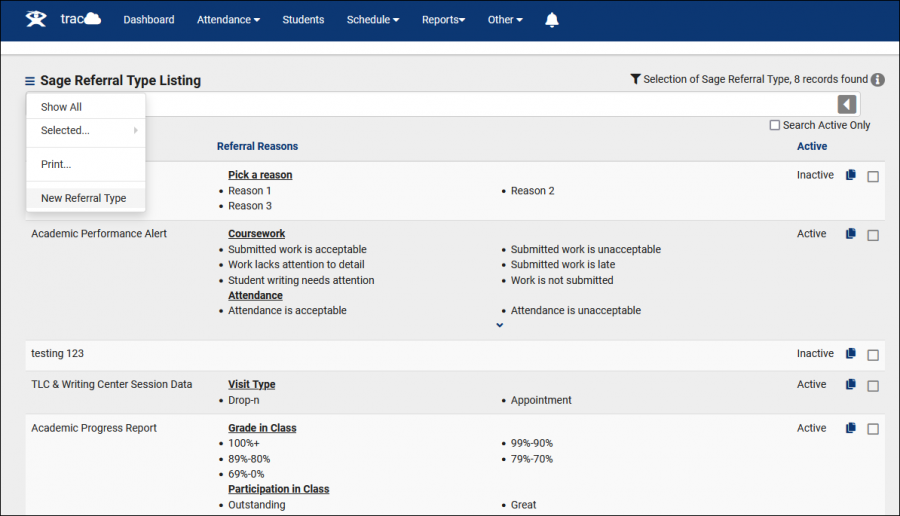
Opening an existing referral type brings us to the following screen.
File:6719490.png
- Active will toggle this referral on or off, allowing you to deactivate it when unneeded, and reactivate it when necessary.
- Test Mode sets this referral into a test mode, where all emails sent will go to the Test Email Address.
- Condense Roster Referral View will display Reasons and Recommendations in a more tightly packed view for faculty. This may be preferred if many referrals are being created at once. Does not affect visible data fields.
- Roster Annotation designates this referral type as a Roster Annotation, meaning it appears as an option for class rosters from the faculty perspective.
- Days is the time-frame provided to the faculty member where they can edit an existing roster referral. After this window has passed, the faculty member will create a new referral rather than editing an existing one.
- Linked List allows you to assign this referral type to a specific student list. Faculty and other users will only be able to create this referral for students on that list. More information on student lists.
- Roster Annotation Settings For Faculty Viewing allows you to link this referral type to a specific subject. The referral will then only appear in contexts of that subject/course/section from the roster referral perspective.
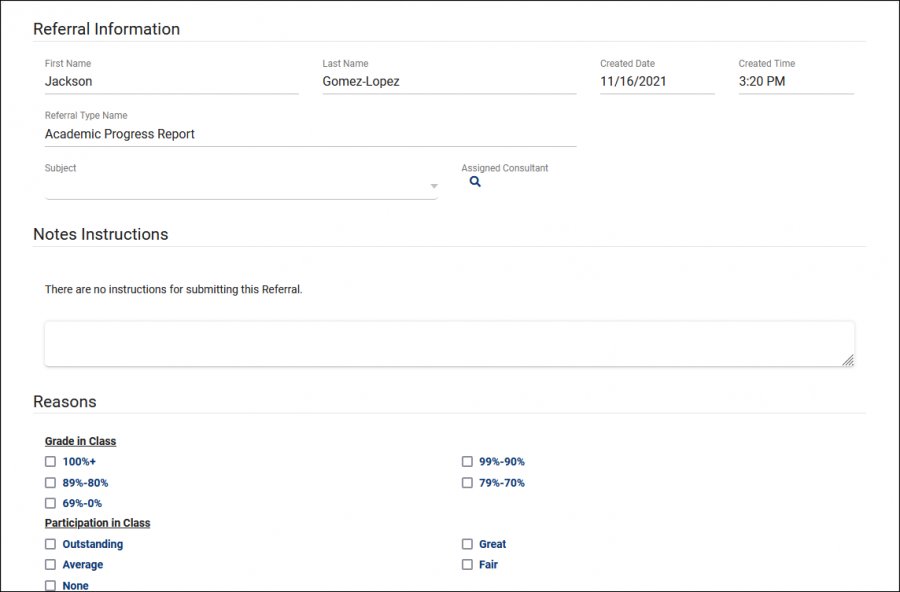
- Notes Instructions is a message that appears to the user submitting this referral, providing information above the Notes box.
File:4765494.png
- Additional Notes Instructions is a message that appears to the user submitting this referral, providing information above the Additional Notes box.
- Processed Button Title determines the name of the "Processed" option, "Complete," "Resolved," etc.
- Hide Options allows you to toggle certain elements/features of your Referral Type off if preferred.
- Require Notes / Additional Notes will require that whoever is submitting this referral enter notes in one or both of these fields.
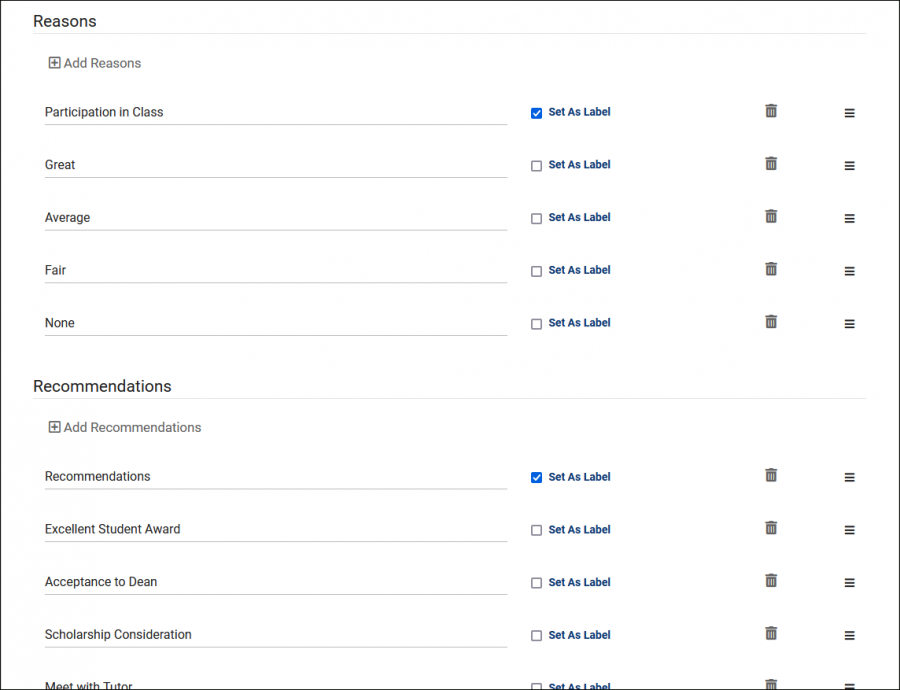
Reasons & RecommendationsReasons and Recommendations can be one of the most important aspects in creating these referrals, as these options can also dictate which emails get sent out to whom. Typically, these would be configured to allow your faculty to quickly describe where the student is struggling and what they recommend as a solution. However, since these are entirely customizable, you can ask any questions you can think of to help make the referral creation process as straightforward as possible.
Click the Add Reasons / Recommendations box to add a new option. Setting a Reason/Recommendation as a "Label" will turn the field into a form of header for the following reasons, to help categorize your different options. These options can also be reorganized by dragging the hamburger icon (File:Hamburger.png) on the right-side up/down.
Custom QuestionsCustom questions allow you to add additional questions to your referrals, these questions can ask whatever you'd like and can be formatted as a Pulldown, Fill-in, or Essay field.
To create your custom question, click Add New Question.
File:2328221.png
- Question Type determines the question format. Pulldown, Fill-in, or Essay.
- Code Reference is used to pull this information into your emails, or for additional logic around what email content is sent. Typically, something like "GradeQuestion1."
- Question is the prompt itself, displayed to staff filling out this referral.
- Choices the available response choices (only applicable to Pulldown format questions). Put each choice on its own line.
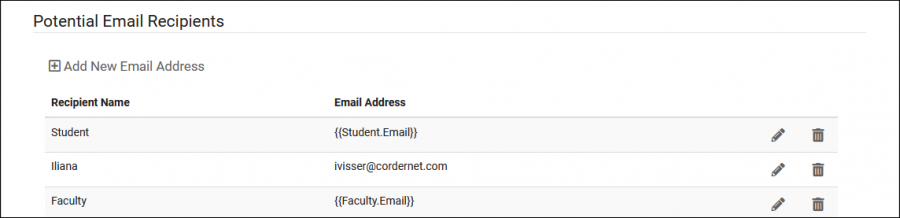
Potential Email RecipientsThese are the possible recipients of alert emails relating to this referral. For example, if this referral's automated emails can be sent to students, then you will need to add students to the list, as seen in the screenshot below. The name of this field is just for reference, it's only important that the correct email tags are used.
- Student: {{Student.Email}}
- Faculty: {{Faculty.Email}}
- Assigned Advisor/Other {{Student.CustomData.cf_18}}
- Student Custom Fields can also be referred to here to pull email addresses, such as in the case of an Assigned Advisor. More information.
- Linked Consultant: {{Consultant.Email}}
- Specific user email addresses can also be entered.
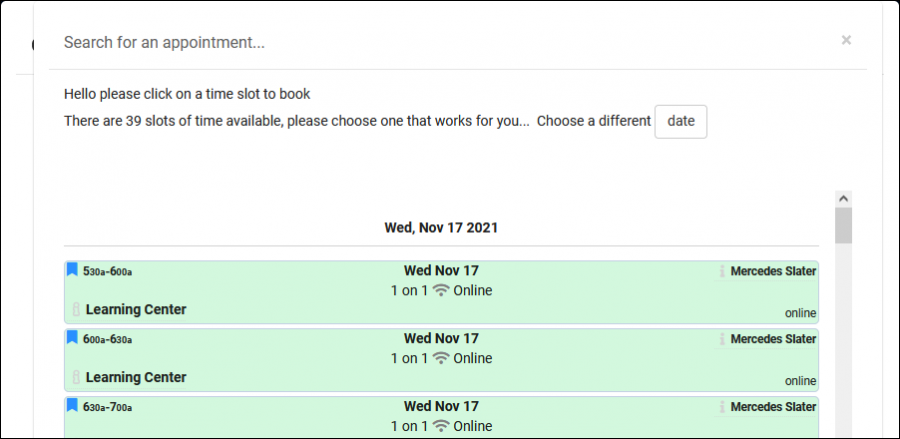
Referral to Testing CenterThis allows you to provide faculty the ability to book appointments for students that they're creating referrals for. Typically used for Testing Centers or Lab environments, where faculty would need to book appointments on behalf of students, or assign multiple students to the same Group Availability.
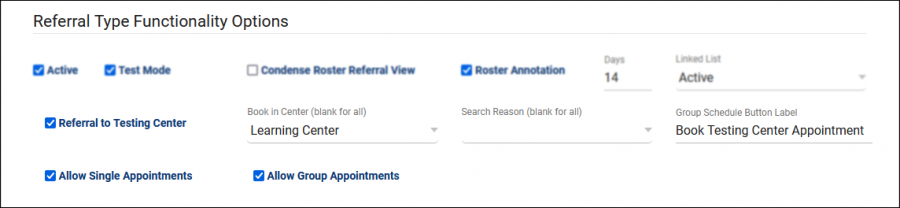
- Referral to Testing Center enables this feature.
- Book in Center determines which center appears when faculty are searching for appointments on behalf of students.
- Search Reason determines which reason is used for the search availability process. Leave blank for all reasons.
- Group Schedule Button Label is the name of the button to search for availabilities.
- Allow Single Appointments provides faculty the ability to book sessions for students one at a time.
- Allow Group Appointments provides faculty the ability to select multiple students, and book a group availability for all at once.
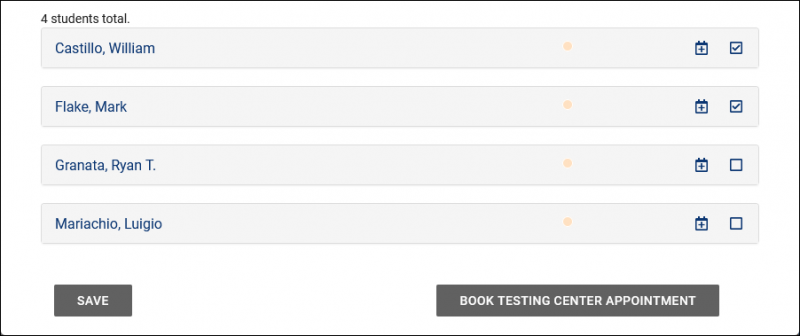
From the faculty perspective, there's a Schedule icon for each student in the roster referral listing, and/or the option to select multiple students and click "Book Testing Center Appointment" to schedule a group appointment for all selected students.
Automated EmailsThe Automated Emails tab allows you to create custom emails that can be sent to one or more of your Potential Email Recipients upon referral submission. Common examples might be an email that is sent to the student when a referral is created for them. Faculty or other staff might also receive different versions of the same email, or a completely different email if configured in that way.
File:3221767.png
To create your first Email, click Create New Email, type in your subject line, then click Save. This will add the email to your Automated Emails listing. Click the Pencil Icon for the email you just created, and you should end up at a page like this.
File:4333492.png
- Email Subject determines the subject line of the email, as you entered previously. This can be changed at any time.
- Email From lets you change which email address this email is sent from. Uses system address if left blank.
- Add Email Recipient allows you to define which users could possibly receive a copy of this email, based on your Potential Email Recipients.
- Email Sends On Referral Action Based Upon Selected Trigger(s) allows you to decide under what context this email is sent. On initial creation, on (one of possibly multiple) follow-ups, and on completion.
- Email Body is the actual contents of your email.
One of the key elements of configuring your SAGE emails is Twig, which you can think of as a mini-programming language. Twig plays two key roles, providing tags for the information displayed, and adding logic to your email to determine what content is sent.
A full list of email tags can be found further into this guide, but to give a quick example, you could format an email as such:
"Hello, {{Student.First_Name}}, this {{ReferralType.Name}} was submitted by {{Faculty.FirstName}}."
Each of those tags would then be replaced by the relevant information when the email is actually sent.
This is where Twig gets slightly more complicated, but significantly more flexible. Let's say you want to add an extra sentence to your email, but only if a particular reason was selected. In that case, you could write your email like this:
{% if "Poor Attendance" in Reasons %}
Online Tutoring is now available! See example.edu/remote/ for more information.
{% endif %}
That sentence will only be included in the email body if that Reason was selected. The extent of what Twig is capable of is outside the scope of this article, but there are many resources available online, and even a collection of common use-cases on our own Wiki.
Email TagsMany of the standard email tags can be utilized in SAGE emails in the same way, but there are also a few SAGE-specific tags to take note of as well. A complete list of tags can be found in our Twig Guide.
Formatting Text in TracCloud with Twig and HTML
Many text fields throughout TracCloud support Twig and HTML, giving you greater control in determining what data is displayed to your users based on the context of appointments, visits, and more, as well as formatting that data to be as clear as possible.
Twig will be the primary focus of this article. Twig is a template engine that serves two primary purposes in TracCloud:
- 1. Print variables in text
- Personalize your emails and messages. Greet the student by name, let them know what subject they selected in their appointment, what time their appointment takes place, the location, and more. These same variables are also used for purpose #2.
- 2. Add logic to your text
- Modify the email or message based on why it was sent. Add an extra paragraph if X center was selected, send a follow-up email after a visit if the student chose Y, prevent an email from being sent on a SAGE referral if Z recommendation was checked, and much more. Rather than creating a generic email for any context, create an email that formats itself to match the current context.
Twig (and HTML) are supported in profile emails, welcome messages, email templates, appointment display, and more. Most of the examples listed in this article are for appointment emails or SAGE referrals, but the same concepts apply in all other supported fields. It's also worth keeping in mind that Twig exists outside of TracCloud, and there are many resources online for how you can utilize it that will also work here. This guide likely covers everything you will need, but it doesn't cover everything Twig is capable of.
HTML will also be used throughout this article, but without much explanation as it's more ubiquitous than Twig. There are many excellent resources online explaining how to use this markup language, such as W3Schools. HTML is used to adjust font sizes and colors, embed images and videos, and more.
What are Twig tags?
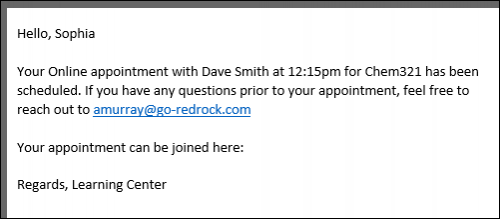
Twig tags can be used to pull data from various TracCloud fields to be included in emails and upcoming appointments. Many of the Twig examples in this chapter will be using these tags, whether they’re used as part of a Twig command or just offhandedly included in an unrelated part of the email. A list of tags can be found at the bottom of this chapter (and within the TracCloud menu), but for a basic primer on how these tags can be used in isolation, here’s an example of a confirmation email.
Hello,  {{Student.First_Name}}
<br/><br/>
Your {{Appointment.OnlineText}} appointment with {{Consultant.FirstLast}} at
{{Appointment.StartTime}} for {{Course.SubjectCourse}} has been scheduled. If you have any
questions prior to your appointment, feel free to reach out to {{Consultant.Email}}
<br/><br/>
Your appointment can be joined here: {{Appointment.OnlineLink}}
<br/><b/r>
Regards, {{Center.Name}}
When this email is sent, all the tags we included are replaced with the relevant information for this appointment.
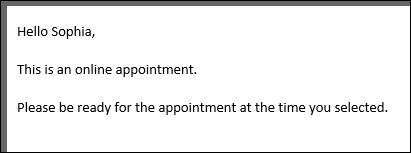
if / if X then do Y
if statements will likely be the most commonly used Twig command for most use-cases. This allows you to write out statements such as “if the student selected reason “Exam Help,” then include this piece of text.” Or in the example below, if the appointment is online, include text to specify this.
In the statement, we’re using the same tags that are used for emails, but without the curly brackets.
Hello {{Student.First_Name}},
<br/><br/>
{% if Appointment.Online == "1" %}
This is an online appointment.
{% endif %}
<br/><br/>
Please be ready for the appointment at the time you selected.
If the if statement is true, all text up to the endif line will be printed in the email. Since the appointment this student booked is online, the “This is an online appointment” text was included. Otherwise, it would jump straight to “Please be ready for the appointment…”
We aren’t limited to just “equals” either. Similar examples with different logic can be found below.
{% if Course.Subject starts with "Chem" %}
this text is only included if our subject starts with “Chem”. This is case-sensitive.
{% endif %}

{% if Course.SubjectCourse ends with "101" %}
This text is only included if our subject ends with “101”
{% endif %}

{% if Appointment.Online != "1" %}
This text is only included if the appointment is not online
{% endif %}

{% if Course.Subject == "Math" or Course.Subject == "Chem" %}
This text is only included if the subject is Math or Chem
{% endif %}

{% if Course.Subject == "Math" and Center.Name == "Math Center" %}
This text is only included if the subject is Math and the center is Math Center
{% endif %}


{% if Course.Subject == "Math" and (Center.Name == "SI" or Center.Name == "Workshop") %}
This text is only included if the subject is Math and the center is SI or Workshop
{% endif %}

{% if (CalcMissedAppointments(Student.Sequence, Center.ProfileID) > 0) %}
You have {{CalcMissedAppointments(Student.Sequence, Center.ProfileID)}} missed
appointments since {{CalcMissedDate(Center.ProfileID)}}.
{% endif %}
Other Examples
"If student is on a Watch List." Watch List sequence can be retrieved by hovering your mouse over the Watch List name in your System Preferences.
{% if Student.WatchLists.wl_14 == "true" %}
This student is on the Athletes list!
{% endif %}
Modify who receives an email based on a custom field, specific to Send Visit Notes to Coach, Advisor or Student.
To Address of Recipient of the Notes (Coach, Advisor, Student) - Only include emails selected from a multi-checkbox custom field, only include semi-colon if needed.
{% set var2 = 0 %}
{% if "Student" in Visit.CustomData.cf_104 %}
    {% if var2 >= 1 %};{% endif %}
    {{Student.Email}}
    {% set var2 = 1 %}
{% endif %}
{% if "Faculty" in Visit.CustomData.cf_104 %}
    {% if var2 >= 1 %};{% endif %}
    {{Faculty.Email}}
    {% set var2 = 1 %}
{% endif %}
{% if "Consultant" in Visit.CustomData.cf_104 %}
    {% if var2 >= 1 %};{% endif %}
    {{Staff.Email}}
    {% set var2 = 1 %}
{% endif %}
{% if "SysAdmin Dave Smith" in Visit.CustomData.cf_104 %}
    {% if var2 >= 1 %};{% endif %}
    example@school.edu
    {% set var2 = 1 %}
{% endif %}
`Who` Label of the Button for Sending the Notes - Modify the phrasing of this button based on the options selected.
{% set var = 0 %}
{% for key,value in Visit.CustomData.cf_104 %}
{% if value != "#NULL#" %}
{% if var >= 1 %},
{% endif %}
{{ value|trim(' ') }}
{% set var = 1 %}
{% endif %}
{% endfor %}
'if' statement based on availability type - One-on-one, group, etc.
{% if Appointment.AvailRecID != "0" %}
{% if AvailBlock.MaxStudents > "1" %}
This is a multi-person appointment with {{AvailBlock.MaxStudents}} slots, make sure you do X
{% else %}
This is a one-on-one appointment, make sure you do Y
{% endif %}
{% else %}
This is an ad-hoc appointment, make sure you do Z
{% endif %}
else / if X then do Y, otherwise do Z
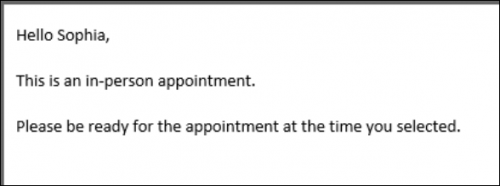
An else statement allows us to include a block of text or an additional instruction if an if statement ends up not being true. For example, if our appointment above turns out to be an in-person appointment, maybe we want to include a different string of text.
Hello  {{Student.First_Name}},
<br/><br/>
{% if  Appointment.Online == "1" %}
This is an online appointment.
{% else %}
This is an in-person appointment.
{% endif %}
<br/><br/>
Please be ready for the appointment at the time you selected.
Since the appointment wasn’t online, we get the “This is an in-person…” text in our confirmation email instead.
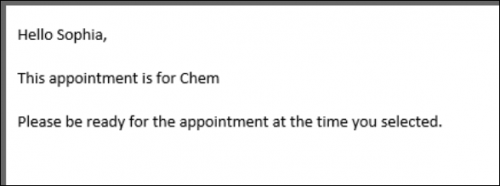
elseif / if W then do X, otherwise if Y then do Z
An elseif statement allows us to ask additional if questions, assuming the answer to the prior question was No.
Hello  {{Student.First_Name}},
<br/><br/>
{% if Course.Subject == "Math" %}
This appointment is for Math
{% elseif Course.Subject == "Chem" %}
This appointment is for Chem
{% endif %}
<br/><br/>
Please be ready for the appointment at the time you selected.
Since our appointment was for Chemistry, we receive the following email. If the appointment was for neither Chemistry nor Math, we wouldn’t see a middle block of text at all.
if (arrays) / if X in Y
When you want to use an if statement for arrays, such as the Reasons and Recommendations for SAGE referrals, the formatting is a little bit different. In this context, you would want to know if the Reasons array contains the reason you’re looking for. This would be formatted as such:
Hello {{Student.First_Name}},
<br/>
{% if "Poor Grades" in Reasons %}
This referral is being submitted due to the reason “Poor Grades”
{% endif %}
Since “Poor Grades” was the reason our faculty member selected when submitting this referral, we receive the following email.

We can also search for the opposite, specifying “not in” instead:
{% if "Poor Grades" not in Reasons %}
This referral was *not* created with the reason “Poor Grades”
{% endif %}
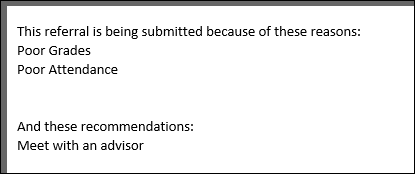
for (arrays) / for each X in Y, do Z
The for command allows us to list out the contents from a specific sequence. This would frequently be used for listing out Reasons or Recommendations in SAGE referral emails.
This referral is being submitted because of these reasons:
<br/>
{% for key,value in Reasons %}
    {{ value }} <br/>
{% endfor %}
<br/><br/>
And these recommendations:
<br/>
{% for key,value in Recommendations %}
    {{ value }} <br/>
{% endfor %}
Alternatively, Array tags such as ReferralType.Reasons will need to be formatted as such:
{% for item in ReferralType.Reasons %}
{{ item.value|e }}
{% endfor %}
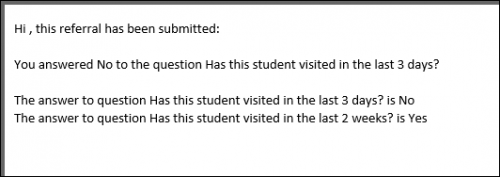
SAGE Questions & Actions
Custom questions within SAGE have one more moving part to take into consideration. When creating a custom question, there’s a field named “Code Reference.” This is the code used when referring to this question in emails and reports.

These questions/answers are part of an array, utilized just like the Reasons and Recommendations above.
Hi, this referral has been submitted:
<br/><br/>
{% if Answers.VisitQuestion != '' %}
You answered {{Answers.VisitQuestion}} to the question {{Questions.VisitQuestion}}
{% endif %}
<br/><br/>
{% for key,value in Answers %}
The answer to question {{ attribute(Questions, key) }} is {{ value }}
<br/>
{% endfor %}
First, we’re looking for a specific question and answer. To pull this information, we’re using the tags “Answers.[Code Reference]” and “Questions.[Code Reference]”, with the code reference portion being replaced with whatever we entered in the SAGE custom question. If this question was answered, we’re going to include our answer and the question itself in the email.
Secondly, we want to go through all of our answers to all of our questions. This would be an array just like Reasons and Recommendations, and is formatted similarly. Once we receive this email, we will see the answers selected by our faculty member.
Actions
Actions can be used as commands in addition to Twig. At this time, the only Action that has been implemented is #ACTION:DO NOT SEND#, which prevents the email from being sent. This is primary used in SAGE emails, but can also be used in profile emails if needed. For example, this could be useful in situations where not all of your SAGE referrals need to result in an email being sent. You could have a dedicated recommendation for “No recommendations at this time”, and we could use that to determine whether or not an email gets sent.
{% if "No recommendations at this time" not in Recommendations %}
This referral is being submitted because of these reasons:
<br/>
{% for key,value in Reasons %}
    {{ value }} <br/>
{% endfor %}
<br/><br/>
And these recommendations:
<br/>
{% for key,value in Recommendations %}
    {{ value }} <br/>
{% endfor %}
{% else %}
#ACTION:DO NOT SEND#
{% endif %}
With this email configuration in place, if our faculty member submits a referral with the recommendation “No recommendations at this time,” no email would be sent. An email will only be sent if that recommendation wasn’t selected, which would then follow the rest of the example above, listing out reasons and recommendations.
Tag List
The remainder of this chapter will display all of the email tags available in TracCloud with definitions.
For most of these tags, you can print the relevant value by surrounding the field with double-curly brackets, as seen in several of the above twig examples. The curly brackets are not required when using the value in an if statement, for example.
Student tags
| Student.First_Name |
Student's first name
|
| Student.Last_Name |
Student's last name
|
| Student.Legal_First |
Student's legal first name
|
| Student.Full_Name |
The student's full name, formatted as "Last, First M."
|
| Student.Full_Name2 |
The student’s full name, formatted as “First M. Last”
|
| Student.FirstLast |
Student's full name, formatted as "First Last"
|
| Student.LastFirst |
Student's full name, formatted as "Last, First M"
|
| Student.Home_Phone |
Student's home phone number
|
| Student.Work_Phone |
Student's work phone number
|
| Student.Cell_Phone |
Student's cell phone number
|
| Student.Email |
Student’s email address
|
| Student.UserName |
Student’s username
|
| Student.ID |
Student's ID number
|
| Student.Other_ID |
An optional unique identifier for this student, like a handle or username
|
| Student.Other_ID2 |
A second optional unique identifier for this student
|
| Student.Barcode |
Student's barcode number
|
| Student.Major |
Student's major
|
| Student.Class |
Student's class
|
| Student.DegreeGoal |
Student's degree goal
|
| Student.Cohort |
Student's cohort
|
| Student.College |
Student's college
|
| Student.Grad_Und |
Student's undergraduate
|
| Student.GPA |
Student's GPA
|
| Student.Pronouns |
Student's preferred pronouns
|
| Student.CustomData.cf_0 |
Custom fields, hover over each field in the Email Tag list to find the correct tag
|
| Student.WatchLists.wl_0 |
Watch lists, returns a true or false value based on whether or not the student is on that list. Hover over the name of your watch list to find the correct sequence number (e.g., wl_9)
|
Appointment & Availability tags
| Appointment.StartDT |
Appointment start day/time, formatted as "2020-01-31 14:00:00"
|
| Appointment.EndDT |
Appointment end day/time, formatted as "2020-01-31 15:00:00"
|
| Appointment.Duration |
The duration of the appointment, formatted as "60"
|
| Appointment.Fund |
Appointment fund choice
|
| Appointment.Location |
Appointment location choice
|
| Appointment.Online |
Online appointments will be "1", asynchronous will be "2", otherwise it will be blank.
|
| Appointment.SchedUser |
The user type and username of who booked this appointment, formatted as "SysAdmin dsmith"
|
| Appointment.SchedDT |
The date and time of when this appointment was booked, formatted as "2020-01-01 13:00:00"
|
| Appointment.SchedModBy |
The user type and username of who last modified this appointment, formatted as "SysAdmin dsmith"
|
| Appointment.SchedModDT |
The date and time of when this appointment was last modified, formatted as "2020-01-31 13:00:00"
|
| Appointment.OnlineLink |
If the appointment is held online, this tag will create a link that sends students to the room and mark the appointment as attended.
|
| Appointment.StartTime |
Appointment start time, formatted as "02:00pm"
|
| Appointment.StartDate |
Appointment start date, formatted as "01/31/20"
|
| Appointment.EndTime |
Appointment end time, formatted as "03:00pm"
|
| Appointment.EndDate |
Appointment end date, formatted as "01/31/20"
|
| Appointment.Day |
The day of the appointment, formatted as "Wednesday"
|
| Appointment.isCancelled |
Cancelled status, displayed as 'true' or 'false'
|
| Appointment.OtherNotes |
Student cancellation reason.
|
| Appointment.autoCanceled |
Whether or not the appointment automatically cancelled due to max cancel/missed in recurring series rules, displayed as 'true' or 'false'
|
| Appointment.isMissed |
Missed status, displayed as 'true' or 'false'
|
| Appointment.isRecurring |
Recurring status, displayed as 'true' or 'false'
|
| Appointment.RecurringDates |
[Array] Lists all dates of appointments in a recurring series
|
| Appointment.recurFirstDate |
The first date of a recurring appointment series, formatted as "2021-01-31"
|
| Appointment.recurLastDate |
The final date of a recurring appointment series, formatted as "2021-01-31"
|
| Appointment.Status |
The appointment status.
|
| Appointment.Type |
The appointment type, formatted as "1 on 1" or "Group"
|
| Appointment.Icon|raw |
An icon indicating the appointment Type.
|
| Appointment.DisplayTime|raw |
Appointment time, formatted as "200p" (minutes will display noticeably smaller than hours)
|
| Appointment.DisplayDate |
Appointment date, formatted as "Fri, Jan 31"
|
| Appointment.hasDocument |
Will be 'true' or 'false' depending on whether or not the appointment has a document uploaded.
|
| Appointment.OnlineText |
If the appointment is online, this tag will display as "Online", otherwise it will be blank. (for example, "...Your Appointment.OnlineText appointment..." will include or exclude the word "Online")
|
| Appointment.Link |
This provides a link to the appointment record in TracCloud, accessible by students or staff.
|
| Appointment.CustomData.cf_0 |
Custom fields, hover over each field in the Email Tag list to find the correct tag
|
| AvailBlock.MaxStudents |
The max students of an availability block, 1 for one-on-one, greater than 1 for group.
|
Center & Reason tags
| Center.Name |
The appointment/visit center
|
| Reason.ReasonName |
The appointment/visit reason
|
| Reason.Category |
The reason category
|
Section, Course, & Faculty tags
| Section.Code |
The section code
|
| Section.CRN |
The section CRN number
|
| Section.SubjectTermCode |
Subject + Section + Term Code, “CHEM321 A2 20202”
|
| Section.SubjectTitle |
Subject + Title, “CHEM321 Chemistry”
|
| Course.Subject |
Subject, "CHEM"
|
| Course.Course |
Course, "321"
|
| Course.Title |
Title, "Chemistry"
|
| Course.SubjectCourse |
Subject + Course, "CHEM321"
|
| Course.SubjectCourseTitle |
Subject + Course + Title, "CHEM231 Chemistry"
|
| Faculty.FirstName |
Faculty's first name
|
| Faculty.LastName |
Faculty's last name
|
| Faculty.Salutation |
Faculty member salutation, for example, "Dr."
|
| Faculty.Department |
Faculty's department
|
| Faculty.Phone |
Faculty's phone number
|
| Faculty.Email |
Faculty's email address
|
| Faculty.SalutationFullName |
Full name with salutation, for example, "Dr. Phil Roberts"
|
| Faculty.SalutationLastName |
Last name with salutation, for example, "Dr. Roberts"
|
| Faculty.CustomData.cf_0 |
Custom fields, hover over each field in the Email Tag list to find the correct tag
|
Consultant/Staff tags
("Consultant." or "Staff." prefixes can be used interchangeably)
| Consultant.First_Name |
Consultant's first name
|
| Consultant.Last_Name |
Consultant's last name
|
| Consultant.LastFirst |
Consultant's full name, formatted as "Last, First"
|
| Consultant.FirstLast |
Consultant's full name, formatted as "First Last"
|
| Consultant.Alias |
Consultant's alias
|
| Consultant.Email |
Consultant's email address
|
| Consultant.Phone |
Consultant's phone number
|
| Consultant.Pronouns |
Consultant's preferred pronouns
|
| Consultant.Photo|raw |
Consultant's photo
|
| Consultant.StaffBIO|raw |
Consultant's bio
|
| Consultant.WorkPhone |
Consultant's work phone number
|
| Consultant.CellPhone |
Consultant's cell phone number
|
| Consultant.CustomData.cf_0 |
Custom fields, hover over each field in the Email Tag list to find the correct tag
|
Visit tags
(only for visit emails)
| Visit.EnteredDT |
The date and Time the student entered the Center
|
| Visit.TimeIn |
The date and Time the student started receiving help.
|
| Visit.TimeOut |
The date and time the student left the center.
|
| Visit.Duration |
Visit duration in minutes
|
| Visit.WaitTime |
Visit wait time in minutes
|
| Visit.EnteredTime |
Start time of visit, including wait time, formatted as “09:45pm”
|
| Visit.EnteredDate |
Start date of visit, including wait time, formatted as “04/05/21”
|
| Visit.StartTime |
Start time of visit, formatted as “09:48pm”
|
| Visit.StartDate |
Start date of visit, formatted as “04/05/21”
|
| Visit.EndTime |
End time of visit, formatted as “09:48pm”
|
| Visit.EndDate |
End date of visit, formatted as “04/05/21”
|
| Visit.Day |
Day of the visit, formatted as "Wednesday"
|
| Visit.CtrNotes |
The notes for this visit.
|
| Visit.CustomData.cf_0 |
Custom fields, hover over each field in the Email Tag list to find the correct tag
|
Document tags
(only for document emails)
| Document.OrigName |
The file name (including file extension)
|
| Document.Notes |
Notes entered during document upload
|
| Document.PostedBy |
The UUID of who uploaded this document
|
| Document.PostedByName |
The user type, sequence, and name of who uploaded this document
|
| Document.Usage |
Where this document was uploaded, e.g., Appointment, Student, Availability
|
| DocType.Name |
The document type selected during upload
|
Resource tags
(only for resource emails)
| Resource.Title |
The name of the resource
|
| Resource.Barcode |
The barcode value of the resource
|
| Resource.Description |
The description of this resource
|
| Resource.Keywords |
The keywords for this resource, which can be used to check the item in or out
|
| Resource.Status |
The status of the resource, "-1" is Inactive, "0" is Checked out, "1" is available and not checked out, "2" is always available
|
| Resource.MaxDaysOut |
The maximum number of days that an item can be checked out
|
| Resource.MaxTimeOut |
The maximum amount of time that an item can be checked out
|
| Checkout.Date |
The resource checkout date
|
| Checkout.Collateral |
The collateral collected from the student during checkout
|
| Checkout.Overdue |
Whether or not this item is overdue, formatted as "0" (not overdue) or "1" (overdue)
|
| Checkout.DueDT |
The date and time that the item is due to be returned, formatted as "2020-01-31 13:00:00"
|
| ResourceType.Name |
The name of the resource type that the resource is assigned to
|
| ResourceType.Description |
The description of the resource type that the resource is assigned to
|
SurveyTrac tags
Custom Field tags
(Replace "123" with your Custom Field sequence number)
| CustomFields.cf_123.DataName |
The internal field name of the specified custom field
|
| CustomFields.cf_123.Prompt |
The external/prompt text of the specified custom field
|
| CustomFields.cf_123.Choices |
[Array] The available choices for the specified custom field (separate from selected choices)
|
SAGE tags
| ReferralType.Name |
The name of the referral that has been submitted
|
| ReferralType.RosterSubject |
[Array] The roster subject, e.g., “Chem”
|
| ReferralType.NotesInstructions |
These are the instructions written out in within the referral settings
|
| ReferralType.Reasons |
[Array] Lists all referral Reasons, regardless of what was selected.
|
| ReferralType.Recommend |
[Array] Lists all referral Recommendations, regardless of what was selected.
|
| ReferralType.AdditionalNotesInstr |
These are the additional notes written out within the referral settings
|
| Referral.CreatedBy |
The name of the faculty member that submitted this referral
|
| Referral.CreatedDT |
When this referral was created
|
| Referral.NotesInstrData |
Notes entered while submitting this referral
|
| Referral.AdditionalNotes |
Additional notes entered while submitting this referral
|
| Referral.ReasonsData |
[Array] Selected reasons, “Reasons” is preferred (see “For” examples above).
|
| ReasonsAndLabels |
[Array] Same as above, but this will also include your Reason labels in the email body.
|
| Referral.RecommendData |
[Array] Selected recommendations, “Recommendations” is preferred (see “For” examples above).
|
| RecommendationsAndLabels |
[Array] Same as above, but this will also include your Recommendation labels in the email body.
|
| Referral.FollowUpDate |
The date this referral should be followed up on
|
| Referral.FollowUpBy |
The name of the staff who followed up on this referral
|
| Referral.FollowedUp |
If a follow-up has been saved, display “1”, otherwise blank
|
| Referral.FollowedUpDT |
The date this referral was followed up on
|
| Referral.FollowedUpBy |
Who this referral was followed up by
|
| Referral.Processed |
If this referral has been processed, display “1”, otherwise blank
|
| Referral.ProcessedDT |
The date/time this referral was marked as processed/completed
|
| Referral.ProcessedBy |
The written date/time this referral should be marked as processed
|
| Referral.ProcessedNotes |
Notes entered when marking the referral as processed
|
| Referral.StudentContacted |
The date that the student was contacted
|
| Referral.CustomData.AssignedConsultantID |
The sequence number of the assigned consultant.
|
| Trigger |
The trigger for this email, “Created”, “Followed Up”, or “Processed”
|
| Email.Subject |
The contents of the email subject line
|
| Questions.CODE |
Questions.[Your custom question code], as covered above
|
| Answers.CODE |
Answers.[Your custom question code], as covered above
|
| {{ setResultActions('AssignConsultant', '123') }} |
If this line is reached within a SAGE email, the assigned staff member will be changed to the specified sequence. The example below shows how you can use this script to link a student's assigned advisor to the referral.
|
|
{% set staffSeq = getRecordFieldData('Staff','Email', Student.CustomData.cf_1,'Sequence') %}
{{ setResultActions('AssignConsultant', staffSeq) }}
|
| {{ setResultActions('SendEmail', '0') }} |
If this line is reached within an email, the email will not be sent
|
| {{ setResultActions('SetProcessed', '1') }} |
If this line is reached within an email, the referral will be marked as processed/completed.
|
| {{ setResultActions('SetProcessedNotes', 'Example notes') }} |
Typically used alongside the tag above. Used to automatically add notes to the processed referral.
|
Success Plan tags
Success Plans
| SuccessPlan.Name |
The name of your Success Plan
|
| SPAssigned.DateStarted |
Start Date of the Success Plan
|
| SPAssigned.DateCompleted |
Completion Date of the Success Plan
|
| SPAssigned.DueDate |
Due Date for Success Plan
|
| SPAssigned.Status |
The Status of the Success Plan (e.g., "In Progress")
|
| SPAssigned.Percent |
The completion percentage of the Success Plan (e.g., 75)
|
| SPStep.Sequence |
The sequence of the current Step
|
| SPStep.Type |
The type of the current step (e.g., Visit, Task, etc.)
|
| SPStep.DateOrOffset |
When this Step needs to be completed (number of days or static date based on Plan type)
|
| SPStep.isOptional |
Whether or not the current Step is optional (1 or 0)
|
| SPStep.isNoSendEmails |
Whether or not emails are disabled for this Step (1 or 0)
|
| SPStep.isPromptOnDash |
Whether or not the prompt is set to display on the dashboard (1 or 0)
|
| SPStep.DirectedTo |
Who the confirmation is directed to (0 = Student, 1 = Plan Staff, 2 = Plan Faculty, 3 = Step Staff, 4 = Step Faculty)
|
| SPStep.OverrideRequireConfirmation |
Whether or not this step has been overridden to allow/disallow confirmation
|
| SPAssignedStep.CompletedDate |
The completion date of your Success Plan Step
|
| SPAssignedStep.DueDate |
The due date of your Success Plan Step
|
| SPAssignedStep.CompletionOverride |
Whether or not the completion override option is enabled for this Step (1 or 0)
|
| SPAssignedStep.StaffNotes |
Any notes entered by staff for this Step
|
| SPAssignedStep.Confirmed |
Whether or not this Step has been confirmed (1 or 0)
|
| SPAssignedStep.Index |
The number of the step, based on the order they were created in.
|
Other
| {{Trigger}} |
The trigger that prompted this email to be sent (trigger_PlanStarted, trigger_PlanReminder1, trigger_PlanComplete, trigger_StepStarted, etc.)
|
| {{ setResultActions('SendEmail', '0') }} |
If this action is reached (typically in a Twig 'if' statement), the email will not be sent
|
| {{ setResultActions('FacultyID', '1') }} |
If this action is reached (in a Twig statement), the assigned Faculty will be changed to the sequence number specified here
|
| {{ setResultActions('ConsultantID', '1') }} |
If this action is reached (in a Twig statement), the assigned Consultant will be changed to the sequence number specified here
|
| {{ setResultActions('TermID', '1') }} |
If this action is reached (in a Twig statement), the assigned Term will be changed to the sequence number specified here
|
| {{ setResultActions('NextPlanID', '3') }} |
If this action is reached (in a Twig statement), a new Success Plan will be assigned (for use in Chained Sub Plans)
|
| {{ GetDatePlusDays(5) }} |
Get the current date plus the number of days specified in parentheses
|
| {{ GetDateTimePlusDays(5) }} |
Get the current date AND time plus the number of days specified in parentheses
|
| {{ createResultAction('createNotification', {'Type' : 1, 'Notes' : 'Sample Notes', 'StudentID': Student.Sequence, 'ForUID' : Student.UUID}) }} |
If this action is reached (in a Twig statement), the student will be sent a Notification. Enter the notification sequence where the '1' is in this example.
|
| {{ createResultAction('createSurvey', {'SurveyID' : 1, 'StudentID': Student.Sequence, 'linkedUID' : Student.UUID}) }} |
If this action is reached (in a Twig statement), the student will be sent a Survey. Enter the Survey sequence where the '1' is in this example.
|
| {{ createResultAction('createReferral', {'RefTypeID' : 1, 'StudentID': Student.Sequence, 'FacultyID' : 0, 'SectionID' : 0, 'ConsultantID' : 0, 'CenterID' : 0, 'ReasonsData' : [{"key": "###keyIndex###","reason": "Time management"}]}) }} |
If this action is reached (in a Twig statement), a SAGE Referral will be created for the student. Enter the Referral sequence where the "1" is in this example. Additional assignments can also be made.
|
| {{ createResultAction('createAssignment', {'PotentialAssignmentID' : 1, 'StudentID': Student.Sequence, 'RegistrationID' : GetStudentRegID(Student.ID,'MAT100 0000 FALL%'), 'GradePoints' : 0, 'Comments' : 'Notes go here'}) }} |
If this action is reached (in a Twig statement), an Assignment will be created for the student. Enter the potential assignment sequence where the '1' is, and choose the section.
|
| {{ createResultAction('createTask', {'TaskType' : 0, 'ForUID' : Student.UUID, 'StudentID': Student.Sequence, 'TaskName' : 'Test of Task Name', 'DueDate' : '2030-01-01', 'Completed' : 0 }) }} |
If this action is reached (in a Twig statement), a Task will be assigned to the Student. Enter the Task sequence where the '0' and choose a due date.
|
| {{ createResultAction('updateStudent', {'Major' : 'Business', 'CustomData.cf_99' : "Text goes here' }) }} |
If this action is reached (in a Twig statement), student fields can be updated to the text specified here. Multiple fields can be edited at once (Major and Custom_99 in this example). Field names are case sensitive.
|
Work Plan tags
Work Plans
| WorkPlan.Name |
The name of your Work Plan
|
| WPAssigned.DateStarted |
Start Date of the Work Plan
|
| WPAssigned.DateCompleted |
Completion Date of the Work Plan
|
| WPAssigned.DueDate |
Due Date for Work Plan
|
| WPAssigned.Status |
The Status of the Work Plan (e.g., "In Progress")
|
| WPAssigned.Percent |
The completion percentage of the Work Plan (e.g., 75)
|
| WPStep.Sequence |
The sequence of the current Step
|
| WPStep.Type |
The type of the current step (e.g., Work Visit, Prompt, etc.)
|
| WPStep.DateOrOffset |
When this Step needs to be completed (number of days or static date based on Plan type)
|
| WPStep.isOptional |
Whether or not the current Step is optional (1 or 0)
|
| WPStep.isNoSendEmails |
Whether or not emails are disabled for this Step (1 or 0)
|
| WPStep.isPromptOnDash |
Whether or not the prompt is set to display on the dashboard (1 or 0)
|
| WPStep.DirectedTo |
Who the confirmation is directed to (0 = Consultant, 1 = Plan Supervisor)
|
| WPStep.OverrideRequireConfirmation |
Whether or not this step has been overridden to allow/disallow confirmation
|
| WPAssignedStep.CompletedDate |
The completion date of your Work Plan Step
|
| WPAssignedStep.DueDate |
The due date of your Work Plan Step
|
| WPAssignedStep.CompletionOverride |
Whether or not the completion override option is enabled for this Step (1 or 0)
|
| WPAssignedStep.StaffNotes |
Any notes entered by staff for this Step
|
| WPAssignedStep.Confirmed |
Whether or not this Step has been confirmed (1 or 0)
|
("StepSupervisor." prefix can be used to retrieve supervisor information for the step instead.)
| Supervisor.First_Name |
The first name of the assigned supervisor.
|
| Supervisor.Last_Name |
Last name of the assigned supervisor.
|
| Supervisor.Alias |
Alias of the assigned supervisor.
|
| Supervisor.Email |
Email address of the assigned supervisor.
|
| Supervisor.UserName |
Username of the assigned supervisor.
|
| Supervisor.FirstLast |
Full name of the assigned supervisor.
|
| Supervisor.isConsultant |
Whether or not the assigned supervisor is a consultant (formatted as "1" or "0")
|
| Supervisor.Phone |
Phone number of the assigned supervisor.
|
| Supervisor.CellPhone |
Cell phone of the assigned supervisor.
|
| Supervisor.WorkPhone |
Work phone of the assigned supervisor.
|
| Supervisor.Location |
Assigned location of the supervisor.
|
| Supervisor.OnlineLink |
The assigned supervisor's online link.
|
| Supervisor.Fund |
Fund of the assigned supervisor.
|
| Supervisor.Pronouns |
Pronouns of the assigned supervisor.
|
| Supervisor.OtherID |
Other ID of the assigned supervisor.
|
| StepFaculty.FirstName |
First name of the linked faculty.
|
| StepFaculty.LastName |
Last name of the linked faculty.
|
| StepFaculty.UserID |
User of the linked faculty. This should almost always be used instead of OtherID.
|
| StepFaculty.UserName |
Username of the linked faculty.
|
| StepFaculty.Salutation |
Salutation of the linked faculty.
|
| StepFaculty.Department |
Department of the linked faculty.
|
| StepFaculty.Phone |
Phone of the linked faculty.
|
| StepFaculty.Email |
Email address of the linked faculty.
|
| StepFaculty.FullName |
Full name of the linked faculty.
|
| StepFaculty.Pronouns |
Pronouns of the linked faculty.
|
Other
| {{Trigger}} |
The trigger that prompted this email to be sent (trigger_PlanStarted, trigger_PlanReminder1, trigger_PlanComplete, trigger_StepStarted, etc.)
|
| {{ setResultActions('SendEmail', '0') }} |
If this action is reached (typically in a Twig 'if' statement), the email will not be sent
|
| {{ setResultActions('ConsultantID', '1') }} |
If this action is reached (in a Twig statement), the assigned Consultant will be changed to the sequence number specified here
|
| {{ setResultActions('TermID', '1') }} |
If this action is reached (in a Twig statement), the assigned Term will be changed to the sequence number specified here
|
| {{ setResultActions('NextPlanID', '3') }} |
If this action is reached (in a Twig statement), a new Work Plan will be assigned (for use in Chained Sub Plans)
|
| {{ GetDatePlusDays(5) }} |
Get the current date plus the number of days specified in parentheses
|
| {{ GetDateTimePlusDays(5) }} |
Get the current date AND time plus the number of days specified in parentheses
|
Other tags
| {{CalcMissedAppointments(Student.Sequence, Center.ProfileID)}} |
The student’s total number of missed appointments since the date specified in your profile Scheduling Prefs. Uses System Pref date if Profile date is blank.
|
| {{CalcMissedDate(Center.ProfileID)}} |
Your profile “Calc Missed Appointments Since” date. If this field is blank, this will use your global Calc Missed date instead.
|
| {{setAdditionalCC('address@domain.edu,address2@domain.edu')}} |
CC additional email addresses, can be used with 'if' statements to make the CC conditional.
|
| {{Appointment.SchedVisitStatusIcon|raw}} |
Can be used on the staff schedule appointment display to allow users to start & conclude the visit directly from the appointment.
|
The final two options, where ".CODE" is used, refer back to your Custom Question Code Reference. For example, if your Code Reference was "GradeQuestion1," the format of this tag would be {{Questions.GradeQuestion1}}, {{Answers.GradeQuestion1}}, etc.
Group Access
In order for staff members to view and/or edit referrals, they must be provided access in their permission group. This also gives you the ability to fine-tune what they can and can't do in relation to these referrals.
Other > Other Options > Groups > [The Group you want to modify] > Admin / Modules
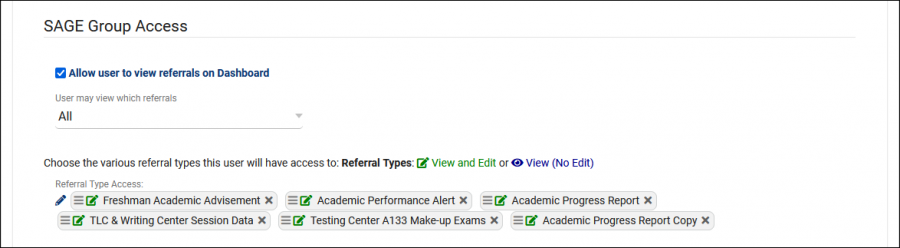
- Allow user to view referrals on Dashboard adds a utility to their dashboard allowing the staff member to quickly review/access relevant referrals.
- User may view which referrals determines if they can view all referrals, or only their own.
- Referral Type Access determines which referral types they can view. The icon within each entry can be clicked to cycle between View and Edit or just View. The former allows the user to view and edit referrals of this type, while the latter only allows them to view.
Reports
There are two SAGE-specific reports available in TracCloud, each providing a different way to view your referral data. These reports can be found in the Navigation Bar, under Reports > SAGE.
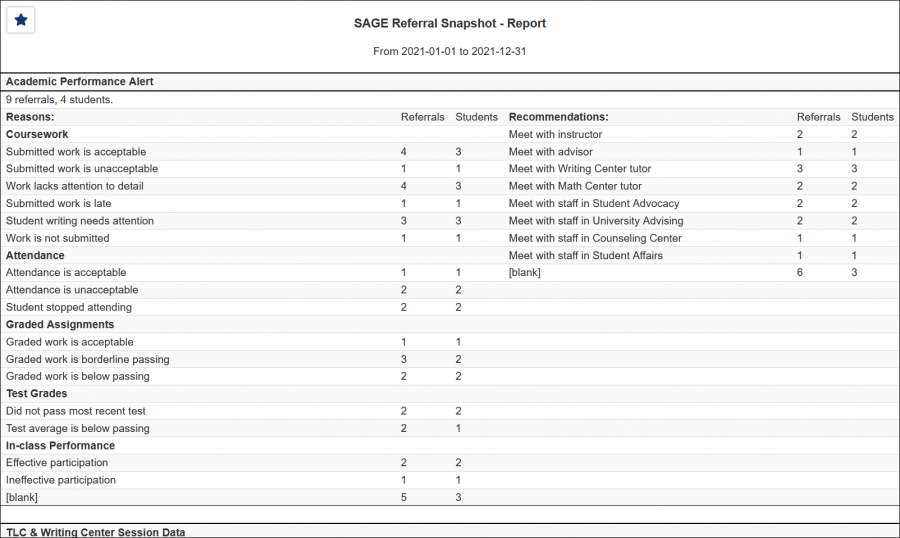
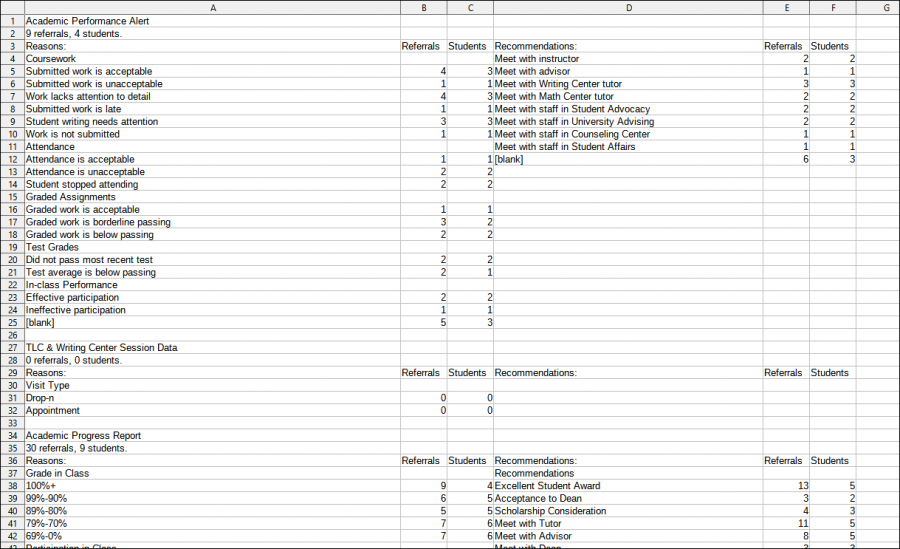
This report provides a snapshot of referrals submitted, including reason and recommendation totals and the number of students per reason/recommendation.
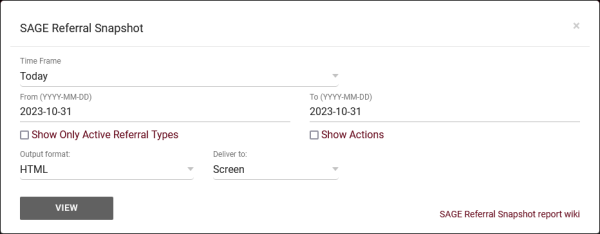
- The date range for the data in this report. Beyond entering a date range manually, you can also choose a preset date range (Today, This Month, This Semester, etc) from the dropdown list above.
- Show Only Active Referral Types
- Check this to exclude inactive referral types from your results.
- Include SAGE Potential Actions data in report results.
- Use HTML to view report data in your browser, or export this report to a CSV file (available for most reports). Some reports offer additional CSV options depending on if you want to include totals and/or data grouping in your export.
- Display this report immediately in your browser ("Screen"), or send the report to a specified email address ("Email"). Multiple email addresses can be specified, use ; to separate them (example@example.edu;sample@example.edu).
HTML
CSV
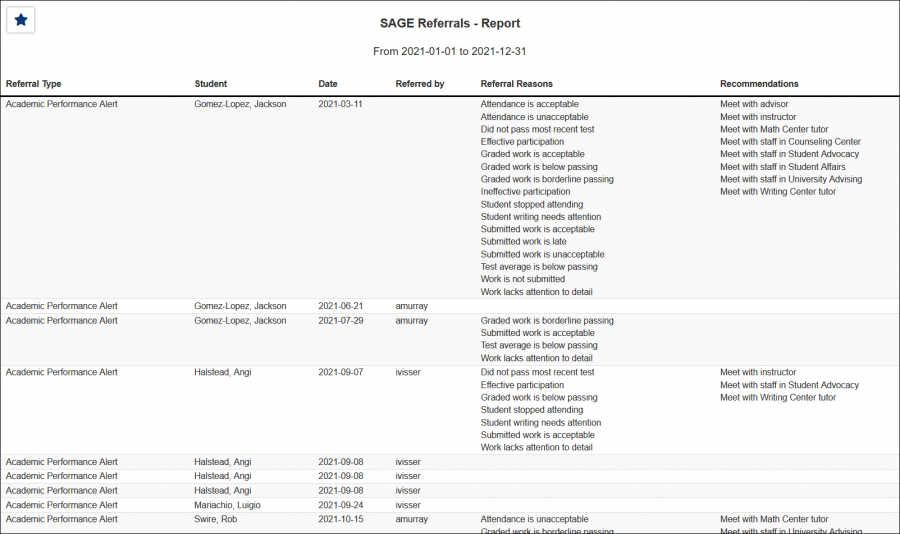
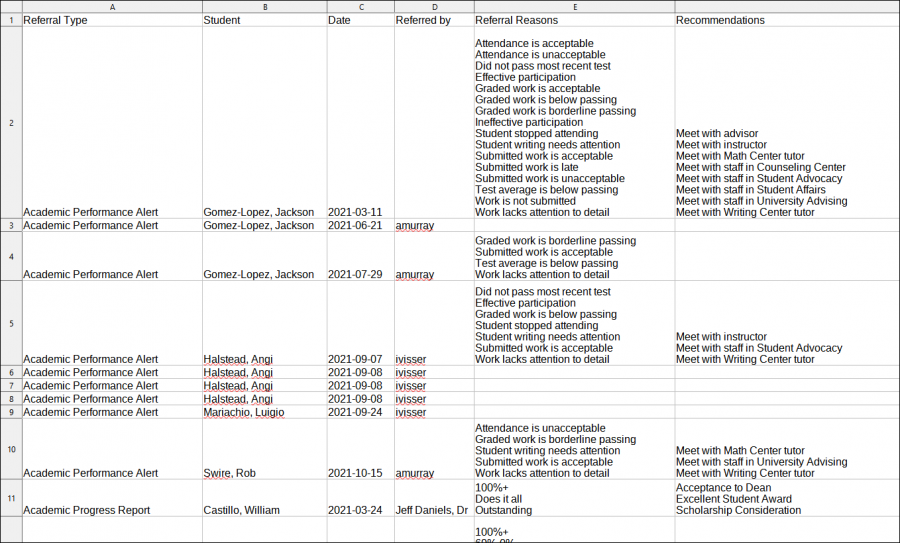
This report provides a list of referrals submitted in the date range specified. The data is grouped by Referral Type by default, showing the student's name, referral date, the staff member who submitted the referral, and the reasons/recommendations selected.
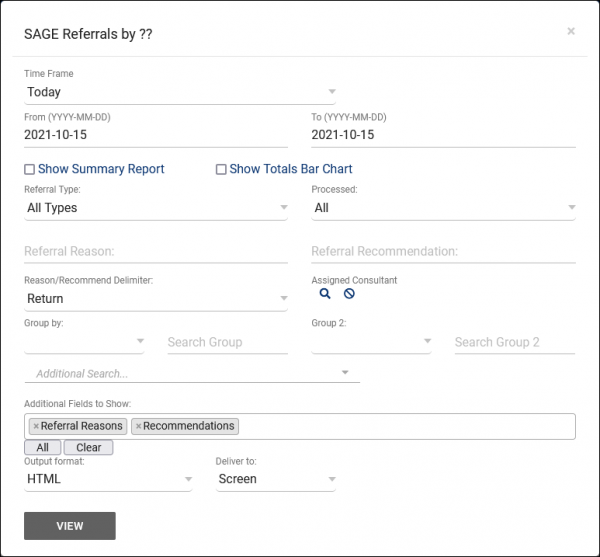
- The date range for the data in this report. Beyond entering a date range manually, you can also choose a preset date range (Today, This Month, This Semester, etc) from the dropdown list above.
- Only show data totals, excluding details of individual records.
- Adds a visual bar chart of totals to your report data.
- Only show referrals of a specific type.
- Filter referrals based on status, Processed or Not Processed. Defaults to 'All.'
- Reason/Recommendation/QA Delimiter
- If multiple Reasons/Recommendations are chosen for a single referral, you can decide how to separate them with this option. E.g., Comma delimited, Pipe delimited, etc.
- Filter referrals based on the assigned consultant/advisor.
- Group records by the selected field. Some reports allow you to add secondary and tertiary groupings as well.
- Filter results based on your search in this group. For example, if you're grouping by Student Major, you can put 'Mathematics' in this field to only show students assigned to that Major.
- Filter your results by a selected field.
Use * as a wildcard (Subject: MAT*)
| as "or" (Major: Mathematics|Biology)
# as "Not" (Status: #Inactive)
&& as "And" (Major: #Mathematics&&#Biology)
blankornull as a keyword to find records where the field is blank (Reason: blankornull)
Multiple fields can be added to further narrow down your results.
- Additional fields to show
- This can be used to add additional data fields to the report results. For example, you could use this to add a student's email address in a visit report.
- Use HTML to view report data in your browser, or export this report to a CSV file (available for most reports). Some reports offer additional CSV options depending on if you want to include totals and/or data grouping in your export.
- Display this report immediately in your browser ("Screen"), or send the report to a specified email address ("Email"). Multiple email addresses can be specified, use ; to separate them (example@example.edu;sample@example.edu).
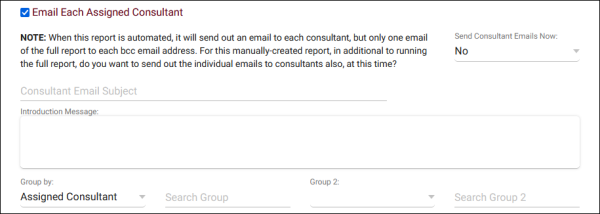
- Email Each Assigned Consultant
- If your referral report is configured to group by assigned consultant and output as HTML, a new option will become available to Email Each Assigned Consultant. This allows you to send referrals to the consultants they're assigned to. Send Consultant Emails Now will immediately send consultants the referrals when you generate the report, and you can write a custom email subject and body if needed. After generating the report, you can save it as a favorite and automate it to have these emails sent to consultants on a daily/weekly/monthly basis. More information on saving favorites and automating reports can be found here.
HTML
CSV
For information on purchasing the SAGE Module, reach out to sales@go-redrock.com
For SAGE functionality questions, reach out to helpdesk@go-redrock.com
|


