TracCloud: Questions and Answers
From Redrock Wiki
This page is still in progress! Come back later to learn more.
This page covers frequently asked questions and suggested troubleshooting steps. If your question can't be answered by this article, feel free to reach out to us using the 'Support' tab at the top of this screen. This page will be expanded over time with new answers.
If you've created a new availability for one of your Consultants and it's not showing up as expected when performing a search for appointment times, there are a few possible causes. This portion of the wiki outlines these possibilities, ordered from most to least likely based on what we at Redrock have experienced working with campuses directly.

1. Center and Consultant Course Lists
The most common cause when an availability isn't appearing in search results is misconfigured Course Lists. Both your Consultant and your Center need to be assigned to the subject you're searching for (unless your Center or Reason is set to ignore Consultant Specialties). Make sure you Process Specialties (Step 2) after applying any changes.
Consultant Course List: Other > Listings > Staff > [Your Staff] > Course List of Specialties
Center Course List: Other > Other Options > Profiles > [Your Profile] > Centers > Course List for this Center
A complete list of Course Lists can also be found by simply going to: Other > Listings > Course Lists

2. Process Specialties
This is always recommended after applying changes to Course Lists, but it may also be the case that the specific section you searched for was imported after you created the Course List for your Center/Consultant, and a Course List refresh alone may resolve this issue. We can setup an automated process to Process Specialties daily if this occurs often, reach out to us using the 'Support' tab above for more information.

3. Reason Assignments
Similar to ensuring that your courses are assigned to the correct Consultant and Center, the same applies for Reasons. This step only applies if you're using Reason as a search criteria.
For Consultants, go to Other > Listings > Staff > [Your Staff] > Reason Specialties
For Centers, go to Other > Other Options > Profiles > [Your Profile] > Centers > [Your Center] > Active Reasons

4. Availability Subject/Reason
If your availability is assigned to the wrong subject or reason, this can cause it to be unintentionally filtered out of results. Make sure the value entered here is correct, especially if you're using wildcards. If these are blank (i.e., available for all specialties), you can skip this troubleshooting step.
Schedule > [Consultant] > Availability

5. Profile Time Restrictions
If your availability is 60 minutes long, but your profile only allows for a maximum of 50-minute appointments, this can unexpectedly filter out availabilities if you haven't updated your profile preferences to match this new limit. The relevant options to check here are Schedule no sooner than and no later than, ensure that you're searching within an allowed range. As well as Minimum and Maximum Appointment Duration, make sure your availability is within the limits defined by your profile.
Other > Other Options > Profiles > [Your Profile] > Prefs > Scheduling > Time Restrictions

More Scheduling Prefs Information
6. Reason/Subject Required for Search
In the event that you aren't searching for both Reason and Subject, and the previous steps haven't resolved your issue, it's worth double-checking to make sure your Profile hasn't been mistakenly set to require a Subject/Reason to show availabilities. Make sure the highlighted settings match the search you're performing on the dashboard.
Other > Other Options > Profiles > [Your Profile] > Prefs > Scheduling > Special Fields

More Scheduling Prefs Information
7. Skills and Accommodations
If your campus utilizes the Skills/Accommodations feature, with 'Excluded when not chosen' enabled, make sure your consultant/availability is assigned to that Skill/Accommodation.
Consultants: Other > Listings > Staff > [Staff Account] > Special Needs/Skills/Accommodations
Availabilities: Schedule > [Availability] > Special Needs > Special Needs/Skills/Accommodations

The process of activating new terms for your upcoming semester in TracCloud is designed to be as straightforward as possible. The steps below outline the process and everything you have to do to prepare and execute a semester changeover. As always, if you run into any trouble, feel free to reach out to us at helpdesk@go-redrock.com.
0. Import New Term Data
Before you can move forward in TracCloud, your IT will need to first send the new semester data to TracCloud via your import process. Once this has been completed, you can move forward to Step 1. More information.
1. Activate Your New Term
Now that your new term data exists in TracCloud, we have to tell the system which terms are active. Go to Other > Other Options > Preferences > Terms. You should see your new term here in a deactivated state (first/left screenshot). Click the pencil icon for your new term, this will open a Term Entry window where you can begin to make changes (second/right screenshot).
Make sure Active is checked, and add the Active From and To dates to the relevant fields as well (these are utilized for "This Term" date ranges in reports and scheduling rules). You may also want to deactivate your prior term at this time as well, or you can deactivate it later if preferred. Multiple terms can be active at once.


2. Process Activations & Process Specialties
After activating your new term (and deactivating the old, if applicable), click the button in the Terms settings labelled Process Activations. This button will activate registrations for this term and deactivate registrations that are no longer relevant. Click this, then click Process Specialties to update your Course Lists. Specialties can also be updated from the Course List Listing, which has the same effect as the option here.

3. Additional Date Fields (Optional)
There are a few locations where semester-relevant date fields may exist. Your system may or may not be utilizing these, but here's a list just in case.
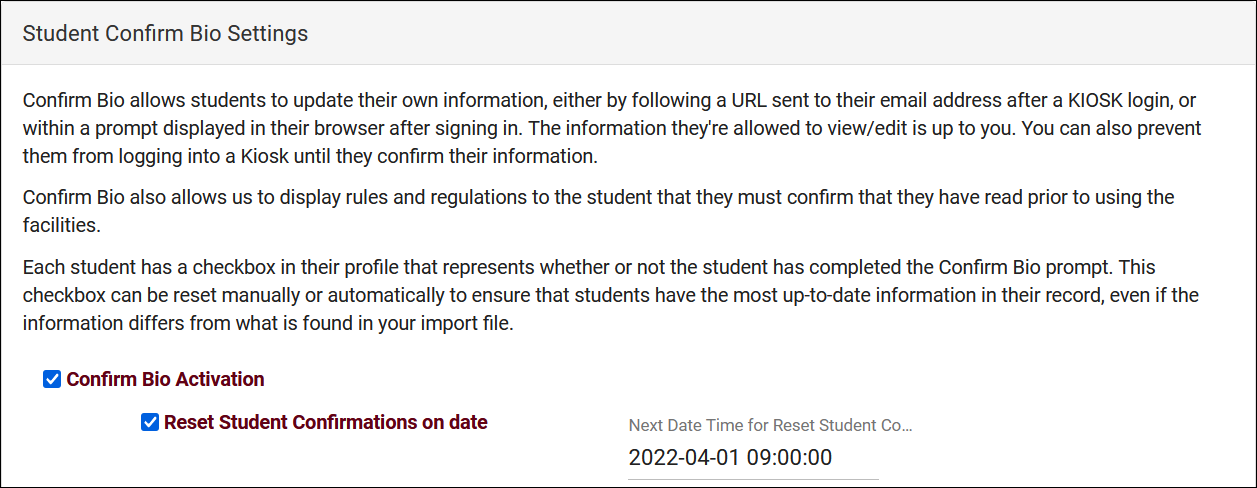
- Student Confirm Bio: Other > Other Options > Preferences > Student Confirm Bio Settings > Reset Student Confirmations on date
- Staff Confirm Bio: Other > Other Options > Preferences > Staff Confirm Bio Settings > Reset Staff Confirmations on date

- Global setting: Other > Other Options > Preferences > System Preferences > Calc Missed Appointments Since
- Profile-specific setting: Other > Other Options > Profiles > [Your Profile] > Prefs > Scheduling > Appointment Status and Management > Calc Missed Appointments Since


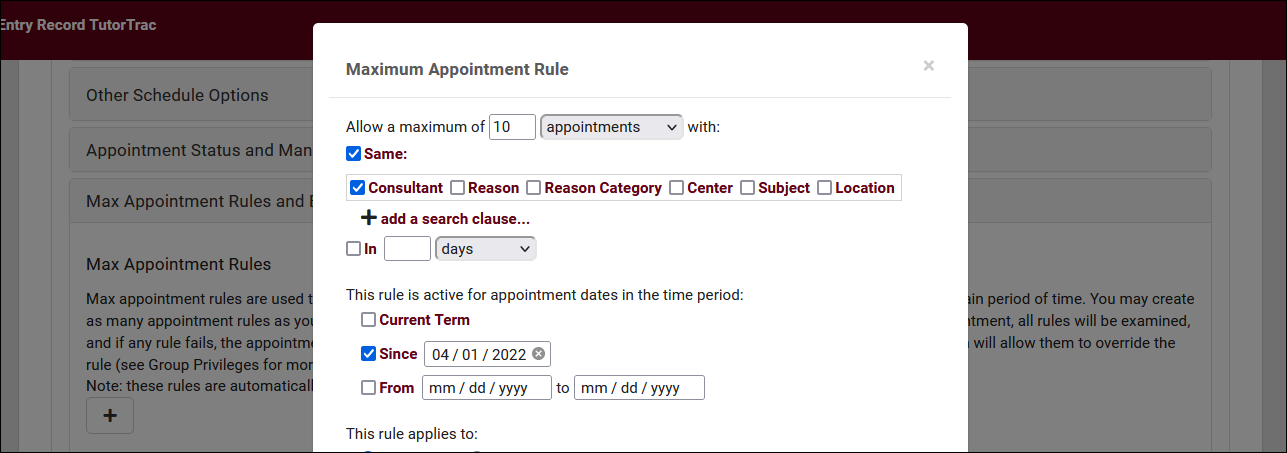
- Other > Other Options > Profiles > [Your Profile] > Prefs > Scheduling > Max Appointment Rules and Blocks > [Your rule] > Since/From date

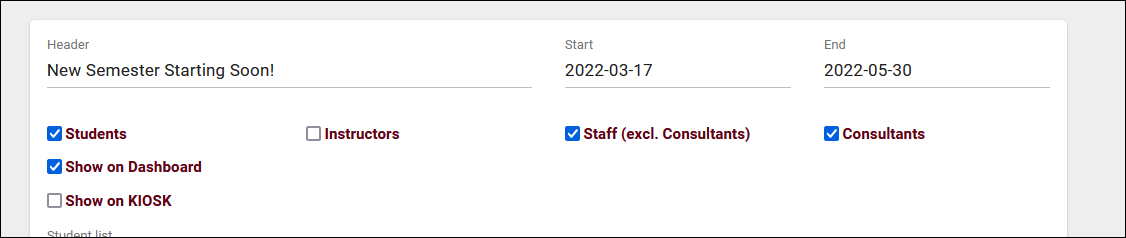
- Other > Other Options > Announcements > [Your Announcement]

And that's it! You're all set for the new semester.
Non-Enrolled courses can be useful in allowing students without registrations or without a relevant registration for the type of appointment/visit they need to still receive tutoring assistance. This article will be going over the process of creating one of these non-enrolled courses.
1. Creating a Course
First, we need to create the course that our section is going to be assigned to.
Start by going to Other > Listings > Courses > New Course.

In the Course Entry window, the Subject field is required, and will be the name of our non-enrolled course. In this example, we’ll be calling our course “Other.” The remaining fields are optional and will be left blank for this scenario. Save once you’re ready to move on to step 2.

2. Creating a Term
Our section will need to be assigned to a term. While we could technically assign it to our currently active term, this may not be ideal, since we would need to create a new non-enrolled section each semester. For a case such as this, let’s create a generic term that we can leave active.
For the name of the term, you can name it anything you'd like. However, naming it "0" has the added benefit that the dates will be copied from your active terms automatically, so there is no extra work needed to update this term later on.
Other > Other Options > Preferences > Terms > New Term.

3. Creating a Section
Next up, we need to create the section that staff and students can select.
Go to Other > Listings > Sections > New Section.

Select the Course and Term that you just created, check the Non-Enrolled and Active box, then save. The other fields are optional.

4. Update your Course Lists
Lastly, you’ll need to update your course lists to ensure that your course is assigned to your Centers and your Consultants. If you need to assign this new subject to multiple course lists at once, check out this article.
Other > Listings > Course Lists > [Your Course List]

You’ll also want to select Process Specialties to update your existing Course Lists.

And you’re all set! Students and staff can now select your non-enrolled course when searching for availabilities or creating visits.

Understanding Import Activations
It's important to understand how your system activates students and registrations. These options should be kept in mind when troubleshooting activations, when manually creating students/registrations, or when attempting to reactivate inactive records.
First, go to Other > Other Options > Preferences > System Preferences > Withdraw Codes and Statuses and take note of your configuration here.

- Withdraw Codes are the values stored in either Registration Status or Grade (depending on the Withdraw via which field choice below) that cause a registration to be deactivated when the import runs regardless of whether or not it is currently being imported for an active term.
- Deactivate registration record when not imported will, if checked, deactivate registrations as soon as your IT no longer provides them in your registration file. In rare cases, this may be combined with Deactivate after x Days not imported to add a buffer. E.g., a registration can be deactivated if it has not been provided in the registration file for 3 days.
Next, go to Other > Other Options > Preferences > Scheduled Daily Imports and look for the "Process" boxes. You will likely see one of three activation processes, other processes can be ignored.

- Students - Activations
- This is the most common activation method. This will activate Registrations for the current active term (while following the system preferences configured above). Following this, Students will be activated if they have an active registration assigned to their account.
- This is the most common activation method. This will activate Registrations for the current active term (while following the system preferences configured above). Following this, Students will be activated if they have an active registration assigned to their account.
- Students - Import Activations
- If this activation method is used, it typically follows "Students - Activations" as this process doesn't inherently activate or deactivate registrations. When this process runs, all students who have been imported today will be activated. All students who have not been imported today will be deactivated.
- If this activation method is used, it typically follows "Students - Activations" as this process doesn't inherently activate or deactivate registrations. When this process runs, all students who have been imported today will be activated. All students who have not been imported today will be deactivated.
- Registrations - Date Activations
- This activation method will activate or deactivate registrations by the dates in the registration record itself. This is typically followed by a process to activate all students with active registrations.
- This activation method will activate or deactivate registrations by the dates in the registration record itself. This is typically followed by a process to activate all students with active registrations.
With the above information in mind, you can now go to the student or registration records and check the following to gain more insight into why the record was deactivated.
When was the record last imported? Was it imported today?
- In student records this field is named "Last Imported" in the General -> Info tab.
- In registration records, this field is also named "Last Imported" and is located under the General Info tab.
For registrations, is the term active? is the registration status/grade set to a value that causes it to be deactivated?
For students, are they on a keep active/keep inactive list?
This section of the article will explain common sign-in errors and how you can troubleshoot them.
Permission Denied | How this displays can vary significantly depending on what SSO implementation your campus uses.

This error indicates that the user does not have permission to access the TracCloud application. Your IT will need to investigate this further, no changes in TracCloud will resolve this error.
Access Denied

This error means they've successfully authenticated via SSO, but TracCloud could not find an active account for them. This often means their account either hasn't been created, or was created with the wrong username.
Did not find [attribute] in response

This error can appear if the attribute your TracCloud instance is configured to use was not received after the person signed in. You should reach out to Redrock Support in this case and we can guide you through correcting your SSO configuration.
There are several