TracCloudGuideListingsApptRequest: Difference between revisions
From Redrock Wiki
m (Protected "TracCloudGuideListingsApptRequest" ([Edit=Allow only administrators] (indefinite) [Move=Allow only administrators] (indefinite))) |
No edit summary |
||
| (5 intermediate revisions by the same user not shown) | |||
| Line 1: | Line 1: | ||
{ | {{TracCloudGuideTabs}} | ||
<div class="tcWidgetPage"> | |||
<div class="categoryWide"> | |||
{{TracCloudGuideListingsTOC}} | |||
</div> | |||
<big><b>Appointment Requests / Report Unable to Find Appointment</b></big><br> | <big><b>Appointment Requests / Report Unable to Find Appointment</b></big><br> | ||
New to TracCloud, students can now request an appointment time or report that they were unable to find an appointment. These requests can then be reviewed and followed-up on by staff members to ensure that students are able to get the assistance they need. | New to TracCloud, students can now request an appointment time or report that they were unable to find an appointment. These requests can then be reviewed and followed-up on by staff members to ensure that students are able to get the assistance they need. | ||
< | <div class="line"></div> | ||
==1. Configuring this Functionality== | ==1. Configuring this Functionality== | ||
The first step is to make sure the option is enabled and set to your desired value. Go to <i>Other > Other Options > Preferences > Search Availability Options > Report Unable to Find Appointment</i>. | The first step is to make sure the option is enabled and set to your desired value. Go to <i>Other > Other Options > Preferences > Search Availability Options > Report Unable to Find Appointment</i>. | ||
<onlyinclude> | |||
[[File:1830320.png|800px]]<br><br> | [[File:1830320.png|800px]]<br><br> | ||
* <b>Setting for Report Unable to Find Appointment</b> | * <b>Setting for Report Unable to Find Appointment</b> | ||
::<b>Off</b> disables this functionality. <b>Standard</b> provides a standard form where students can write out what they searched for and what they did (or didn’t) find. These reports can later be reviewed and managed by staff with the appropriate permissions. <b>Custom</b> lets you enter a custom URL that students will be taken to after selecting the “Report Unable to Find an Appointment” button | ::This adds a utility to the <i>Search for Availability</i> screen allowing staff and students to report that they weren’t able to find an availability that works for them. <b>Button Label</b> can be used to change the student-facing phrasing of this option.<br> | ||
::* <b>Off</b> disables this functionality.<br> | |||
::* <b>Standard</b> provides a standard form where students can write out what they searched for and what they did (or didn’t) find. These reports can later be reviewed and managed by staff with the appropriate permissions.<br> | |||
::* <b>Custom</b> lets you enter a custom URL that students will be taken to after selecting the “Report Unable to Find an Appointment” button.<br><br> | |||
* <b>Button Label</b> | * <b>Button Label</b> | ||
:: | ::Changes the label of the button that students would click when using this utility. <i>Report Unable to Find Appointment</i> by default.<br><br> | ||
* <b>Instructions</b> | * <b>Instructions</b> | ||
::This text appears | ::This text appears within the "Unable to Find Appointment" prompt for students & staff, and can be used for additional instructions or contact methods.<br><br> | ||
</onlyinclude> | |||
Another setting to consider is your permission group access. If a user needs to have the ability to review these Appointment Requests, their group must allow it. Go to <i>Other > Other Options > Groups > [The group you want to edit] > Admin / Modules > Table Access > Add the Outstanding Appt Requests table > Save</i>. You may want to set this to <b>View and Edit</b> or only <b>View</b> depending on what level of access they require. | Another setting to consider is your permission group access. If a user needs to have the ability to review these Appointment Requests, their group must allow it. Go to <i>Other > Other Options > Groups > [The group you want to edit] > Admin / Modules > Table Access > Add the Outstanding Appt Requests table > Save</i>. You may want to set this to <b>View and Edit</b> or only <b>View</b> depending on what level of access they require. | ||
| Line 77: | Line 84: | ||
{{#lst:Template:TracCloudListingDescriptions|Print}} | {{#lst:Template:TracCloudListingDescriptions|Print}} | ||
<hr> | |||
==4. Outstanding Appointment Requests Report== | |||
{{:TracCloudReportsManagement09}} | |||
[[Category:TracCloud]] | [[Category:TracCloud]] | ||
</div> | |||
Latest revision as of 17:01, 30 April 2024
Listings
Appointment Requests / Report Unable to Find Appointment
New to TracCloud, students can now request an appointment time or report that they were unable to find an appointment. These requests can then be reviewed and followed-up on by staff members to ensure that students are able to get the assistance they need.
1. Configuring this Functionality
The first step is to make sure the option is enabled and set to your desired value. Go to Other > Other Options > Preferences > Search Availability Options > Report Unable to Find Appointment.

- Setting for Report Unable to Find Appointment
- This adds a utility to the Search for Availability screen allowing staff and students to report that they weren’t able to find an availability that works for them. Button Label can be used to change the student-facing phrasing of this option.
- This adds a utility to the Search for Availability screen allowing staff and students to report that they weren’t able to find an availability that works for them. Button Label can be used to change the student-facing phrasing of this option.
- Off disables this functionality.
- Off disables this functionality.
- Standard provides a standard form where students can write out what they searched for and what they did (or didn’t) find. These reports can later be reviewed and managed by staff with the appropriate permissions.
- Standard provides a standard form where students can write out what they searched for and what they did (or didn’t) find. These reports can later be reviewed and managed by staff with the appropriate permissions.
- Custom lets you enter a custom URL that students will be taken to after selecting the “Report Unable to Find an Appointment” button.
- Custom lets you enter a custom URL that students will be taken to after selecting the “Report Unable to Find an Appointment” button.
- Button Label
- Changes the label of the button that students would click when using this utility. Report Unable to Find Appointment by default.
- Changes the label of the button that students would click when using this utility. Report Unable to Find Appointment by default.
- Instructions
- This text appears within the "Unable to Find Appointment" prompt for students & staff, and can be used for additional instructions or contact methods.
- This text appears within the "Unable to Find Appointment" prompt for students & staff, and can be used for additional instructions or contact methods.
Another setting to consider is your permission group access. If a user needs to have the ability to review these Appointment Requests, their group must allow it. Go to Other > Other Options > Groups > [The group you want to edit] > Admin / Modules > Table Access > Add the Outstanding Appt Requests table > Save. You may want to set this to View and Edit or only View depending on what level of access they require.

2. Submitting a Request
Now that this utility has been configured, students (and even staff) are all set to submit these requests while searching for appointments. The button will appear in the lower-left corner of availability searches, regardless of whether or not availabilities appear. This provides the chance for students to request a more specific time or tutor, even if there may be other time slots available.

After clicking the option, the following box appears where staff/students can write out what they were hoping to find versus what they found instead. If a custom URL is used instead, the button will instead open that URL in a new tab.

3. Reviewing Requests
After a request has been submitted, staff can review these requests and mark them as completed once resolved. This only applies when utilizing the 'Standard' form option. Go to Other > Listings > Outstanding Appt Requests. This will bring you to the following page, where you can review Appointment Requests and quickly see which of them have been resolved based on the checkbox on the right and the Followed Up status.

Appointment Requests can also display in Notifications to Staff Members.

Clicking a request (or the pencil icon in a notification) takes us to that specific record. Here we can find the details of what the student was searching for and options for us to follow-up on this request.

- Reported On and Reported By shows the time and date of this request, and which user submitted the request (myself as an example in this case).
- Show Details displays a log of what the student searched for and what they found in the results.

- Student shows the student who was trying to book an appointment. "View Student Record" allows you to quickly open the student's profile to retrieve contact information, etc.
- Section, Reason, Profile, and Center show what was selected when performing the search.
- Reported Search and Reported Found are the contents of the text fields filled out when the request was being submitted.
- Followed Up Date Time and Followed Up By show when someone followed-up on this request, and who that user was. Follow up notes can be used to record additional details as needed.
- Resolved is the final checkbox to be checked when the request has been closed. This also adds an indicator to the Outstanding Appt Request listing to show that this has been resolved.
Hamburger Menu
Every listing page in the Trac System features a hamburger menu with utilities to search for or interact with your list of records. Some of these options are specific to a certain listing/record-type, others are shared. The following list includes definitions for the hamburger menu options available on this listing, and how they can be utilized.

- List All
- This option will show all records on the current listing. Some listings have an additional toggle for only showing "Active" records, such as Students and Registrations, which will still override a "List All" search if checked.
- This option will show all records on the current listing. Some listings have an additional toggle for only showing "Active" records, such as Students and Registrations, which will still override a "List All" search if checked.
- Search
- This utility will open a pop-up window unique to each Listing it's present on, allowing you to search your records by a number of different fields.
- This utility will open a pop-up window unique to each Listing it's present on, allowing you to search your records by a number of different fields.
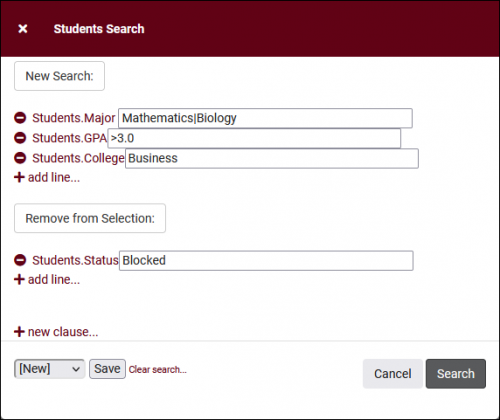
- Power Search
- This option provides a simple but powerful search utility to find the records you need. String together multiple searches, adding or removing results for each. Use Search Symbols to include ranges of data, and Save Searches for later use if needed. The search term 'blankornull' can be used to find all records with a value of nothing ("") or null ().

- Allows you to print the contents of the current listing, by extension this also allows you to export the current list as a PDF file.
- Allows you to print the contents of the current listing, by extension this also allows you to export the current list as a PDF file.
4. Outstanding Appointment Requests Report
This report in the Management category allows you to view any Appointment Requests submitted by staff or students while looking for availabilities.

- Time Frame
- The date range for the data in this report. Beyond entering a date range manually, you can also choose a preset date range (Today, This Month, This Semester, etc) from the dropdown list above.
- Sort by
- Choose how the selected data is sorted.
- Apply Date Range to
- Choose what your selected date range is in reference to. Defaults to any matching date range.
- Show Looking-for Notes, Found Notes, Followed-Up Notes
- Checking any of these three boxes will include the related 'Notes' field content to your report results.
- Reason
- Only show results for the specific Reason.
- Subject/Course/Section
- Only show results for the specific Subject, Course, or Section.
- Output format
- Use HTML to view report data in your browser, or export this report to a CSV file (available for most reports). Some reports offer additional CSV options depending on if you want to include totals and/or data grouping in your export.
- Deliver to
- Display this report immediately in your browser ("Screen"), or send the report to a specified email address ("Email"). Multiple email addresses can be specified, use ; to separate them (example@example.edu;sample@example.edu).
HTML

CSV
