Editing a Reason and StarfishModule: Difference between pages

From Redrock Wiki

(Difference between pages)
Editing a Reason
en>Ivisser
No edit summary
 
No edit summary
 
Line 1: Line 1:
<!-- table for the whole page -->
{| style="width:100%; vertical-align:top; "
 
| style="width:250px; vertical-align:top; padding:2px 15px 2px 2px;" | {{40Modules}}
<!-- include the TOC as a template in the first column -->
| style="width:250px; vertical-align:top; padding:2px 15px 2px 2px;" | {{UserManualReasonsTOC}}
 
<!-- here is the second column of the full wiki page - will contain content -->
| style="vertical-align:top; padding:20px 20px 20px 2px;" |
| style="vertical-align:top; padding:20px 20px 20px 2px;" |
{| style="width:100%; vertical-align:top; " The Starfish Export module provides an extract of data from your Trac System that meets the specifications to import into your Starfish system.


<!-- here is a table for the content of the page -->
Trac System users may also utilize Starfish to track and report their retention. In order to assist with that reporting, the Starfish Export module provides a simple interface for users to set up an export from the Trac System that meets the Starfish specifications. If you utilize the Trac System and Starfish at your campus, you may need this module to facilitate communication between the two systems.
{| style="width:100%; vertical-align:top; "


|-


| style="vertical-align:top; font-size:140%; color:#7c1911; padding:30px 0px 0px 0px;" | Editing a Reason<HR>
| style="vertical-align:top; font-size:140%; color:#7c1911; padding:30px 0px 0px 0px;" | Starfish Settings <HR>
 
|-
|-
| style="vertical-align:top; font-size:100%; " |


|style="vertical-align:top; font-size:100%; " |When you click on a reason name you can edit the reason and a series of preferences.
To access your Starfish settings, go to Trac Navigation > Trac Man icon > Utilities and Prefs > System Prefs > Search for “star” > Click on ‘Starfish Export Settings’.  


[[File:starfish1.png|border|600px]]


[[File:EditingReason1.png|border|600px]]
This is where you’ll set your desired fields.  


'''Is Work Reason:'''


More information on work reasons can be found [http://wiki.go-redrock.com/wiki/Work_Reasons here.]
'''ID Export Field''' – This can be ID, Barcode, Handle, or Email.


'''Location Export Field''' – This can be location or subcenter.


'''Is Staff Reason:'''
'''File Location''' – This is where the exported file will be placed.


'''Do NOT SHOW for Appointments    '''                                                                                                
'''File Name''' – This is the name of the exported file.


Activating this preference will proceed to NOT display the selected reason in the Schedule specifically in Appointment Entries.  
'''Number of Days or…''' Date range of export.


'''Semicolon Separated List…''' – If you wanted to exclude centers from the export, you would set them here (formatted as: subcenter1;subcenter2).


'''Do NOT SHOW for Login/Out process  '''                                                                                          
'''Date Sort Field''' – The visit sequence number or visit date.


Activating this preference will proceed to NOT display the selected reason during the Login
'''Provider Name Format''' – Consultant name formatting


'''Course Format''' – SectionTerm, Subject, or Subject Section.


'''Notify when student still logged in after __ minutes  '''                                                                     


The “Notify when student still logged in after ___ minutes” preference is an especially useful tool for Testing centers. Here you can set a warning symbol to show up for a student that has been in a center for the allotted amount of time given for the test, which would then notify whomever is watching the log listing screen that their time is up for the test.
Here’s what the export will look like.


[[File:starfish2.png|border|600px]]


'''Snooze time = __ minutes.      '''                                                                                                       


The snooze feature correlates with the warning, allowing you to turn off that alert for a few moments. This way, you can set up reminders that the student’s time is almost up.
|-


'''Recommended duration = ___ minutes    '''                                                                           
| style="vertical-align:top; font-size:140%; color:#7c1911; padding:30px 0px 0px 0px;" |  Running the Export and Managing the Auto Event<HR>
|-
| style="vertical-align:top; font-size:100%; " |


Recommended Duration is a setting that is used when creating an appointment. A student will not be allowed to schedule an appointment for a reason whose recommended time is longer than the allotted time for their appointment. If they try to, a warning alert will flash telling them that they will need more time available than what they are trying to schedule for that visit reason.
From the same Utilities and Prefs window, click on the “Auto Events” tab. Towards the bottom you’ll see “Starfish Module Export”. If wanted to manually run the event, click on the green gear icon on the right side, and the event will be run. Otherwise, click on the hyperlinked name of the event, “Starfish Module Export”, to access settings.


[[File:starfish3.png|border|600px]]


'''Auto logout after (__) minutes'''


The Auto logout feature allows you to set a maximum or default time for any visit that is logged in for that specific visit reason. This means that the Log listing screen will watch that visit (based on Reason selection), and once it reaches the max time indicated on the Auto Logout, it will automatically log a student out of the center, concluding their visit for that session.
Once in the event settings, there’s really only a couple options here you'll need to utilize.
If the “minutes” field to the right of “Auto Logout after” is filled in, any student that logs in with this visit reason will automatically be logged out of the center, with the auto logout time being set as their visit time for their visit. This option is useful especially for SI visits, Workshops, and Orientations, where the student will be logging in, but will not be returning to logout.


:'''Is Pending''' – Enables or Disables the event running automatically. 
:'''Last Performed''' – When the event ran last, this can be manually changed so that the event will run at the next scheduled time.
:'''Schedule''' – How frequently the event runs
:'''Time''' – The exact time the event will run. Make sure this time doesn’t conflict with other Auto Events, or during normal operating hours.


'''Do not wait full time'''
Save once you have it configured correctly.


This preference, if activated, will not wait the full time to run the Auto-logout process, and consequently will log students out before the full set time has expired.  
[[File:starfish4.png|border|600px]]


|}
|-


| style="vertical-align:top; font-size:140%; color:#7c1911; padding:30px 0px 0px 0px;" | Advanced Prefs<HR>
|-
| style="vertical-align:top; font-size:100%; " |
:*'''sfx-manualgmtoffset''', if "Convert Date/Time to GMT" isn't working for you, it's possible your server isn't allowing TutorTrac to read/write an offset file. This preference can be used to bypass the file, manually setting an offset in hours. E.g., "4", "7".


<span style="color:#707070">''Trac Navigation > Trac-Man > Utilities and Prefs > Advanced Prefs > sfx-manualgmtoffset''</span><BR>
[[File:4pbg3i3iuhb3ioubh.png|border|600px]]


<!-- here is the end of the content table -->
|}
|}


<!-- this line is the end of the table for the entire page -->
|}


{{DISPLAYTITLE:<span>User Manual</span>}}
__NOTOC__
__NOTOC__
[[Category:Trac 4]]

Revision as of 16:50, 24 April 2023

Trac System users may also utilize Starfish to track and report their retention. In order to assist with that reporting, the Starfish Export module provides a simple interface for users to set up an export from the Trac System that meets the Starfish specifications. If you utilize the Trac System and Starfish at your campus, you may need this module to facilitate communication between the two systems.
Starfish Settings

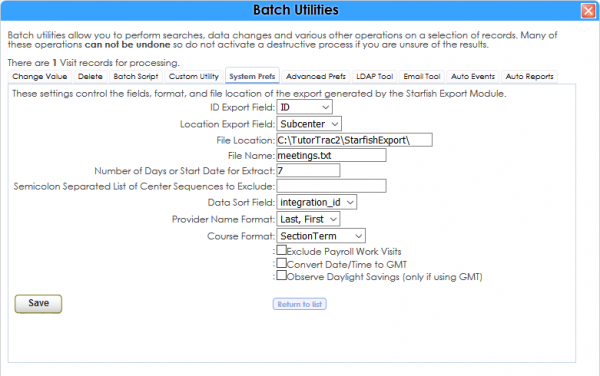
To access your Starfish settings, go to Trac Navigation > Trac Man icon > Utilities and Prefs > System Prefs > Search for “star” > Click on ‘Starfish Export Settings’.

Starfish1.png

This is where you’ll set your desired fields.


ID Export Field – This can be ID, Barcode, Handle, or Email.

Location Export Field – This can be location or subcenter.

File Location – This is where the exported file will be placed.

File Name – This is the name of the exported file.

Number of Days or… – Date range of export.

Semicolon Separated List… – If you wanted to exclude centers from the export, you would set them here (formatted as: subcenter1;subcenter2).

Date Sort Field – The visit sequence number or visit date.

Provider Name Format – Consultant name formatting

Course Format – SectionTerm, Subject, or Subject Section.


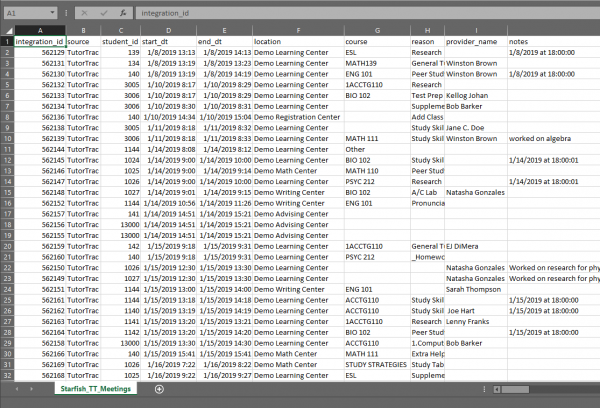
Here’s what the export will look like.

Starfish2.png


Running the Export and Managing the Auto Event

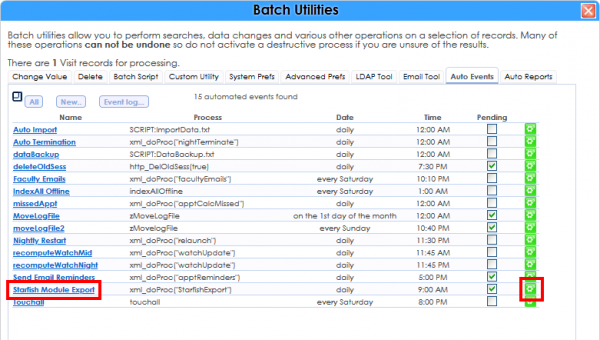
From the same Utilities and Prefs window, click on the “Auto Events” tab. Towards the bottom you’ll see “Starfish Module Export”. If wanted to manually run the event, click on the green gear icon on the right side, and the event will be run. Otherwise, click on the hyperlinked name of the event, “Starfish Module Export”, to access settings.

Starfish3.png


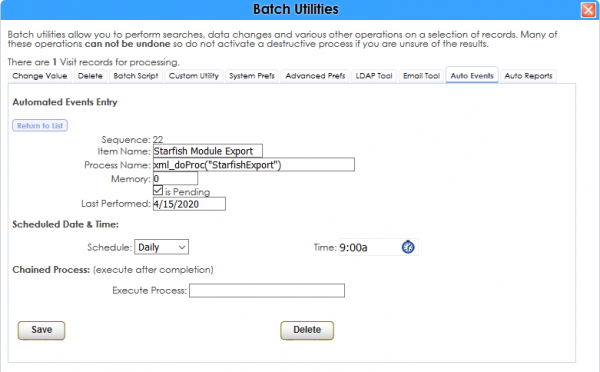
Once in the event settings, there’s really only a couple options here you'll need to utilize.

Is Pending – Enables or Disables the event running automatically.
Last Performed – When the event ran last, this can be manually changed so that the event will run at the next scheduled time.
Schedule – How frequently the event runs
Time – The exact time the event will run. Make sure this time doesn’t conflict with other Auto Events, or during normal operating hours.

Save once you have it configured correctly.

Starfish4.png


Advanced Prefs
  • sfx-manualgmtoffset, if "Convert Date/Time to GMT" isn't working for you, it's possible your server isn't allowing TutorTrac to read/write an offset file. This preference can be used to bypass the file, manually setting an offset in hours. E.g., "4", "7".

Trac Navigation > Trac-Man > Utilities and Prefs > Advanced Prefs > sfx-manualgmtoffset
4pbg3i3iuhb3ioubh.png