Creating a Reason and StarfishModule: Difference between pages

From Redrock Wiki

(Difference between pages)
m (1 revision imported)
 
No edit summary
 
Line 1: Line 1:
<!-- table for the whole page -->
{| style="width:100%; vertical-align:top; "
 
| style="width:250px; vertical-align:top; padding:2px 15px 2px 2px;" | {{40Modules}}
<!-- include the TOC as a template in the first column -->
| style="width:250px; vertical-align:top; padding:2px 15px 2px 2px;" | {{UserManualReasonsTOC}}
 
<!-- here is the second column of the full wiki page - will contain content -->
| style="vertical-align:top; padding:20px 20px 20px 2px;" |
| style="vertical-align:top; padding:20px 20px 20px 2px;" |
{| style="width:100%; vertical-align:top; " The Starfish Export module provides an extract of data from your Trac System that meets the specifications to import into your Starfish system.


<!-- here is a table for the content of the page -->
Trac System users may also utilize Starfish to track and report their retention. In order to assist with that reporting, the Starfish Export module provides a simple interface for users to set up an export from the Trac System that meets the Starfish specifications. If you utilize the Trac System and Starfish at your campus, you may need this module to facilitate communication between the two systems.
{| style="width:100%; vertical-align:top; "


|-


| style="vertical-align:top; font-size:140%; color:#7c1911; padding:30px 0px 0px 0px;" | Creating a Reason<HR>
| style="vertical-align:top; font-size:140%; color:#7c1911; padding:30px 0px 0px 0px;" | Starfish Settings <HR>
 
|-
|-
| style="vertical-align:top; font-size:100%; " |


|style="vertical-align:top; font-size:100%; " |Reasons are contained within your '''Center Profiles''', so hover over the search glass icon on the right hand side of the Trac Navigation bar (top left corner of Main Menu) and choose '''Center Profiles'''. Then, click on your Center Profile and enter the "Reasons" tab.
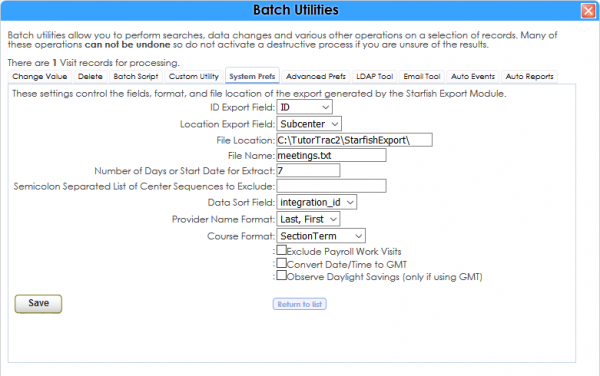
To access your Starfish settings, go to Trac Navigation > Trac Man icon > Utilities and Prefs > System Prefs > Search for “star” > Click on ‘Starfish Export Settings’.  


[[File:starfish1.png|border|600px]]


[[File:657457535.mp4|border|680px]]
This is where you’ll set your desired fields.  


Once you're on the "Reasons" tab and click on the '''Create New''' button.  
'''ID Export Field''' – This can be ID, Barcode, Handle, or Email.


'''Location Export Field''' – This can be location or subcenter.


[[File:CreatingReason2.png|border|600px]]
'''File Location''' – This is where the exported file will be placed.


'''File Name''' – This is the name of the exported file.


In the pop up window that appears, enter a reason and click '''Add''' to create a Reason.
'''Number of Days or…''' – Date range of export.


'''Semicolon Separated List…''' – If you wanted to exclude centers from the export, you would set them here (formatted as: subcenter1;subcenter2).


[[File:CreatingReason3.png|border|400px]]
'''Date Sort Field''' – The visit sequence number or visit date.


'''Provider Name Format''' – Consultant name formatting


Your newly created Reason will then display in a List within your '''Reasons''' Tab.
'''Course Format''' – SectionTerm, Subject, or Subject Section.


[[File:CreatingReason4.png|border|600px]]
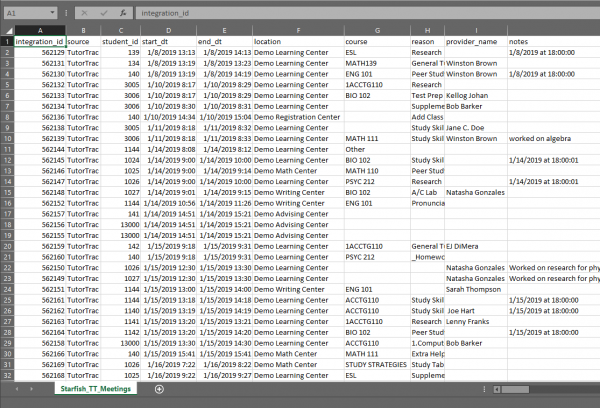
Here’s what the export will look like.


[[File:starfish2.png|border|600px]]


You can also create Multiple Reasons at once by selecting '''List Options > Create multiple…'''
[[File:CreatingReason5.png|border|600px]]


|-


In the '''Enter Reasons''' window that appears, you can enter multiple reasons at once by separating each reason with an Enter or Return character. Click '''Add''' to save your reasons.
[[File:CreatingReason6.png|border|400px]]
{|
| style="vertical-align:top; font-size:140%; color:#7c1911; padding:30px 0px 0px 0px;" | Assigning Reasons to a Subcenter<HR>


| style="vertical-align:top; font-size:140%; color:#7c1911; padding:30px 0px 0px 0px;" |  Running the Export and Managing the Auto Event<HR>
|-
|-
| style="vertical-align:top; font-size:100%; " |


|style="vertical-align:top; font-size:100%; " |Once our Reasons have been created, we can “add” Reasons to your Subcenters individually. For this next example, let’s say we have a Reason and a Subcenter – General Advising and the Advising Center. We would like the General Advising reason to be available in the Advising Center.
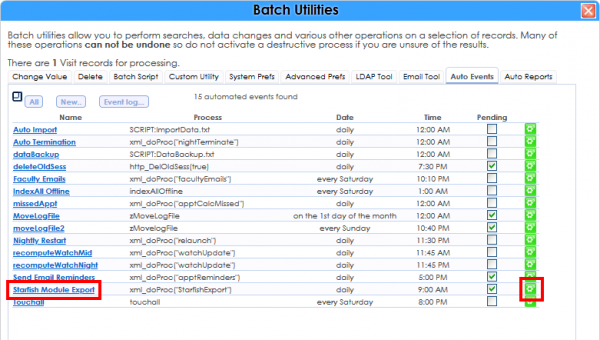
From the same Utilities and Prefs window, click on the “Auto Events” tab. Towards the bottom you’ll see “Starfish Module Export”. If wanted to manually run the event, click on the green gear icon on the right side, and the event will be run. Otherwise, click on the hyperlinked name of the event, “Starfish Module Export”, to access settings.
We can add the Reason to a center by first choosing a Subcenter through the '''Subcenter Options''' drop down menu. For the General Advising Reason, we would choose the Advising Center.


[[File:starfish3.png|border|600px]]


[[File:AssigningReasons1.png|border|600px]]


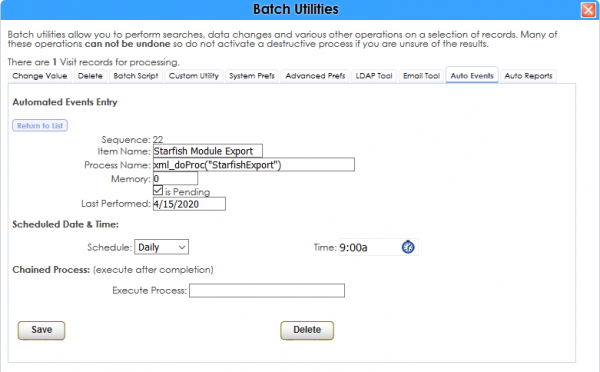
Once in the event settings, there’s really only a couple options here you'll need to utilize.


After we have selected the Advising Center, the system notifies us above the '''Subcenter Options'''.
:'''Is Pending''' – Enables or Disables the event running automatically. 
:'''Last Performed''' – When the event ran last, this can be manually changed so that the event will run at the next scheduled time.
:'''Schedule''' – How frequently the event runs
:'''Time''' – The exact time the event will run. Make sure this time doesn’t conflict with other Auto Events, or during normal operating hours.


Save once you have it configured correctly.


[[File:AssigningReasons2.png|border|600px]]
[[File:starfish4.png|border|600px]]


At this point we have two checkboxes beside each Reason, one to the left and one to the right (in the center of the window). The checkbox on the left side determines whether or not the Reason is active on a global level (for all Subcenters). The checkbox on the right determines whether or not the reason is active for the selected Subcenter (above). Make sure the checkbox on the left of the Reason “General Advising” is active. 
|-
 
 
[[File:AssigningReasons3.png|border|600px]]
 
 
Because we want to activate the General Advising Reason for the Advising Center, make sure the Advising Center has been chosen, and then activate the checkbox on the right to add the Reason to the Subcenter. 


[[File:AssigningReasons4.png|border|600px]]
Now when the list of Reasons refreshes, the General Advising Reason shows a Subcenter Assignment to the Advising Center.
[[File:AssigningReasons5.png|border|600px]]
(Keep in mind that in the last screenshot, the checkbox on the right is deactivated as the Subcenter selection has since changed)
|-
| style="vertical-align:top; font-size:140%; color:#7c1911; padding:30px 0px 0px 0px;" | Subcenter Options<HR>


| style="vertical-align:top; font-size:140%; color:#7c1911; padding:30px 0px 0px 0px;" | Advanced Prefs<HR>
|-
|-
| style="vertical-align:top; font-size:100%; " |
:*'''sfx-manualgmtoffset''', if "Convert Date/Time to GMT" isn't working for you, it's possible your server isn't allowing TutorTrac to read/write an offset file. This preference can be used to bypass the file, manually setting an offset in hours. E.g., "4", "7".


|style="vertical-align:top; font-size:100%; " |Adding Reasons to Subcenters can be done individually as shown through the process detailed above. Reasons can be added to multiple Subcenters simply by repeating the process for different Subcenters. There are several tools, however, under your Subcenter Options that allow some convenient shortcuts to be utilized.
<span style="color:#707070">''Trac Navigation > Trac-Man > Utilities and Prefs > Advanced Prefs > sfx-manualgmtoffset''</span><BR>
 
[[File:4pbg3i3iuhb3ioubh.png|border|600px]]
 
[[File:AssigningReasons6.png|border|300px]]
 
 
'''Add These To: The''' Add These To function will add ALL reasons to the selected Subcenter.
 
'''Remove These From:''' The Remove These From function will remove ALL reasons from the selected Subcenter.
 
'''Find Reasons Not in:''' The Find Reasons Not in function will find ALL reasons not assigned to the selected Subcenter.
 
'''Find Reasons in:''' The Find Reasons in function will find ALL reasons that ARE assigned to the selected Subcenter.


|}
|}


<!-- here is the end of the content table -->
|}
|}


<!-- this line is the end of the table for the entire page -->
{{DISPLAYTITLE:<span>User Manual</span>}}
__NOTOC__
__NOTOC__
[[Category:Trac 4]]

Revision as of 16:50, 24 April 2023

Trac System users may also utilize Starfish to track and report their retention. In order to assist with that reporting, the Starfish Export module provides a simple interface for users to set up an export from the Trac System that meets the Starfish specifications. If you utilize the Trac System and Starfish at your campus, you may need this module to facilitate communication between the two systems.
Starfish Settings

To access your Starfish settings, go to Trac Navigation > Trac Man icon > Utilities and Prefs > System Prefs > Search for “star” > Click on ‘Starfish Export Settings’.

Starfish1.png

This is where you’ll set your desired fields.


ID Export Field – This can be ID, Barcode, Handle, or Email.

Location Export Field – This can be location or subcenter.

File Location – This is where the exported file will be placed.

File Name – This is the name of the exported file.

Number of Days or… – Date range of export.

Semicolon Separated List… – If you wanted to exclude centers from the export, you would set them here (formatted as: subcenter1;subcenter2).

Date Sort Field – The visit sequence number or visit date.

Provider Name Format – Consultant name formatting

Course Format – SectionTerm, Subject, or Subject Section.


Here’s what the export will look like.

Starfish2.png


Running the Export and Managing the Auto Event

From the same Utilities and Prefs window, click on the “Auto Events” tab. Towards the bottom you’ll see “Starfish Module Export”. If wanted to manually run the event, click on the green gear icon on the right side, and the event will be run. Otherwise, click on the hyperlinked name of the event, “Starfish Module Export”, to access settings.

Starfish3.png


Once in the event settings, there’s really only a couple options here you'll need to utilize.

Is Pending – Enables or Disables the event running automatically.
Last Performed – When the event ran last, this can be manually changed so that the event will run at the next scheduled time.
Schedule – How frequently the event runs
Time – The exact time the event will run. Make sure this time doesn’t conflict with other Auto Events, or during normal operating hours.

Save once you have it configured correctly.

Starfish4.png


Advanced Prefs
  • sfx-manualgmtoffset, if "Convert Date/Time to GMT" isn't working for you, it's possible your server isn't allowing TutorTrac to read/write an offset file. This preference can be used to bypass the file, manually setting an offset in hours. E.g., "4", "7".

Trac Navigation > Trac-Man > Utilities and Prefs > Advanced Prefs > sfx-manualgmtoffset
4pbg3i3iuhb3ioubh.png