TracCloudWhatsNew2022-09-14 2 and Reports:Registrations by: Difference between pages
From Redrock Wiki
(Difference between pages)
No edit summary |
No edit summary |
||
| Line 1: | Line 1: | ||
<!-- table for the whole page --> | |||
{| style="width:100%; vertical-align:top; " | {| style="width:100%; vertical-align:top; " | ||
| style="width: | |||
<!-- include the TOC as a template in the first column --> | |||
| style="width:300px; vertical-align:top; padding:2px 15px 2px 2px;" | {{ReportsGuideRegTOC}} | |||
<!-- here is the second column of the full wiki page - will contain content --> | |||
| style="vertical-align:top; padding:20px 20px 20px 2px;" | | | style="vertical-align:top; padding:20px 20px 20px 2px;" | | ||
<!-- here is a table for the content of the page --> | |||
{| style="width:100%; vertical-align:top; " | {| style="width:100%; vertical-align:top; " | ||
< | | style="vertical-align:top; font-size:160%; color:#7c1911; " | '''Registrations by ??''' <HR> | ||
|- | |||
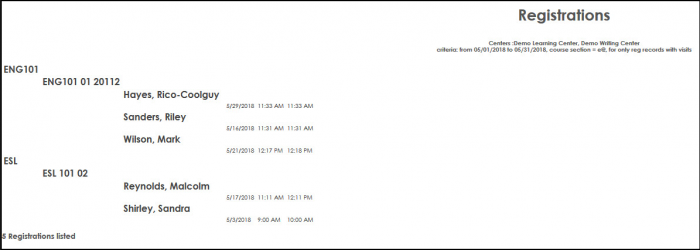
| style="vertical-align:top; font-size:120%; " | <BR />The Registrations by Report will display the course and the student enrolled in the course with the visits on the left. Additional field can be included to the report for more information. | |||
'''GENERATE THE REPORT''' | |||
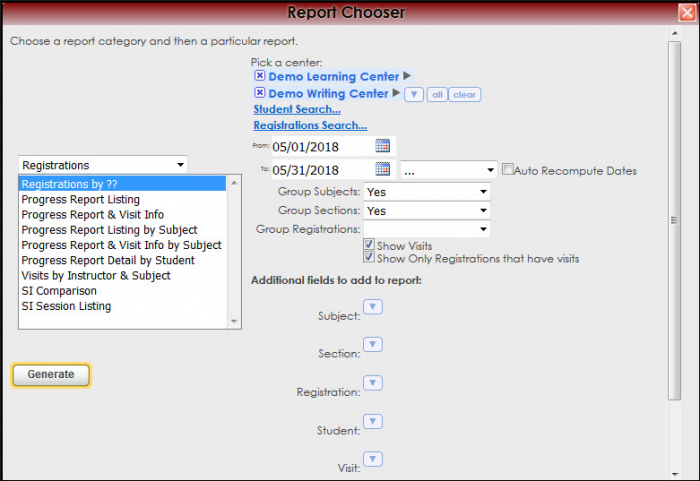
To generate the Registrations by, click on Reports from the TutorTrac Main Menu. On the Reports Chooser, select Registrations from the pull down list of available categories. After selecting Registrations, choose Registrations by. Choose center(s) and then enter a date range for the time period that you would like to review in the report. Then click on the Generate Report button. | |||
</ | |||
< | [[File:Regby.png|border|700px]] | ||
[[File:Regby1.png|border|700px]] | |||
|- | |||
| style="width:100%;" | | |||
<!-- this table appears at the bottom of the manual page and contains a previous page and next page link --> | |||
{| style="width:70%; vertical-align:top; " | |||
| style="width:50%; text-align:left;" | [[Reports:Students List|← Previous Page]] | |||
| style="width:50%; text-align:right;" | [[Reports:Progress Report Listing|Next Page →]] | |||
<!-- here is the end of the previous / next page table --> | |||
|} | |||
<!-- here is the end of the content table --> | |||
|} | |} | ||
<!-- this line is the end of the table for the entire page --> | |||
|} | |||
__NOTOC__ | |||
[[Category:Trac 4]] | |||
Revision as of 16:52, 24 April 2023
Reports Guide Contents• Center Usage and Demographics • Progress Report & Visit Info • Progress Report Listing by Subject • Progress Report & Visit Info by Subject • Progress Report Detail by Student
|
|

