Creating Consultants: Difference between revisions

From Redrock Wiki

Creating Consultants
No edit summary
No edit summary
Line 149: Line 149:


__NOTOC__
__NOTOC__
[[Category:Trac 4]]

Revision as of 16:07, 24 April 2023

Template:UserManualConsultantTOC
Creating Consultant Profiles
Now that we’ve defined the Term and Group for your Consultants, we are able to create individual Consultant Profiles. To do so, we must navigate to the Consultants Tab of your Center Profile.


To get to the Consultants Tab of your Center Profile, hover over the Search Glass on the right side of your Trac Navigation bar (upper left corner of Main Menu). Select Center Profiles and click on your Center Profile. Navigate to the Consultants Tab three tabs to the right of the General Tab selected by default. Keep in mind that the name of this Tab will change if you have changed the Name for Consultants preference previously mentioned (i.e. Tutors, Advisors)


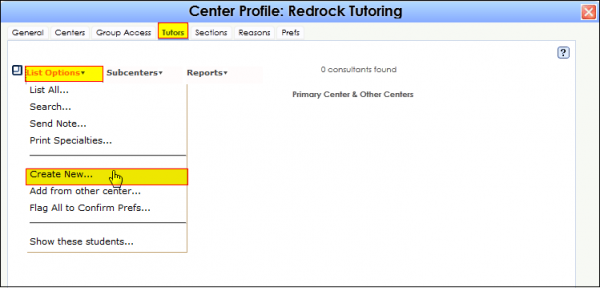
Click on List Options, then select Create New.


CreatingConsultant1.png


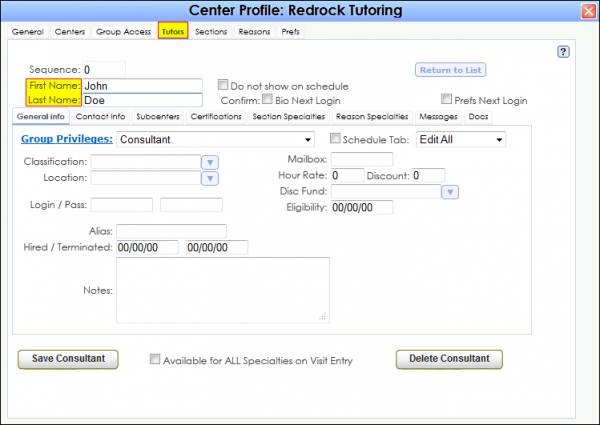
The first tab selected in the new Consultant Record is the General Info Tab. Here we can enter information regarding Contact info, Section Specialties, Certifications, or any relevant information for our Consultants. First, let’s enter a First Name and Last Name.


CreatingConsultant2.png


From the Group Privileges drop down menu, select the Group your Consultant will be assigned to. The Group you select will define the set of Privileges assigned to your Consultant.


CreatingConsultant3.png


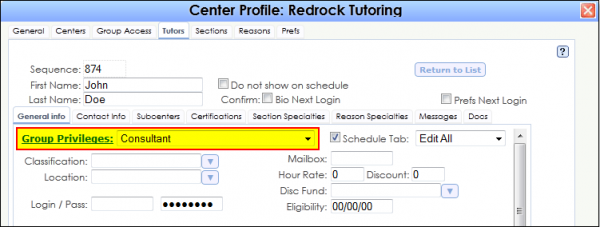
If your Consultant needs to be further classified, you can use the Classification field to further Group your Consultants (i.e. Assigned Advisor, Professional Tutor).


CreatingConsultant4.png


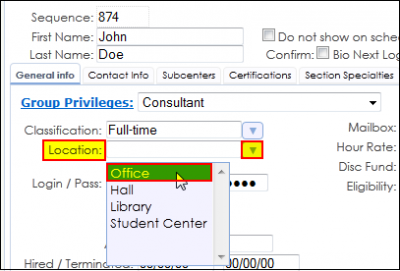
The location field can designate a sort of “home” location or a common meeting area for your Consultant. Both Location and Classification can be displayed on your Consultant Schedule for users’ reference as they book appointments.


CreatingConsultant5.png


After you have filled out all relevant information, click “Save Consultant” to Create the Consultant Record.


Click on the Contact Info Tab. Here we can enter some basic contact information for your Consultant.


CreatingConsultant6.png


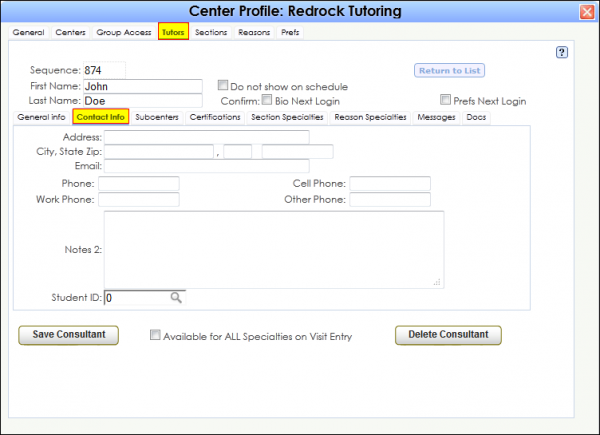
The “Student ID” field towards the bottom of the Contact Info Tab allows a Consultant Profile to be linked to a Student Profile. This is useful for several reasons. First, a Consultant who is both Consultant and Student can consolidate their accounts and only login using one username and one password. Second, a Consultant who is both a Consultant and a Student can differentiate the roles of each account and access unique functions of each role. Third, for a Consultant to login for a Work Reason they must have a linked Student Account to be able to record a Visit. To link a Consultant Profile to a Student profile simply type in a Name or ID to begin a Live search (last, first for names), and click on the Student’s Profile when found.


Subcenter Assignment
Click on the Subcenters Tab. Assign Subcenters for your Consultants by clicking the blue dropdown arrow and selecting the appropriate subcenter(s).


SubcenterAssignment1.png


Assigning Subcenters to a Consultant is essential in providing them the access that they need. Select a Subcenter from the List by to assign this Consultant to a Subcenter.


Click on the Certifications Tab. Any type of Certification can be created and recorded here for reference purposes. Click “Create New” to create a New Certification.


SubcenterAssignment2.png


Section Specialties
TutorTrac Profile: Click on the Section Specialties Tab. Assign Sections as Specialties for this Consultant by checking the checkbox for the appropriate sections.


SectionSpecialties1.png


You can use the Search field to narrow your search. Clicking on the ALL button will load ALL sections. Clicking on the FIND SEL button will only display the sections the Consultant currently specializes in. If, as an example, you are looking to assign all English sections to a Consultant as specialties, enter “ENG@” in the Search field to include all courses that begin with “ENG”. After performing the search and finding your selection of English courses, click on the SELECT button to assign these courses to the Consultant as specialties.


SectionSpecialties2.png


Let’s say that we search for the term “20112”. The system returns with 180 results, showing 180 sections found. If we click on the SELECT button, the system will assign these 180 sections found to our selected Consultant as Section Specialties. If we click on the DESELECT button, the system will deactivate the selection of courses as section specialties.


SectionSpecialties3.png


To assign ALL available sections as Specialties, type “@” into the Search field and hit enter or return to perform the search. Now click the SELECT button to assign ALL courses as section specialties.


Reason Specialties
AdvisorTrac Profile: Click on the Reason Specialties Tab. Assign Reasons as Specialties for this Consultant by checking the checkbox for the appropriate sections.


ReasonSpecialties1.png


You can use the Search field to narrow your search. Clicking on the ALL button will load ALL Reasons.


Click Save Consultant to save the additional settings for this Consultant Record. Click “Return to List” to return to the list of Consultant Records under this Center Profile.


Copy Specialties Utility
The Copy Specialties Utility allows you to copy the same sections from one term to another.


The Copy Specialties option is found in the Utilities and Preferences. Select the Custom Utility Tab and click on Copy Specialties.


The Copy Specialties Utility allows you to specify some options. Specify which term the specialties are copied from and to which term they are copied. Choose whether the previous tutor specialties are removed or are left as tutor specialties. Select if the Copy Specialties Utility will be run for all tutors from all centers, for all tutors from a specific center, or for just a specific tutor. Click Execute to run the Utility.


CopySpecialtiesUtility.png