|
SurveyTrac: Find Out What Your Students Are Saying About Your Center!
Effective Tutoring/Advising centers make a huge difference in the lives of students; however it can be challenging to understand how students view their learning environments and their Consultants, and to provide actionable feedback to administrators. In this Newsletter we will look at why student survey can be a valuable source of feedback and how that feedback can be used to improve teaching effectiveness and student outcomes.
Why Use SurveyTrac?
The SurveyTrac module enables surveys to be created and delivered manually or automatically to the Users through the Trac System. These surveys can appear when a student logs in/out, books an appointment, on the student record, or emailed to students to be taken on their own time. Surveys are completely customizable, and Users can design the types of questions; for example, multiple choice, text fields, dropdown menus, essay, etc… SurveyTrac gives you an opportunity to gather additional feedback from your students, consultants or any type of user for your Trac System.
Installing SurveyTrac
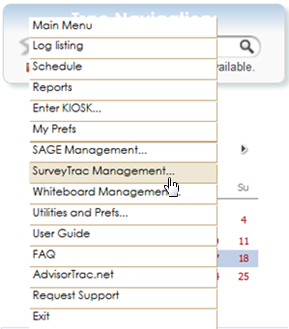
Once SurveyTrac has been purchased, Redrock Software will need to be notified in order to activate the Module on your Trac System. Once the module has been activated, a new option will appear in the Trac Navigation called “SurveyTrac Management”. If you do not see this option or would like to allow other Users access to the surveys, simply check the box in their User account privileges.
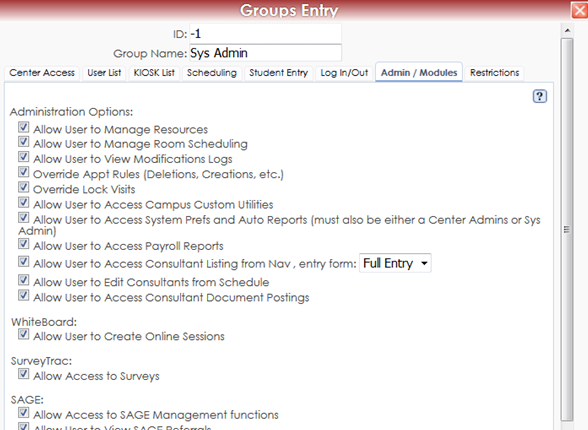
After checking the box, ‘Allow Access to Surveys’, in the administrator user account, the user will have a link in the Trac Navigation, Tracman Icon to SurveyTrac Management.
Creating Surveys
Select ‘New’ from the top of the Survey Listing. An empty Survey screen appears allowing the user to enter the survey information.
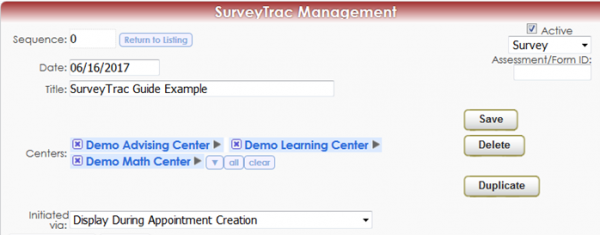
After the new survey has a title, date, you can choose how you want it to be initiated from the following options:
- Display During Appointment Creation – Will display on the appointment screen as an appointment is being booked.
- Display During Visit Entry – Will display when logging in for a visit.
- Email after Visit – Will be emailed to the student or tutor/advisor after every visit.
- Email after 1st Visit during this survey period – Will be emailed to the student after their first visit during a given date range.
- Email after New student record – Will be emailed to the student after their record has just been created.
- Show at Entry – Displays to the student as they sign in for a visit.
- Show at Entry before 1st Visit during this survey period – Will be emailed to the student before their first visit during a given date range.
- Show at Exit – Displays to the student or advisor as the student is signed out.
- Show at Exit after 1st Visit during this survey period – Will be emailed to the student after their first visit during a given date range.
- Display as link on Main Menu – Displays a link to open the survey on the student
- Main Menu or the tutor/advisor Main Menu.
- Do not Auto Send – No sending options selected.
- Link on Edit Student – Displays as a link on the Student Listing and Student Entry screens. Click the link to email the survey to the selected students.
- Link on Edit Visit – Displays as a link on the Student Listing screen. Click the link to email the surveys to the students matching the visits.
- Display on Document Posting – Displays as a link on the Student document posting screen.
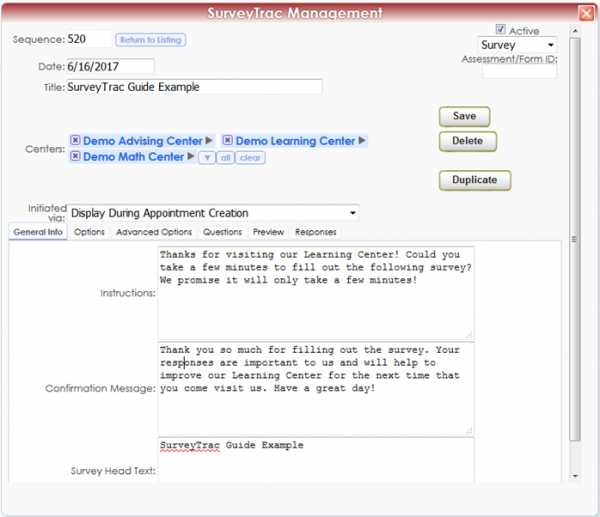
Once the survey has been saved, there will be six additional tabs to each Survey: General Info, Options, Advance Opt, Questions, Preview and Responses.
General Info tab:
The General Info tab of the Survey allows you to create Instructions and a confirmation message that will appear as the body of text in an email survey. The confirmation will not appear in the surveys displayed during the appointment creation, at entry, or at exit.
Options Tab:
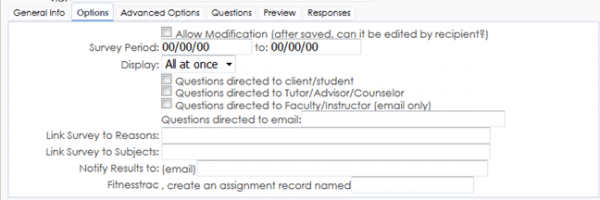
- Allow Modification - Check this box to allow the student to go back to a survey and change their responses. Uncheck the box to prevent students from changing their previous responses to the survey.
- Survey Period (Active Dates) - A survey may be activated during a specific date range entered here. These dates will automatically make the survey Active/Inactive as the dates arrive.
- Display Format - Currently, format is to display all questions at once.
- Questions directed to Client/Student - Check this box to send the email surveys to the student, or display the surveys on the student’s screens.
- Questions directed to Tutor/Advisor/Counselor - Check this box to send the email surveys to the tutor/advisor, or display the surveys on their screens.
- Questions directed to Faculty/Instructor (email only) - Email questions to Faculty / Instructor.
- Questions directed to email - Check this box to email the survey directly to an individual email address.
- Link Survey to Reasons - This will send a survey for specific reason that students/tutors selected when logging in.
- Link Survey to Subjects - This will send a survey for specific subjects that students/tutors selected when logging in.
- Notify Results to email - This email address receives the results of each survey response.
- FitnessTrac, create assignment record named - For FitnessTrac customers only.
Advanced Options tab:
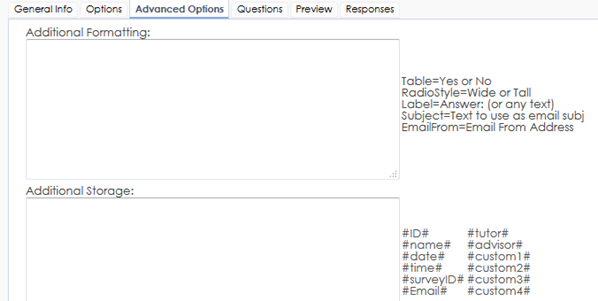
Additional Formatting - You can format your survey as a table with two columns, provide a default label for your answers, and provide a subject for the email surveys.
Additional Storage - Include information about the student/visit without asking questions in the survey.
Questions Tab:
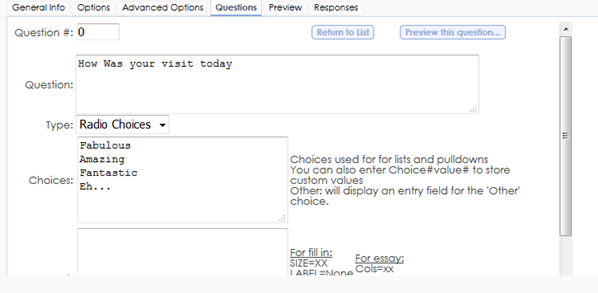
The Question Entry page of the Survey sets up the questions for the survey by determining the question, type, choices, and format. Enter the question information and click Save to create the question.
Type
- Checkbox – Provides a checkbox for the question. Check for a positive answer.
- Pulldown – Provides a list of answers available in a pulldown menu.
- List – Provides a box of the possible answers to the question.
- Radio Choices – Provides a list of choices with buttons to select an answer.
- Fill in – Allows a single line for an 80 character typed response.
- Essay – Allows a text box for a full text response.
- Multi-check – Allows the user to select multiple answers to a question.
- STATEMENT – Displays the question as instructions or a statement.
- SCRIPT – Allows a customized script to be initiated on the survey.
Preview Tab:
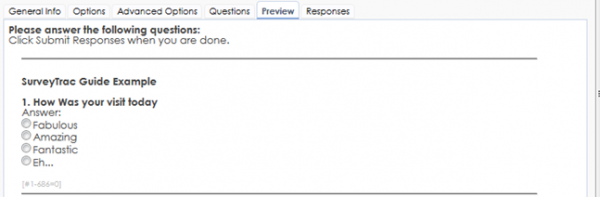
The Preview tab is where you can view your entire survey and make any necessary changes.
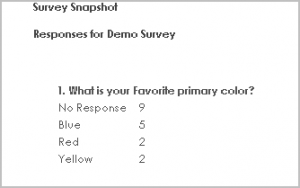
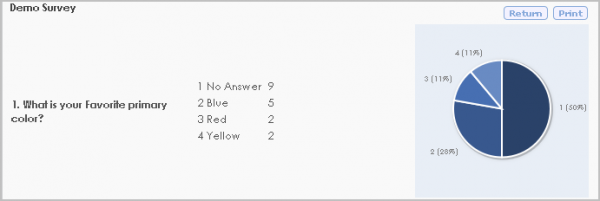
Responses Tab:
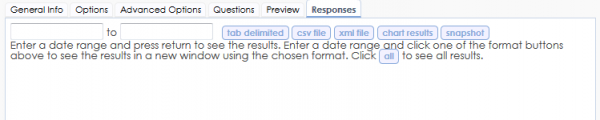
The Survey Responses page allows you to access the responses from the surveyed population. There are different options to gather the response data; view the text and import it to another application, displaying a chart or run a snapshot report of the Survey data.
More Questions?
We hope that you find this newsletter helpful and as always if you have any questions on this or any other features, please feel free to let us know by emailing Helpdesk@go-redrock.com or submitting a ticket. Enter any comments below.
Thank you for your continued support!
| 


