Creating a Reason: Difference between revisions

From Redrock Wiki

No edit summary
No edit summary
Line 105: Line 105:
'''Find Reasons in:''' The Find Reasons in function will find ALL reasons that ARE assigned to the selected Subcenter.


|}
|-
| style="vertical-align:top; font-size:140%; color:#7c1911; padding:30px 0px 0px 0px;" | Editing a Reason<HR>
 
|-
 
|style="vertical-align:top; font-size:100%; " |When you click on a reason name you can edit the reason and a series of preferences.
 
 
[[File:EditingReason1.png|border|600px]]
 
'''Is Work Reason:'''
 
More information on work reasons can be found [[Work_Reasons|here.]
 
 
'''Is Staff Reason:'''
 
'''Do NOT SHOW for Appointments    '''                                                                                                 
 
Activating this preference will proceed to NOT display the selected reason in the Schedule – specifically in Appointment Entries.
 
 
'''Do NOT SHOW for Login/Out process  '''                                                                                         
 
Activating this preference will proceed to NOT display the selected reason during the Login
 
 
'''Notify when student still logged in after __ minutes  '''                                                                     
 
The “Notify when student still logged in after ___ minutes” preference is an especially useful tool for Testing centers. Here you can set a warning symbol to show up for a student that has been in a center for the allotted amount of time given for the test, which would then notify whomever is watching the log listing screen that their time is up for the test.
 
 
'''Snooze time = __ minutes.      '''                                                                                                       
 
The snooze feature correlates with the warning, allowing you to turn off that alert for a few moments. This way, you can set up reminders that the student’s time is almost up.
 
 
'''Recommended duration = ___ minutes    '''                                                                           
 
Recommended Duration is a setting that is used when creating an appointment. A student will not be allowed to schedule an appointment for a reason whose recommended time is longer than the allotted time for their appointment. If they try to, a warning alert will flash telling them that they will need more time available than what they are trying to schedule for that visit reason.
 
 
'''Auto logout after (__) minutes'''
 
The Auto logout feature allows you to set a maximum or default time for any visit that is logged in for that specific visit reason. This means that the Log listing screen will watch that visit (based on Reason selection), and once it reaches the max time indicated on the Auto Logout, it will automatically log a student out of the center, concluding their visit for that session.
If the “minutes” field to the right of “Auto Logout after” is filled in, any student that logs in with this visit reason will automatically be logged out of the center, with the auto logout time being set as their visit time for their visit. This option is useful especially for SI visits, Workshops, and Orientations, where the student will be logging in, but will not be returning to logout.
 
 
'''Do not wait full time'''
 
This preference, if activated, will not wait the full time to run the Auto-logout process, and consequently will log students out before the full set time has expired.


<!-- here is the end of the content table -->

Revision as of 14:17, 6 December 2023


Creating a Reason
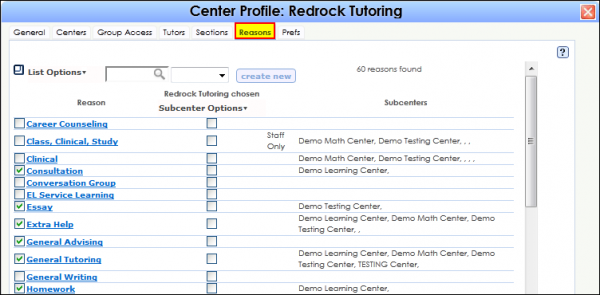
Reasons are contained within your Center Profiles, so hover over the search glass icon on the right hand side of the Trac Navigation bar (top left corner of Main Menu) and choose Center Profiles. Then, click on your Center Profile and enter the "Reasons" tab.

Once you're on the "Reasons" tab and click on the Create New button.


CreatingReason2.png


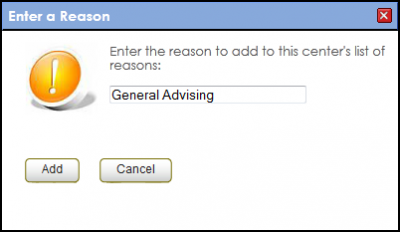
In the pop up window that appears, enter a reason and click Add to create a Reason.


CreatingReason3.png


Your newly created Reason will then display in a List within your Reasons Tab.


CreatingReason4.png


You can also create Multiple Reasons at once by selecting List Options > Create multiple…


CreatingReason5.png


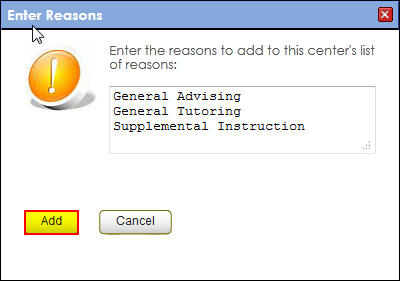
In the Enter Reasons window that appears, you can enter multiple reasons at once by separating each reason with an Enter or Return character. Click Add to save your reasons.


CreatingReason6.png


Assigning Reasons to a Subcenter
Once our Reasons have been created, we can “add” Reasons to your Subcenters individually. For this next example, let’s say we have a Reason and a Subcenter – General Advising and the Advising Center. We would like the General Advising reason to be available in the Advising Center.

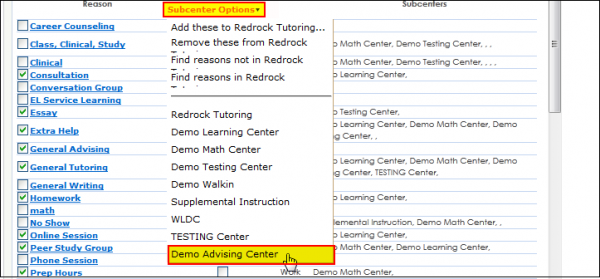
We can add the Reason to a center by first choosing a Subcenter through the Subcenter Options drop down menu. For the General Advising Reason, we would choose the Advising Center.


AssigningReasons1.png


After we have selected the Advising Center, the system notifies us above the Subcenter Options.


AssigningReasons2.png


At this point we have two checkboxes beside each Reason, one to the left and one to the right (in the center of the window). The checkbox on the left side determines whether or not the Reason is active on a global level (for all Subcenters). The checkbox on the right determines whether or not the reason is active for the selected Subcenter (above). Make sure the checkbox on the left of the Reason “General Advising” is active.


AssigningReasons3.png


Because we want to activate the General Advising Reason for the Advising Center, make sure the Advising Center has been chosen, and then activate the checkbox on the right to add the Reason to the Subcenter.


AssigningReasons4.png


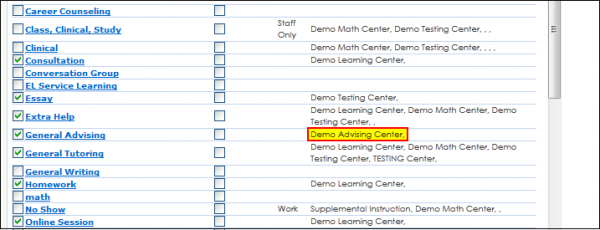
Now when the list of Reasons refreshes, the General Advising Reason shows a Subcenter Assignment to the Advising Center.


AssigningReasons5.png


(Keep in mind that in the last screenshot, the checkbox on the right is deactivated as the Subcenter selection has since changed)

Subcenter Options
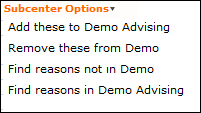
Adding Reasons to Subcenters can be done individually as shown through the process detailed above. Reasons can be added to multiple Subcenters simply by repeating the process for different Subcenters. There are several tools, however, under your Subcenter Options that allow some convenient shortcuts to be utilized.


AssigningReasons6.png


Add These To: The Add These To function will add ALL reasons to the selected Subcenter.

Remove These From: The Remove These From function will remove ALL reasons from the selected Subcenter.

Find Reasons Not in: The Find Reasons Not in function will find ALL reasons not assigned to the selected Subcenter.

Find Reasons in: The Find Reasons in function will find ALL reasons that ARE assigned to the selected Subcenter.

Editing a Reason
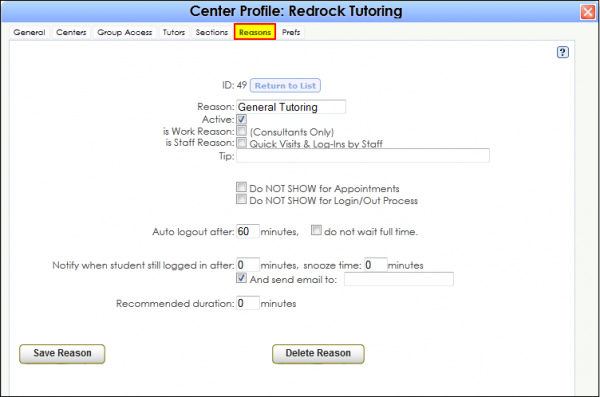
When you click on a reason name you can edit the reason and a series of preferences.


EditingReason1.png

Is Work Reason:

More information on work reasons can be found [[Work_Reasons|here.]


Is Staff Reason:

Do NOT SHOW for Appointments

Activating this preference will proceed to NOT display the selected reason in the Schedule – specifically in Appointment Entries.


Do NOT SHOW for Login/Out process

Activating this preference will proceed to NOT display the selected reason during the Login


Notify when student still logged in after __ minutes

The “Notify when student still logged in after ___ minutes” preference is an especially useful tool for Testing centers. Here you can set a warning symbol to show up for a student that has been in a center for the allotted amount of time given for the test, which would then notify whomever is watching the log listing screen that their time is up for the test.


Snooze time = __ minutes.

The snooze feature correlates with the warning, allowing you to turn off that alert for a few moments. This way, you can set up reminders that the student’s time is almost up.


Recommended duration = ___ minutes

Recommended Duration is a setting that is used when creating an appointment. A student will not be allowed to schedule an appointment for a reason whose recommended time is longer than the allotted time for their appointment. If they try to, a warning alert will flash telling them that they will need more time available than what they are trying to schedule for that visit reason.


Auto logout after (__) minutes

The Auto logout feature allows you to set a maximum or default time for any visit that is logged in for that specific visit reason. This means that the Log listing screen will watch that visit (based on Reason selection), and once it reaches the max time indicated on the Auto Logout, it will automatically log a student out of the center, concluding their visit for that session. If the “minutes” field to the right of “Auto Logout after” is filled in, any student that logs in with this visit reason will automatically be logged out of the center, with the auto logout time being set as their visit time for their visit. This option is useful especially for SI visits, Workshops, and Orientations, where the student will be logging in, but will not be returning to logout.


Do not wait full time

This preference, if activated, will not wait the full time to run the Auto-logout process, and consequently will log students out before the full set time has expired.