|
|
| Line 3: |
Line 3: |
|
| |
|
| <!-- include the TOC as a template in the first column --> | | <!-- include the TOC as a template in the first column --> |
| | style="width:250px; vertical-align:top; padding:2px 15px 2px 2px;" | {{TechDocsTOC}} | | | style="width:300px; vertical-align:top; padding:2px 15px 2px 2px;" | {{ReportsGuideRegTOC}} |
|
| |
|
| <!-- here is the second column of the full wiki page - will contain content --> | | <!-- here is the second column of the full wiki page - will contain content --> |
| Line 10: |
Line 10: |
| <!-- here is a table for the content of the page --> | | <!-- here is a table for the content of the page --> |
| {| style="width:100%; vertical-align:top; " | | {| style="width:100%; vertical-align:top; " |
| | | | style="vertical-align:top; font-size:160%; color:#7c1911; " | '''Progress Report Listing by Subject''' <HR> |
| | style="vertical-align:top; font-size:160%; color:#7c1911; " | '''Authentication Options''' <HR> | |
| | |
| |- | | |- |
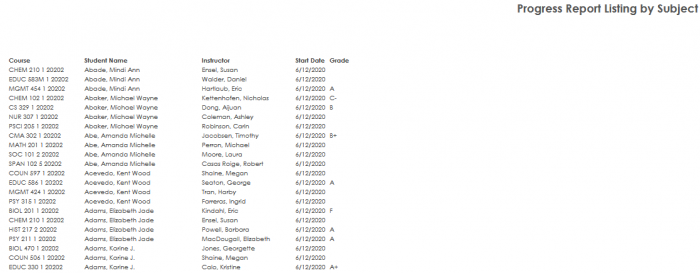
| | style="vertical-align:top; font-size:120%; " | <br />To use campus credentials (Single Sign-on or SSO) to sign into your Trac System, there are a few choices. Our preferred authentication method is SAML, but you may also use CAS, LDAP or Microsoft Azure. Shibboleth may be used, but only when it has a SAML or CAS front end. Please see below for more detailed technical information. | | | style="vertical-align:top; font-size:120%; " | <BR />The Progress Report Listing by Subject allows for a quick overview of the progress report subjects. The listing displays in alphabetical order of the course name, then the student name, the instructor, the report date and grades. The report may be generated for an individual student, instructor, course or grade. |
| |-
| | |
| | |
| | style="vertical-align:top; font-size:140%; color:#7c1911; padding:30px 0px 0px 0px;" | SAML Authentication <HR>
| |
| | |
| |-
| |
| | style="vertical-align:top; font-size:100%; " | Redrock tech support and your campus IT contact will need to work together to set up SAML Authentication.
| |
|
| |
| SAML requires some communication between your campus authentication server and the Redrock SAML Proxy server.
| |
| | |
| '''1)''' Your AdvisorTrac/TutorTrac software must be updated to the Feb 2019 version or later.
| |
| | |
| '''2)''' Please provide Redrock with your campus metadata (or the HTTP-POST URL).
| |
| | |
| '''3)''' Here is the Redrock Metadata link:
| |
| <nowiki>https://saml2.go-redrock.com/simplesaml/module.php/saml/sp/metadata.php/trac4-saml</nowiki>
| |
| *download and install our metadata into your SSO software.
| |
| | |
| '''4)''' We will need a test student account.
| |
|
| |
|
| '''5)''' SAML Attribute: | | '''GENERATE THE REPORT''' |
| *Send username, email address, or student ID as an attribute.
| |
| *The name of the attribute can be whatever your system uses. (examples: username, student id, email, sAMAccountName, personprincipal, name id, PersonID)
| |
| *The attribute needs to be a unique identifier for the student account (preferably the username).
| |
| *The attribute must be a value that we can match with the TutorTrac student or instructor account.
| |
|
| |
|
| '''6)''' SAML Response to Redrock:
| |
| *can be signed
| |
| *can be encrypted
| |
| **can be transient or persistent
| |
| **Our SAML setup is for SP (Service Provider) initiated with Redrock as the SP.
| |
| - We have plans to support IdP (Identity Provider) initiated in the future, rollout date is TBD.
| |
|
| |
|
| '''7)''' Your TutorTrac/AdvisorTrac URL must be reachable (without VPN credentials). Redrock IP must be whitelisted.
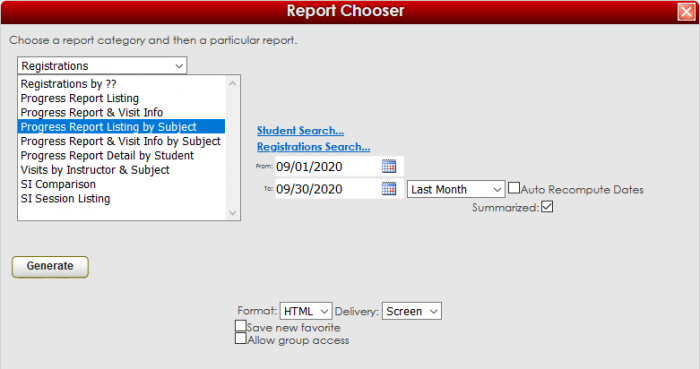
| | To generate the Progress Report Listing by Subject, click on Reports from the TutorTrac Main Menu. On the Reports Chooser, select Registrations from the pull down list of available categories. After selecting Registrations, choose Progress Report Listing by Subject. Then enter a date range for the time period that you would like to review in the report. Then click on the Generate Report button. |
| *Redrock SAML Proxy IP: saml2.go-redrock.com (63.224.138.136), ports 80 and 443
| | |
| | [[File:G4w35j34j335ju3.png|700px]] |
|
| |
|
| *Redrock Tech Support IP: go-redrock.com (63.224.138.155), ports 80 and 443
| | [[File:4kj5j4j4j44j.png|700px]] |
| | |
| '''8)''' Your TutorTrac/AdvisorTrac URL must use SSL <nowiki>(https://TracSystem.campus.edu)</nowiki>
| |
| | |
| '''9)''' After the end user is finished using AdvisorTrac/TutorTrac, we can re-direct to a webpage that you specify. Please provide the exact link address (for example <nowiki>https://mycampus.edu).</nowiki>
| |
| | |
| '''10)''' Please schedule a time to test SAML configuration.
| |
| | |
| | |
| |-
| |
| | style="vertical-align:top; font-size:140%; color:#7c1911; padding:30px 0px 0px 0px;" | LDAP Authentication <HR>
| |
| | |
| |-
| |
| | style="vertical-align:top; font-size:100%; " | '''1)''' The Trac system provides an LDAP test page that can be accessed from your main menu. Simply click on the Trac Man icon, then on Utilities and Prefs. There you will find a tab labeled “LDAP Tool”. Fill out the form with values provided to you by your system administrator and click test. A green response is good, a red is bad.
| |
| | |
| This is an example of a single bind LDAP test:
| |
| | |
| '''2)''' For your system to use LDAP, Redrock will require some information about your system that will be used to generate an LDAP binding script that runs when a user attempts to log in. Please send an email to helpdesk@go-redrock.com with the following information:
| |
| | |
| *LDAP Server address
| |
| *Base DN
| |
| *Format of username
| |
| *Username of lookup account (for double-bind setups)
| |
| *Port Number (typically 389 or 636)
| |
| *Encrypted (true or false)
| |
| *Search Criteria (Leave as cn=NOTAUSER unless doing a double bind)
| |
| | |
| Once you send Redrock the necessary information, a team member will implement a binding script on your server and contact you once completed.
| |
| | |
| | |
| | |
| |-
| |
| | style="vertical-align:top; font-size:140%; color:#7c1911; padding:30px 0px 0px 0px;" | CAS Authentication<HR> | |
| | |
| |-
| |
| | style="vertical-align:top; font-size:100%; " |
| |
| '''1)''' You will create your own weblink to the CAS portal page.
| |
| | |
| '''2)''' Redrock will need a test student account to test with.
| |
| | |
| '''3)''' Redrock needs your CAS service links:
| |
| :*Login URL (example: <nowiki>https://mycampus.school.edu/cas/login </nowiki>)
| |
| :*Logout URL (example: <nowiki>https://mycampus.school.edu/cas/logout </nowiki>)
| |
| :*Validate URL (example: <nowiki>https://mycampus.school.edu/cas/serviceValidate </nowiki>)
| |
| | |
| '''4)''' Redrock needs the CAS XML Attribute containing username (it is usually cas:user).
| |
| | |
| '''5)''' Redrock will need to put a few settings in place.
| |
| | |
| '''6)''' Schedule a time to test with us.
| |
|
| |
|
|
| |
|
| Line 105: |
Line 28: |
| | style="width:100%;" | | | | style="width:100%;" | |
|
| |
|
| <!-- this table appears at the bottom of the manual page and contains a previous page and next page link -->
| |
| {| style="width:70%; vertical-align:top; "
| |
|
| |
|
| | style="width:50%; text-align:left;" | [[TechEmailTool|← Previous Page]] | | {| style="width:70%; vertical-align:top; " |
| | style="width:50%; text-align:right;" | [[TechImport|Next Page →]] | | | style="width:50%; text-align:left;" | [[Reports:Progress Report Visit Info|← Previous Page]] |
| <!-- here is the end of the previous / next page table -->
| | | style="width:50%; text-align:right;" | [[Reports:Progress Report Visit Info by Subj|Next Page →]] |
|
| |
|
| |} | | |} |
|
| |
| <!-- here is the end of the content table -->
| |
| |} | | |} |
|
| |
| <!-- this line is the end of the table for the entire page -->
| |
| |} | | |} |
|
| |
|
| __NOTOC__ | | __NOTOC__ |
| [[Category:Trac 4]] | | [[Category:Trac 4]] |

