|
|
| Line 1: |
Line 1: |
| | <!-- table for the whole page --> |
| {| style="width:100%; vertical-align:top; " | | {| style="width:100%; vertical-align:top; " |
| | style="width:250px; vertical-align:top; padding:2px 15px 2px 2px;" | {{UserManualStudentsTOC}} | | |
| | <!-- include the TOC as a template in the first column --> |
| | | style="width:300px; vertical-align:top; padding:2px 15px 2px 2px;" | {{ReportsGuideRegTOC}} |
| | |
| | <!-- here is the second column of the full wiki page - will contain content --> |
| | style="vertical-align:top; padding:20px 20px 20px 2px;" | | | | style="vertical-align:top; padding:20px 20px 20px 2px;" | |
| | |
| | <!-- here is a table for the content of the page --> |
| {| style="width:100%; vertical-align:top; " | | {| style="width:100%; vertical-align:top; " |
| | | | style="vertical-align:top; font-size:160%; color:#7c1911; " | '''Progress Report Listing by Subject''' <HR> |
| | style="vertical-align:top; font-size:140%; color:#7c1911; padding:30px 0px 0px 0px;" | <span style="color:#7C1911">'''How to Post Documents''' | |
| </span><HR>
| |
| | |
| |- | | |- |
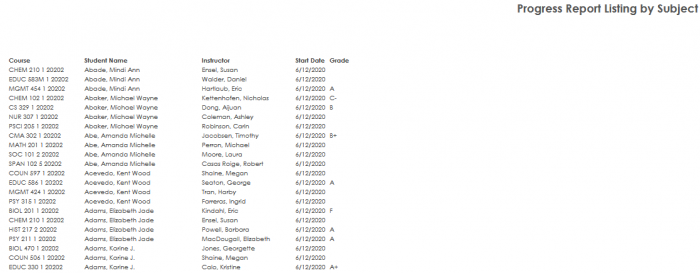
| | | style="vertical-align:top; font-size:120%; " | <BR />The Progress Report Listing by Subject allows for a quick overview of the progress report subjects. The listing displays in alphabetical order of the course name, then the student name, the instructor, the report date and grades. The report may be generated for an individual student, instructor, course or grade. |
| | |
|
| |
|
| |style="vertical-align:top; font-size:100%; " |
| | '''GENERATE THE REPORT''' |
| Posting Documents allows you to upload important documents to a Student’s profile. Then users that have access to those documents will be able to download and view them when necessary. In order to be able to successfully post documents, the first step is to set up the types of documents that can be uploaded.
| |
|
| |
|
|
| |
|
| ==Creating Document Types==
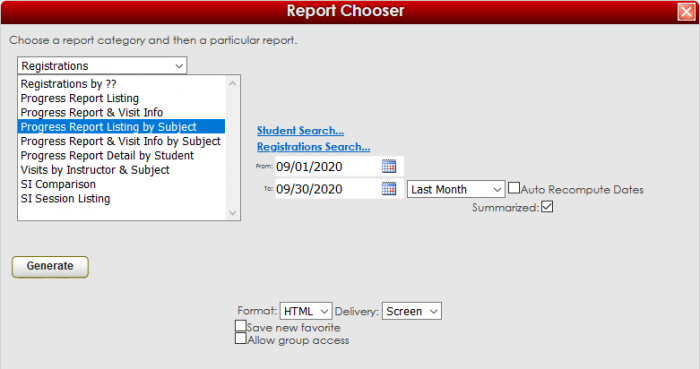
| | To generate the Progress Report Listing by Subject, click on Reports from the TutorTrac Main Menu. On the Reports Chooser, select Registrations from the pull down list of available categories. After selecting Registrations, choose Progress Report Listing by Subject. Then enter a date range for the time period that you would like to review in the report. Then click on the Generate Report button. |
| | |
| | [[File:G4w35j34j335ju3.png|700px]] |
|
| |
|
| Document types doesn’t refer to whether the document being uploaded is an excel, word, or pdf document. Instead this is used to indicate who is allowed to access the document. Some examples of document types might be Student Documents, Administrative Document, or Disability Document.
| | [[File:4kj5j4j4j44j.png|700px]] |
| In order to create the Document Types, you’ll need to log in to Trac 4.0 as an Administrator. Click on the Trac Man icon, and choose Utilities and Prefs. Navigate to the System Prefs tab, and look for the preference category called Document Posting. The preference documentPostTypes will be listed under this category. You will then enter all of the different types of Documents that can be uploaded in this preference.
| |
|
| |
|
| [[image:Document_Types.jpg|border|600px]]
| |
|
| |
|
| [[image:Document_Types2.jpg|border|600px]]
| | |- |
| | | style="width:100%;" | |
|
| |
|
|
| |
|
| ==Assigning Document Type Privileges== | | {| style="width:70%; vertical-align:top; " |
| | | | style="width:50%; text-align:left;" | [[Reports:Progress Report Visit Info|← Previous Page]] |
| Once you’ve created the different types of documents that can be uploaded, the next step is to indicate which types of documents each Group is allowed to upload or download. You do this by access the Group Access tab of your Center Profile, and clicking on the Group that you want to give access to documents. In the Center Access tab of the Groups Entry, there is a preference labeled Doc Post Types. Here you can click on the drop down arrow, and choose the types of documents that this Group can access. Be sure to save the Group when you’ve finished assigning Document Types.
| | | style="width:50%; text-align:right;" | [[Reports:Progress Report Visit Info by Subj|Next Page →]] |
| | |
| [[image:Document_Privileges.jpg|border|600px]]
| |
| | |
| | |
| ==Uploading Documents== | |
| | |
| To upload Documents to a Student’s profile, use the Student Listing to find the Student’s profile. On the Student Profile, click on the Documents tab, and then click on “Upload” to upload a new Document. You can then indicate the type of Document it is, and include some notes about the document if needed. Browse for the file that you want to upload, and then press “Upload or Save Changes”. This will upload your document.
| |
| | |
| [[image:Document_Upload.jpg|border|600px]]
| |
| | |
| [[image:Document_Upload2.jpg|border|600px]] | |
| | |
| | |
| ==Downloading Documents== | |
| | |
| Once Documents have been uploaded, users that have access to those Document Types can download the Documents as needed. Once you access the Student’s Profile, and go to the Documents tab, there will be a list of the Documents that you may Download and View. To view the Document, click on the Icon of the paper with an eye on it. The document will then either open, or give you the option to save the document, depending on what type of document it is.
| |
| | |
| [[image:Document_Download.jpg|border|600px]]
| |
| | |
| | |
| ==Deleting Documents==
| |
| | |
| Administrators have the option to delete old Documents. To do this, access the Student’s profile, and go to the Documents tab. On the Documents tab, click on the link for the Document you want to delete. There will be a button to allow you to then Delete that Document.
| |
| | |
| [[image:Document_Delete.jpg|border|600px]] | |
|
| |
|
| |} | | |} |
| |} | | |} |
| | |} |
| | |
| __NOTOC__ | | __NOTOC__ |

